vue3從零開始一篇文章帶你學習
升級vue CLI
- 使用命令
## 查看@vue/cli版本,確保@vue/cli版本在4.5.0以上
vue --version
## 安裝或者升級你的@vue/cli
npm install -g @vue/cli
## 創建
vue create vue_test
## 啟動
cd vue_test
npm run serve
nvm管理node版本,區分老舊項目
node版本升級,從卸載到使用nvm管理node版本并配置vue環境(學習趟雷版)
創建vue項目
vite創建vue項目傳送門
組合式函數
利用vue組合式API來封裝和復用有狀態邏輯的函數
1.結合官網 使用鼠標跟蹤器來實現組合式API,創建mouse.js 文件,將鼠標跟蹤功能給提前出來
// mouse.js
import {ref,onMounted,onUnmounted
} from 'vue'// 封裝組合式函數
export function useMouse() {// 管理狀態const x = ref(0)const y = ref(0)// 組合函數更改狀態function updated(event) {x.value = event.pageXy.value = event.pageY}// 在生命周期商注冊和卸載鼠標事件onMounted(() => {window.addEventListener('mousemove', updated)})onUnmounted(() => {window.removeEventListener('mousemove', updated)})//  將管理的狀態值暴漏出去return {x,y}
}
- 在頁面中使用
<template><div class="container">坐標: {{ mouse.x }} , {{ mouse.y }}</div>
</template>
<!-- setup 語法糖 -->
<script setup>
import {useMouse
} from '@/utils/mouse'
import { reactive } from 'vue';
const mouse = reactive(useMouse())
// 或者使用此解構出來
// const {
//  x,
//  y
// } = useMouse()
</script>
- 將添加和清除DOM事件的邏輯也給抽離出來,并在mouse里面使用
- event.js 文件
import {onMounted,onUnmounted
} from 'vue'// 封裝組合式函數
export function useEventListener(target, event, callback) {// 在生命周期商注冊和卸載鼠標事件// 也可以用字符串形式的 CSS 選擇器來尋找目標 DOM 元素onMounted(() => {target.addEventListener(event, callback)})onUnmounted(() => {target.removeEventListener(event, callback)})
}
- mouse.js 引入使用
import {ref,
} from 'vue'
import { useEventListener } from './event'
// 封裝組合式函數
export function useMouse() {// 管理狀態const x = ref(0)const y = ref(0)// 組合函數更改狀態function updated(event) {x.value = event.pageXy.value = event.pageY}useEventListener(window, 'mousemove', updated)//  將管理的狀態值暴漏出去return {x,y}
}
vite項目
注:vue3兼容vue2語法,vue2的語法可以在vue3項目內使用,vue3不能讀取vue語法內的數據
API
setup組合式 API 的入口
-
setup在生命周期執行時間高于beforeCreate, created,在vue2語法內可以直接this調用setup里面的聲明變量
-
setup里面的this不是vue實例,而是undefined ,在vue3中弱化了this的使用
-
直接聲明變量:let const var 的值非響應式數據,修改的話,頁面也不會變化的
-
返回值,可以是值,對象,函數,它會在組件被解析前被調用
-
setup 函數的參數
setup 函數在組件創建created()之前執行,setup函數是一個函數,它也可以有返回值,類似于Vue 2中的data()和methods()的組合?,接收兩個參數:props 和 context- props: 是響應式的,當傳入顯端prop 時他會進行更新,包含父組件傳遞給子組件的所有數據
- context: 是一個普通的js對象,上下文對象,暴漏setup中可用的值
選項式 API 和組合式 API
官方文檔傳送門
組合式 API
組合式 API 通常會與 <script setup> 搭配使用 vue3.0進行響應式數據操作會使用 ref、reactive、toRef、toRefs四個核心 API 函數
-
ref 通常將基本數據類型(string,Number,Boolean…)轉為響應式,也可以將引用類型轉為響應式,但引用類型內的數據修改就不會及時通知頁面發生變化
-
配置自動添加value在vscode設置
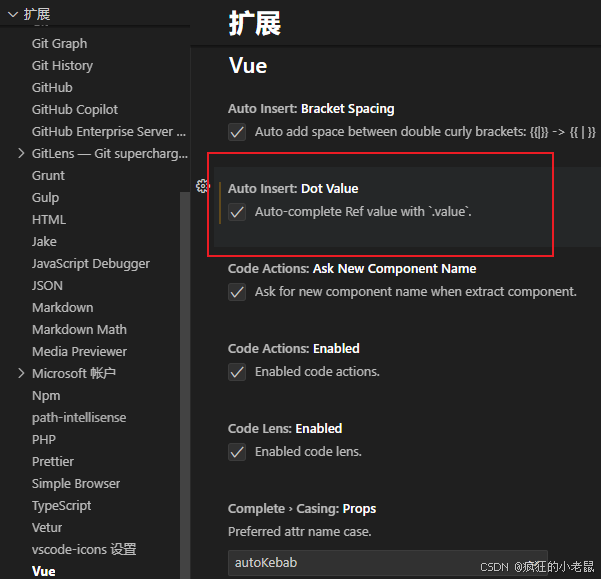
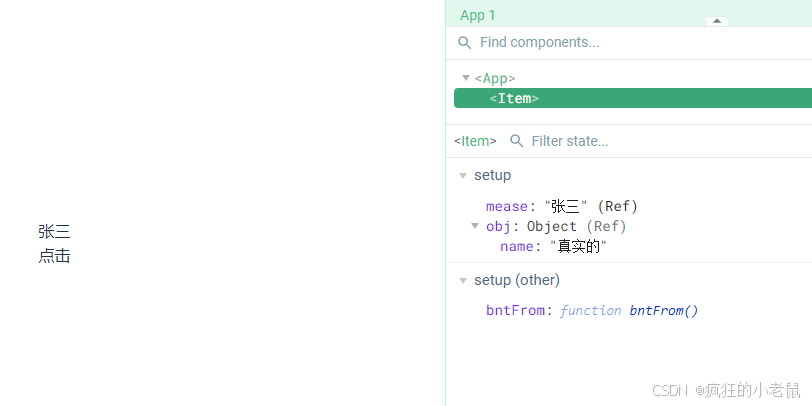
<template><div>{{ mease }}<div @click="bntFrom">點擊</div></div>
</template><script lang="ts" setup>
import {ref
} from 'vue'let mease = ref('張三')引用類型let obj = ref({name: "真實的"})function bntFrom(){mease.value = '李四'obj.value.name = '虛假的'console.log('點擊了');}
</script>
-
reactive 只能定義引用類型(obj,arry),相比較ref可以改變深層次的屬性響應式 ,ref也可以改變引用對象,但深層的數據還是建議使用reactive
<template><div><h1>ref定義屬性</h1>{{ mease }}<div @click="bntFrom">點擊</div><h1>reactive定義</h1><p v-for="item in arry" :key="item.name">{{ item.age }}</p></div>
</template><script lang="ts" setup>
import {ref,reactive
} from 'vue'let mease = ref('張三')let obj = ref({name: "真實的"})let arry = reactive([{name: '王二',age: 10}])function bntFrom(){mease.value = '李四'obj.value.name = '虛假的'arry[0].age = 30console.log('點擊了');}
</script>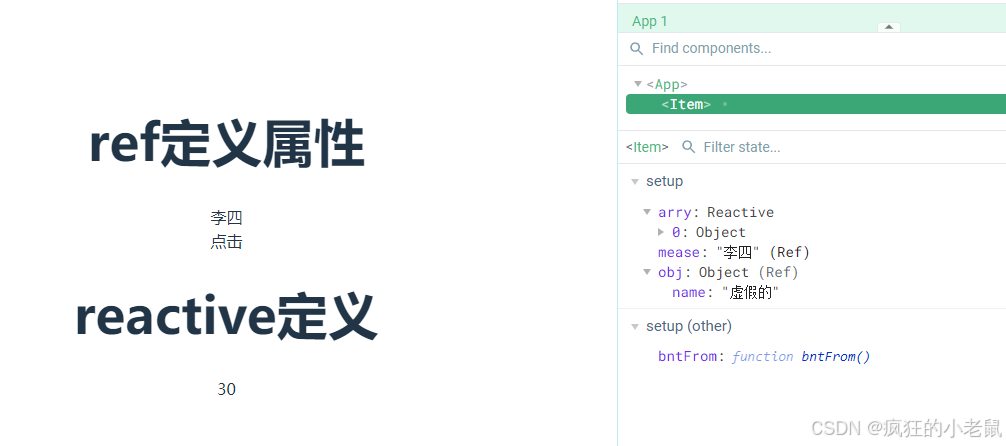
- 將reactive定義的響應式重新定義一個對象,就會變成一個非響應式對象,可以使用Object.assign(obj,{name: ‘ssf’})
-
toRefs 將 reactive 定義的對象屬性給解構賦值轉換為響應式引用,保持對象的響應性,一般reactive 創建的對象,直接解構賦值后會失去響應式,所以就需要torefs將其給解構賦值成響應式
-
如下面代碼,將對象解構賦值直接使用,也可以通過對象使用,只要值改變都會發生改變
<script setup lang="ts">
import { reactive,toRefs
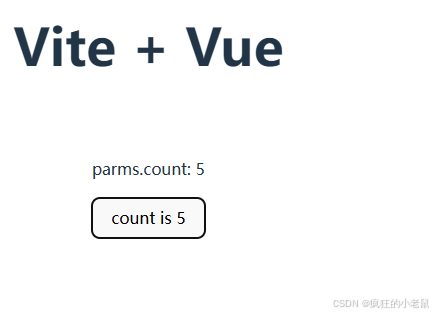
} from 'vue'const parms = reactive({name: '掌聲',count: 0
})
const {count
} = toRefs(parms)
</script><template><h1>{{ msg }}</h1><div class="card"><p>parms.count: {{ parms.count }}</p><button type="button" @click="count++">count is {{ count }}</button></div>
</template>
計算屬性computed
- 基于緩存: 計算屬性是基于它所依賴的響應式進行緩存的,只有當響應式依賴發生變化時,計算屬性才會重新計算
- 聲明式:計算屬性根據返回值來定義,代碼更清晰,更利于理解
- 自動更新:當依賴數據發生變化時,計算屬性返回的值也會更新
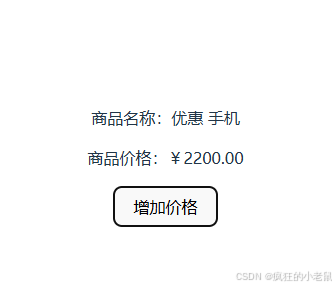
<script setup lang="ts">
import { reactive, computed } from "vue";// 響應式數據
const state = reactive({name: "手機",price: 2000,
});
// 計算屬性
const productName = computed(() => {return `優惠 ${state.name}`;
});const formattedPrice = computed(() => {return `¥${state.price.toFixed(2)}`;
});// 方法
const increasePrice = () => {state.price += 100;
};
</script><template><div><p>商品名稱:{{ productName }}</p><p>商品價格:{{ formattedPrice }}</p><button @click="increasePrice">增加價格</button></div>
</template>
2. 計算屬性默認是只讀的,如果你想要更改計算屬性的值時,你需要使用getter 和 setter 來創建
- getter 進行計算,將結果緩存起來,當參與計算的響應數據發生變化時,會觸發更新機制,再次調用getter來重新計算屬性的值
- setter 函數會接收一個函數值,即要修改的值
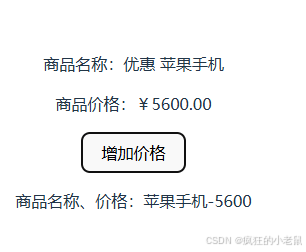
<script setup lang="ts">
import { reactive, computed } from "vue";// 響應式數據
const state = reactive({name: "手機",price: 2000,
});
// 計算屬性
const productName = computed(() => {return `優惠 ${state.name}`;
});const formattedPrice = computed(() => {return `¥${state.price.toFixed(2)}`;
});const formattedNamePrice = computed({// 當依賴發生變化時再次調用,返回新的值get(){return state.name + '-' + state.price.toFixed();},// 接收用戶傳值并進行修改set(newValue){const [name,price] = newValue.split('-')state.name = namestate.price = Number(price)}});// 方法
const increasePrice = () => {state.price += 100;formattedNamePrice.value = '蘋果手機-5600'
};
</script><template><div><p>商品名稱:{{ productName }}</p><p>商品價格:{{ formattedPrice }}</p><button @click="increasePrice">增加價格</button><p>商品名稱、價格:{{ formattedNamePrice }}</p></div>
</template>
監聽屬性
- 非緩存:監聽屬性不會緩存其值,每次依賴發生變化時都會執行回調函數,但他有新值和舊值
- 靈活:可以監聽一個或者多個數據源,當執行復雜邏輯時,可以進行異步操作
監聽ref聲明值
- watch 監聽值發生變化,監聽ref聲明的值
<script setup lang="ts">
import { ref, watch } from "vue";let couent = ref(0);// 監聽
watch(couent, (newValue,oldValue) => {console.log(newValue,oldValue,'值發生變化了');});// 方法
const changeCouent = () => {couent.value +=1
};
</script><template><div><p>商品價格:{{ couent }}</p><button @click="changeCouent">增加價格</button></div>
</template><style scoped></style>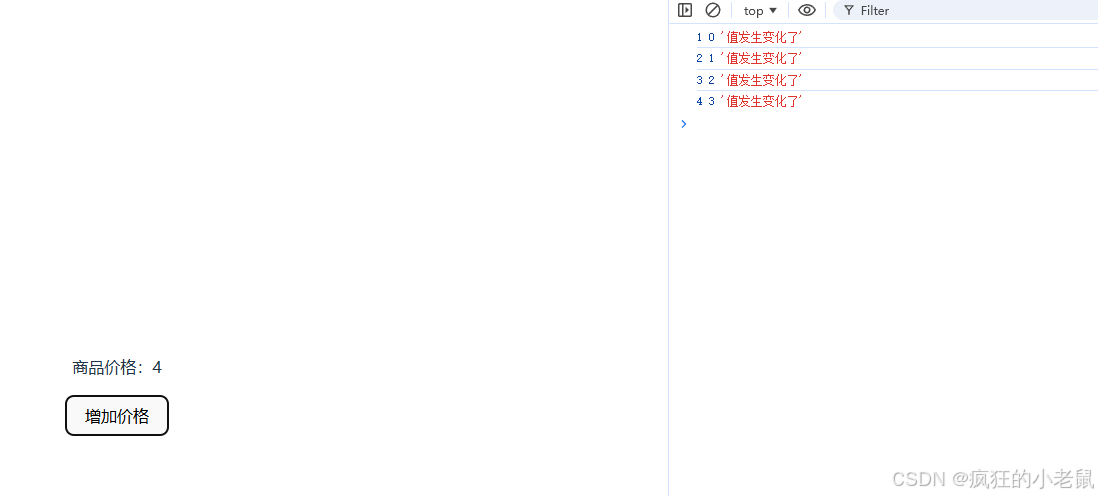
2. 監聽聲明的對象類型,當改變單個值時未曾發生變化,需要使用 deep:tree, 深度監聽屬性,立即監聽的話需要使用immediate: true,
- 單個監聽
watch(() => person.value.price,(newValue, oldValue) => {console.log(newValue, oldValue, "價格發生變化了");}
);
- 多個監聽
watch(() => [person.value.name,person.value.price],(newValue, oldValue) => {console.log(newValue, oldValue, "價格發生變化了");}
);
- 深度監聽,立即執行和監聽整個對象
<script setup lang="ts">
import { ref, watch } from "vue";let person = ref({name: "lisd",price: 100,});watch(person,(newValue, oldValue) => {console.log(newValue, oldValue, "值發生變化了");},{deep: true,immediate: true,}
);
// 方法
const changeName = () => {person.value.name = '理想';
};// 方法
const changePrice = () => {person.value.price += 1;
};// 方法
const changeObj = () => {person.value = {name: "寶馬",price: 345,};
};
</script><template><div><p>品牌:{{ person.name }}</p><p>價格:{{ person.price }}</p><button @click="changeName">增加價格</button><button @click="changePrice">增加價格</button><button @click="changeObj">修改整個品牌</button></div>
</template><style scoped></style>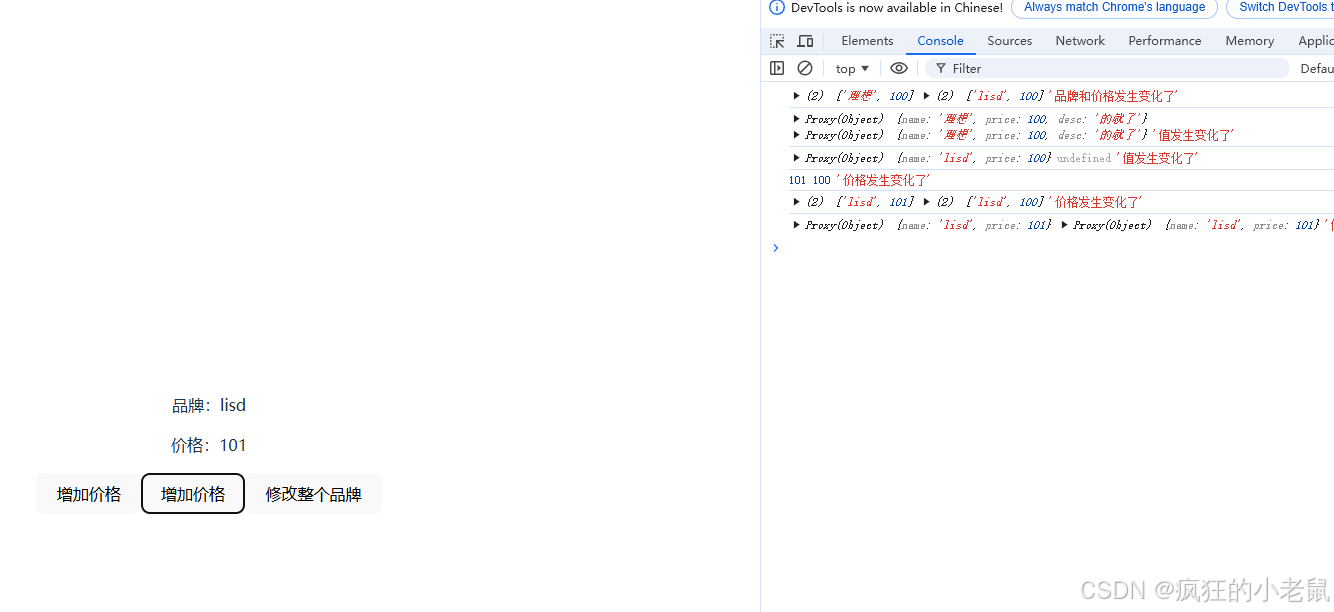
監聽 reactive
- 當改變單個值時也能監聽到變化,reactive聲明的對象類型會隱士的開啟 deep:tree 深度監聽屬性,還無法關閉,立即監聽的話需要使用immediate: true,
- 單個監聽
watch(() => person.price,(newValue, oldValue) => {console.log(newValue, oldValue, "價格發生變化了");}
);
- 多個監聽
watch(() => [person.name,person.price],(newValue, oldValue) => {console.log(newValue, oldValue, "價格發生變化了");}
);
- 監聽整個對象可以不用函數寫法,可以直接監聽整個對象
<script setup lang="ts">
import { reactive, watch } from "vue";let person = reactive({name: "lisd",price: 100,
});watch(person,(newValue, oldValue) => {console.log(newValue, oldValue, "值發生變化了");},{immediate: true,}
);
// 方法
const changeName = () => {person.name = "理想";
};// 方法
const changePrice = () => {person.price += 1;
};// 方法
const changeObj = () => {Object.assign(person, {name: "寶馬",price: 345,});
};
</script><template><div><p>品牌:{{ person.name }}</p><p>價格:{{ person.price }}</p><button @click="changeName">增加價格</button><button @click="changePrice">增加價格</button><button @click="changeObj">修改整個品牌</button></div>
</template><style scoped></style>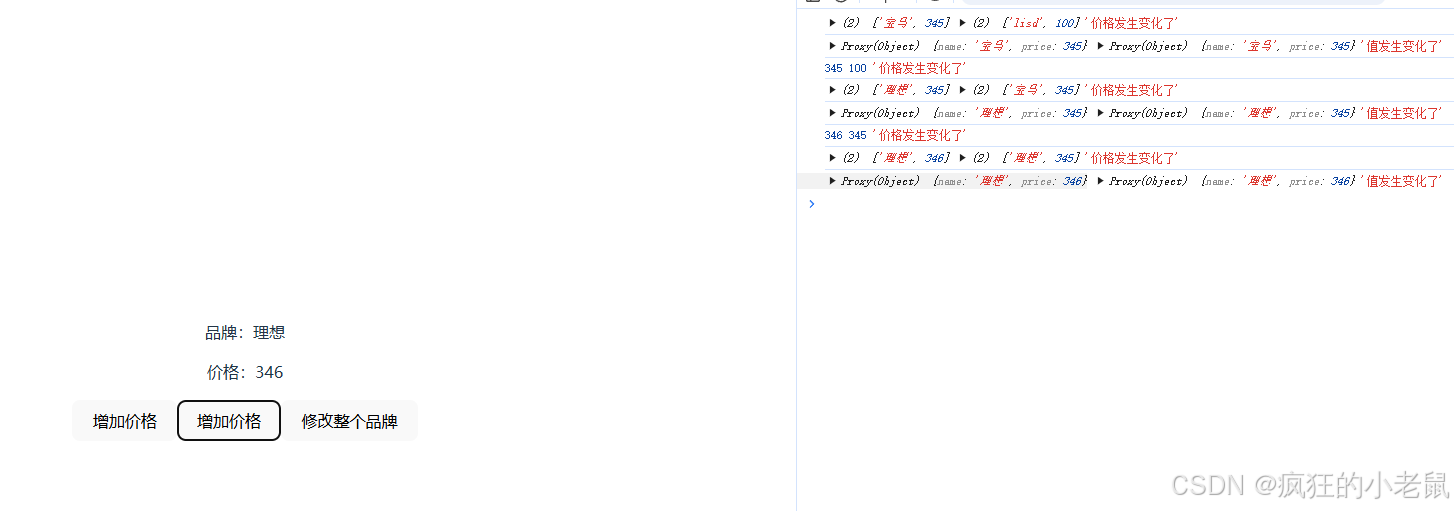
**注意:**監聽時,單個字段時,使用函數監聽值的變化,監聽對象或數組時,可以直接監聽,不用寫函數來監聽,但最好還是寫函數來監聽,不管是單個值還是對象
watchEffect監聽全局
* 無論是哪個字段發生變化,都會觸發,而watch需要寫具體監聽某個值
計算屬性和監聽屬性兩者使用場景
- 計算屬性:當你基于組件的響應數據,生成一個新的可緩存值時,可以是使用計算屬性
- 監聽屬性:當你數據發生變化,并且想要根據這個變化,進行一些復雜邏輯和異步操作時,可以使用監聽屬性
Class 與 Style 綁定 和vue的寫法沒什么區別
<template>//對象式綁定<div :class="{ active: isActive, 'text-danger'}">內容</div>//數組式綁定<div :class="['conter',{ active: isActive, 'text-danger'}]">內容</div>//使用對象語法動態綁定行內樣式<div :class="{ color: red, fontSize: fontSize}">內容</div>//使用數組語法動態綁定行內樣式<div :class="[basStyle]">內容</div>
</template><script>
export default {data() {return {isActive: true,fontSize: '12px',basStyle: {width: '20px'height: '20px'background: 'red'}}}
}
</script>
TS中:接口,泛型,自定義類型
vue 官方文檔
- 接口:interface,用于定義對象是否符合特定的結構,可以用來定義,props,methods 或者 data的類型
-
對象的結構,屬性名稱,類型
-
定義的對象如果不符合結構,亦或者缺少屬性,或者類型不匹配,ts就會報錯,當然你也可以添加
?使其變成一個可選屬性,比如以下錯誤

-
類型聲明和組合式聲明
//類型let test: string | number = 1;組合式APIlet refTest = ref<string | number>("");refTest.value = "123";let reactiveTest = reactive<object>({id: 1,name: "張三",});console.log(reactiveTest); -
符合定義對象結構寫法
// 定義一個接口,用于限制posen對象的具體屬性
<template><div>姓名:{{ posen.name }}-{{ posen.num }}</div>
</template><script setup lang="ts">
import { reactive} from "vue";let posen = reactive<PersonInter>({id: 1,name: "張三",
});
export interface PersonInter {id: string | number;name: string;num?: number;
}
</script><style></style>
- 自定義類型 type
自定義類型允許你為現有的類型創建一個名稱,可以組合多個類型,亦或者在類型別名內添加額外的屬性
-
基本類型的別名
type PersonType = {id: string | number;name: string;num?: number; }; let person: PersonType = {id: 1,name: "張三", }; -
聯合類型
type Age = string | number;
type ID = string | number;
type PersonType = {id: ID;name: string;num?: Age;
};let refTest = ref<Age>("");
refTest.value = "123";type combinationType = PersonType & { age: Age };
let combination: combinationType = {id: 1,name: "張三",age: 23,
};
console.log(combination); // {id: 1, name: '張三', age: 23}
- 泛型
- 泛型,允許我們編寫可重用的代碼,適用于多種類型,在定義函數,接口,類的時候
- 通過泛型,可以處理任意類型的輸入,并確保輸入和輸出類型一致
// 定義泛型
function generic<T>(arg: T): T {return arg;
}// 使用泛型
let age = generic<number>(23);   // 明確指定類型
let strText = generic("hello");    // 類型推斷
ref獲取在dom中的使用
vue2的ref和vue3的寫法不一樣,可以直接聲明取值,而不需要使用this.$refs.
- 組件直接使用,父組件獲取子組件的內容
-
子組件
<template><div>我是子組件</div> </template><script setup lang="ts"> import { ref, defineExpose } from "vue"; let re = ref('我是上三'); let con = ref(3); defineExpose({re,con }); </script><style></style> -
父組件
<script setup lang="ts">
import ChildComponent from "./aItem.vue";
import { ref } from "vue";// 明確 refDom 的類型
interface ChildComponentInstance {re: string;
}const refDom = ref<ChildComponentInstance | null>(null);
/*** changeRef函數用于檢查和操作一個名為refDom的引用對象* 此函數旨在演示如何在Vue組件中處理和訪問refs引用的元素或組件*/const changeRef = () => {// 檢查refDom引用是否已初始化 if (refDom.value) {// 如果refDom已初始化,打印其值和特定屬性console.log(refDom.value, refDom.value.re); // Proxy(Object) {re: RefImpl, con: RefImpl, __v_skip: true}[[Handler]]: Object[[Target]]: Proxy(Object)[[IsRevoked]]: false '我是上三'} else {// 如果refDom未初始化,打印提示信息console.log('refDom is not initialized');}
};
</script><template><ChildComponent ref="refDom" /><el-button @click="changeRef">點擊觸發</el-button>
</template><style scoped></style>
- 在 v-for中使用ref時,這個時候返回的 ref 就是一個包含綁定所有元素的數組或者對象了
<template><div :ref="setItemRef" v-for="item in posenList" :key="item.id">{{ item.name }}</div>
</template>
<script setup lang="ts">
import { ref,ComponentPublicInstance } from "vue";let itemRefs = ref<HTMLDivElement[]>([]);
// 設置每個元素的 ref
const setItemRef = (el: Element | ComponentPublicInstance | null) => {if (el instanceof HTMLDivElement) {itemsRef.value.push(el); // 只添加有效的 HTMLDivElement}
};
console.log("itemRefs 綁定", itemRefs.value);
</script>
組件
官方文檔
動態組件:當多個組件在一個區域來回切換時,可以使用
<!-- currentTab 改變時組件也改變 -->
<component :is="activeComponentName" />
<component :is="tabs[currentTab]"></component>
組件通信
- 父組件給子組件傳值
-
Props 是一種特別的
atterbutes你可以用defineProps函數來定義組件期望接收的props,每個props都可以指定類型、默認值、是否必需等屬性,其中包含了組件傳遞的所有 props -
defineProps 是一個僅
<script setup>中可用的編譯宏命令,所以不需要顯示的導入 -
props官方文檔
-
父組件
<script setup lang="ts"> import ChildComponent from "./childItem.vue"; import { reactive } from "vue";let chPerson = reactive({ id: 1, name: "張三" }); </script><template><ChildComponent :propsVal="chPerson" car="寶馬" ref="refDom" /> </template><style scoped></style> -
子組件
<template><div><p>子組件數據: {{ person.name }}</p><p>父組件傳遞數據: 姓名:{{ props.propsVal.name }}-汽車:{{ car }}</p></div>
</template><script setup lang="ts">
import {reactive,defineProps } from "vue";let person = reactive({name: "q2",
});const props = defineProps({propsVal: {type: Object,default: () => {return {name: "q2",};},},car: {type: String,default: "奔馳",},
});// 解構 props
// const { propsVal, car } = defineProps({
//   propsVal: {
//     type: Object,
//     default: () => ({
//       name: "q2",
//     }),
//   },
//   car: {
//     type: String,
//     default: "奔馳",
//   },
// });
console.log(props);// 父組件傳遞數據</script><style></style>
注意:如果沒有在
<script setup>下,那么 props 就必須以props選項的方式聲明,props 對象會作為setup()函數的第一個參數被傳入<template><div><p>父組件傳遞數據: 姓名:{{ propsVal.name }}-汽車:{{ car }}</p></div> </template><script> export default {name: "childItem",props: {propsVal: {type: Object,default: () => {return {name: "q2",};},},car: {type: String,default: "奔馳",},},setup(props, context) {console.log(props, props.propsVal.name);// console.log(context.emit);// console.log(context.slots);} } </script><style></style> -
- 子組件給父組件傳值 defineEmits
-
defineEmits方法返回函數并觸發,可以使子組件的值傳遞到父組件中
-
defineEmits 僅可用于
<script setup>中,可以不需要導入直接使用,它返回一個等同于$emit的emit函數,可以在組件內拋出事件-
子組件
<template><div><el-button @click="changeName">給父組件傳遞數據</el-button></div> </template><script setup lang="ts"> import { reactive,defineEmits } from "vue";let person = reactive({name: "q2", });let emit = defineEmits(["childEvent"]); const changeName = () => {emit("childEvent", person); }; </script><style></style> -
父組件
<script setup lang="ts">
import ChildComponent from "./childItem.vue";interface ChildEventData {id?: number;name?: string;[key: string]: any; // 允許擴展其他字段
}const handleChildEvent = (val: ChildEventData | {})=> {console.log(val,'子組件傳遞的值');
}
</script><template><ChildComponent @child-event="handleChildEvent" />
</template><style scoped></style>
-
-
如果你沒有在使用
<script setup>,你可以從setup()函數的第二個參數的emit,拋出事件的export default {emits: ['enlarge-text'],setup(props, ctx) {ctx.emit('enlarge-text')} }
- $ref + defineExpose(obj)
-
defineExpos可以用來顯式暴露組件內部的屬性或方法,使得父組件可以通過 ref 訪問子組件的內容
-
由于子組件的內容不會自動暴露給父組件,所以需要defineExpose 選擇性地暴露內部內容,從而避免不必要的屬性泄漏,同時提供更好的封裝性
-
defineExpose 是專為
<script setup>設計的,不能用于普通的<script>或setup()函數中 -
不建議直接暴露整個組件內部狀態,應該只暴露需要的內容,從而保持組件封裝性
-
父組件
<script setup lang="ts"> import ChildComponent from "./childItem.vue"; import { ref } from "vue";const refDom = ref();const changeRef = () => {// 檢查refDom引用是否已初始化if (refDom.value) {// 如果refDom已初始化,打印其值和特定屬性console.log(refDom.value.messe, "父組件hi", refDom.value);const { btnChild } = refDom.value;btnChild('父組件傳遞哦')} else {// 如果refDom未初始化,打印提示信息console.log("refDom is not initialized");} }; </script><template><ChildComponent ref="refDom" /><el-button @click="changeRef">調用子組件方法</el-button> </template><style scoped></style> -
子組件
<template><div></div>
</template><script setup lang="ts">
import { ref, reactive, defineExpose } from "vue";let person = reactive({name: "q2",
});
let messe = ref("子組件消息");
const btnChild = (value: string) => {console.log("子組件按鈕", value);
};defineExpose({person,messe,btnChild,text: "我是子組件的text",
});
</script><style></style>
-
- 兄弟組件之間通信 mitt
安裝 mitt
npm install --save mitt
-
你可以封裝成一個xx.ts使用
import mitt from "mitt"; export default mitt(); -
組件內使用
// 兄弟組件1
<template><div><el-button @click="btnChild">子組件按鈕</el-button></div>
</template><script setup lang="ts">
import { ref } from "vue";
import emittler from "@/utils/emitter";let messe = ref("你好啊");
const btnChild = (value: string) => {console.log("子組件按鈕", value);emittler.emit("myEvent", messe.value);
};
</script><style></style>
// 兄弟組件2
<template><div></div>
</template><script setup lang="ts">
import emittler from "@/utils/emitter";
emittler.on('myEvent', (message) => {console.log(message) // 輸出: "你好啊"
})</script><style></style>
- useAttrs + a t t r s 如果需要在子組件接受很多 p r o p s , 但你又沒在 p r o p s 中定義,那么其他傳遞的值就會放在 ‘ attrs 如果需要在子組件接受很多props, 但你又沒在 props中定義,那么其他傳遞的值就會放在 ` attrs如果需要在子組件接受很多props,但你又沒在props中定義,那么其他傳遞的值就會放在‘atters`中

-
父組件傳值
<script setup lang="ts"> import ChildComponent from "./childItem.vue"; import { reactive } from "vue";let chPerson = reactive({ id: 1, name: "張三" });</script><template><ChildComponent :propsVal="chPerson" :test="234" car="寶馬" ref="refDom" /> </template><style scoped></style> -
子組件接收,你可以直接
$atters去取值,也可以聲明變量去接值<template><div><p>父組件傳遞數據: 姓名:{{ props.propsVal.name }}-汽車:{{ $attrs.car }}</p></div> </template><script setup lang="ts"> import { defineProps,useAttrs } from "vue";const attrs = useAttrs(); console.log(attrs.car); // 寶馬const props = defineProps({propsVal: {type: Object,default: () => {return {name: "q2",};},}, }); </script><style></style>
- 雙向綁定 v-model + defineModel 官方文檔
-
父子組件數據雙向綁定 ,v-model 在組件上實現雙向綁定
-
多個v-model 可以接收一個參數,我們可以通過將這個參數當成字符串給
defineModel來接收對應的值 -
如果聲明之后,那么如果你不通過字符串來獲取,那你將獲取不到值
-
父組件
<script setup lang="ts"> import ChildComponent from "./childItem.vue"; import { ref,reactive } from "vue"; let titleString = ref("收到反饋及時"); let chPerson = reactive({ id: 1, name: "張三" });</script><template><p>{{ chPerson }}</p><p>{{ titleString }}</p><ChildComponent v-model="chPerson" v-model:title="titleString" car="寶馬" /> </template><style scoped></style> -
子組件
<template><div><el-button type="primary" @click="brnHa">點擊修改</el-button></div>
</template><script setup lang="ts">
import { defineModel } from "vue";
interface Person {name: string;id: number;
}const chPerson = defineModel<Person>({default: () => {return {name: "寶馬",id: 1,};},
});
const stringTitle = defineModel('title',{type: String,default: '中NSA公司',
});
console.log(chPerson.value,stringTitle.value); // 寶馬
const brnHa = () => {stringTitle.value = '中發的時間分厘卡'chPerson.value = {name: "奔馳",id: 2,};console.log(chPerson);
};
</script><style></style>
-
-
v-model 可以綁定一些內置修飾符,如
.trim,.number,.lazy等,當然我們也可以自己定義一個修飾符, 通過 解構defineModel的返回值,我們可以在子組件訪問時給定義修飾符,基于修飾符可以選擇性的調節值的讀取和寫入,我們給defineModel傳入get,set兩個選擇,根據判斷修飾符來實現我們的代碼邏輯,這里使用了set-
父組件
<script setup lang="ts"> import ChildComponent from "./childItem.vue"; import { ref } from "vue";let character = ref("dhasdh");</script><template><p>{{ character }}</p><ChildComponent v-model:character.capitalLetters="character" /> </template><style scoped></style> -
子組件
<template><div><input type="text" v-model="character"></div>
</template><script setup lang="ts">
import { defineModel } from "vue";
const [character,modifiers] = defineModel('character',{set: (val:string) => {// 含有capitalLetters修飾符if(modifiers.capitalLetters){return val.charAt(0).toUpperCase() + val.slice(1)}console.log(val,character,modifiers);return val}
});</script><style></style>
-
- provide / Inject(提供/注入)
-
在父組件中定義值和事件
provide(提供數據)<script setup lang="ts"> import ChildComponent from "./childItem.vue"; import { reactive,provide } from "vue";let chPerson = reactive({ id: 1, name: "張三" }); provide('sae',chPerson)const refDom = ()=>{console.log('234') } provide('abnt', refDom)</script><template><p>{{ chPerson }}</p><ChildComponent :propsVal="chPerson" :test="234" car="寶馬" /> </template><style scoped></style> -
子組件或孫子組件 中使用
inject(獲取數據)<template><div><el-button type="primary" @click="brnHa">點擊修改</el-button></div> </template><script setup lang="ts"> import { inject } from "vue";const car = inject("sae", { name: "未知品牌" }); // 提供默認值避免 undefined const abnt = inject("abnt", () => {}); // 提供空函數作為默認值console.log(car); // 寶馬 const brnHa = () =>{car.name = "奔馳";abnt()console.log(car); }</script><style></style> -
注意:如果在其中一個組件修改,那么所有組件都會同步修改后的數據的
- pinia vue官方推薦的狀態集中管理工具可以看下面的 vuex => pinia
vuex => pinia的使用
官方文檔
-
Pinia 提供了更簡潔直接的 API,并提供了組合式風格的 API,最重要的是,在使用 TypeScript 時它提供了更完善的類型推導
-
state (狀態)
- 應用的數據來源,是一個響應式對象
-
getters (計算屬性)
- 類似于技術屬性,
getters可以根據state的值來派生出新的值 getters是有緩存的,只有所依賴的數據發生改變的時候才會重新計算
- 類似于技術屬性,
-
actions (動作)
- 在
actions中定義事件函數,來改變state中的值
- 在
-
-
Pinia 的使用 選項式API
-
先下載 pinia
npm install pinia # 或者 yarn add pinia -
在 mina.ts里引用
import { createApp } from 'vue'import App from './App.vue'import { createPinia } from 'pinia' let store = createPinia() const app = createApp(App); app .use(store) .mount('#app') -
在
src/store目錄下創建一個 例如useStore.ts文件import { defineStore } from "pinia";export const useertStore = defineStore("main", {state: () => {return {// all your data herecount: 0,};},getters: {doubleCount: (state) => state.count * 2,},actions: {// all your methods hereincrement() {this.count++;},}, }); -
在組件里面使用
// 父組件
<script setup lang="ts">
import ChildComponent from "./childItem.vue";import { useertStore } from "@/store/useStore"
const store = useertStore();
</script><template><p>{{ store.count }}</p><ChildComponent />
</template><style scoped></style>// 子組件
<template><div><el-button type="primary" @click="btnAdd">點擊添加{{store.count}}</el-button><p>{{ store.doubleCount }}</p></div>
</template><script setup lang="ts">
import { useertStore } from "@/store/useStore"
const store = useertStore();const btnAdd = () => {store.increment();console.log(store.count)
}
</script><style></style>
-
-
pinia 的使用 組合式API 在組件內用法和選項式API一樣
import { defineStore } from "pinia";
import { ref, computed } from "vue";
export const useertStore = defineStore("main", () => {let count = ref(0);let doubleCount = computed(() => count.value * 2);const increment = () => {count.value++;};return { doubleCount, count, increment };
});
插槽使用slot
-
默認插槽:用于在子組件模板中定義一個位置,父組件可以在該位置插入自己的內容。
-
具名插槽:允許你在子組件模板中定義多個插槽位置,每個位置可以有自己的名字。在父組件中,你可以指定內容應該插入到哪個具名插槽。你可以
v-slot:header也可以簡寫#header -
條件插槽:我們可以通過
$slots和v-if來實現 -
作用域插槽:允許子組件數據傳遞給父組件,以便父組件可以自定義如何渲染這些數據,你可以這樣寫
v-slot:name="slotProps"也可以這樣簡寫#name="slotProps" -
動態插槽:允許插槽的名稱是動態的,以滿足更多的業務需求
- 子組件聲明插槽
<template><div><slot></slot><div class="container"><header><slot name="header"></slot></header><main><slot name="main" maintext="主要內容頭部"></slot><div class="list"><div class="item" v-for="item in list"><slot name="item" :item="item">默認信息</slot></div></div></main><footer><template v-if="$slots.footer"><slot name="footer">我是底部</slot></template></footer></div></div> </template><script setup lang="ts"> import { reactive } from 'vue';let list = reactive([1, 2, 3]); </script><style></style>- 父組件使用
<script setup lang="ts">
import ChildComponent from "./childItem.vue";
</script><template><ChildComponent>發生的<template #header><div>我是具名插槽</div></template><!-- 作用域插槽 --><template #main="props"><div>{{ props.maintext }}</div></template><!-- 動態插槽 --><template #item="items"><div>{{items.item}}</div></template></ChildComponent>
</template><style scoped></style>
生命周期
- Vue2 的生命周期鉤子代碼更新到 Vue3 官方文檔
- setup 是vue 3 新增的鉤子函數,位于組件創建實例之前,適用于進行異步數據獲取,狀態管理,邏輯代碼封裝
beforeCreate-> 使用setup(): 實例創建前created-> 使用setup():實例創建完畢,可以用于訪問和修改數據,但還未掛載到dom元素上
beforeMount->onBeforeMount: 掛載前,可以用于修改dom解構
mounted->onMounted:掛載完畢,也就是組件渲染你完成,可以進行dom的操作和事件調用和監聽
beforeUpdate->onBeforeUpdate: 組件將要更新到dom樹之前,可以在vue更新dom之前訪問dom狀態
updated->onUpdated: 組件更新到dom樹之后,用于執行依賴dom的更新操作
beforeDestroy->onBeforeUnmount:銷毀前->卸載前, 用于清理資源
destroyed->onUnmounted:銷毀完畢->卸載完畢,用于清理資源
errorCaptured->onErrorCaptured:捕獲錯誤,在錯誤發生時調用
- 組件緩存
<KeepAlive>
-
<KeepAlive>是一個內置組件,它可以在多個人組件動態切換時緩存被移除的組件實例<!-- 非活躍的組件將會被緩存! --> <KeepAlive><component :is="activeComponent" /> </KeepAlive>-
我們可以通過
include來制定是否需要緩存,當名稱匹配時組件才會被緩存<!-- 以英文逗號分隔的字符串 --> <KeepAlive include="a,b"><component :is="view" /> </KeepAlive><!-- 正則表達式 (需使用 `v-bind`) --> <KeepAlive :include="/a|b/"><component :is="view" /> </KeepAlive><!-- 數組 (需使用 `v-bind`) --> <KeepAlive :include="['a', 'b']"><component :is="view" /> </KeepAlive> -
exclude來排除不緩存的組件,當匹配時不緩存,用法和include一樣 -
max 可以設置緩存組件的最大值,當緩存組件數量達到最大數值時,那么在新組件創建之前,已緩存組件中很久未曾訪問的組件就會被銷毀掉
-
-
生命周期
onActivated在組件掛載時也會調用(組件從緩存中被激活時觸發)onDeactivated在組件卸載時也會調 (組件切換到其他頁面時觸發)
- 父子組件生命周期的先后順序,vue2 和 vue3 變化不大,只是`beforeCreate ,created 被 setup() 取代
-
加載渲染依次順序:
父組件:
beforeCreate=> 父組件:created=> 父組件:beforeMount(onBeforeMount)=> 子組件:beforeCreate=> 子組件:created=> 子組件:beforeMount(onBeforeMount)=>子組件:mounted(onMounted)=> 父組件:`mounted(onMounted) -
更新過程中依次順序:
父組件:
beforeUpdate(onBeforeUpdate)=> 子組件:beforeUpdate(onBeforeUpdate)=> 子組件:updated(onUpdated)=> 父組件:updated(onUpdated) -
銷毀過程中依次順序:
父組件:父組件:
beforeDestroy(onBeforeUnmount)=> 子組件:beforeDestroy(onBeforeUnmount)=> 子組件:destroyed(onUnmounted)=> 父組件:destroyed(onUnmounted)
hooks
- vue hooks 是一個遵循特點規則的函數,命名以
use起始,依托于vue 的組合式API構建,將組件邏輯拆分為獨立,可復用的小塊
-
useCount.ts 一個簡單的計算屬性
import { ref } from "vue"; export const useCount = () => {const count = ref(0);const increment = () => {count.value++;};return { count, increment }; };<template><div><div> 計算結果:{{ count }}</div><el-button type="primary" @click="increment">添加</el-button></div> </template><script setup lang="ts"> import { useCount } from "@/hooks/useCount"; const { count, increment } = useCount(); </script><style></style> -
多個嵌套使用
import { ref } from "vue"; export const useRide = () => {const rideNum = ref(2);const ride = (num: number) => {return rideNum.value * num;};return { rideNum, ride }; };<template><div><div>計算結果:{{ count }}</div><el-button type="primary" @click="increment">添加</el-button><p>{{ result }}</p></div> </template><script setup lang="ts"> import { useCount } from "@/hooks/useCount"; import { useRide } from "@/hooks/useRide"; import { ref, watch } from "vue"; const { count, increment } = useCount(); const { ride } = useRide(); let result = ref(0) watch(() => count.value,(newValue, oldValue) => {console.log(newValue, oldValue);result.value = ride(newValue);} ); </script><style></style>
自定義指令
傳送門
其他API
- shallowRef : 創建一個響應式數據,但只對頂層屬性進行響應式處理,只跟蹤引用值變化,不關心值內部屬性變化
- shallowReactive:創建一個淺層響應式對象,但只對對象頂層屬性進行響應式處理,對象內部屬性變化不會做任何響應
- readonly:創建一個對象,對象的所以屬性包括嵌套屬性都只能讀,不能修改
- shallowReadonly::和readonly相似,創建一個對象,對象的頂層屬性只能讀,不能修改,但嵌套屬性是可以更改的
其他組件
- teleport:是一種能夠將我們組件的HTML結構一定到指定位置的技術
<teleport to="body">html內容
</teleport>
- Suspense
安裝路由
Vue Router 是 Vue.js 的官方路由。它與 Vue.js 核心深度集成,讓用 Vue.js 構建單頁應用變得輕而易舉
-
安裝路由
npm install vue-router@4 # 或者 yarn add vue-router@4 -
在src/router/index.ts創建路由實例
import {createRouter,createWebHistory,type RouteRecordRaw, } from "vue-router"; export const Layout = () => import("@/layout/index.vue"); // 靜態路由 export const constantRoutes: RouteRecordRaw[] = [{path: "/",component: Layout,meta: { hidden: true },children: [{path: "/",component: () => import("@/views/index.vue"),},{path: "/aItem",component: () => import("@/views/aItem.vue"),},],}, ]; const router = createRouter({history: createWebHistory(), routes: constantRoutes,});export default router; -
在main.ts內掛載使用
import router from './router'const app = createApp(App); app .use(router) .mount('#app') -
路由工作模式
-
history模式(HTML5 模式):createWebHistory
-
優點:不含有
#,顯得更優雅 -
缺點:項目上線,需要服務端配合處理路徑問題,如果沒有適當的服務器配置,用戶在瀏覽器中直接訪問 https://example.com/user/id,就會得到一個 404 錯誤
const router = createRouter({history: createWebHistory(),routes: constantRoutes,});
-
-
hash模式
-
優點:不需要服務端進行特殊的處理
-
缺點:url上會出現一個
#,在seo中影響不好const router = createRouter({history: createWebHashHistory(), //history: createWebHashHistory(),routes: constantRoutes, });
-
- RouterLink 和 RouterView
-
RouterLink: 創建導航鏈接 -
RouterView: 渲染組件,也就是當前路由顯示匹配的組件<RouterLink to="/">Go to Home</RouterLink><RouterLink to="/aItem">Go About</RouterLink><RouterView /> -
攜帶參數跳轉
<RouterLink to="/aItem?id:3">跳轉</RouterLink>
// 或
<router-link :to="{ path: '/aItem', params: { id: '12' } }">跳轉
</router-link>
- 嵌套路由
<router-view>嵌套一個<router-view>,如果渲染到這個嵌套的 router-view 中,我們需要在路由中配置 children- children 配置只是另一個路由數組,就像 routes 本身一樣。因此,你可以根據自己的需要,不斷地嵌套視圖
import {createRouter,createWebHashHistory,type RouteRecordRaw,
} from "vue-router";
export const Layout = () => import("@/layout/index.vue");
// 靜態路由
export const constantRoutes: RouteRecordRaw[] = [{path: "/",component: Layout,meta: { hidden: true },children: [{path: "/",component: () => import("@/views/index.vue"),},{path: "/aItem/:id",name: "aItem",component: () => import("@/views/aItem.vue"),},],},
];
const router = createRouter({history: createWebHashHistory(),routes: constantRoutes,
});export default router;
- 命名路由
- 當創建路由時我們可以給路由一個name
const routes = [{path: '/user/:username',name: 'profile', component: User}
]
- 動態路由
-
通過路徑傳遞參數
<script setup lang="ts"> </script><template>頁面二<router-link :to="{ name: 'aItem', params: { id: '12' } }">跳轉aItem</router-link> </template><style scoped></style> -
需要路由配置支持動態路徑參數
import { createRouter, createWebHistory } from 'vue-router';const routes = [{path: '/aItem/:id',name: 'aItem',component: () => import('@/views/aItem.vue'),},
];const router = createRouter({history: createWebHistory(),routes,
});export default router;
- 編程時導航
我們可以通過useRouter來訪問路由
-
導航到不同位置
- 使用
router.push方法,會給 history 棧添加一個新的記錄,當用戶點擊返回,即返回上一頁時就會回到之前的URL,此方法相當于點擊<router-link :to="..."><script setup lang="ts"> import { useRouter } from 'vue-router' const router = useRouter() const goAitem = () => {router.push({name: 'aItem',params: {id: '12'}}) } </script><template>頁面二<router-link :to="{ name: 'aItem', params: { id: '12' } }">跳轉aItem</router-link><el-button type="primary" @click="goAitem">跳轉aItem</el-button> </template><style scoped></style>
- 使用
-
替換當前位置
-
router.replace,它不會向history添加新的記錄,會直接替換當前條目,亦或者router.push中添加一個replace: true<script setup lang="ts"> import { useRouter } from 'vue-router' const router = useRouter() const goAitem = () => {router.replace({name: 'aItem',params: {id: '12'}})// 亦或者 添加 replace: true,// router.push({// name: 'aItem',// replace: true,// params: {// id: '12'// }// }) } </script><template>頁面二<router-link :to="{ name: 'aItem', replace: true, params: { id: '12' } }">跳轉aItem</router-link><el-button type="primary" @click="goAitem">跳轉aItem</el-button> </template><style scoped></style>
-
- 路由組件傳參
-
傳遞參數
- params:是URL的一部分,通常用于傳遞靜態數據,若使用 to的對象寫法時,必須使用 name配置項,在路由里面配置,也就是動態路由
- query :參數也會附加在URL后面,用于傳遞敏感數據
<script setup lang="ts"> import { useRouter } from 'vue-router' const router = useRouter() const goAitem = () => {// paramsrouter.push({name: 'aItem',params: {id: '12'}})// queryrouter.push({name: 'aItem',query: {id: '12'}}) } </script><template>頁面二<router-link :to="{ name: 'aItem', replace: true, params: { id: '12' } }">跳轉aItem</router-link><router-link :to="{ name: 'aItem', replace: true, query: { id: '12' } }">跳轉aItem</router-link><el-button type="primary" @click="goAitem">跳轉aItem</el-button> </template><style scoped></style> -
接收參數
- 通過
useRoute來獲取query參數,useRoute返回的是響應式的路由對象,其中query包含了所以查詢參數<script setup lang="ts"> import { useRoute } from 'vue-router'; const route = useRoute(); console.log(route,' `query`'); </script>
- 通過
-
路由 props 配置
-
當 props 設置為 true 時,route.params 將被設置為組件的 props
const routes = [{ path: '/aItem/:id',name: 'aItem',component: User, props: true } ] -
函數模式下無論是動態路由參數還是查詢參數,params, query 都可以方便地作為 props 傳遞到組件中
- 配置
const routes = [{path: '/aItem',component: SearchUser,props: route => ({ query: route.query.q })} ]- 組件接收
<script setup>
defineProps({id: {type: String,default: "奔馳",}
})
</script>
-
部署服務器
傳送門
vue創建項目使用element-plus
- 下載引用element-plus
# 選擇一個你喜歡的包管理器# NPM
npm install element-plus --save# Yarn
yarn add element-plus# pnpm
pnpm install element-plus
- 在main.js內引用
import { createApp } from 'vue'
import App from './App.vue'
import router from './router'
import store from './store'// 引入 Element-Plus 依賴
import ElementPlus from 'element-plus'
// 引入全局 cSS 樣式
import 'element-plus/dist/index.css'createApp(App)
.use(store)
.use(router)
.use(ElementPlus)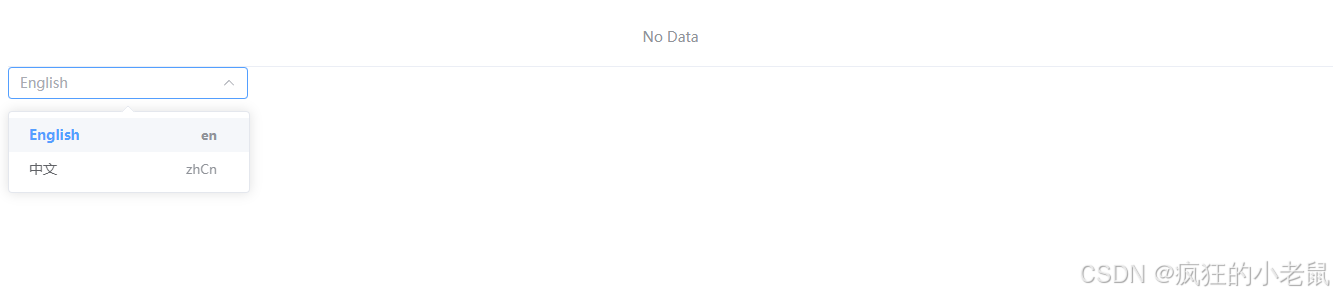
.mount('#app')- 頁面中使用,這里實現element-plus中英文切換 結合 vuex切換中英文
<template><div class='about'><el-select @change="handleClear" v-model="selectValue" placeholder="選擇語言" style="width: 240px"><el-option v-for="item in langOptions" :key="item.value" :label="item.label" :value="item.value"><span style="float: left">{{ item.label }}</span><span style="float: right;color: var(--el-text-color-secondary);font-size: 13px;">{{ item.value }}</span></el-option></el-select></div>
</template><script>
import { useStore } from "vuex";
import {reactive, ref
} from 'vue'
export default {name: 'about',setup() {const selectValue = ref('')const langOptions = reactive([{value: 'en',label: 'English'},{value: 'zhCn',label: '中文'}])const store = useStore()const handleClear = (value) => {store.dispatch('provider/updateLanguage', value)}return {selectValue,langOptions,handleClear}}
};
</script>
<style lang='less' scoped></style>- 全局實現中英文
<template><el-config-provider :locale="locale"><el-table mb-1 :data="[]" /><router-view /></el-config-provider>
</template><script>
import {computed,
} from 'vue'
import { useStore } from "vuex";export default {name: 'App',setup() {const store = useStore()const locale = computed(() => store.state.provider.language);// 返回數據return {locale,}}
}
</script>
- vuex 配置與使用
import { createStore } from 'vuex'
import provider  from './modules/provider'
export default createStore({state: {},mutations: {},actions: {},modules: {provider }
})
- modules的創建provider文件
// 導入 Element Plus 中英文語言包
import zhCn from "element-plus/es/locale/lang/zh-cn";
import en from "element-plus/es/locale/lang/en";
const user = {namespaced: true,state: {language: zhCn,},mutations: {setLanguage(state, language) {if (language == "en") {state.language = en;} else {state.language = zhCn;}}},actions: {/*** 根據語言標識讀取對應的語言包*/updateLanguage({ commit }, language) {commit('setLanguage', language)}},getters: {language(state) {return state.language}}
}
export default user
- 最終實現效果
- 啟動項目報錯
- 預轉換錯誤:未找到預處理器依賴項“sas-embedded”。你安裝了嗎?嘗試
npm install-D sass-embedded。

- 按照提示安裝重新啟動就好
按需引入
- 按需導入,下載兩款插件
unplugin-vue-components和unplugin-auto-import這兩款插件
npm install -D unplugin-vue-components unplugin-auto-import
- 在vite.config.ts 中配置
import { defineConfig } from 'vite'
import vue from '@vitejs/plugin-vue'
import AutoImport from 'unplugin-auto-import/vite'
import Components from 'unplugin-vue-components/vite'
import { ElementPlusResolver } from 'unplugin-vue-components/resolvers'
// https://vite.dev/config/
export default defineConfig({plugins: [vue(),AutoImport({resolvers: [ElementPlusResolver()],}),Components({resolvers: [ElementPlusResolver()],}),],
})- 重啟項目接下來直接引用就行了
組件名稱的單個配置
-
vue3 會根據組件文件名稱自動推導出name屬性,item.vue name 名為item ,但當我們起個文件夾名稱,但文件夾內容的文件是index.vue時就無法推導出文件內名稱了
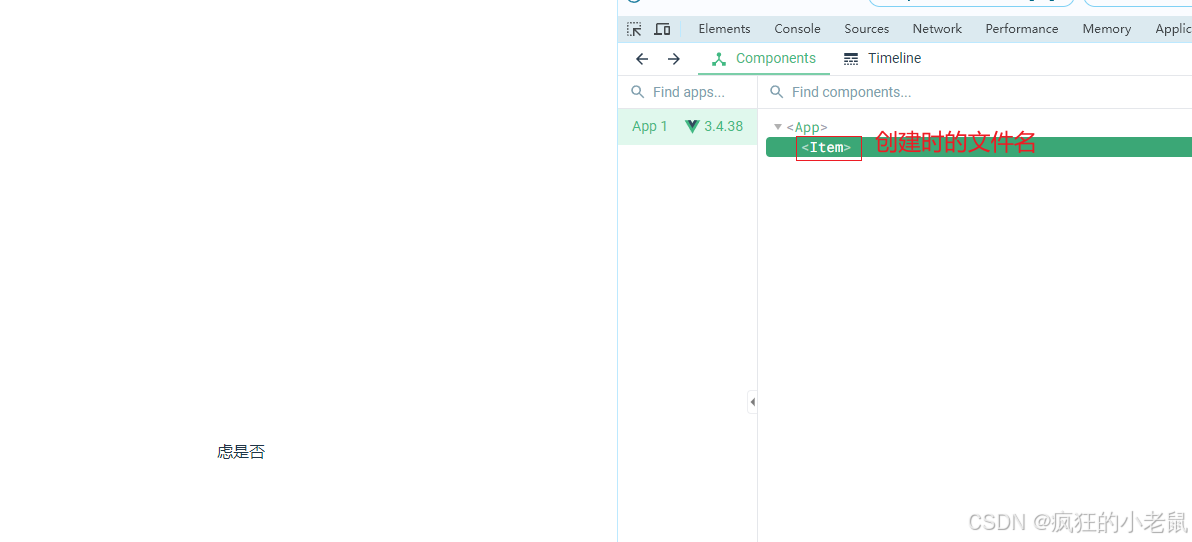
-
這在我們調試和定位問題時就不太方便了,當然我們也可以單獨添加一個scrit 來去寫name名稱,但這種方法有點過于繁瑣
``` <script lang="ts">export default {name: 'pramas'} </script> ``` -
社區推出了 unplugin-vue-define-options 來簡化該操作
npm i unplugin-vue-define-options -D
// vite.config.ts import DefineOptions from 'unplugin-vue-define-options/vite' import Vue from '@vitejs/plugin-vue'export default defineConfig({plugins: [Vue(), DefineOptions()], }) -
頁面中使用
<script setup lang="ts"> defineOptions({name: "pramas" }) <script> -
三方插件在
<script lang="ts" name="pramas">上添加name
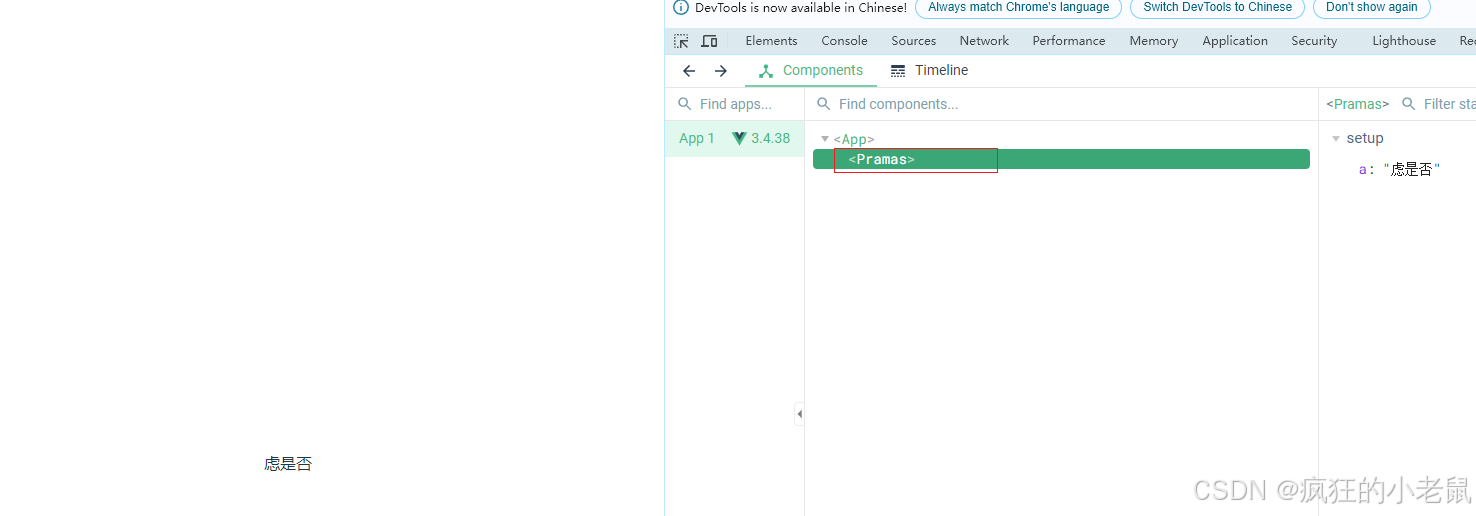
<script setup name="pramas">let a = '慮是否' </script>- 下載此插件可以動態修改vue文件名稱
npm i vite-plugin-vue-setup-extend -D
-
-
在 vite.config.ts內引用
import { defineConfig } from 'vite' import vue from '@vitejs/plugin-vue' import vueDefineNmae from 'vite-plugin-vue-setup-extend' export default defineConfig({plugins: [vue(),vueDefineNmae()], }) -
代碼運行就可以看見我們自定義的name名稱了
遇到問題
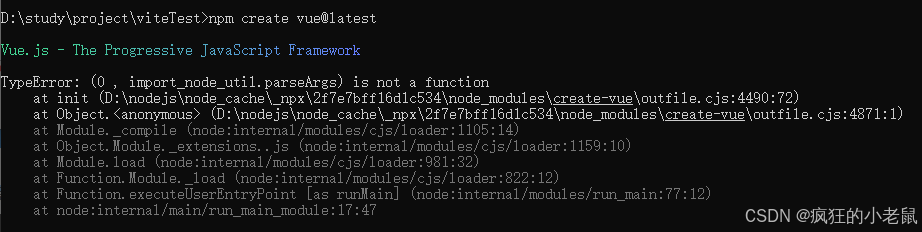
1. 淘寶鏡像過期,更改淘寶鏡像

- 在這里插入代碼片
1.查看當前npm鏡像
npm config get
2.配置新的鏡像
npm config set registry https://registry.npmmirror.com
3.再次查看鏡像配置情況
npm config get
2.npm run dev` 無法啟動項目,顯示vite不是內部或外部命令,這是系統啟動vite項目,但找不到vite,意味著你未曾安裝vite,你可以執行以下命令全局安裝,再執行之前命令
npm install -g vite
- node 和 npm 版本不兼容,官網需要18.3或更高版本的
3.vscode打開vite創建項目引入組件報錯解決

-
在src下創建此文件xxx.d.ts在你的 src 目錄中,填入以下內容,幫助 TypeScript 理解 .vue 文件
declare module "*.vue" {import { defineComponent } from "vue";const Component: ReturnType<typeof defineComponent>;export default Component;} -
如果未曾解決,將
.vue改為vue并重新打開項目 -
如果還未解決可以看看官網的方法

4.vue3+vite3+ts使用@alias路徑別名爆紅報錯解決

- 在
vite.config.ts中配置以下內容
import { defineConfig } from 'vite'
import vue from '@vitejs/plugin-vue'
import path from "path";
// https://vite.dev/config/
export default defineConfig({plugins: [vue()],resolve: {alias: {"@": path.resolve(__dirname, "./src"),},},
})
- 如果顯示找不到 path 按照以下命令安裝
npm install --save-dev @types/node
- 在
tsconfig.app.json中配置以下內容,然后重啟項目
{"compilerOptions": {"baseUrl": ".","paths": {"@/*": ["src/*"],}},"include": ["src/**/*.ts", "src/**/*.tsx", "src/**/*.vue"]
}

——CADc#實現)


—— 網絡安全)


)


