隨著人工智能(AI)技術的迅猛發展,軟件測試領域正經歷深刻變革。傳統手動測試和基于規則的自動化測試已難以應對日益復雜的系統架構與海量用戶行為。AI測試通過引入機器學習、自然語言處理、計算機視覺等技術,顯著提升了測試效率、覆蓋率和缺陷發現能力。本文將深入探討AI在三大核心測試場景中的應用:自動化測試框架、智能缺陷檢測和A/B測試優化,并結合代碼示例、Mermaid流程圖、Prompt設計、可視化圖表等多維度內容,全面展示AI測試的技術實現路徑與最佳實踐。
一、AI驅動的自動化測試框架
1.1 背景與挑戰
傳統自動化測試依賴于固定的腳本(如Selenium、Appium),需人工編寫元素定位邏輯、操作步驟和斷言規則。這種方式存在以下問題:
- 維護成本高:UI變更導致大量腳本失效;
- 覆蓋率低:難以覆蓋所有用戶路徑;
- 可讀性差:腳本缺乏語義理解,調試困難;
- 適應性弱:無法應對動態內容或模糊匹配場景。
AI賦能的自動化測試框架通過視覺識別、自然語言解析、行為預測等方式,實現更智能、自適應的測試執行。
1.2 架構設計與流程圖(Mermaid)
graph TD
A[用戶輸入自然語言需求] --> B(NLP解析引擎)
B --> C{是否為測試用例?}
C -->|是| D[生成結構化測試步驟]
C -->|否| E[返回澄清問題]
D --> F[AI元素識別模型]
F --> G[定位頁面元素(圖像/文本/XPath)]
G --> H[執行操作(點擊/輸入/滑動)]
H --> I[結果驗證(視覺比對/OCR/語義分析)]
I --> J{通過?}
J -->|否| K[記錄缺陷 + 截圖 + 日志]
J -->|是| L[繼續下一步]
L --> M{是否完成?}
M -->|否| H
M -->|是| N[生成測試報告]
N --> O[可視化儀表盤]
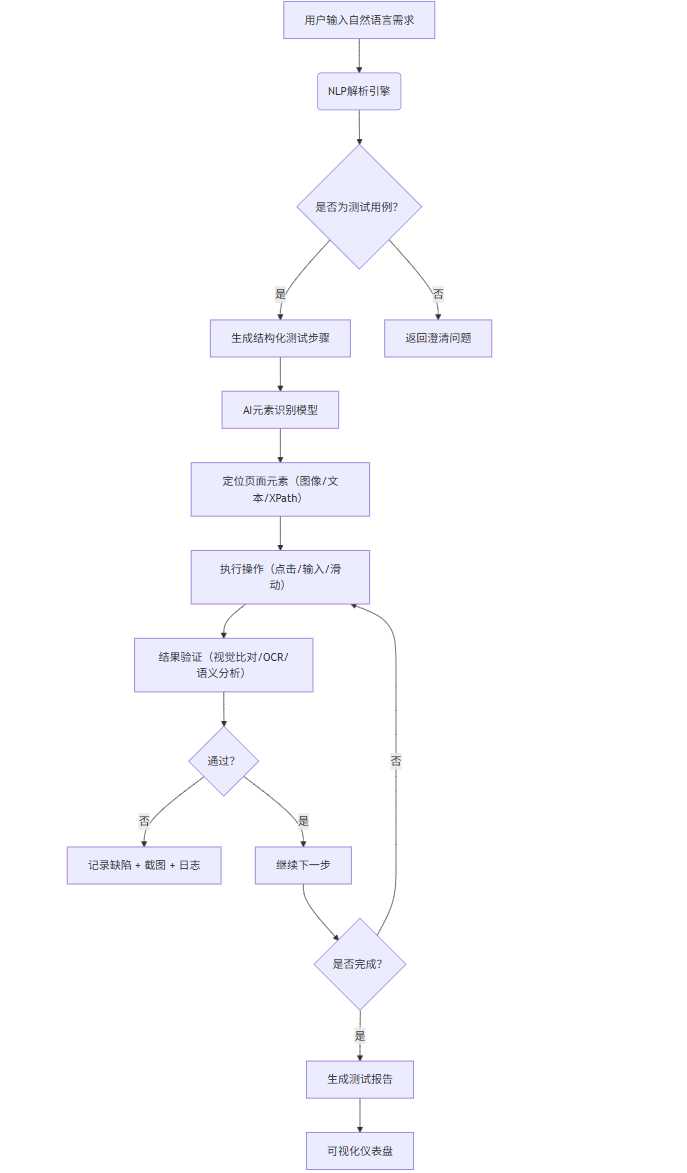
說明:該流程圖展示了從自然語言輸入到測試執行與結果反饋的完整閉環。AI模型貫穿于元素識別、操作決策和結果驗證環節。
1.3 核心組件與代碼示例
1.3.1 自然語言到測試用例轉換(NLP解析)
使用Hugging Face的transformers庫加載預訓練模型,將用戶輸入“點擊登錄按鈕,輸入用戶名‘test’,提交表單”轉化為結構化指令。
from transformers import pipeline
# 初始化NLP解析管道
nlp_pipeline = pipeline("text2text-generation", model="t5-small")
def parse_test_instruction(instruction: str):
input_text = f"translate to test steps: {instruction}"
output = nlp_pipeline(input_text, max_length=100, num_return_sequences=1)
return output[0]['generated_text']
# 示例
instruction = "Click the login button, enter username 'test', and submit the form."
steps = parse_test_instruction(instruction)
print(steps)
# 輸出示例: click(login_button), input(username_field, 'test'), click(submit_button)
1.3.2 基于CV的元素識別(OpenCV + YOLOv8)
使用YOLOv8訓練自定義UI元素檢測模型,識別按鈕、輸入框等控件。
import cv2
from ultralytics import YOLO
# 加載預訓練UI元素檢測模型
model = YOLO('ui_element_detector.pt')
def detect_elements(screenshot_path):
img = cv2.imread(screenshot_path)
results = model(img)
elements = []
for r in results:
boxes = r.boxes
for box in boxes:
x1, y1, x2, y2 = box.xyxy[0].cpu().numpy().astype(int)
conf = box.conf.cpu().numpy()[0]
cls = int(box.cls.cpu().numpy()[0])
label = model.names[cls]
elements.append({
'label': label,
'bbox': (x1, y1, x2, y2),
'confidence': conf
})
# 繪制邊框
cv2.rectangle(img, (x1, y1), (x2, y2), (0,255,0), 2)
cv2.putText(img, f"{label}:{conf:.2f}", (x1, y1-10),
cv2.FONT_HERSHEY_SIMPLEX, 0.5, (0,255,0), 1)
cv2.imwrite("annotated_screenshot.png", img)
return elements
# 使用示例
elements = detect_elements("current_screen.png")
for elem in elements:
print(elem)
1.3.3 動作執行引擎(基于Appium + AI決策)
from appium import webdriver
import time
class AITestExecutor:
def __init__(self):
self.driver = None
def start_session(self):
caps = {
"platformName": "Android",
"deviceName": "emulator-5554",
"appPackage": "com.example.app",
"appActivity": ".MainActivity"
}
self.driver = webdriver.Remote("http://localhost:4723/wd/hub", caps)
time.sleep(3)
def find_element_by_image(self, target_img_path):
# 截圖當前屏幕
self.driver.get_screenshot_as_file("current.png")
screen = cv2.imread("current.png")
template = cv2.imread(target_img_path, 0)
screen_gray = cv2.cvtColor(screen, cv2.COLOR_BGR2GRAY)
res = cv2.matchTemplate(screen_gray, template, cv2.TM_CCOEFF_NORMED)
_, max_val, _, max_loc = cv2.minMaxLoc(res)
if max_val > 0.8:
h, w = template.shape
center_x = max_loc[0] + w // 2
center_y = max_loc[1] + h // 2
return center_x, center_y
return None
def execute_step(self, action, value=None):
if action == "click":
pos = self.find_element_by_image(f"images/{value}.png")
if pos:
self.driver.tap([pos], 100)
print(f"Clicked on {value}")
elif action == "input":
elem = self.driver.find_element_by_accessibility_id(value)
elem.send_keys("test_user")
print(f"Inputted into {value}")
def close(self):
self.driver.quit()
# 執行測試
executor = AITestExecutor()
executor.start_session()
executor.execute_step("click", "login_button")
executor.execute_step("input", "username_field")
executor.close()
二、智能缺陷檢測
2.1 傳統缺陷檢測的局限
傳統方式依賴日志監控、斷言失敗和人工巡檢,存在:
- 滯后性:問題發生后才被發現;
- 誤報率高:日志噪聲干擾;
- 難以定位根因:缺乏上下文關聯。
AI可通過異常檢測、日志聚類、圖像比對等方式實現主動式缺陷識別。
2.2 智能缺陷檢測系統架構(Mermaid)
graph LR
A[實時日志流] --> B(Log Parser)
B --> C[結構化日志]
C --> D[特征提取]
D --> E{異常檢測模型}
E -->|異常| F[告警通知]
E -->|正常| G[存儲歸檔]
H[UI截圖序列] --> I(Image Diff Engine)
I --> J{像素差異 > 閾值?}
J -->|是| K[視覺異常標記]
J -->|否| L[無異常]
M[用戶行為日志] --> N[路徑分析模型]
N --> O{偏離正常路徑?}
O -->|是| P[潛在缺陷預警]
F --> Q[缺陷知識庫]
K --> Q
P --> Q
Q --> R[Root Cause Analysis]
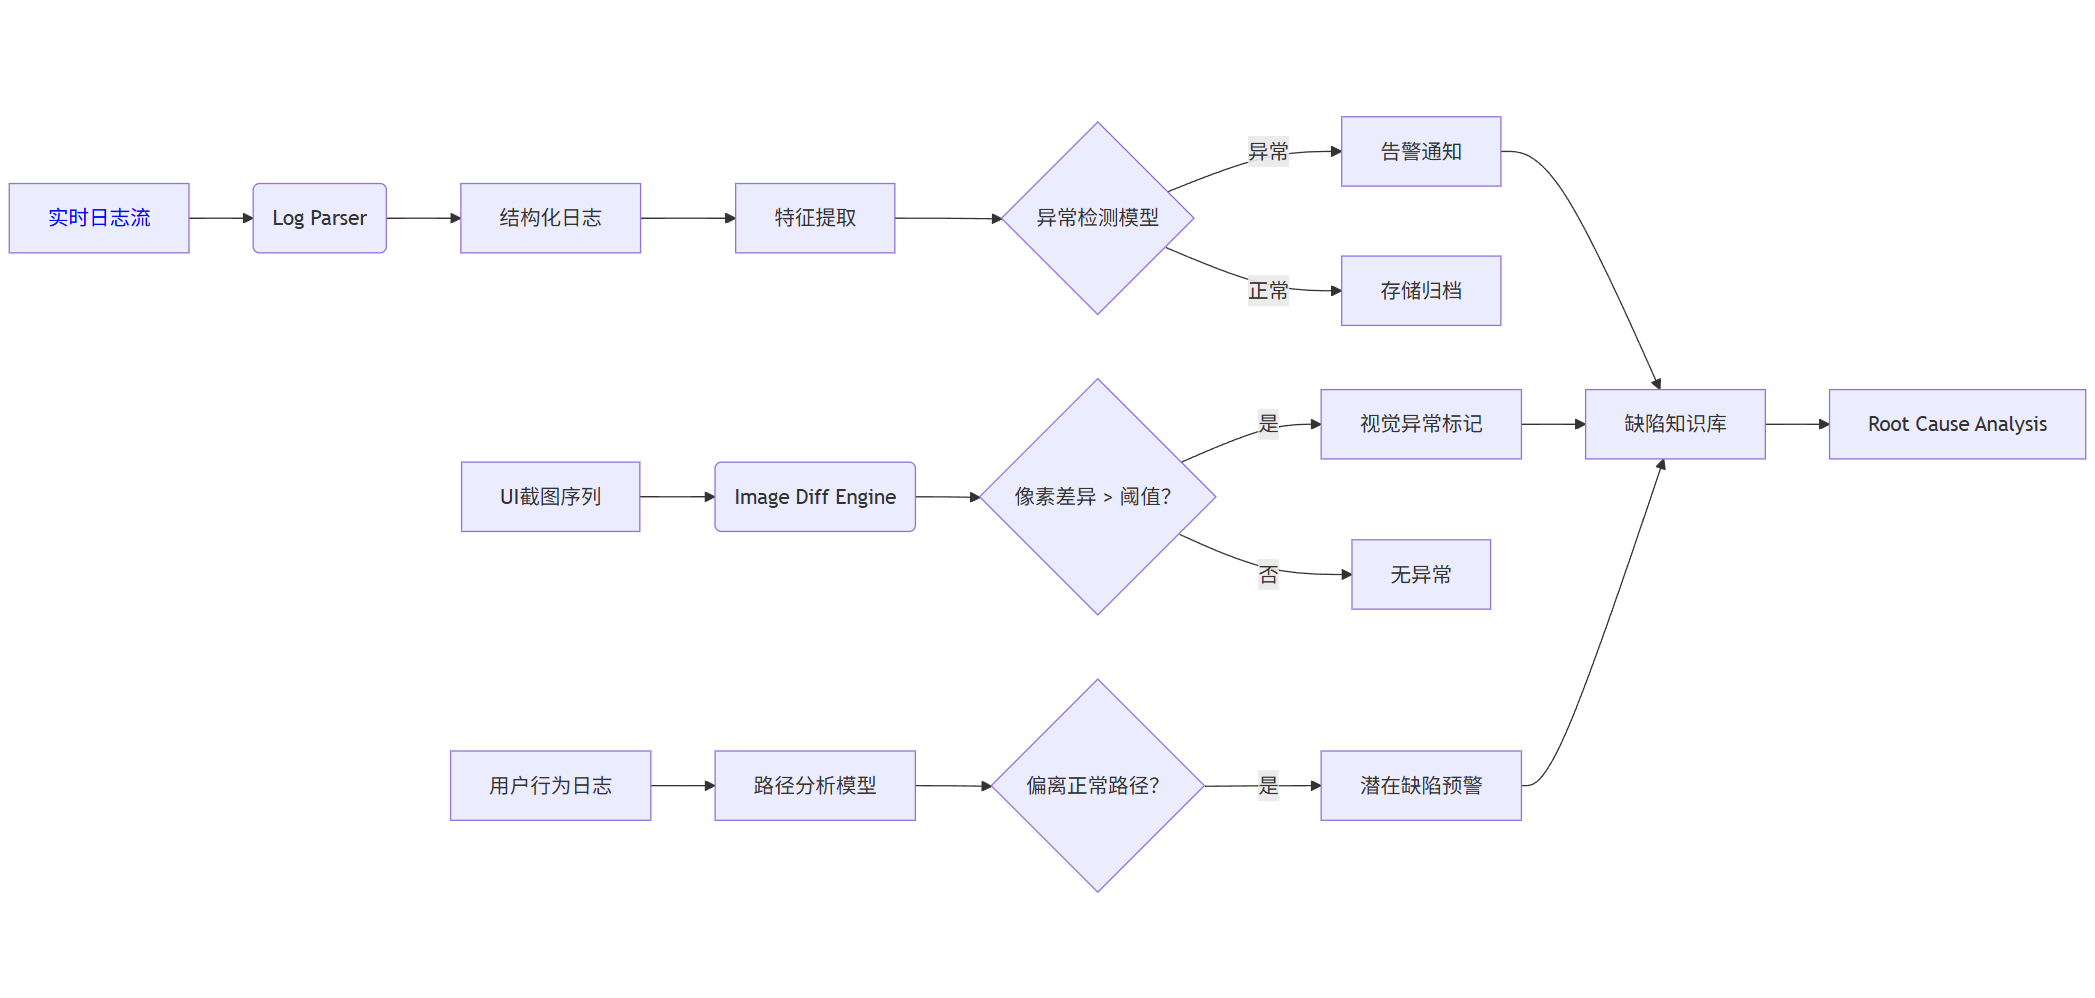
說明:多源數據融合檢測,提升缺陷識別準確率。
2.3 基于日志的異常檢測(LSTM Autoencoder)
使用長短期記憶網絡(LSTM)構建自編碼器,對正常日志模式建模,檢測異常。
import numpy as np
from keras.models import Sequential
from keras.layers import LSTM, Dense, Dropout
from sklearn.preprocessing import StandardScaler
import pandas as pd
# 模擬日志數據(時間序列向量)
data = pd.read_csv("logs_embedding.csv") ?# 每行是日志的向量化表示
scaler = StandardScaler()
scaled_data = scaler.fit_transform(data)
# 構建LSTM自編碼器
model = Sequential([
LSTM(64, activation='relu', input_shape=(10, scaled_data.shape[1]), return_sequences=True),
LSTM(32, activation='relu', return_sequences=False),
Dropout(0.2),
Dense(32, activation='relu'),
Dense(64, activation='relu'),
Dense(scaled_data.shape[1])
])
model.compile(optimizer='adam', loss='mse')
# 訓練(僅用正常日志)
X_train = np.array([scaled_data[i:i+10] for i in range(len(scaled_data)-10)])
model.fit(X_train, X_train[:, -1, :], epochs=50, batch_size=32, validation_split=0.1)
# 檢測異常
def detect_anomaly(log_seq, threshold=0.1):
seq = scaler.transform(log_seq).reshape(1, 10, -1)
reconstructed = model.predict(seq)
mse = np.mean((seq[0, -1, :] - reconstructed[0])**2)
return mse > threshold, mse
# 示例
test_seq = scaled_data[100:110]
is_anomalous, score = detect_anomaly(test_seq)
print(f"Anomalous: {is_anomalous}, MSE: {score:.4f}")
2.4 視覺缺陷檢測(圖像差異 + OCR語義校驗)
import cv2
import numpy as np
from difflib import SequenceMatcher
import pytesseract
def image_diff_and_ocr_check(before_img, after_img, expected_text):
# 圖像差異檢測
img1 = cv2.imread(before_img, 0)
img2 = cv2.imread(after_img, 0)
diff = cv2.absdiff(img1, img2)
_, thresh = cv2.threshold(diff, 30, 255, cv2.THRESH_BINARY)
non_zero_count = cv2.countNonZero(thresh)
if non_zero_count < 100:
print("No significant visual change.")
return False
# OCR提取文本
actual_text = pytesseract.image_to_string(after_img).strip()
similarity = SequenceMatcher(None, expected_text, actual_text).ratio()
if similarity < 0.8:
print(f"Text mismatch! Expected: '{expected_text}', Got: '{actual_text}'")
return True ?# 存在缺陷
print("Visual and text check passed.")
return False
# 使用示例
has_defect = image_diff_and_ocr_check(
"home_v1.png",?
"home_v2.png",?
"Welcome to our app"
)
2.5 Prompt示例:用于缺陷分類與建議
你是一名資深QA工程師,請根據以下缺陷描述進行分類并提出修復建議:
【缺陷描述】
用戶在提交訂單后,頁面跳轉至空白頁,控制臺報錯:Uncaught TypeError: Cannot read property 'id' of undefined at checkout.js:45
【分析要求】
1. 判斷缺陷類型(前端/后端/網絡/兼容性)
2. 推測可能原因
3. 提供3條修復建議
請以JSON格式輸出:
{
"type": "",
"possible_causes": [],
"fix_suggestions": []
}
AI響應示例:
{
"type": "前端",
"possible_causes": [
"訂單數據未正確傳遞至前端",
"checkout.js中未對null/undefined進行判斷",
"API返回結構變更導致字段缺失"
],
"fix_suggestions": [
"在訪問對象屬性前添加空值檢查:if (order && order.id)",
"增加前端錯誤邊界處理,顯示友好提示",
"與后端確認API契約,確保返回字段一致性"
]
}
三、AI驅動的A/B測試優化
3.1 A/B測試的傳統瓶頸
傳統A/B測試面臨:
- 樣本效率低:需大量用戶才能得出結論;
- 靜態分組:無法動態調整流量;
- 分析滯后:結果需手動統計;
- 維度爆炸:多變量測試組合過多。
AI可通過貝葉斯優化、多臂老虎機(MAB)、因果推斷提升測試效率與決策質量。
3.2 智能A/B測試流程圖(Mermaid)
graph TB
A[定義目標指標] --> B[生成變體(AI文案/布局)]
B --> C[用戶分組(MAB算法)]
C --> D[實時數據采集]
D --> E[貝葉斯更新后驗分布]
E --> F{達到顯著性?}
F -->|否| G[動態調整流量分配]
G --> C
F -->|是| H[確定最優變體]
H --> I[全量發布]
I --> J[持續監控]
J --> K{性能下降?}
K -->|是| B
K -->|否| J
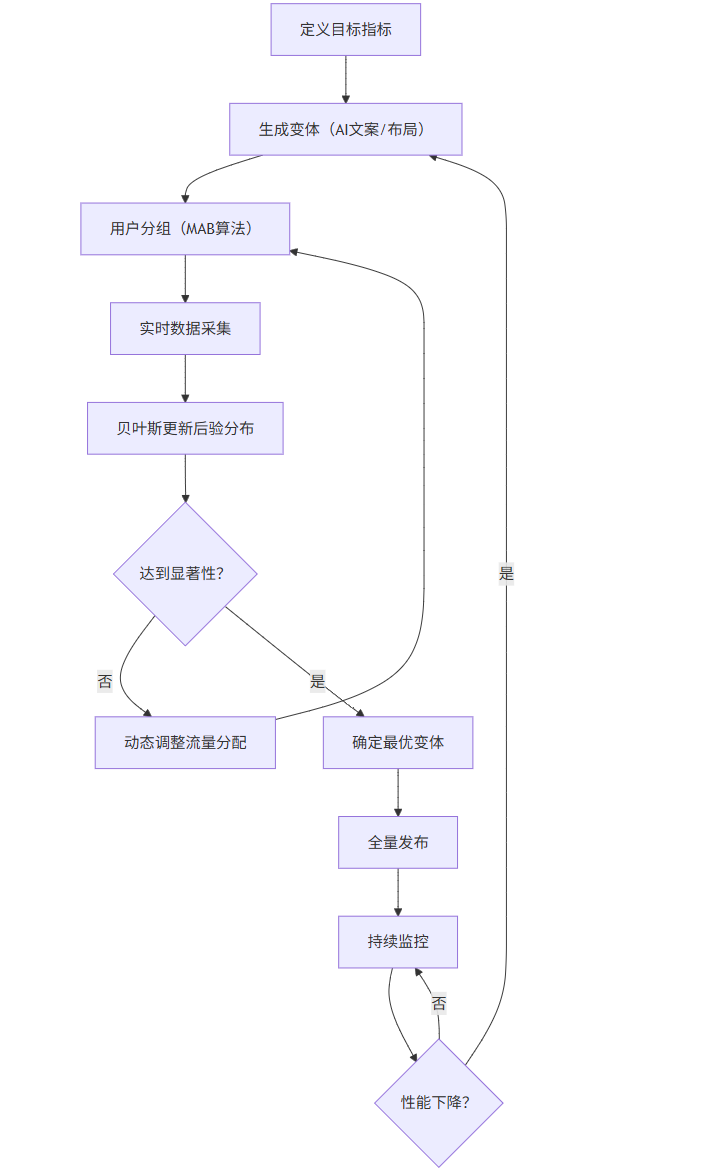
說明:采用多臂老虎機實現探索-利用平衡,加速收斂。
3.3 多臂老虎機(Thompson Sampling)實現
import numpy as np
import random
class ThompsonSampling:
def __init__(self, n_variants):
self.n = n_variants
self.alpha = np.ones(n_variants) ?# 成功次數(先驗)
self.beta = np.ones(n_variants) ?# 失敗次數(先驗)
def select_variant(self):
samples = [np.random.beta(self.alpha[i], self.beta[i]) for i in range(self.n)]
return np.argmax(samples)
def update(self, variant_id, reward):
if reward == 1:
self.alpha[variant_id] += 1
else:
self.beta[variant_id] += 1
# 模擬A/B測試
ts = ThompsonSampling(n_variants=3)
true_conversion_rates = [0.05, 0.08, 0.06] ?# 真實轉化率
for _ in range(10000):
variant = ts.select_variant()
# 模擬用戶行為
reward = 1 if random.random() < true_conversion_rates[variant] else 0
ts.update(variant, reward)
print("最終參數估計:")
for i in range(3):
mean = ts.alpha[i] / (ts.alpha[i] + ts.beta[i])
print(f"Variant {i}: {mean:.3f} (真實: {true_conversion_rates[i]})")
輸出示例:
Variant 0: 0.051
Variant 1: 0.079 ?← 最優
Variant 2: 0.060
3.4 AI生成測試變體(Prompt + GPT)
你是一名UI/UX設計師,請為電商App的首頁生成3個不同的Banner文案變體,目標是提升點擊率(CTR)。
要求:
- 變體A:強調價格優惠
- 變體B:突出限時緊迫感
- 變體C:情感共鳴型
輸出格式:
{
"variants": [
{"id": "A", "text": "", "color_scheme": "", "call_to_action": ""},
{"id": "B", "text": "", "color_scheme": "", "call_to_action": ""},
{"id": "C", "text": "", "color_scheme": "", "call_to_action": ""}
]
}
AI響應示例:
{
"variants": [
{
"id": "A",
"text": "全場低至3折起,省下一半錢!",
"color_scheme": "紅色+黃色",
"call_to_action": "立即搶購"
},
{
"id": "B",
"text": "最后2小時!錯過再等一年",
"color_scheme": "黑色+橙色",
"call_to_action": "馬上查看"
},
{
"id": "C",
"text": "為愛的人挑選一份溫暖禮物",
"color_scheme": "粉色+白色",
"call_to_action": "開始挑選"
}
]
}
3.5 貝葉斯A/B測試分析(Python)
import numpy as np
import matplotlib.pyplot as plt
from scipy.stats import beta
def bayesian_ab_test(clicks_A, views_A, clicks_B, views_B):
# 后驗分布
a_A, b_A = 1 + clicks_A, 1 + views_A - clicks_A
a_B, b_B = 1 + clicks_B, 1 + views_B - clicks_B
# 采樣比較
samples_A = beta.rvs(a_A, b_A, size=10000)
samples_B = beta.rvs(a_B, b_B, size=10000)
prob_B_better = np.mean(samples_B > samples_A)
print(f"P(Variant B > A) = {prob_B_better:.3f}")
# 繪制后驗分布
plt.figure(figsize=(10, 6))
x = np.linspace(0, 0.15, 1000)
plt.plot(x, beta.pdf(x, a_A, b_A), label=f'Variant A (CTR ≈ {a_A/(a_A+b_A):.3f})')
plt.plot(x, beta.pdf(x, a_B, b_B), label=f'Variant B (CTR ≈ {a_B/(a_B+b_B):.3f})')
plt.xlabel('Conversion Rate')
plt.ylabel('Density')
plt.title('Bayesian Posterior Distributions')
plt.legend()
plt.grid(True, alpha=0.3)
plt.savefig("ab_bayesian_result.png")
plt.show()
# 示例數據
bayesian_ab_test(clicks_A=45, views_A=1000, clicks_B=62, views_B=1000)
注:實際運行將生成兩條Beta分布曲線,直觀展示B優于A的概率。
四、綜合系統集成與可視化
4.1 AI測試平臺儀表盤(示意圖)
+-----------------------------------------------------------+
| ? ? ? ? ? ? ? ? ? AI Test Platform Dashboard ? ? ? ? ? ? ?|
+---------------------+----------------------+--------------+
| ?自動化測試進度 ? ? | ?缺陷趨勢分析 ? ? ? ?| ?A/B測試狀態 ? |
| ?[█????????] 23% ? ?| ?▲ 本周+15% ? ? ? ? ?| ?Variant B: 68% |
| ?今日執行: 142 ? ? ?| ?● 嚴重: 3 ? ? ? ? ? | ?Confidence: 92%|
| ?通過率: 94.1% ? ? ?| ?○ 一般: 12 ? ? ? ? ?| ? ? ? ? ? ? ? ?|
+---------------------+----------------------+--------------+
| ?最新缺陷(AI標記) ? ? ? ? ? ? ? ? ? ? ? ? ? ? ? ? ? ? ? ? ?|
| ?? [視覺] 登錄頁按鈕錯位 (v2.1.0) ? ? ? ? ? ? ? ? ? ? ? ? ? ?|
| ?? [日志] 支付超時錯誤頻發 (order-service) ? ? ? ? ? ? ? ? ? |
| ?? [行為] 30%用戶在結算頁流失 ? ? ? ? ? ? ? ? ? ? ? ? ? ? ? |
+-----------------------------------------------------------+
| ?推薦行動 ? ? ? ? ? ? ? ? ? ? ? ? ? ? ? ? ? ? ? ? ? ? ? ? ? |
| ?? 重新訓練UI檢測模型(準確率下降5%) ? ? ? ? ? ? ? ? ? ? ? |
| ?? 擴大A/B測試流量至Variant B ? ? ? ? ? ? ? ? ? ? ? ? ? ? ? |
+-----------------------------------------------------------+
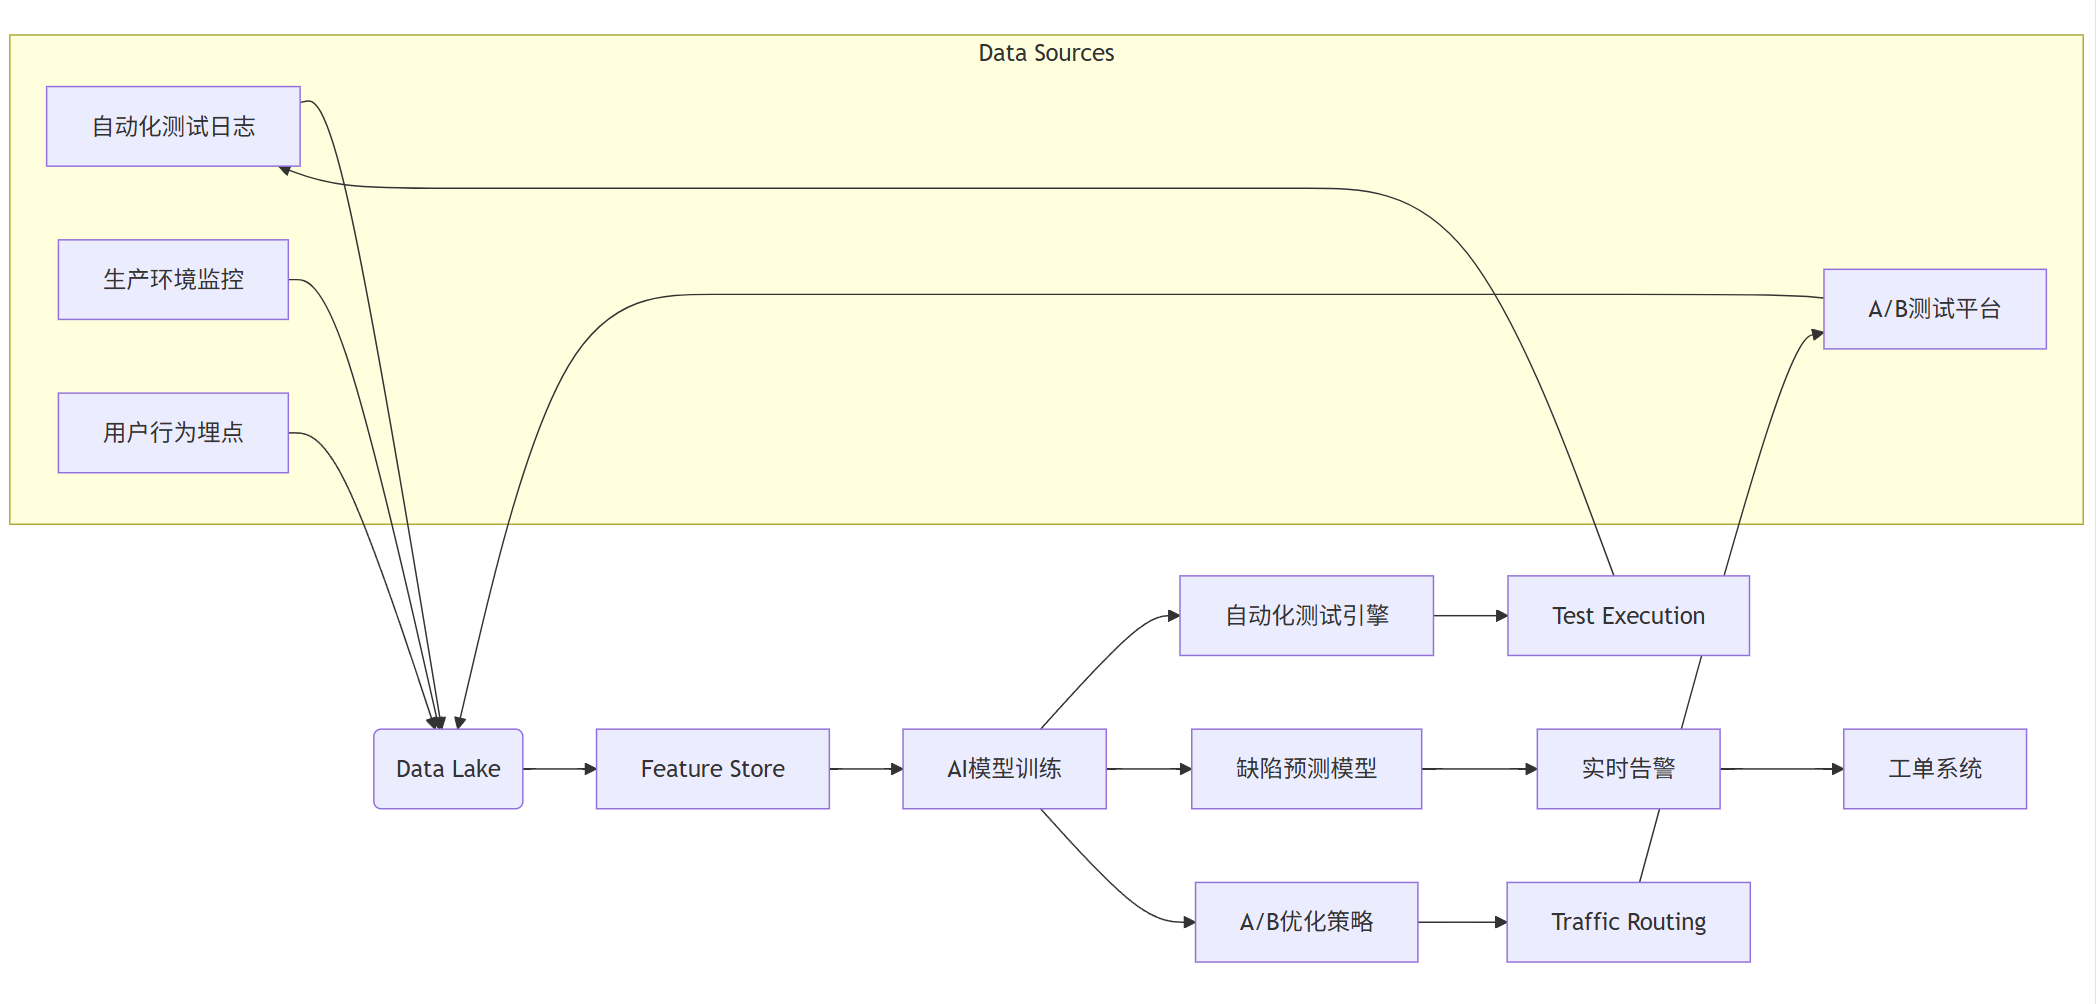
4.2 數據流架構圖(Mermaid)
graph LR
subgraph Data Sources
A[自動化測試日志]
B[生產環境監控]
C[用戶行為埋點]
D[A/B測試平臺]
end
? ? A --> E(Data Lake)
B --> E
C --> E
D --> E
? ? E --> F[Feature Store]
F --> G[AI模型訓練]
G --> H[自動化測試引擎]
G --> I[缺陷預測模型]
G --> J[A/B優化策略]
? ? H --> K[Test Execution]
I --> L[實時告警]
J --> M[Traffic Routing]
? ? K --> A
L --> N[工單系統]
M --> D
五、總結與展望
AI測試正在重塑軟件質量保障體系:
- 自動化測試:從“腳本驅動”走向“語義理解+視覺識別”;
- 缺陷檢測:從“事后響應”轉向“事前預警”;
- A/B測試:從“靜態實驗”升級為“動態優化”。
未來方向包括:
- LLM + 測試:大模型自動生成測試用例、分析日志;
- 強化學習:自主探索應用路徑,發現深層缺陷;
- 數字孿生測試:在虛擬環境中模擬百萬用戶并發。
通過AI與測試工程的深度融合,企業將實現更高效、更智能、更可靠的質量保障閉環。
![[linux倉庫]性能加速的隱形引擎:深度解析Linux文件IO中的緩沖區奧秘](http://pic.xiahunao.cn/[linux倉庫]性能加速的隱形引擎:深度解析Linux文件IO中的緩沖區奧秘)


)


)


