目錄
原文概要
1. 訓練
2. 轉表
3. 測試
本文是對ECLUT技術的代碼解讀,原文解讀請看ECLUT。?
原文概要
ECLUT通過EC模塊增大網絡感受野,提升超分效果,實現SRLUT的改進,主要是2個創新點:
- 提出了一個擴展卷積(expand Conv),跟RCLUT一樣,是一個用于低成本提升RF大小的模塊。
- 一個簡單有效的scaling方法來減小旋轉累計的量化誤差,該方法的計算成本基本可以忽略不計。
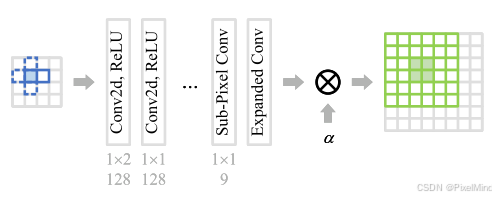
其網絡結構圖如下:
?
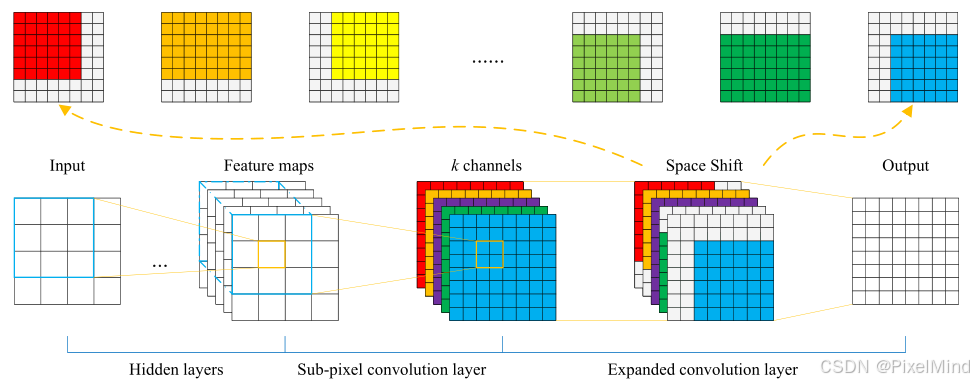
Expanded?Conv:
 ?
?
首先根據前面的講解,我們可以發現ECLUT是在SRLUT的基礎上進行的優化,ECLUT因為只使用了2個查詢點,因此LUT的size在全尺寸下也不會很大。作者是采用了1的間隔來實現ECLUT,所以精度是能夠得到保證的,流程就可以分為,訓練、轉表以及推理,忽略確保精度的微調步驟。
1. 訓練
代碼實現如下:
### A lightweight deep network ###
class SRNet(torch.nn.Module):def __init__(self, upscale=4):super(SRNet, self).__init__()self.upscale = upscaleself.conv1 = nn.Conv2d(1, 64, [2,1], stride=1, padding=0, dilation=1)self.conv2 = nn.Conv2d(64, 64, 1, stride=1, padding=0, dilation=1)self.conv3 = nn.Conv2d(64, 64, 1, stride=1, padding=0, dilation=1)self.conv4 = nn.Conv2d(64, 64, 1, stride=1, padding=0, dilation=1)self.conv5 = nn.Conv2d(64, 64, 1, stride=1, padding=0, dilation=1)self.conv6 = nn.Conv2d(64, 9*upscale*upscale, 1, stride=1, padding=0, dilation=1)self.pixel_shuffle = nn.PixelShuffle(upscale)self.expand_conv = ExpandConv()# Init weightsfor m in self.modules():classname = m.__class__.__name__if classname.lower().find('conv') != -1:nn.init.kaiming_normal(m.weight)nn.init.constant(m.bias, 0)elif classname.find('bn') != -1:m.weight.data.normal_(1.0, 0.02)m.bias.data.fill_(0)def forward(self, x_in, alpha):B, C, H, W = x_in.size()x_in = x_in.reshape(B*C, 1, H, W)x = self.conv1(x_in)x = self.conv2(F.relu(x))x = self.conv3(F.relu(x))x = self.conv4(F.relu(x))x = self.conv5(F.relu(x))x = self.conv6(F.relu(x))x = self.pixel_shuffle(x)x = self.expand_conv(x)x = x.reshape(B, C, self.upscale*(H-1), self.upscale*W)return x * alpha
根據前面的講解,ECLUT是在SRLUT的基礎上進行的優化,因此整體結構的實現博主采取了與SRLUT的代碼差不多的方式。不同之處在于:
1)ECLUT因為只使用了2個查詢點,因此首層的卷積kernel_size是2x1。
2)pixel_shuffle之前的通道多了9倍,因為需要進行我們講到的EC模塊,即expand_conv。
3)最后的alpha加權,減小量化誤差。
這里關于最重要的模塊expand_conv的實現如下:
class ExpandConv(torch.nn.Module):def __init__(self):super(ExpandConv, self).__init__()passdef forward(self, inputs):# b, 9, h*scale, w*scale# (0,0) -> (2, 2)# pad left right top bottomshift_x1 = F.pad(inputs[:, 0:1, 1:, 1:], (0,1,0,1), mode='reflect')shift_x2 = F.pad(inputs[:, 1:2, 1:, :], (0,0,0,1), mode='reflect')shift_x3 = F.pad(inputs[:, 2:3, 1:, :-1], (1,0,0,1), mode='reflect')shift_x4 = F.pad(inputs[:, 3:4, :, 1:], (0,1,0,0), mode='reflect')shift_x5 = inputs[:, 4:5, :, :]shift_x6 = F.pad(inputs[:, 5:6, :, :-1], (1,0,0,0), mode='reflect')shift_x7 = F.pad(inputs[:, 6:7, :-1, 1:], (0,1,1,0), mode='reflect')shift_x8 = F.pad(inputs[:, 7:8, :-1, :], (0,0,1,0), mode='reflect')shift_x9 = F.pad(inputs[:, 8:9, :-1, :-1], (1,0,1,0), mode='reflect')result = shift_x1 + shift_x2 + shift_x3 +\shift_x4 + shift_x5 + shift_x6 + shift_x7 + shift_x8 + shift_x9result /= 9return result對inputs進行9個方向的偏移,然后pad對應的長度使得其輸出大小不變,最后將他們相加進行一個融合,完成了這個EC模塊的計算過程。
2. 轉表
首先我們需要初始化一個2D的輸入。
def get_ec_lut(interval):# 1D inputbase = torch.arange(0, 257, interval) # 0-256base[-1] -= 1L = base.size(0)# 2D input# 256*256 0 0 0... |1 1 1... |...|255 255 255...first = base.cuda().unsqueeze(1).repeat(1, L).reshape(-1)# 256*256 0 1 2 .. 255|0 1 2 ... 255|...|0 1 2 ... 255second = base.cuda().repeat(L)onebytwo = torch.stack([first, second], 1) # [256*256, 2]# Rearange input: [N, 4] -> [N, C=1, H=2, W=2]input_tensor = onebytwo.unsqueeze(1).unsqueeze(1).reshape(-1, 1, 2, 1).float() / 255.0return input_tensor然后送入推理即可,因為ECLUT是通過對多輸出進行偏移得到更大的RF,因此這里就已經得到了最終所需要的LUT。
3. 測試
測試的部分,針對第一個卷積及其后面的1x1卷積部分,可以轉換為一個完全精度的2D LUT,這個查詢是不需要插值的,因此十分簡單,第二個是expand_conv,只需要我們將1.訓練中實現的torch版本改寫為numpy的版本即可,對于最后的alpha加權,使用加2再右移2位來實現。這個代碼的實現在ECLUT的講解中有提到。
以上針對于ECLUT代碼實現的部分講解完畢,如果有不清楚的問題歡迎大家提出。


4.8定時器QTimer 與QElapsedTimer:理論,例題的界面搭建,與功能的代碼實現。)


)
)