使用CNN實現簡單的貓狗分類
完整代碼見:基于Keras3.x使用CNN實現簡單的貓狗分類,置信度約為:85%
文章目錄
- 概述
- 項目整體目錄
- 環境版本
- 注意
- 環境準備
- 下載miniconda
- 新建虛擬環境
- 基于conda虛擬環境新建Pycharm項目
- 下載分類需要用到的依賴
- 數據準備
- 數據目錄結構
- 挪動圖片可以采用下列代碼
- config
- 準備訓練、測試數據集
- 構建模型
- 訓練模型
- 訓練過程
- 損失和準確度曲線
- 測試模型
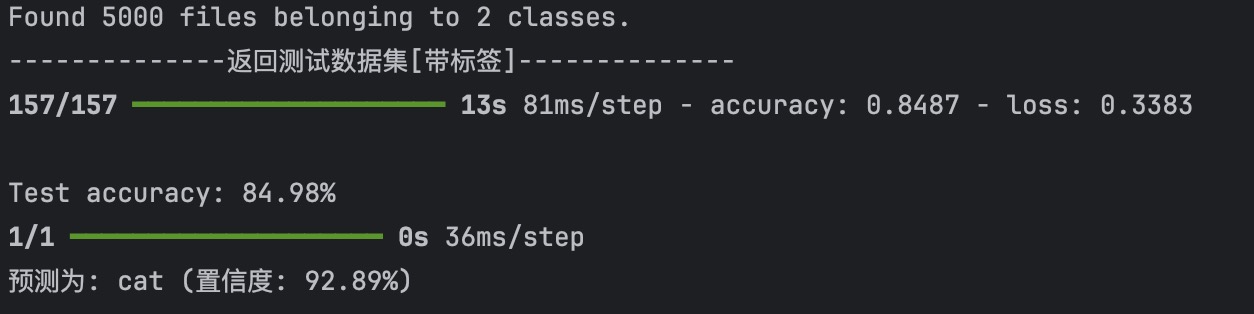
- 使用帶標簽的測試圖片評估整體準確率
- 定義模型類
- 預測單張圖片
- 將不帶標簽的測試圖片分類并存到對應目錄中
- 源碼
- 錯誤記錄
- 雙重歸一化問題
概述
項目整體目錄

- /data 存放數據集
- /model 存放訓練好的模型
- /config.py 存儲一些關鍵模型參數和路徑信息等
- /dataset.py 返回數據增強后的數據集,用于模型訓練
- /model.py 定義模型
- /train.py 訓練模型并繪制訓練損失和準確度曲線
- /test.py 測試模型精準度
環境版本
- python 3.11
- keras 3.9.2
- tensorflow 2.19.0
注意
本項目使用Keras3.x實現,代碼與keras 2.x有部分不同,請仔細甄別
環境準備
下載miniconda
如果沒有下載conda,參照上一篇文章進行下載配置
新建虛擬環境
創建一個用于貓狗識別的虛擬環境,可以指定py版本
conda create --name catanddog python=3.11
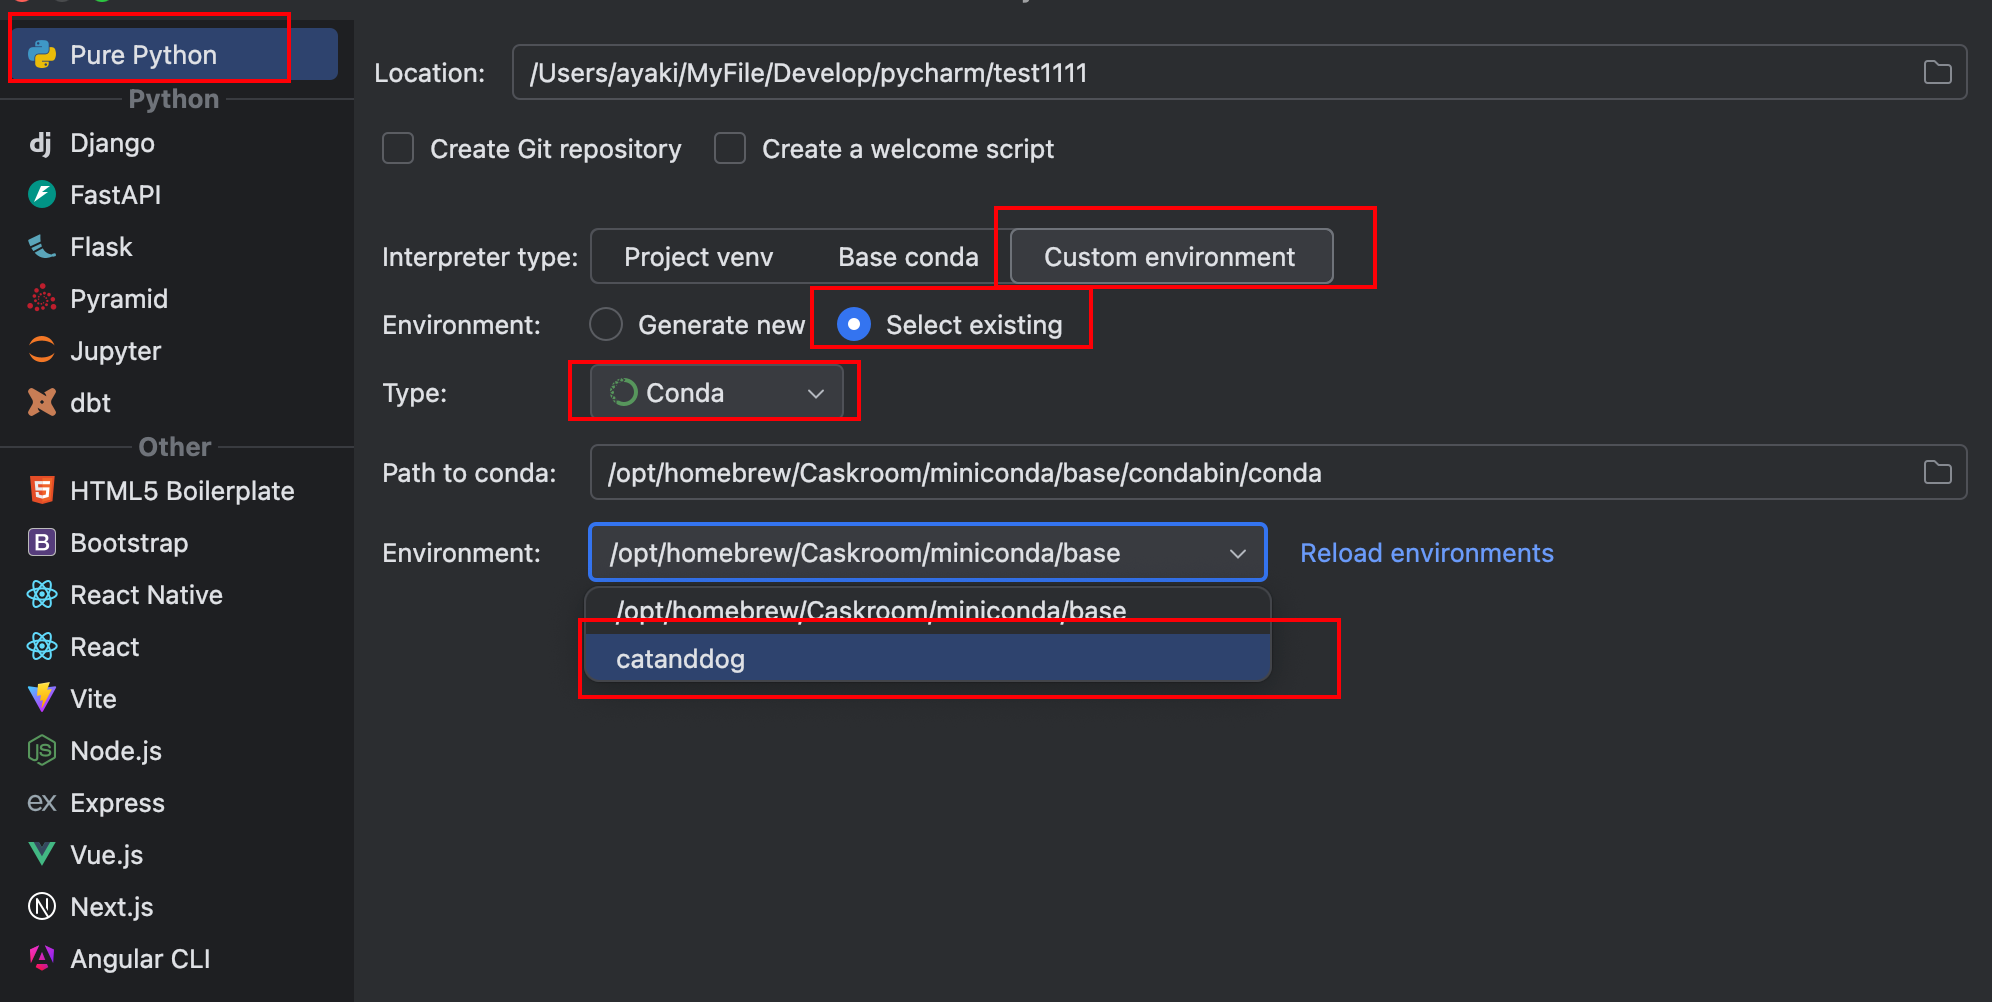
基于conda虛擬環境新建Pycharm項目
依次選擇菜單路徑:
File-NewProject-Pure Python
在彈出的窗口選擇:
- custom environment
- Select existing
- Type:conda
- 選擇剛剛新建的
catanddog虛擬環境
如圖:
下載分類需要用到的依賴
主要用到:keras3.9.2和tensorflow2.19.0
pip install keras
數據準備
從Kaggle上下載常用的貓狗分類數據集,下載下來后,有訓練數據(共25000張,貓狗各一半,帶標簽,命名示例:dog.0.jpg)和測試數據(共12500張,不帶標簽,命名示例:1.jgp)。
將訓練數據分為兩份,前20000張用于訓練數據,后5000張帶標簽的數據用于預測模型整體準確度。12500張測試數據可以用于單張圖片的模型預測,以及將貓狗分類后放入對應的目錄中,方便查看。
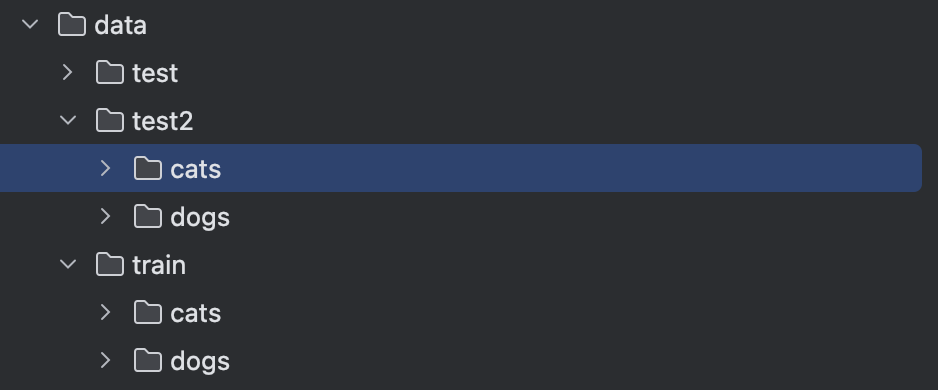
如圖組織數據:
- test為12500張不帶標簽的測試數據;
- test2為5000張帶標簽的測試數據;
- train為20000張訓練數據
數據目錄結構
注意:必須把訓練數據、test2圖片放在新建好的cats和dogs目錄下,模型才能自動推斷標簽
挪動圖片可以采用下列代碼
import os, shutil
# 將train_dir_tag_cat后2500張貓圖像移動到test2_dir_tag_cat
cats = ['cat.{}.jpg'.format(i) for i in range(1000)]
for cat in cats:src = os.path.join(train_dir_tag_cat, cat)dst = os.path.join(test2_dir_tag_cat, cat)shutil.move(src, dst)
config
config.py:用于存儲一些關鍵參數和路徑信息等。
訓練的batch為:32
訓練15個EPOCH
"""
@Author      :Ayaki Shi
@Date        :2025/4/18 11:03
@Description : 配置信息
"""
import os, shutildata_dir = './data'# 訓練集、測試集所在路徑
test_dir = os.path.join(data_dir, 'test')
test2_dir = os.path.join(data_dir, 'test2')
train_dir = os.path.join(data_dir, 'train')# 劃分標簽后的數據路徑
train_dir_tag_cat = os.path.join(train_dir, 'cats')
test_dir_tag_cat = os.path.join(test_dir, 'cats')
test2_dir_tag_cat = os.path.join(test2_dir, 'cats')train_dir_tag_dog = os.path.join(train_dir, 'dogs')
test_dir_tag_dog = os.path.join(test_dir, 'dogs')
test2_dir_tag_dog = os.path.join(test2_dir, 'dogs')# 訓練參數
IMG_SIZE = (256, 256)
BATCH_SIZE = 32
EPOCHS = 15# 模型路徑
MODEL_PATH = './model/CatAndDogClassifier.keras'
準備訓練、測試數據集
dataset.py
訓練數據經過數據增強后返回,用于測試模型整體準確度的test2無需數據增強直接返回。
注意: 這個方法ImageDataGenerator已經不推薦使用了,因此使用image_dataset_from_directory這個方法,可以根據目錄自動推斷標簽,只是數據增強稍微復雜了點
"""
@Author      :Ayaki Shi
@Date        :2025/4/18 11:02
@Description : 返回dataset
"""from keras.api.utils import image_dataset_from_directory
from config import train_dir,test2_dir, BATCH_SIZE,IMG_SIZE
from keras import layers, models
import tensorflow as tf# 數據增強
def create_augmentation_model():return models.Sequential([layers.RandomFlip("horizontal", seed=42),layers.RandomRotation(0.2, fill_mode='nearest', seed=42),layers.RandomZoom(0.2, fill_mode='nearest', seed=42),layers.RandomContrast(0.3, seed=42),layers.RandomTranslation(0.1, 0.1, fill_mode='nearest', seed=42),], name="data_augmentation")def create_train_dataset():train_dataset = image_dataset_from_directory(train_dir,label_mode = 'binary',batch_size = BATCH_SIZE,image_size = IMG_SIZE,shuffle=True,  # 必須啟用 shuffleseed=42)# 創建預處理模型augmentation_model = create_augmentation_model()# 定義預處理函數def preprocess_train(image, label):image = augmentation_model(image, training=True)  # 訓練模式激活增強return image, labeltrain_dataset = train_dataset.map(preprocess_train,num_parallel_calls= tf.data.AUTOTUNE)print('--------------返回增強后的訓練數據集--------------')return train_dataset.prefetch(buffer_size=tf.data.AUTOTUNE)def create_test2_dataset():test2_dataset = image_dataset_from_directory(test2_dir,label_mode = 'binary',batch_size = BATCH_SIZE,image_size = IMG_SIZE,shuffle=False)print('--------------返回測試數據集[帶標簽]--------------')return test2_dataset
構建模型
model.py 模型結構:
- 輸入層:指定輸入數據形狀
- 數據歸一化
- 四層卷積層和四層池化層交替
- 展平層:將輸出的多維特征圖展平為一維向量
- Dropout防止過擬合
- 兩個全連接層,用于特征提取和最終分類
"""
@Author      :Ayaki Shi
@Date        :2025/4/18 11:02
@Description : 創建模型
"""
from keras import layers, models, optimizersfrom config import IMG_SIZEdef create_model():model = models.Sequential([# 輸入層:指定輸入數據形狀layers.Input(shape=(*IMG_SIZE, 3)),layers.Rescaling(1./255),  # 歸一化到 [0,1]# 四層卷積層和四層池化層layers.Conv2D(32, (3, 3), activation='relu'),layers.MaxPooling2D(2, 2),layers.Conv2D(64, (3, 3), activation='relu'),layers.MaxPooling2D(2, 2),layers.Conv2D(128, (3, 3), activation='relu'),layers.MaxPooling2D(2, 2),layers.Conv2D(128, (3, 3), activation='relu'),layers.MaxPooling2D(2, 2),# 展平層:將輸出的多維特征圖展平為一維向量layers.Flatten(),# 防止過擬合layers.Dropout(0.5),# 兩個全連接層,用于特征提取和最終分類layers.Dense(512, activation='relu'),layers.Dense(1, activation='sigmoid')])# 編譯模型model.compile(loss='binary_crossentropy',  # 損失函數optimizer= optimizers.Adam(learning_rate=1e-4), # 優化器metrics=['accuracy']) # 評估標準:準確率print('--------------構建模型成功--------------')return model
訓練模型
train.py
獲取數據集-創建模型-訓練模型-保存模型-繪制損失和準確度曲線
"""
@Author :Ayaki Shi
@Date :2025/4/18 16:08
@Description : 訓練模型
"""from dataset import create_train_dataset
from model import create_model
from config import EPOCHS, BATCH_SIZE, MODEL_PATH
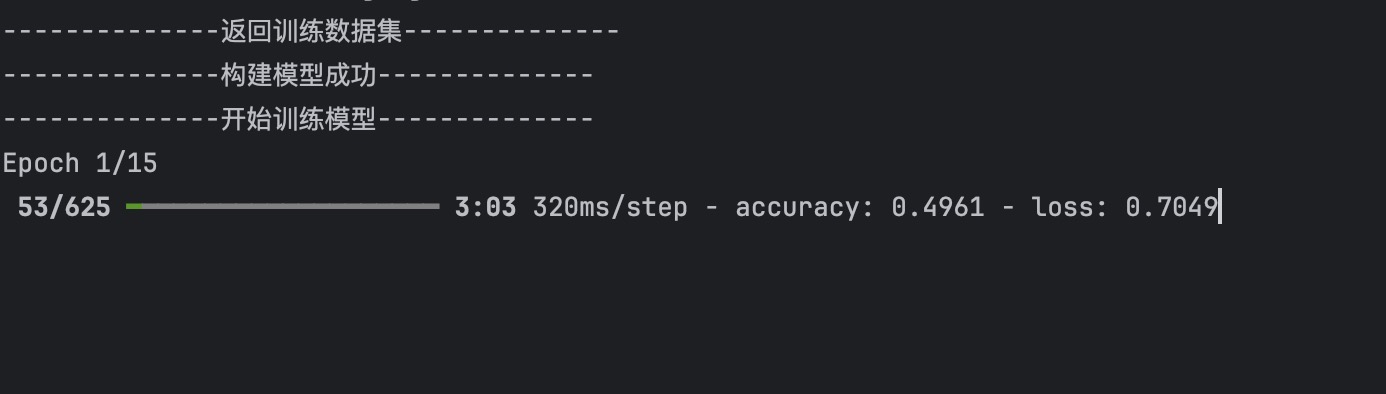
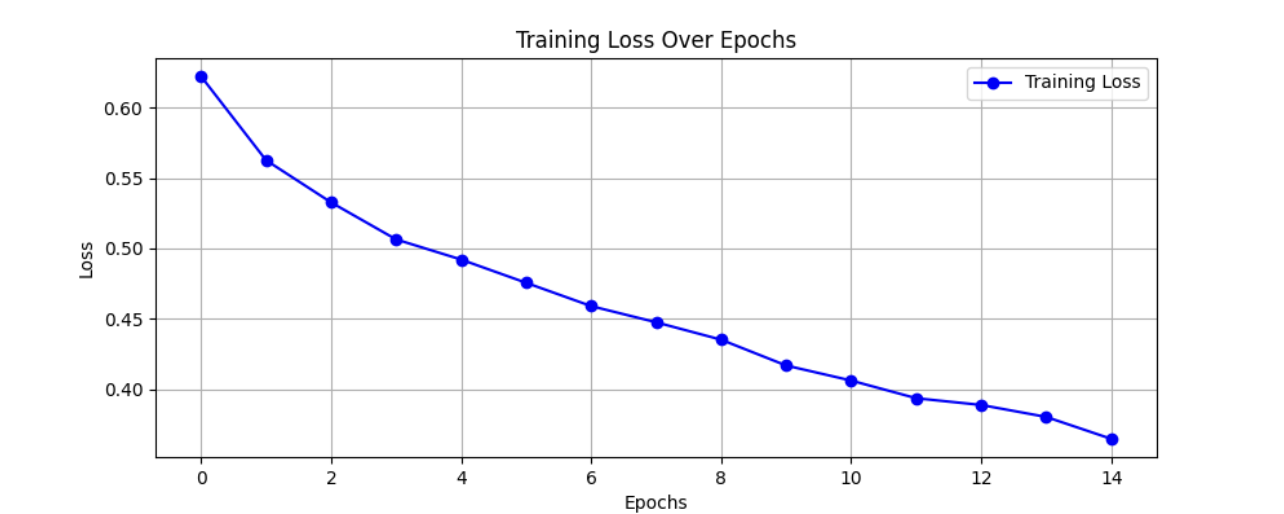
import matplotlib.pyplot as pltdef train_model():# 獲取datasettrain_dataset = create_train_dataset()# 生成模型model = create_model()# 訓練模型print('--------------開始訓練模型--------------')history = model.fit(train_dataset,epochs = EPOCHS,batch_size = BATCH_SIZE)# 保存模型print('--------------開始保存模型--------------')model.save(MODEL_PATH)print('--------------開始繪制損失和準確性曲線--------------')# 繪制訓練損失曲線plt.figure(figsize=(10, 4))plt.plot(history.history['loss'], label='Training Loss', color='blue', marker='o')plt.title('Training Loss Over Epochs')plt.xlabel('Epochs')plt.ylabel('Loss')plt.legend()plt.grid(True)plt.show()# 繪制訓練準確率曲線plt.figure(figsize=(10, 4))plt.plot(history.history['accuracy'], label='Training Accuracy', color='green', marker='s')plt.title('Training Accuracy Over Epochs')plt.xlabel('Epochs')plt.ylabel('Accuracy')plt.legend()plt.grid(True)plt.show()if __name__ == '__main__':train_model()
訓練過程
損失和準確度曲線

測試模型
test.py
使用帶標簽的測試圖片評估整體準確率
代碼見后面,可以看到整體準確度為85%左右
定義模型類
代碼見后面
預測單張圖片
代碼見后面,預測為狗的概率是73%。

將不帶標簽的測試圖片分類并存到對應目錄中
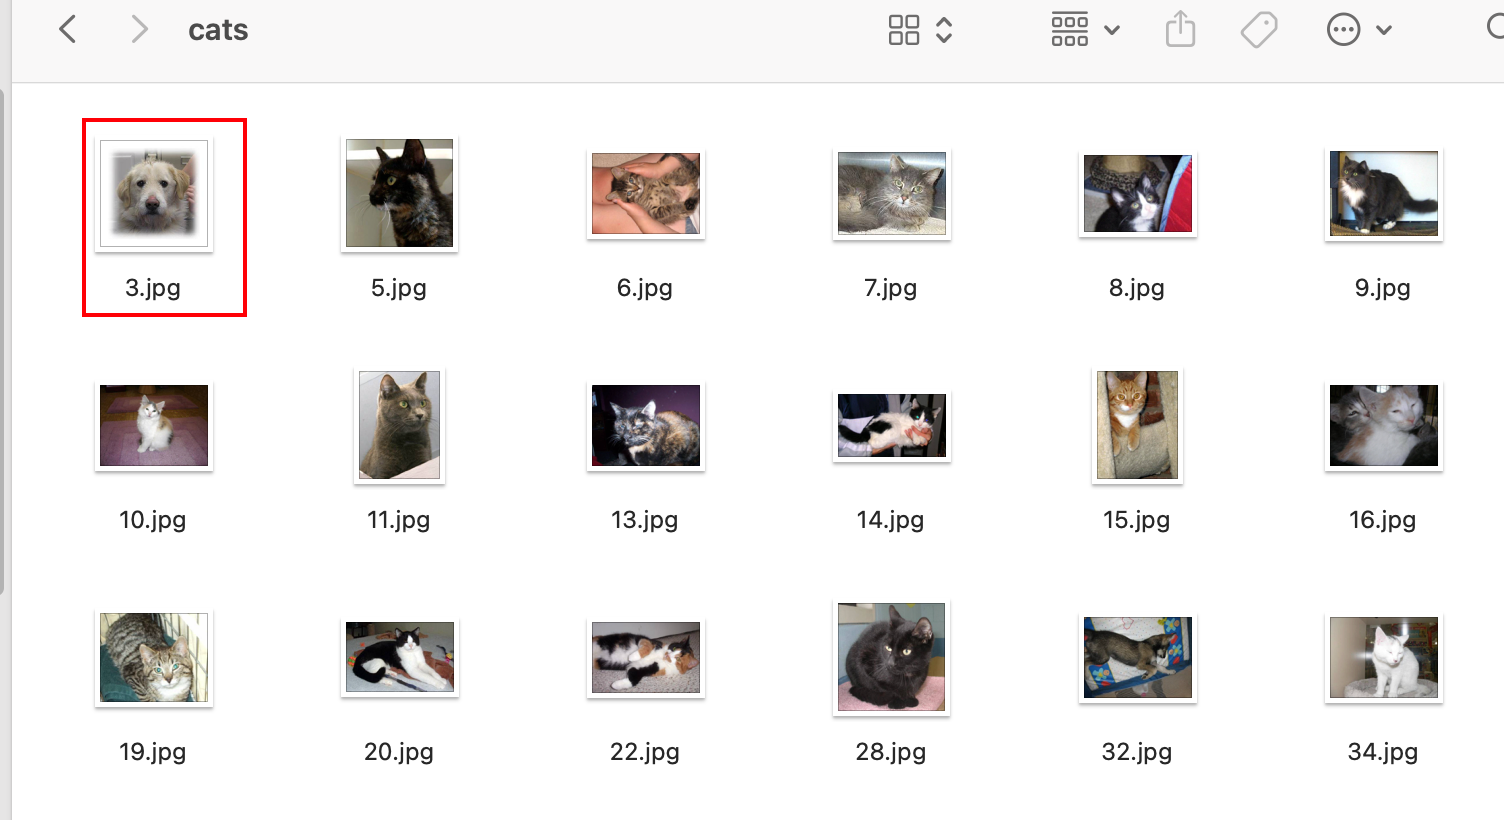
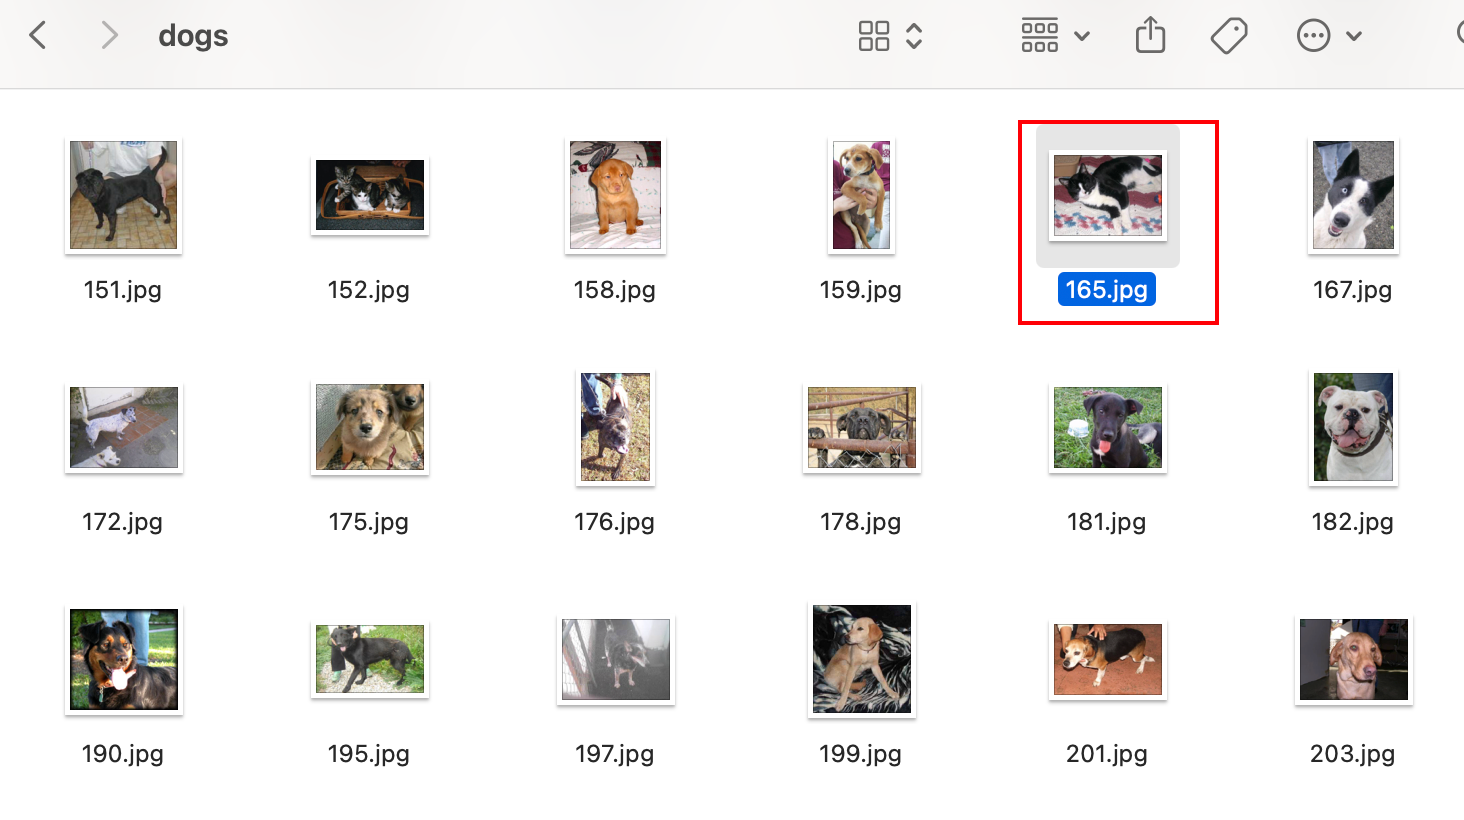
代碼見后面,可以看到大部分測試圖片都被放到了正確的目錄里,但是也有少數錯的
源碼
from keras import models
import numpy as np
import os, shutil
from keras_preprocessing import image
from config import MODEL_PATH,IMG_SIZE,test_dir,test_dir_tag_cat,test_dir_tag_dogDOG_TAG_STR = 'dog'
CAT_TAG_STR = 'cat'
NUM_IMAGES = 12500             # 測試圖片數class CatAndDogClassifier:def __init__(self):self.model = models.load_model(MODEL_PATH)print("模型加載成功!")def predict_single_image(self, img_path):img = image.load_img(img_path, target_size=IMG_SIZE)img_array = image.img_to_array(img)# 錯誤代碼:雙重歸一化# img_array = np.expand_dims(img_array, axis=0) / 255.0img_array = np.expand_dims(img_array, axis=0)prediction = self.model.predict(img_array)[0][0]print(prediction)return DOG_TAG_STR if prediction > 0.5 else CAT_TAG_STR, predictiondef classify_all_images(self):# 遍歷所有圖片# for i in range(1, NUM_IMAGES + 1):filename = ''for i in range(1, NUM_IMAGES + 1):try:#(文件名為1.jpg到12500.jpg)filename = f"{i}.jpg"src_path = os.path.join(test_dir, filename)# 跳過不存在的文件if not os.path.exists(src_path):print(f"Warning: {filename} 不存在,已跳過")continue# 進行預測label, confidence = self.predict_single_image(src_path)# 確定目標目錄dest_dir = test_dir_tag_dog if label == DOG_TAG_STR else test_dir_tag_catdest_path = os.path.join(dest_dir, filename)# 移動文件shutil.move(src_path, dest_path)if i%500 == 0: # 打印12500行太多了,每500行打印一次print(f"[{i}/12500] {filename} -> {dest_dir} (置信度: {confidence:.2%})")except Exception as e:print(f"處理 {filename} 時發生錯誤: {str(e)}")continuedef evaluate_model():from dataset import create_test2_datasettest2_dataset = create_test2_dataset()model = models.load_model(MODEL_PATH)loss, acc = model.evaluate(test2_dataset)print(f'\nTest accuracy: {acc:.2%}')if __name__ == '__main__':# 初始化分類器classifier = CatAndDogClassifier()# # 評估整體準確率# evaluate_model()# # 單張圖片預測# img_path = os.path.join('./data/train/dogs/dog.100.jpg')# label, prob = classifier.predict_single_image(img_path)# print(f'預測為: {label} (置信度: {prob if label == DOG_TAG_STR else 1 - prob:.2%})')# 將不帶標簽的測試圖片分類放入不同的文件夾classifier.classify_all_images()
錯誤記錄
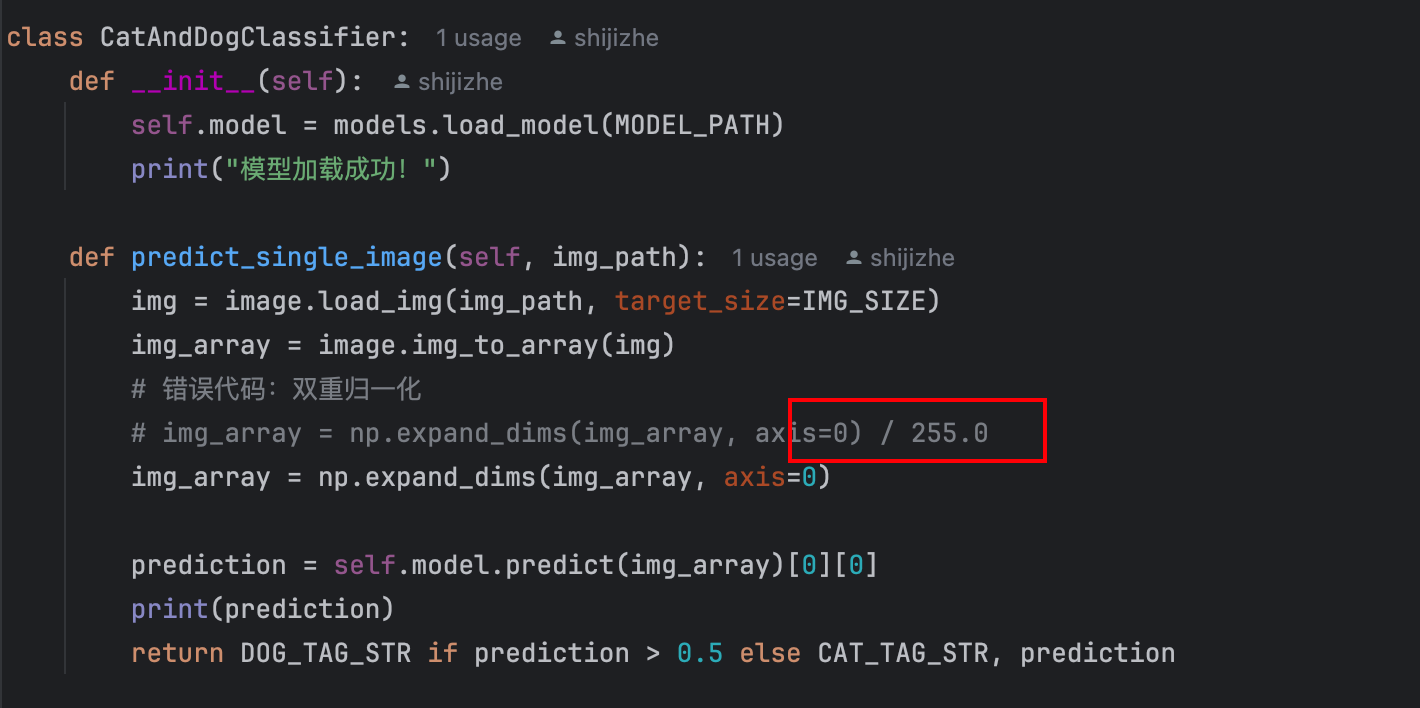
雙重歸一化問題
在預測單張圖片過程中,出現了不管什么圖片,預測度總是特別低,只有7%左右

首先預測結果不對第一時間考慮到是不是模型欠擬合或者過擬合的問題。
但是基于以下兩個原因:
- 首先訓練過程中記錄的準確度和測試整體準確率都是85%,說明模型大概率是沒有問題的
- 其次這個置信度已經低的離譜了
所以考慮是在測試單張圖片對圖片處理出現了問題,經過排查,發現問題出在了,我在對單張圖片進行了歸一化,然后模型中又進行了一次歸一化,導致預測置信度極低。
test.py


框架深度解析)
——循環神經網絡詳解)
)


:攝入 MongoDB 數據)

等級考試試卷-理論綜合)


