GRU
GRU簡介
門控循環神經網絡 (Gated Recurrent Neural Network,GRNN) 的提出,旨在更好地捕捉時間序列中時間步距離較大的依賴關系。它通過可學習的門來控制信息的流動。其中,門控循環單元 (Gated Recurrent Unit , GRU) 是一種常用的 GRNN 。 GRU 對 LSTM 做了很多簡化,同時卻保持著和 LSTM 相同的效果。
GRU的原理
GRU 的兩個重大改進
- 將三個門:輸入門、遺忘門、輸出門變為兩個門:更新門 (Update Gate) 和 重置門 (Reset Gate)。
- 將 (候選) 單元狀態 與 隱藏狀態 (輸出) 合并,即只有 當前時刻候選隱藏狀態 和 當前時刻隱藏狀態 。
模型結構
簡化圖

內部結構圖

- ?
:當前時刻輸入信息
:上一時刻的隱藏狀態。隱藏狀態充當了神經網絡記憶,它包含了之前節點所見過的數據的信息
:傳遞下一時刻的隱藏狀態
:候選隱藏狀態
:重置門
:更新門
:sigmoid函數,通過這個函數可以將數據變為0-1范圍內的數值
:tanh函數,通過這個函數可以將數據變為[-1,1]范圍內的數值
、
和w是W是模型參數(權重矩陣),需要通過訓練數據來學習
- GRU通過其他門控制機制能夠有效的捕捉到序列數據中的時間動態,同時相較于LSTM來說,由于起結構更加簡潔,通常參數更少,計算效率更高
重置門
重置門決定在計算當前候選隱藏狀態時,忽略多少過去的信息

更新門
更新門決定了多少過去的信息將被保留,它使用前一時間步的隱藏狀態()和當前輸入(
)來計算得出

候選隱藏狀態
候選隱藏狀態是當前時間步的建議更新,它包含了當前輸入和過去的隱藏狀態的信息,重置門的作用體現在它可以允許模型拋棄或保留之前的隱藏狀態。

?最終隱藏狀態
最終隱藏狀態是通過融合過去的隱藏狀態和當前大的隱藏狀態來計算得出的,更新門控制了融合過去信息和當前信息的比列

代碼實現
原生代碼
import numpy as np
class GRU:def __init__(self, input_size, hidden_size):# # gru_model = GRU(10, 5)self.input_size = input_size # 10self.hidden_size = hidden_size # 5# hidden_size 是隱藏層的大小# input_size + hidden_size 當前時刻xt的維度+上一個時刻隱藏層的大小# (5, 15)self.W_z = np.random.randn(hidden_size, input_size + hidden_size)# (5)self.b_z = np.zeros((hidden_size, ))# (5, 15)self.W_r = np.random.randn(hidden_size, input_size + hidden_size)# (5)self.b_r = np.zeros((hidden_size, ))# (5, 15)self.W_h = np.random.randn(hidden_size, input_size + hidden_size)# (5)self.b_h = np.zeros((hidden_size, ))def sigmoid(self, x):return 1 / (1 + np.exp(-x))def tanh(self, x):return np.tanh(x)def forward(self, x):# print("Input shape:", x.shape)# Input shape: (10,)h_prev = np.zeros((hidden_size, )) #(5,)concat_input = np.concatenate((h_prev, x), axis=0) # (15,)z_t = self.sigmoid(np.dot(self.W_z, concat_input) + self.b_z) # (5,)r_t = self.sigmoid(np.dot(self.W_r, concat_input) + self.b_r) # (5,)# s = r_t * h_prev# print(r_t.shape) # (5,)# print(s.shape) # (5,)concat_reset_input = np.concatenate((r_t * h_prev, x), axis=0) # (15,)h_candidate = self.tanh(np.dot(self.W_h, concat_reset_input) + self.b_h) # (5,)h_t = (1 - z_t) * h_prev + z_t * h_candidate # (5,)return h_t
# 測試原生代碼實現的 GRU
input_size = 10
hidden_size = 5
seq_len = 8
# gru_model = GRU(10, 5)
gru_model = GRU(input_size, hidden_size)
x = np.random.randn(seq_len, input_size)
# print("Input shape:", x.shape) # (8, 10)
all_out = []
for t in range(seq_len): # 8x_t = x[t,:] # 確保 x_t 形狀為 (input_size, 1) # print("Input shape:", x_t.shape) # Input shape: (10,)h_t = gru_model.forward(x_t)all_out.append(h_t)
print("Output shape:", h_t.shape)
print("All output:", np.array(all_out).shape)
PyTorch
nn.GRUCell
import torch
import torch.nn as nn
class GRU(nn.Module):def __init__(self, input_size, hidden_size):super(GRU, self).__init__()self.hidden_size = hidden_size # 5# (10, 5)self.gru_cell = nn.GRUCell(input_size, hidden_size)def forward(self, x, h_prev):# h_t = self.gru_cell(x, h_prev) 返回的是當前時間步 t 的隱藏狀態 h_th_t = self.gru_cell(x, h_prev)return h_t
# 測試 PyTorch 實現的 GRU
input_size = 10
hidden_size = 5
timesteps = 8
# gru_model = GRU(10, 5)
gru_model = GRU(input_size, hidden_size)
x = torch.randn(timesteps, input_size) # (8, 10)
h_prev = torch.zeros(hidden_size) # (5,)
for t in range(timesteps):# (1,10) (5,1)h_t = gru_model(x[t], h_prev)print("Output shape:", h_t.shape)
nn.GRU
import torch
import torch.nn as nn
class GRUModel(nn.Module):def __init__(self, input_size, hidden_size):super(GRUModel, self).__init__()self.hidden_size = hidden_size # 5self.gru = nn.GRU(input_size, hidden_size, batch_first=True)def forward(self, x):# # (1, 8, 10) [batch_size, timesteps, input_size]# 前向傳播output, h_n = self.gru(x)return output, h_n
# 測試 PyTorch 實現的 GRU
input_size = 10
hidden_size = 5
timesteps = 8 # seq_len
batch_size = 1 # 設置批次大小為 1
# gru_model = GRUModel(10, 5)
gru_model = GRUModel(input_size, hidden_size)
# (1, 8, 10) [batch_size, timesteps, input_size]
x = torch.randn(batch_size, timesteps, input_size) # 輸入張量的形狀為 (batch_size,seq_len, input_size)
output, h_n = gru_model(x)
#  Output shape: torch.Size([1, 8, 5])
print("Output shape:", output.shape) # 輸出形狀為 (batch_size, seq_len,hidden_size)
# Final hidden state shape: torch.Size([1, 1, 5])
print("Final hidden state shape:", h_n.shape) # 最終隱藏狀態的形狀為 (num_layers,batch_size, hidden_size)
(1)output(
- 形狀為 (batch_size, sequence_length, hidden_size) 。
- 這是一個完整的模型中的一個循環網絡層,所以最后的輸出不涉及分類數,而是隱藏層
- 這個張量包含了 GRU 對每個時間步的輸出,也就是每個時間步的隱藏狀態。對于每個時間步 t , GRU 會輸出一個對應的隱藏狀態。
- 如果 batch_first=True (如在代碼中設置的那樣),則 output 的第一個維度是批次大小batch_size ,第二個維度是序列長度 sequence_length ,第三個維度是隱藏層的大小 hidden_size 。
(2)h_n
- 形狀為 (num_layers * num_directions, batch_size, hidden_size) 。
- 這是 GRU 在最后一個時間步的隱藏狀態。它只保留每個樣本在整個序列中最后一個時間步的隱藏狀態。
- 如果是單向 GRU , num_directions=1 ;如果是雙向 GRU (即 bidirectional=True ),num_directions=2 。
BiLSTM
概述
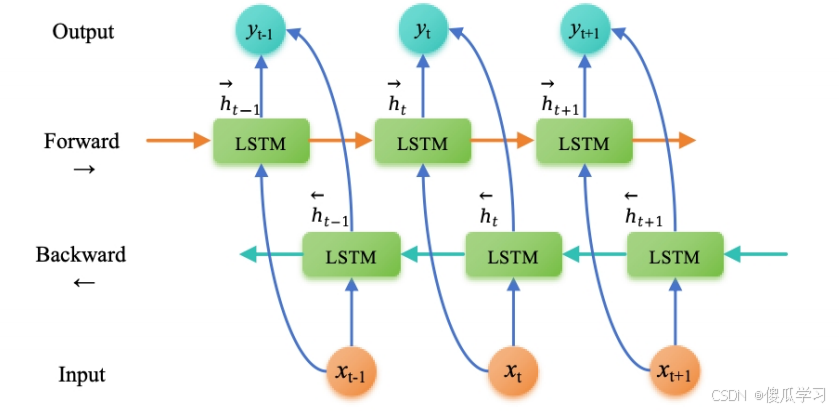
雙向長短期記憶網絡(Bi-directional Long Short-Term Memory,BiLSTM )是一種擴展自長短期記憶網絡(LSTM )的結構,旨在解決傳統 LSTM 模型只能考慮到過去信息的問題。 BiLSTM 在每個時間步同時考慮了過去和未來的信息,從而更好地捕捉了序列數據中的雙向上下文關系。
BiLSTM 的創新點在于引入了兩個獨立的 LSTM 層,一個按正向順序處理輸入序列,另一個按逆向順序 處理輸入序列。這樣,每個時間步的輸出就包含了當前時間步之前和之后的信息,進而使得模型能夠更好地理解序列數據中的語義和上下文關系。
- 正向傳遞: 輸入序列按照時間順序被輸入到第一個LSTM層。每個時間步的輸出都會被計算并保留下來。
- 反向傳遞 : 輸入序列按照時間的逆序(即先輸入最后一個元素)被輸入到第二個 LSTM 層。與正向傳遞類似,每個時間步的輸出都會被計算并保留下來。
- 合并輸出 : 在每個時間步,將兩個 LSTM 層的輸出通過某種方式合并(如拼接或加和)以得到最終的輸出。
BILSTM模型應用背景
命名體識別

標注集
BMES標注集
分詞的標注集并非只有一種,舉例中文分詞的情況,漢子作為詞語開始 Begin,結束End,中間Middle, 單字Single ,這四種情況就可以囊括所有的分詞情況。于是就有了 BMES 標注集,這樣的標注集在命名實體識別任務中也非常常見。

詞性標注
在序列標注問題中單詞序列就是 x,詞性序列就是y ,當前詞詞性的判定需要綜合考慮前后單詞的詞性。 而標注集最著名的就是863 標注集和北大標注集。

代碼實現
原生代碼
import numpy as np
import torch
class BiLSTM:# # bilstm = BiLSTM(2, 3, 4)def __init__(self, input_size, hidden_size, output_size):self.input_size = input_size # 2self.hidden_size = hidden_size #3self.output_size = output_size #4# 正向 LSTM 參數# self.forward_lstm = LSTM(2, 3, 4)self.forward_lstm = LSTM(input_size, hidden_size, output_size)# 反向 LSTM 參數self.backward_lstm = LSTM(input_size, hidden_size, output_size)def forward(self, inputs):# 正向 LSTM 傳播forward_outputs, _, _ = self.forward_lstm.forward(inputs)# 反向 LSTM 傳播# np.flip(inputs, axis=0) 是用來翻轉 inputs 數組的第一維(即時間步維度)backward_outputs, _, _ = self.backward_lstm.forward(np.flip(inputs,axis=0))# 合并正向和反向的輸出# x1 = [f1, f2, f3]# x2 = [b1, b2, b3]# zip() 的結果是 [(f1, b1), (f2, b2), (f3, b3)]combined_outputs = [np.concatenate((f, b), axis=0) for f, b in zip(forward_outputs, np.flip(backward_outputs, axis=0))]return combined_outputsclass LSTM:def __init__(self, input_size, hidden_size, output_size):""":param input_size: 詞向量大小:param hidden_size: 隱藏層大小:param output_size: 輸出類別"""self.input_size = input_size #2self.hidden_size = hidden_size #3self.output_size = output_size #4# 初始化權重和偏置# (3, 5)self.w_f = np.random.rand(hidden_size, input_size + hidden_size)# (3,)self.b_f = np.random.rand(hidden_size)# (3, 5)self.w_i = np.random.rand(hidden_size, input_size + hidden_size)# (3,)self.b_i = np.random.rand(hidden_size)# (3, 5)self.w_c = np.random.rand(hidden_size, input_size + hidden_size)# (3,)self.b_c = np.random.rand(hidden_size)# (3, 5)self.w_o = np.random.rand(hidden_size, input_size + hidden_size)# (3,)self.b_o = np.random.rand(hidden_size)# (4, 3)# 輸出層self.w_y = np.random.rand(output_size, hidden_size)# (4,)self.b_y = np.random.rand(output_size)def tanh(self, x):return np.tanh(x)def sigmoid(self, x):return 1 / (1 + np.exp(-x))def forward(self, x):# (5, 2)h_t = np.zeros((self.hidden_size,)) # 初始隱藏狀態 (3,1)c_t = np.zeros((self.hidden_size,)) # 初始細胞狀態 (3,1)h_states = [] # 存儲每個時間步的隱藏狀態c_states = [] # 存儲每個時間步的細胞狀態for t in range(x.shape[0]): # 5x_t = x[t] # 當前時間步的輸入# concatenate 將x_t和h_t拼接 垂直方向x_t = np.concatenate([x_t, h_t]) # (5,)# 遺忘門f_t = self.sigmoid(np.dot(self.w_f, x_t) + self.b_f) # (3, 5)*(5,)=>(3,)+(3,)=>(3,)# 輸入門i_t = self.sigmoid(np.dot(self.w_i, x_t) + self.b_i) # (3, 5)*(5,)=>(3,)+(3,)=>(3,)# 候選細胞狀態c_hat_t = self.tanh(np.dot(self.w_c, x_t) + self.b_c) # (3, 5)*(5,)=>(3,)+(3,)=>(3,)# 更新細胞狀態c_t = f_t * c_t + i_t * c_hat_t # (3,)*(3,)+(3,)*(3,)=>(3,)# 輸出門o_t = self.sigmoid(np.dot(self.w_o, x_t) + self.b_o) # (3, 5)*(5,)=>(3,)+(3,)=>(3,)# 更新隱藏狀態h_t = o_t * self.tanh(c_t) # (3,)*(3,)=>(3,)# 保存每個時間步的隱藏狀態和細胞狀態h_states.append(h_t) #(5,3)c_states.append(c_t) # (5,3)# 輸出層 對最后一個時間步的隱藏狀態進行預測,分類類別y_t = np.dot(self.w_y, h_t) + self.b_y # (4, 3)*(3,)=>(4,)+(4,)=>(4,)   # 轉成張量形式 dim 0 表示行的維度output = torch.softmax(torch.tensor(y_t), dim=0) # (4,)# 轉換為 NumPy 數組return np.array(h_states), np.array(c_states), output# 測試用例
input_size = 2
hidden_size = 3
output_size = 4
# bilstm = BiLSTM(2, 3, 4)
bilstm = BiLSTM(input_size, hidden_size, output_size)
# 輸入序列
inputs = np.random.rand(5, 2)
# 前向傳播
outputs = bilstm.forward(inputs)
# Outputs after one forward pass: (5, 6)
print("Outputs after one forward pass:", np.array(outputs).shape)
Pytorch
import torch
import torch.nn as nn
# 定義BiLSTM類
class BiLSTM(nn.Module):# # bilstm = BiLSTM(10, 6, 5)def __init__(self, input_dim, hidden_dim, output_dim):super(BiLSTM, self).__init__()# 初始化雙向LSTM層,輸入維度input_dim,隱藏層維度hidden_dim,雙向設為Trueself.lstm = nn.LSTM(input_size=input_dim, hidden_size=hidden_dim,bidirectional=True)# 初始化線性層,因為是雙向的,所以輸入維度是2倍的hidden_dim,輸出維度是output_dimself.linear = nn.Linear(hidden_dim * 2, output_dim)def forward(self, input_seq):# 創建一個測試輸入張量,形狀為(seq_len, batch_size, input_dim)# test_input = torch.randn(3, 1, 10)# 通過雙向LSTM層處理輸入序列# lstm_out時間步的隱藏狀態輸出lstm_out, _ = self.lstm(input_seq)# torch.Size([3, 1, 12])# print(lstm_out.shape)# lstm_out[-1] 通常指的是從LSTM模型獲取的輸出序列中的最后一個元素。# torch.Size([1, 12])# print(lstm_out[-1].shape)# 將雙向LSTM層的最后一步的輸出通過線性層獲得最終輸出final_output = self.linear(lstm_out[-1])return final_output
# 測試案例
# 輸入維度
input_dim = 10 # 輸入向量的維度
hidden_dim = 6 # 隱藏層的維度
output_dim = 5 # 輸出向量的維度
seq_len = 3 # 輸入序列的長度
# 實例化BiLSTM
# bilstm = BiLSTM(10, 6, 5)
bilstm = BiLSTM(input_dim, hidden_dim, output_dim)
# 創建一個測試輸入張量,形狀為(seq_len, batch_size, input_dim)
# 這里假設batch_size為1
# test_input = torch.randn(3, 1, 10)
test_input = torch.randn(seq_len, 1, input_dim)
# 獲得BiLSTM的輸出
test_output = bilstm(test_input)
print(test_output)


)

![[2025年最新]2024.3版本idea無法安裝插件問題解決](http://pic.xiahunao.cn/[2025年最新]2024.3版本idea無法安裝插件問題解決)

