文章目錄
- 基于 配置類 方式管理 Bean
- 一、 配置類和掃描注解
- 二、@Bean定義組件
- 三、高級特性:@Bean注解細節
- 四、高級特性:@Import擴展
- 五、基于注解+配置類方式整合三層架構組件
- 總結
基于 配置類 方式管理 Bean
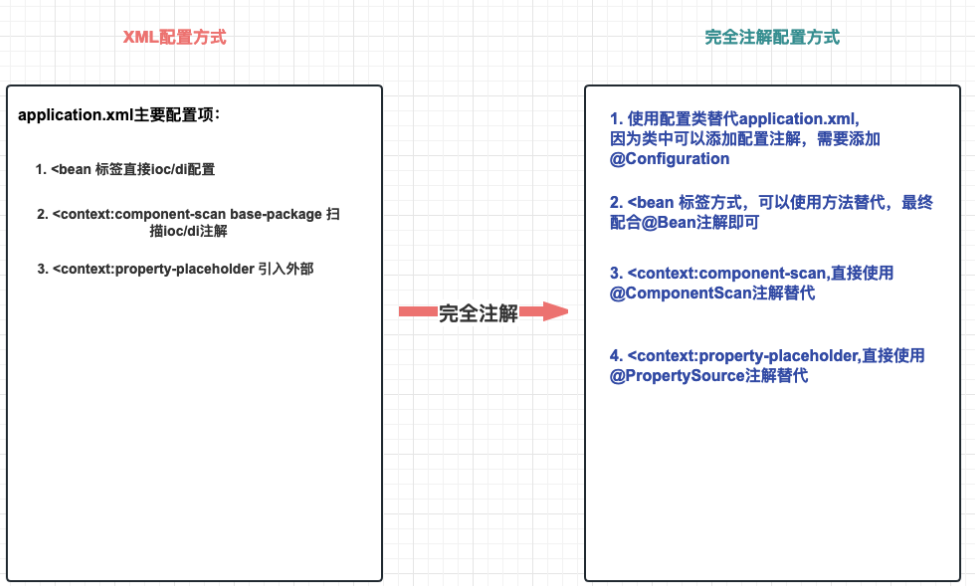
- Spring 完全注解配置(Fully Annotation-based Configuration)是指通過 Java配置類 代碼來配置 Spring 應用程序,使用注解來替代原本在 XML 配置文件中的配置。
- 相對于 XML 配置,完全注解配置具有更強的類型安全性和更好的可讀性。
從 xml 到 完全注解 配置!
一、 配置類和掃描注解
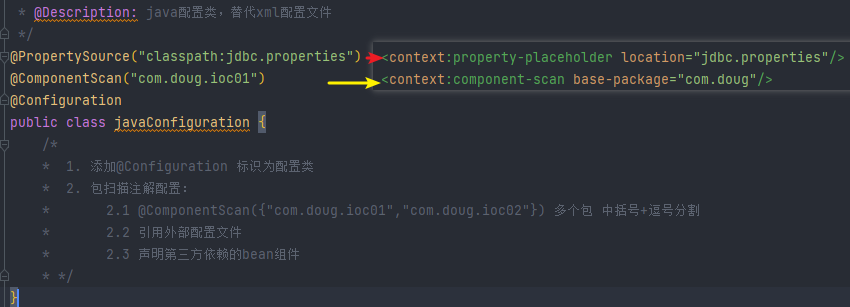
//使用注解讀取外部配置,替代 <context:property-placeholder標簽
@PropertySource("classpath:jdbc.properties")
//使用@ComponentScan注解,可以配置掃描包,替代<context:component-scan標簽
@ComponentScan("com.doug.ioc01")
//標注當前類是配置類,替代application.xml
@Configuration
public class javaConfiguration {/**  1. 添加@Configuration 標識為配置類*  2. 包掃描注解配置:*       2.1 @ComponentScan({"com.doug.ioc01","com.doug.ioc02"}) 多個包 中括號+逗號分割*       2.2 引用外部配置文件  *       2.3 聲明第三方依賴的bean組件* */
}
測試:
@Testpublic void testIoc_01(){// AnnotationConfigApplicationContext 根據配置類創建 IOC 容器對象AnnotationConfigApplicationContext context = new AnnotationConfigApplicationContext(javaConfiguration.class);StuController bean = context.getBean(StuController.class);bean.show();}
也可以使用 no-arg 構造函數實例化 AnnotationConfigApplicationContext ,然后使用 register() 方法對其進行配置。
// AnnotationConfigApplicationContext-IOC容器對象
ApplicationContext iocContainerAnnotation =
new AnnotationConfigApplicationContext();
//外部設置配置類
iocContainerAnnotation.register(MyConfiguration.class);
//刷新后方可生效!!
iocContainerAnnotation.refresh();
- @Configuration指定一個類為配置類,可以添加配置注解,替代配置xml文件
- @ComponentScan(basePackages = {“包”,“包”}) 替代<context:component-scan標簽實現注解掃描
- @PropertySource(“classpath:配置文件地址”) 替代 <context:property-placeholder標簽
- 配合IoC/DI注解,可以進行完整注解開發!
二、@Bean定義組件
屬性只在當前方法使用,直接寫成形參
//標注當前類是配置類,替代application.xml
@Configuration
//引入jdbc.properties文件
@PropertySource({"classpath:application.properties","classpath:jdbc.properties"})
@ComponentScan(basePackages = {"com.doug.components"})
public class MyConfiguration {//如果第三方類進行IoC管理,無法直接使用@Component相關注解//解決方案: xml方式可以使用<bean標簽//解決方案: 配置類方式,可以使用方法返回值+@Bean注解@Beanpublic DataSource createDataSource(@Value("${jdbc.user}") String username,@Value("${jdbc.password}")String password,@Value("${jdbc.url}")String url,@Value("${jdbc.driver}")String driverClassName){//使用Java代碼實例化DruidDataSource dataSource = new DruidDataSource();dataSource.setUsername(username);dataSource.setPassword(password);dataSource.setUrl(url);dataSource.setDriverClassName(driverClassName);//返回結果即可return dataSource;}
}
三、高級特性:@Bean注解細節
/** @Bean會真正讓配置類的方法創建的組件存儲到IOC容器** 1. beanName* 默認:方法名* 指定:name/value 屬性起名字,覆蓋方法名** 2. 周期方法指定* 原有注解方法:PostConstruct + PreDestroy* bean屬性指定:initMethod / destroyMethod** 3.作用域* @Scope 默認單例** 4.如何引用其他ioc組件* 直接調用對方的bean方法* 直接形參變量引入,要就必須有對應組件,如有多個,形參名 = 組件id標識 即可* */@Scope(scopeName = ConfigurableBeanFactory.SCOPE_SINGLETON)@Bean(name = "dataSource",initMethod = "",destroyMethod = "")public DataSource createDataSource(){DruidDataSource dataSource = new DruidDataSource();dataSource.setUrl(url);dataSource.setDriverClassName(driver);dataSource.setUsername(username);dataSource.setPassword(password);return dataSource;}@Bean(name = "dougSource")public DataSource dataSource(){DruidDataSource dataSource = new DruidDataSource();dataSource.setUrl(url);dataSource.setDriverClassName(driver);dataSource.setUsername(username);dataSource.setPassword(password);return dataSource;}/*** 方法一:* 直接把方法引入* @return*/@Beanpublic JdbcTemplate jdbcTemplate(){JdbcTemplate jdbcTemplate = new JdbcTemplate();jdbcTemplate.setDataSource(createDataSource());return jdbcTemplate;}/*** 方法二:* 使用形參的方式,IOC容器會自動裝配,可以一個或多個* @return*/@Beanpublic JdbcTemplate jdbcTemplate2(DataSource dataSource){JdbcTemplate jdbcTemplate = new JdbcTemplate();//使用形參的方法,就必須要有這個類型的參數已經被注入了,// 就是上面的createDataSource方法被@Bean注解標識了(沒有標注是會報錯的)jdbcTemplate.setDataSource(dataSource);return jdbcTemplate;}/*** 如果是多個形參的情況,根據傳入參數的名字對應bean設置的name,選擇*/@Beanpublic JdbcTemplate jdbcTemplate3(DataSource dataSource,DataSource dougSource){JdbcTemplate jdbcTemplate = new JdbcTemplate();//使用形參的方法,就必須要有這個類型的參數已經被注入了,// 就是上面的createDataSource方法被@Bean注解標識了(沒有標注是會報錯的)// 如果是多個形參的情況,根據傳入參數的名字對應bean設置的name,選擇jdbcTemplate.setDataSource(dougSource);return jdbcTemplate;}
四、高級特性:@Import擴展
@Import 注釋允許從另一個配置類加載 @Bean 定義
也就是 :
當有A B兩個配置類, A中引入@ImportB
在實例化配置類時 , 只要引入A就可以,B會跟著一起。
@Configuration
public class ConfigA {@Beanpublic A a() {return new A();}
}@Configuration
@Import(ConfigA.class)
public class ConfigB {@Beanpublic B b() {return new B();}
}
容器實例化只需要引入 ConfigB.class (但是AB都可以用);
在實例化上下文時不需要同時指定 ConfigA.class 和 ConfigB.class ,只需顯式提供 ConfigB
public static void main(String[] args) {ApplicationContext ctx = new AnnotationConfigApplicationContext(ConfigB.class);// now both beans A and B will be available...A a = ctx.getBean(A.class);B b = ctx.getBean(B.class);
}
此方法簡化了容器實例化,因為只需要處理一個類,而不是要求在構造期間記住可能大量的 @Configuration 類。
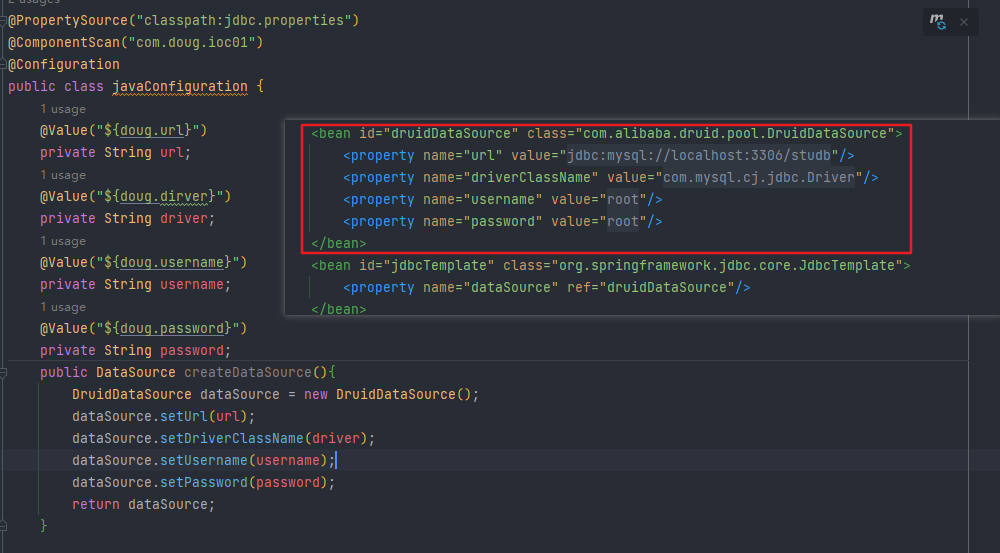
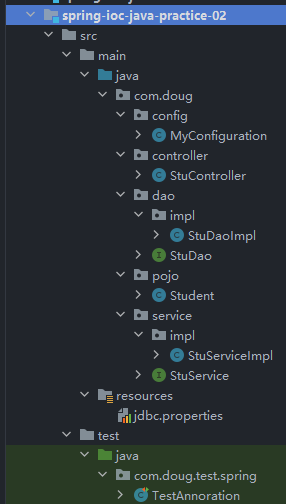
五、基于注解+配置類方式整合三層架構組件
將原xml 配置第三方類 都使用 配置類來寫,其余用都用注解,也就是完全注解開發,舍棄了在xml里面配置
配置類:
@PropertySource("classpath:jdbc.properties")
@ComponentScan("com.doug")
@Configuration
public class MyConfiguration {@Beanpublic DataSource dataSource(@Value("${doug.url}") String url, @Value("${doug.driver}") String driver,@Value("${doug.username}") String username, @Value("${doug.password}") String password) {DruidDataSource dataSource = new DruidDataSource();dataSource.setUrl(url);dataSource.setDriverClassName(driver);dataSource.setUsername(username);dataSource.setPassword(password);return dataSource;}@Beanpublic JdbcTemplate jdbcTemplate(DataSource dataSource) {JdbcTemplate jdbcTemplate = new JdbcTemplate();jdbcTemplate.setDataSource(dataSource);return jdbcTemplate;}
}
總結

注解+配置類 IoC方式總結
- 完全摒棄了XML配置文件
- 自定義類使用IoC和DI注解標記
- 第三方類使用配置類聲明方法+@Bean方式處理
- 完全注解方式(配置類+注解)是現在主流配置方式


)


)


)


