puppeteer執行js
Hi guys! Today let's look at another powerful function of the puppeteer API using Node.js part 2.
嗨,大家好! 今天,讓我們看看使用Node.js第2部分的puppeteer API的另一個強大功能。
In the first part of this section, was talking about commands for keystroke control and typing as we'll normally do with an opened browser.
在本節的第一部分中,我們將討論鍵盤控制和鍵入的命令,就像我們通常在打開的瀏覽器中所做的那樣。
Here's the link to part 1: INTERACTING WITH FORMS AND WEB PAGES USING NODE-JS AND PUPPETEER- 1
這是第1部分的鏈接: 使用NODE-JS和PUPPETEER-1與表單和網頁進行交互
Imagine for a moment if it's possible to open a website, log in and take a screenshot of your dashboard.
想象一下,如果有可能打開一個網站,登錄并為您的儀表板截屏。
?????
??????
Take Note! You should have Node-js and puppeteer installed in your PC.
做記錄! 您應該在PC中安裝Node-js和puppeteer。
With Node-js and puppeteer already up and running, let's get started.
在Node-js和puppeteer已啟動并運行的情況下,讓我們開始吧。
*NB: If you don't yet have Node-js/ puppeteer installed in your PC, read the article NODE & GOOGLE PUPPETEER API SERIES
*注意:如果您的PC尚未安裝Node-js / puppeteer,請閱讀文章NODE&GOOGLE PUPPETEER API SERIES
Today, let's continue from our last part where we saw how to type o fill the form.
今天,讓我們從最后一部分繼續,在那里我們看到了如何鍵入o填寫表格。
Now let's see how to submit..
現在讓我們看看如何提交。
But there's a problem!!!! Most often, the submit button has no id or class.
但是有一個問題! 通常,提交按鈕沒有ID或類。
Indeed, the puppeteer has made work easy for you and me.
的確,木偶使您和我的工作變得輕松。
Let's see how this can be done.
讓我們看看如何做到這一點。
Now, let's get started.
現在,讓我們開始吧。
Since we can't get the id or class of the submit button from inspecting, we will use a command on the web browser's console which will return what we'll use at the place of id/class.
由于無法通過檢查獲取提交按鈕的ID或類,因此我們將在Web瀏覽器的控制臺上使用命令,該命令將返回我們將在ID /類位置使用的命令。
Open your browser, move to the console and type
打開瀏覽器,移至控制臺并輸入
document.querySelectorAll('input[type="submit"]') [0]
It's going to output the input type and value of your own submit button.
將輸出您自己的提交按鈕的輸入類型和值。
Use the input type at the await.page.click parameter as seen in the code below.
使用await.page.click參數中的輸入類型,如下面的代碼所示。
Open a text editor and type the following code and save it with the file name app.js:
打開一個文本編輯器,輸入以下代碼,并將其保存為文件名app.js :
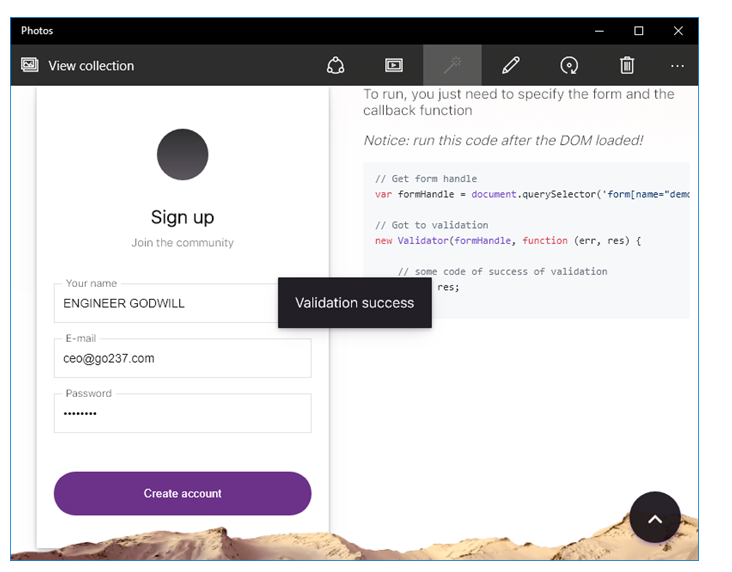
The code below fills the form and submits and takes a screenshot of action after submitting.
下面的代碼填寫了表單,然后提交并在提交后對操作進行了截圖。
const puppeteer = require('puppeteer');
(async () => {
const browser = await puppeteer.launch()
const page = await browser.newPage()
await page.goto('file:///H:/js-form-validator-master/index.html')
// focus on the element with id  specified in bracket
await page.focus('#example-1-name')
// types the sentence in bracket
await page.keyboard.type('ENGINEER GODWILL')
await page.focus('#example-1-email')
await page.keyboard.type('[email?protected]')
await page.focus('#example-1-password')
await page.keyboard.type('admin123')
// clicks on the submit button of the form
await page.click ('input[type="submit"]')
// captures a screenshot
await page.screenshot({ path: 'keyboard.png' })
console.log ('done');
await browser.close()
})()
NB: You can use any URL of your choice,
注意:您可以使用任何選擇的URL,
I this example, I used a webpage that was already downloaded to facilitate the tutorial but if it concerns a URL on the www, internet connection is required to navigate to the website/web page.
在本示例中,我使用已經下載的網頁來簡化本教程,但是如果它涉及www上的URL,則需要互聯網連接才能導航到該網站/網頁。
The file should be saved in your default Node-js directory.
該文件應保存在默認的Node-js目錄中。
Run the code by initiating the file at the command prompt like a regular Node-js file.
通過在命令提示符處啟動文件(如常規Node-js文件)來運行代碼。
The Screenshot ( image file) is then stored in the default Node-js directory with name keyboard.png
屏幕快照(圖像文件)然后存儲在名稱為keyboard.png的默認Node-js目錄中。
Output image file:
輸出圖像文件:
翻譯自: https://www.includehelp.com/node-js/interacting-with-forms-and-web-pages-using-node-js-and-puppeteer-2.aspx
puppeteer執行js


)


方法(帶示例))