9-資源限制
了解stress工具
stress是一個壓力測試工具
docker run -it ubuntu:16.04
此時會進入ubuntu內,這時我們安裝 stress工具
apt-get update && apt-get install -y stress
查看help
stress --help
Usage: stress [OPTION [ARG]] ...-?, --help show this help statement--version show version statement-v, --verbose be verbose-q, --quiet be quiet-n, --dry-run show what would have been done-t, --timeout N timeout after N seconds--backoff N wait factor of N microseconds before work starts-c, --cpu N spawn N workers spinning on sqrt()-i, --io N spawn N workers spinning on sync()-m, --vm N spawn N workers spinning on malloc()/free()--vm-bytes B malloc B bytes per vm worker (default is 256MB)--vm-stride B touch a byte every B bytes (default is 4096)--vm-hang N sleep N secs before free (default none, 0 is inf)--vm-keep redirty memory instead of freeing and reallocating-d, --hdd N spawn N workers spinning on write()/unlink()--hdd-bytes B write B bytes per hdd worker (default is 1GB)
-? 顯示幫助信息
-v 顯示版本號
-q 不顯示運行信息
-n,--dry-run 顯示已經完成的指令執行情況
-t --timeout N 指定運行N秒后停止--backoff N 等待N微妙后開始運行
-c --cpu 產生n個進程 每個進程都反復不停的計算隨機數的平方根
-i --io  產生n個進程 每個進程反復調用sync(),sync()用于將內存上的內容寫到硬盤上
-m --vm n 產生n個進程,每個進程不斷調用內存分配malloc和內存釋放free函數--vm-bytes B 指定malloc時內存的字節數 (默認256MB)--vm-hang N 指示每個消耗內存的進程在分配到內存后轉入休眠狀態,與正常的無限分配和釋放內存的處理相反,這有利于模擬只有少量內存的機器
-d --hadd n 產生n個執行write和unlink函數的進程--hadd-bytes B 指定寫的字節數,默認是1GB--hadd-noclean 不要將寫入隨機ASCII數據的文件Unlink時間單位可以為秒s,分m,小時h,天d,年y,文件大小單位可以為K,M,G
重點說幾個重要的參數
--vm創建幾個進程--vm-bytes創建的內存大小
例子1.
stress --vm 1
結果
root@aec1c5bc8396:/# stress --vm 1
stress: info: [221] dispatching hogs: 0 cpu, 0 io, 1 vm, 0 hdd
此時stress會反復創建 256MB 內存 然后釋放。
這里log不是很詳細,可以加
--verbose查看詳細log輸出
例子2.
stress --vm 1 --vm-bytes 500000M --verbose
此時會報錯,因為分配的內存超出了虛擬機的內存。
我們可以看看虛擬機的內存。
top
Tasks:   2 total,   1 running,   1 sleeping,   0 stopped,   0 zombie
%Cpu(s):  0.0 us,  0.3 sy,  0.0 ni, 99.7 id,  0.0 wa,  0.0 hi,  0.0 si,  0.0 st
KiB Mem :   498892 total,   219204 free,   172276 used,   107412 buff/cache
KiB Swap:  2097148 total,  2084092 free,    13056 used.   286196 avail Mem
我們可以看到虛擬機的內存為 498892KB
構建一個stress的鏡像
-
創建一個文件夾
mkdir stress -
在stress文件夾內創建Dockerfile
FROM ubuntu:16.04 RUN apt-get update && apt-get install -y stress ENTRYPOINT ["/usr/bin/stress"] -
構建鏡像
docker build -t ubuntu-stress . -
測試鏡像使用
docker run -it --rm ubuntu-stress --vm 1此時這個容器就可以當做stress命令使用了。
容器的資源配置
這個資源是 例如 cpu 內存(包含虛擬內存)。
在創建容器的時候是可以指定一些參數的,我們來看一下有哪些參數。
docker run --help
Options:--add-host list Add a custom host-to-IP mapping (host:ip)-a, --attach list Attach to STDIN, STDOUT or STDERR--blkio-weight uint16 Block IO (relative weight), between 10 and 1000, or 0 to disable (default 0)--blkio-weight-device list Block IO weight (relative device weight) (default [])--cap-add list Add Linux capabilities--cap-drop list Drop Linux capabilities--cgroup-parent string Optional parent cgroup for the container--cidfile string Write the container ID to the file--cpu-period int Limit CPU CFS (Completely Fair Scheduler) period--cpu-quota int Limit CPU CFS (Completely Fair Scheduler) quota--cpu-rt-period int Limit CPU real-time period in microseconds--cpu-rt-runtime int Limit CPU real-time runtime in microseconds-c, --cpu-shares int CPU shares (relative weight)--cpus decimal Number of CPUs--cpuset-cpus string CPUs in which to allow execution (0-3, 0,1)--cpuset-mems string MEMs in which to allow execution (0-3, 0,1)-d, --detach Run container in background and print container ID--detach-keys string Override the key sequence for detaching a container--device list Add a host device to the container--device-cgroup-rule list Add a rule to the cgroup allowed devices list--device-read-bps list Limit read rate (bytes per second) from a device (default [])--device-read-iops list Limit read rate (IO per second) from a device (default [])--device-write-bps list Limit write rate (bytes per second) to a device (default [])--device-write-iops list Limit write rate (IO per second) to a device (default [])--disable-content-trust Skip image verification (default true)--dns list Set custom DNS servers--dns-option list Set DNS options--dns-search list Set custom DNS search domains--entrypoint string Overwrite the default ENTRYPOINT of the image-e, --env list Set environment variables--env-file list Read in a file of environment variables--expose list Expose a port or a range of ports--group-add list Add additional groups to join--health-cmd string Command to run to check health--health-interval duration Time between running the check (ms|s|m|h) (default 0s)--health-retries int Consecutive failures needed to report unhealthy--health-start-period duration Start period for the container to initialize before starting health-retries countdown (ms|s|m|h) (default 0s)--health-timeout duration Maximum time to allow one check to run (ms|s|m|h) (default 0s)--help Print usage-h, --hostname string Container host name--init Run an init inside the container that forwards signals and reaps processes-i, --interactive Keep STDIN open even if not attached--ip string IPv4 address (e.g., 172.30.100.104)--ip6 string IPv6 address (e.g., 2001:db8::33)--ipc string IPC mode to use--isolation string Container isolation technology--kernel-memory bytes Kernel memory limit-l, --label list Set meta data on a container--label-file list Read in a line delimited file of labels--link list Add link to another container--link-local-ip list Container IPv4/IPv6 link-local addresses--log-driver string Logging driver for the container--log-opt list Log driver options--mac-address string Container MAC address (e.g., 92:d0:c6:0a:29:33)-m, --memory bytes Memory limit--memory-reservation bytes Memory soft limit--memory-swap bytes Swap limit equal to memory plus swap: '-1' to enable unlimited swap--memory-swappiness int Tune container memory swappiness (0 to 100) (default -1)--mount mount Attach a filesystem mount to the container--name string Assign a name to the container--network string Connect a container to a network (default "default")--network-alias list Add network-scoped alias for the container--no-healthcheck Disable any container-specified HEALTHCHECK--oom-kill-disable Disable OOM Killer--oom-score-adj int Tune host's OOM preferences (-1000 to 1000)--pid string PID namespace to use--pids-limit int Tune container pids limit (set -1 for unlimited)--privileged Give extended privileges to this container-p, --publish list Publish a container's port(s) to the host-P, --publish-all Publish all exposed ports to random ports--read-only Mount the container's root filesystem as read only--restart string Restart policy to apply when a container exits (default "no")--rm Automatically remove the container when it exits--runtime string Runtime to use for this container--security-opt list Security Options--shm-size bytes Size of /dev/shm--sig-proxy Proxy received signals to the process (default true)--stop-signal string Signal to stop a container (default "SIGTERM")--stop-timeout int Timeout (in seconds) to stop a container--storage-opt list Storage driver options for the container--sysctl map Sysctl options (default map[])--tmpfs list Mount a tmpfs directory-t, --tty Allocate a pseudo-TTY--ulimit ulimit Ulimit options (default [])-u, --user string Username or UID (format: <name|uid>[:<group|gid>])--userns string User namespace to use--uts string UTS namespace to use-v, --volume list Bind mount a volume--volume-driver string Optional volume driver for the container--volumes-from list Mount volumes from the specified container(s)-w, --workdir string Working directory inside the container
內內存的限制
參數
--memory--memory-swap
如果我們只是限制了
memory而沒有限制memory-swap那么memory-swap會和memory一樣。
列子1.
限定 200M 內存
docker run --memory=200M ubuntu-stress --vm 1 --verbose
壓力測試 500M
docker run --memory=200M ubuntu-stress --vm 1 --verbose --vm-bytes 500M
結果
stress: info: [1] dispatching hogs: 0 cpu, 0 io, 1 vm, 0 hdd
stress: dbug: [1] using backoff sleep of 3000us
stress: dbug: [1] --> hogvm worker 1 [6] forked
stress: dbug: [6] allocating 524288000 bytes ...
stress: dbug: [6] touching bytes in strides of 4096 bytes ...
stress: FAIL: [1] (415) <-- worker 6 got signal 9
stress: WARN: [1] (417) now reaping child worker processes
stress: FAIL: [1] (421) kill error: No such process
stress: FAIL: [1] (451) failed run completed in 1s
cpu限制
參數
--cpu-shares是一個相對權重。例如: 有兩個容器,一個設定了10,一個設定了5,這樣的話,兩個容器如果占滿了cpu,那么這個個數的比例就是權重,10個cpu的百分比是5個cpu的百分比的兩倍。
例子1.
-
打開三個虛擬機的窗口,通過
vagrant ssh -
第一個窗口執行
top命令 -
第二個執行
ubuntu-stress容器docker run --name test2 --cpu-shares=5 ubuntu-stress --cpu 1此時我們查看第一個窗口的
top8875 root 20 0 7472 96 0 R 99.7 0.0 0:06.99 stresscpu已經占用已經快 100% 了。
-
第三個窗口執行
ubuntu-stress容器docker run --name test1 --cpu-shares=10 ubuntu-stress --cpu 1此時我們查看第一個窗口的
top8956 root 20 0 7472 96 0 R 66.1 0.0 0:03.54 stress 8875 root 20 0 7472 96 0 R 33.2 0.0 1:21.26 stress我們可以看到 8875 進程的cpu占用率編程 33 了,另一個是 66,大約是兩倍的關系。
所以
--cpu-shares的含義并不是指定使用了多少顆cpu,而是一個比例,默認值為 1024,最小為2,只有在容器競爭資源的時候才有意義,如果只有一個容器,即使設置為2,那么也是占用當前設備的 100% cpu資源。
限制可用的 CPU 個數
當前系統為 2 個cpu
為容器分配2個cpu,并且使用一個cpu
- 在其中一個終端執行
docker run --rm --cpus=2 ubuntu-stress --cpu 1
- 另外一個終端執行
top
PID USER PR NI VIRT RES SHR S %CPU %MEM TIME+ COMMAND 5120 root 20 0 7472 96 0 R 99.7 0.0 0:54.48 stress
查看宿主cpu使用情況
也可以通過 top 命令 然后按 1 查看。
可以看到 5120 進程 占用了 100%,此時只有一個cpu被占用,那么我們使用2個cpu做一下測試
docker run --rm --cpus=2 ubuntu-stress --cpu 2
查看top
PID USER PR NI VIRT RES SHR S %CPU %MEM TIME+ COMMAND 5234 root 20 0 7472 96 0 R 99.7 0.0 0:13.47 stress 5233 root 20 0 7472 96 0 R 99.3 0.0 0:13.38 stress
可以看到 2 個進程消耗了cpu 100%,說明兩個cpu都被充分利用。
指定固定的 CPU
通過 --cpus 選項我們無法讓容器始終在一個或某幾個 CPU 上運行,但是通過 --cpuset-cpus 選項卻可以做到!這是非常有意義的,因為現在的多核系統中每個核心都有自己的緩存,如果頻繁的調度進程在不同的核心上執行勢必會帶來緩存失效等開銷。下面我們就演示如何設置容器使用固定的 CPU,下面的命令為容器設置了 --cpuset-cpus 選項,指定運行容器的 CPU 編號為 1:
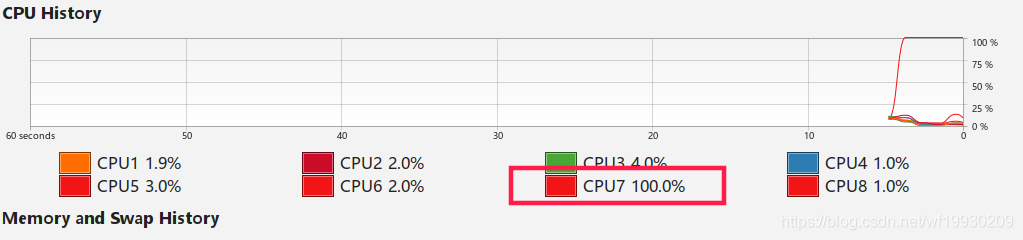
docker run --rm --cpuset-cpus="1" ubuntu-stress --cpu 1
在 top 終端內按 數字 1
%Cpu0  :  0.3 us,  0.3 sy,  0.0 ni, 99.3 id,  0.0 wa,  0.0 hi,  0.0 si,  0.0 st
%Cpu1  :100.0 us,  0.0 sy,  0.0 ni,  0.0 id,  0.0 wa,  0.0 hi,  0.0 si,  0.0 st
可以看到是在編號為 1 的cpu上運行。
資源限制的底層技術支持
- Namespace : 做隔離 pid, net, ipc, mnt, uts
- Control groups : 做資源限制
- Union file systems : Container 和 image的分層
隔離性 Linux namespace
每個用戶實例之間相互隔離, 互不影響。 一般的硬件虛擬化方法給出的方法是VM,而LXC給出的方法是container,更細一點講就是kernel namespace。其中pid、net、ipc、mnt、uts、user等namespace將container的進程、網絡、消息、文件系統、UTS(“UNIX Time-sharing System”)和用戶空間隔離開。
-
pid namespace
不同用戶的進程就是通過pid namespace隔離開的,且不同 namespace 中可以有相同pid。所有的LXC進程在docker中的父進程為docker進程,每個lxc進程具有不同的namespace。同時由于允許嵌套,因此可以很方便的實現 Docker in Docker。
-
net namespace
有了 pid namespace, 每個namespace中的pid能夠相互隔離,但是網絡端口還是共享host的端口。網絡隔離是通過net namespace實現的, 每個net namespace有獨立的 network devices, IP addresses, IP routing tables, /proc/net 目錄。這樣每個container的網絡就能隔離開來。docker默認采用veth的方式將container中的虛擬網卡同host上的一個docker bridge: docker0連接在一起。
-
ipc namespace
container中進程交互還是采用linux常見的進程間交互方法(interprocess communication - IPC), 包括常見的信號量、消息隊列和共享內存。然而同 VM 不同的是,container 的進程間交互實際上還是host上具有相同pid namespace中的進程間交互,因此需要在IPC資源申請時加入namespace信息 - 每個IPC資源有一個唯一的 32 位 ID。
-
mnt namespace
類似chroot,將一個進程放到一個特定的目錄執行。mnt namespace允許不同namespace的進程看到的文件結構不同,這樣每個 namespace 中的進程所看到的文件目錄就被隔離開了。同chroot不同,每個namespace中的container在/proc/mounts的信息只包含所在namespace的mount point。
-
uts namespace
UTS(“UNIX Time-sharing System”) namespace允許每個container擁有獨立的hostname和domain name, 使其在網絡上可以被視作一個獨立的節點而非Host上的一個進程。
-
user namespace
每個container可以有不同的 user 和 group id, 也就是說可以在container內部用container內部的用戶執行程序而非Host上的用戶。


