k8---proxy

kube-proxy 通過 Informer知道了Service、endpoints對象的創建,然后把service身上的CLUSTER-IP 和端口已經端點信息拿出來,創建iptable NAT規則做轉發或通過ipvs模塊創建VS服務器,這樣經過CLUSTER-IP的流量都被轉發到后端pod。

iptables模式

我們先查看nat表的OUTPUT鏈,存在kube-proxy創建的KUBE-SERVICE鏈

iptables -nvL OUTPUT -t nat

在KUBE-SERVICES鏈中有一條目的地為10.96.148.206即CLUSTER-IP地址跳轉到KUBE-SVC-EJUV4ZBKPDWOZNF4

iptables -nvL KUBE-SERVICES -t nat |grep service-demo

接著是查看這條鏈,以1/3的概率跳轉到其中一條

iptables -nvL KUBE-SVC-EJUV4ZBKPDWOZNF4 -t nat

最后KUBE-SEP-BTFJGISFGMEBGVUF鏈終于找到了DNAT規則

iptables -nvL KUBE-SEP-BTFJGISFGMEBGVUF -t nat

即將請求通過DNAT發送到地址100.101.184.61:9376也就是我們其中一個Pod。

IPVS模式

與iptalbes模式相比,IPVS模式工作在內核態,在同步代理規則時具有更好的性能,同時提高網絡吞吐量為大型集群提供了更好的可擴展性。

IPVS 模式在工作時,當我們創建了前面的 Service 之后,kube-proxy 首先會在宿主機上創建一個虛擬網卡kube-ipvs0,并為它分配 Service VIP 作為 IP 地址,如圖

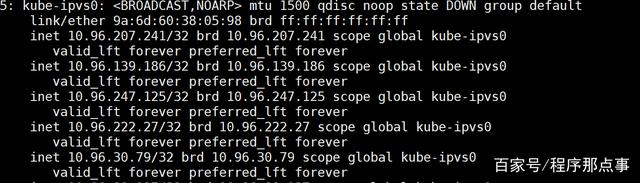
接著kube-proxy通過Linux的IPVS模塊為這個 IP 地址添加三個 IPVS 虛擬主機,并設置這三個虛擬主機之間使用輪詢模式 來作為負載均衡策略。

通過ipvsadm查看

ipvsadm -ln |grep -C 5 10.96.148.206

可以看到虛擬server的IP即是Pod的地址,這樣流量即向了目的地Pod。

以上我們先認識了Service這個API對象,接著講到了service與endpoints和pod的關聯,然后是service與kube-proxy的關系,以及kube-proxy的兩種模式如何通過service的IP創建iptables、IPVS規則將流量轉發到Pod。

本文來自互聯網用戶投稿,該文觀點僅代表作者本人,不代表本站立場。本站僅提供信息存儲空間服務,不擁有所有權,不承擔相關法律責任。
如若轉載,請注明出處:http://www.pswp.cn/news/535298.shtml
繁體地址,請注明出處:http://hk.pswp.cn/news/535298.shtml
英文地址,請注明出處:http://en.pswp.cn/news/535298.shtml

如若內容造成侵權/違法違規/事實不符,請聯系多彩編程網進行投訴反饋email:809451989@qq.com,一經查實,立即刪除!

相關文章

k8s--configmap

當卷中使用的ConfigMap被更新時,所投射的鍵最終也會被更新。kubelet組件會在每次周期性同步時檢查所掛載的ConfigMap是否為最新。 不過,kubelet使用的是其本地的高速緩存來獲得ConfigMap的當前值。 ConfigMap既可以通過watch操作實現內容傳播(默認形式&…

etcd命令

[rootlocalhost calico]# etcdctl get /coreos.com/network/subnets/4.0.32.0-24 {"PublicIP":"10.8.65.53"} 從etcd中查詢出4.0.32.0/24的子網的宿主機host的ip10.8.65.53。

docker搭建ldap

1.下載鏡像 docker pull osixia/openldap docker pull docker.io/osixia/phpldapadmin 2.運行鏡像 docker run -dit --name ldap23 --restartalways -p 389:389 -p 636:636 -e LDAP_ORGANISATION”test” -e LDAP_DOMAIN”test.com” -e LDAP_ADMIN_PASSWORD123456″ osixi…

centos 縮減邏輯卷

在使用期間磁盤空間不足,發現/dev/mapper/centos-home下還有很多空間,如果想要將home下面的磁盤空間分配到root磁盤下面,可以使用以下方法 查看磁盤空間,每個人的磁盤名稱可能不同 df -h 1 備份home文件 tar cvf /tmp/home.tar /…

zabbix自動發現監控腳本

自動發現端口列表腳本 # -*- coding: utf-8 -*- import os import json data{} tcp_list[] port_list[] commandos.popen("ss -4tln | awk -F [ :] NR>2{print $5}") for port in command:port_list.append(port.strip()) for port in port_list:port_dict{}por…

獲取cpu使用率腳本

#!/bin/bash # 獲取要監控的本地服務器IP地址 IPifconfig | grep inet | grep -vE inet6|127.0.0.1 | awk {print $2} echo -e "\033[32mIP地址:\033[0m" $IP echo -e "\033[31m獲取CPU\033[0m" # 獲取cpu總核數 cpu_numgrep -c "model n…

獲取磁盤使用率

#!/bin/bash #用途:監控磁盤的使用情況。 #定義檢查磁盤的空間使用率函數 userroot topnum10 local_diskdir/data/jiankong/disk mkdirdisk() { if [ ! -d $disktmpdir ];then mkdir $disktmpdir fi } chk_sp() {ip$1n$(wc -l $local_diskdir/$ip/chk_sp.log | awk …

python郵件腳本

#用于發送測試報告(帶附件)或其它內容# -*- coding:utf-8 -*- import os import smtplib from email.mime.text import MIMEText from email.mime.multipart import MIMEMultipartclass SendEmail(object):def __init__(self, receivers):mail_host "127.0.0.1" # …

Rsync+Inotify

RsyncInotify Rsync這個一般使用系統自帶的服務,服務端需要啟動客戶端無需啟動,服務端設置開機自動啟動 systemctl start rsyncd systemctl status rsyncd systemctl restart rsyncd systemctl enable rsyncd Inotify單獨下載安裝&#xff0c…

logstash密碼設置步驟

生成密鑰存儲倉庫 cd /app/logstash-6.8.4/bin/ ./logstash-keystore create 輸入y 添加Logstash中可引用的變量 ./logstash-keystore add es_user 輸入elastic ./logstash-keystore add es_pwd 輸入bamBoo123 ./logstash-keystore add kafka_pwd 輸入bamBoo123 ./logstash…

清理cacahe腳本

#! /bin/bash # 需要釋放內存的,內存使用百分比,可以傳參,默認是85% max_rate$1 if [ ! "$max_rate" ] ; thenmax_rate85 fi echo "max_rate: $max_rate"totalfree -m | awk NR2 | awk {print $2} usedfree -m | awk NR2…

Prometheus node_exporter 指標說明及告警規則表達

Prometheus node_exporter 指標說明及告警規則表達_獨步秋風的博客-CSDN博客_node exporter 指標

UnicodeEncodeError: 'gbk' codec can't encode character '\xeb' in position 20: illegal multibyte sequ

源代碼:with open (os.path.join(self.root,filename),mode‘w’,newline’’) as f: writercsv.writer(f) for img in images: nameimg.split(os.sep)[-2] labelself.name2lable[name] writer.writerow([img,label]) 解決方法 在open()里面…

列表生成式(List)

列表生成式即List Comprehensions,是Python內置的非常簡單卻強大的可以用來創建list的生成式。 list(range(1,6)) [1,2,3,4,5]print([x*x for x in range(10)]) [0, 1, 4, 9, 16, 25, 36, 49, 64, 81]print([x*x for x in range(10) if x%20]) [0, 4, 16, 36, 64]

uint8 轉換為 float

znp.arange(3,dtypenp.uintj8) >>> z.astype(float) array([ 0., 1., 2.]) >>> np.int8(z) array([0, 1, 2], dtypeint8)

AttributeError: 'NoneType' object has no attribute 'astype'

img cv2.imread(path)#path為圖片地址 print(type(img))>>> <class numpy.ndarray> <class numpy.ndarray> <class numpy.ndarray> <class NoneType>錯誤問題為沒有正確讀到圖片&#xff0c;返回一個Nonetype類型&#xff0c;

pycharm 自動補全括號 引號

過程&#xff1a; File->settings->Editior->General->Smart Keys 勾選Insert paired barckets(),[],{},<>

RuntimeError: freeze_support()

train_dataloaderDataLoader(train_dataset,batch_sizebatch_size,shuffleTrue,num_workers4) 把nu_worker4 去掉 train_dataloaderDataLoader(train_dataset,batch_sizebatch_size,shuffleTrue)

IndexError: list index out of range image_name=self.images_name[index]

這里是引用 def __len__(self):return len(self.images_name) 注意這個地方