如果您正在閱讀這篇文章,您可能會因為缺少與Squid相關的信息而感到沮喪,Squid是一種非常流行的轉發代理。這些令人沮喪的事情包括:在小的軟件修訂之后出現的重大的可用性變化,對幕后發生的事情的誤解,以及真正糟糕的文檔。這是一個全面的入門,它將使你和魷魚。
首先,為什么要使用轉發代理?在過去,在將所有連接發送到internet之前終止所有代理上的連接是非常流行的。這在企業中已經不那么流行了,但有時您可能仍然會遇到這種情況。然而,Squid可以做的遠不止截獲純文本通信——它還可以對SSL/TLS通信進行實時解密,并且可以采用兩種不同的配置,這些配置具有各自的安全含義。
轉發代理有兩種子類型——顯式和隱式,代理SSL/TLS通信有兩種方式——終止和不終止。這四種組合中的任何一種都是可能的,并且每種都有自己的需求集。顯式v.隱式只是指客戶端是否必須在其端指定(并可能驗證)轉發代理。在這種情況下,客戶知道這正在發生。它使用CONNECT消息與代理進行接口,并幫助它協商到目的地的連接。
另一方面,隱含的聯系更棘手,也更危險。在這個配置中,代理正在執行在另一個上下文中被認為是中間人攻擊的操作。客戶端完全不知道,他們的通信正在發送的某個地方偽裝成目的地,對他們的通信進行解密,然后重新加密后發送到真正的目標服務器。響應也被動態捕獲,并發送回原始服務器。正如我們所知,SSL/TLS通過使用非對稱加密來保護與私鑰的通信安全,并通過維護受信任公鑰的注冊表來防止中間人攻擊。隱式轉發代理繞過了這兩種保護(盡管常常是故意的,有時甚至是安全的)。客戶機沒有顯式地指定連接,而是像往常一樣發送它的流量。在上游的某個地方,流量實際上是由第三層設備路由到代理的,然后代理將流量發送到另一個接口,以避免在另一端被檢測到。它提供了一個對任何域都有效的證書,這些域是在請求實時到達時生成的,由于客戶端需要被配置為信任代理使用的同一根CA證書,因此將允許連接。(請記住,作為根證書受信任的任何證書都可以為任何和所有域和路徑簽署有效的證書,而不僅僅是自己的。)

然而,這種配置非常有用。因為代理終止連接并與目的地重新協商,所以它實際上可以更改在飛行中使用的加密類型。假設您有使用Java 6的舊軟件。你可以把前面的魷魚代理服務器,允許它實現PCI遵從性,即使軟件只能使用TLS通過普通HTTP或HTTPS通信v1(目前不一致),代理將對交通使用TLS 1.2黃金標準。
如何配置這樣的配置?當然,這可能會有點麻煩。對于每個操作系統來說也是不同的,但是基礎是相同的。這并不適合膽小的人,需要一些在Linux中編譯軟件的經驗。
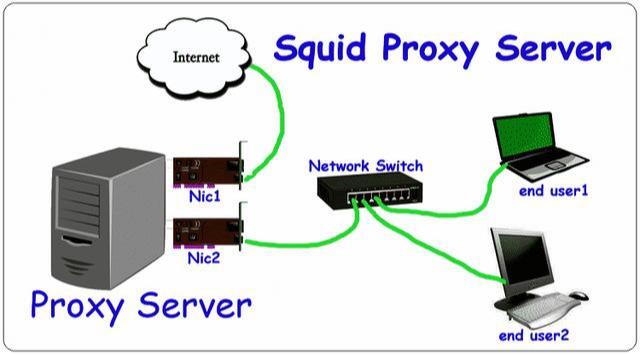
在撰寫本文時,最好的版本是Squid 3.5。從項目網站下載并解壓到一個目錄。您的linux發行版將需要gcc、make和其他潛在的開發環境工具。特別是在ubuntu上,安裝build-essential應該覆蓋你。你需要在這個盒子上加兩個網卡,這樣你才能在它們之間進行NAT。
您需要創建一個用戶,名為:squid。
adduser squid
確保使用這些標志正確鏈接到所需的庫。
./configure
--prefix=/usr
--exec-prefix=/usr
--includedir=/usr/include
--datadir=/usr/share
--libdir=/usr/lib64
--libexecdir=/usr/lib64/squid
--localstatedir=/var
--sysconfdir=/etc/squid
--sharedstatedir=/var/lib
--with-logdir=/var/log/squid
--with-pidfile=/var/run/squid.pid
--with-default-user=squid
--enable-silent-rules
--enable-dependency-tracking
--with-openssl
--enable-icmp
--enable-delay-pools
--enable-useragent-log
--enable-esi
--enable-follow-x-forwarded-for
--enable-auth
--enable-ssl-crtd
--disable-arch-native
--with-openssl
接下來是make,然后是make install。
您需要生成自己的CA。
cd /etc/squid
mkdir ssl_cert
chown squid:squid ssl_cert
chmod 600 ssl_cert
cd ssl_cert
openssl req -new -newkey rsa:2048 -sha256 -days 365 -nodes -x509 -keyout myCA.pem -out myCA.pem
您可以確定您的CA的有效期應該超過1年。
openssl x509 -in myCA.pem -outform DER -out myCA.der
你的squidconf應該是這樣的:
#
# Recommended minimum configuration:
#
# Example rule allowing access from your local networks.
# Adapt to list your (internal) IP networks from where browsing
# should be allowed
acl localnet src 10.0.0.0/8 # RFC1918 possible internal network
acl localnet src 172.16.0.0/12 # RFC1918 possible internal network
acl localnet src 192.168.0.0/16 # RFC1918 possible internal network
acl localnet src fc00::/7 # RFC 4193 local private network range
acl localnet src fe80::/10 # RFC 4291 link-local (directly plugged) machines
acl localnet src 127.0.0.1
acl SSL_ports port 443
acl Safe_ports port 80 # http
acl Safe_ports port 21 # ftp
acl Safe_ports port 443 # https
acl Safe_ports port 70 # gopher
acl Safe_ports port 210 # wais
acl Safe_ports port 1025-65535 # unregistered ports
acl Safe_ports port 280 # http-mgmt
acl Safe_ports port 488 # gss-http
acl Safe_ports port 591 # filemaker
acl Safe_ports port 777 # multiling http
acl CONNECT method CONNECT
sslproxy_cert_error allow all
#disable this in production, it is dangerous but useful for testing
sslproxy_flags DONT_VERIFY_PEER
#
# Recommended minimum Access Permission configuration:
#
# Deny requests to certain unsafe ports
http_access deny !Safe_ports
# Deny CONNECT to other than secure SSL ports
http_access deny CONNECT !SSL_ports
# Only allow cachemgr access from localhost
http_access allow localhost manager
http_access deny manager
# We strongly recommend the following be uncommented to protect innocent
# web applications running on the proxy server who think the only
# one who can access services on "localhost" is a local user
#http_access deny to_localhost
#
# INSERT YOUR OWN RULE(S) HERE TO ALLOW ACCESS FROM YOUR CLIENTS
#
# Example rule allowing access from your local networks.
# Adapt localnet in the ACL section to list your (internal) IP networks
# from where browsing should be allowed
http_access allow localnet
http_access allow localhost
# And finally deny all other access to this proxy
http_access deny all
# Squid normally listens to port 3128
http_port 3128
# Uncomment and adjust the following to add a disk cache directory.
#cache_dir ufs /var/cache/squid 100 16 256
# Leave coredumps in the first cache dir
coredump_dir /var/cache/squid
http_port x.x.x.x:3129 ssl-bump
cert=/etc/squid/ssl_cert/myCA.pem
generate-host-certificates=on dynamic_cert_mem_cache_size=4MB
#this is what generates certs on the fly. Point to the CA you generated above.
https_port x.x.x.x:3130 ssl-bump intercept
cert=/etc/squid/ssl_cert/myCA.pem
generate-host-certificates=on dynamic_cert_mem_cache_size=4MB
acl step1 at_step SslBump1
ssl_bump peek step1
ssl_bump stare all
ssl_bump bump all
always_direct allow all
#
# Add any of your own refresh_pattern entries above these.
#
refresh_pattern ^ftp: 1440 20% 10080
refresh_pattern ^gopher: 1440 0% 1440
refresh_pattern -i (/cgi-bin/|?) 0 0% 0
refresh_pattern . 0 20% 4320
使用操作系統提供的命令啟動squid服務。確保/var/log/squid中沒有錯誤
你可以使用以下命令:
sudo netstat -peant | grep ":3130"
以確保squid已經成功地連接到端口。
此命令需要在每次啟動時應用到NAT流量,該流量將被路由到IP上的端口443(在您的原始設備上使用靜態路由y.y.y)。y或上一個網絡組件)監聽到的烏賊正在監聽另一個NIC綁定到的烏賊(x.x.x.x)
iptables -t nat -I PREROUTING -p tcp --dport y.y.y.y:443 -j DNAT --to x.x.x.x:3130
假設客戶機信任根證書,squid代理將透明地代理所有發送到出站的連接。
原文:https://www.ssltrust.com.au/help/setup-guides/setup-squid-proxy
本文:https://pub.intelligentx.net/setup-squid-forward-proxy
討論:請加入知識星球【首席架構師圈】或者飛聊小組【首席架構師智庫】

)


)

