這是我的WWDC2013系列筆記中的一篇,完整的筆記列表請參看這篇總覽。本文僅作為個人記錄使用,也歡迎在許可協議范圍內轉載或使用,但是還煩請保留原文鏈接,謝謝您的理解合作。如果您覺得本站對您能有幫助,您可以使用RSS或郵件方式訂閱本站,這樣您將能在第一時間獲取本站信息。
本文涉及到的WWDC2013 Session有
- Session 206 Getting Started with UIKit Dynamics
- Session 217 Exploring Scroll Views in iOS7
UIScrollView可以說是UIKit中最重要的類之一了,包括UITableView和UICollectionView等重要的數據容器類都是UIScrollView的子類。在歷年的WWDC上,UIScrollView和相關的API都有專門的主題進行介紹,也可以看出這個類的使用和變化之快。今年也不例外,因為iOS7完全重新定義了UI,這使得UIScrollView里原來不太會使用的一些用法和實現的效果在新的系統中得到了很好的表現。另外,由于引入了UIKit Dynamics,我們還可以結合ScrollView做出一些以前不太可能或者需要花費很大力氣來實現的效果,包括帶有重力的swipe或者是類似新的信息app中的帶有彈簧效果聊天泡泡等。如果您還不太了解iOS7中信息app的效果,這里有一張gif圖可以幫您大概了解一下:

這次筆記的內容主要就是實現一個這樣的效果。為了避免重復造輪子,我對這個效果進行了一些簡單的封裝,并連同這篇筆記的demo一起扔在了Github上,有需要的童鞋可以到這里自取。
iOS7的SDK中Apple最大的野心其實是想用SpriteKit來結束iOS平臺游戲開發(至少是2D游戲開發)的亂戰,統一游戲開發的方式并建立良性社區。而UIKit Dynamics,個人猜測Apple在花費力氣為SpriteKit開發了物理引擎的同時,發現在UIKit中也可以使用,并能得到不錯的效果,于是順便革新了一下設計理念,在UI設計中引入了不少物理的概念。在iOS系統中,最為典型的應用是鎖屏界面打開相機時中途放棄后的重力下墜+反彈的效果,另一個就是信息應用中的加入彈性的消息列表了。彈性列表在我自己上手試過以后覺得表現形式確實很生動,可以消除原來列表那種冷冰冰的感覺,是有可能在今后的設計中被大量使用的,因此決定學上一學。
首先我們需要知道要如何實現這樣一種效果,我們會用到哪些東西。毋庸置疑,如果不使用UIKit Dynamics的話,自己從頭開始來完成會是一件非常費力的事情,你可能需要實現一套位置計算和物理模擬來使效果看起來真實滑潤。而UIKit Dynamics中已經給我們提供了現成的彈簧效果,可以用UIAttachmentBehavior進行實現。另外,在說到彈性效果的時候,我們其實是在描述一個列表中的各個cell之間的關系,對于傳統的UITableView來說,描述UITableViewCell之間的關系是比較復雜的(因為Apple已經把絕大多數工作做了,包括計算cell位置和位移等。使用越簡單,定制就會越麻煩在絕大多數情況下都是真理)。而UICollectionView則通過layout來完成cell之間位置關系的描述,給了開發者較大的空間來實現布局。另外,UIKit Dynamics為UICollectionView做了很多方便的Catagory,可以很容易地“指導”UICollectionView利用加入物理特性計算后的結果,在實現彈性效果的時候,UICollectionView是我們不二的選擇。
如果您在閱讀這篇筆記的時候遇到困難的話,建議您可以看看我之前的一些筆記,包括今年的UIKit Dynamics的介紹和去年的UICollectionView介紹。
話不多說,我們開工。首先準備一個UICollectionViewFlowLayout的子類(在這里叫做VVSpringCollectionViewFlowLayout),然后在ViewController中用這個layout實現一個簡單的collectionView:
//ViewController.m@interface ViewController ()<UICollectionViewDataSource, UICollectionViewDelegate>
@property (nonatomic, strong) VVSpringCollectionViewFlowLayout *layout;
@endstatic NSString *reuseId = @"collectionViewCellReuseId";@implementation ViewController
- (void)viewDidLoad
{[super viewDidLoad];// Do any additional setup after loading the view, typically from a nib.self.layout = [[VVSpringCollectionViewFlowLayout alloc] init];self.layout.itemSize = CGSizeMake(self.view.frame.size.width, 44);UICollectionView *collectionView = [[UICollectionView alloc] initWithFrame:self.view.frame collectionViewLayout:self.layout];collectionView.backgroundColor = [UIColor clearColor];[collectionView registerClass:[UICollectionViewCell class] forCellWithReuseIdentifier:reuseId];collectionView.dataSource = self;[self.view insertSubview:collectionView atIndex:0];
}#pragma mark - UICollectionViewDataSource
- (NSInteger)collectionView:(UICollectionView *)collectionView numberOfItemsInSection:(NSInteger)section
{return 50;
}- (UICollectionViewCell *)collectionView:(UICollectionView *)collectionView cellForItemAtIndexPath:(NSIndexPath *)indexPath
{UICollectionViewCell *cell = [collectionView dequeueReusableCellWithReuseIdentifier:reuseId forIndexPath:indexPath];//Just give a random color to the cell. See https://gist.github.com/kylefox/1689973cell.contentView.backgroundColor = [UIColor randomColor];return cell;
}
@end
這部分沒什么可以多說的,現在我們有一個標準的FlowLayout的UICollectionView了。通過使用UICollectionViewFlowLayout的子類來作為開始的layout,我們可以節省下所有的初始cell位置計算的代碼,在上面代碼的情況下,這個collectionView的表現和一個普通的tableView并沒有太大不同。接下來我們著重來看看要如何實現彈性的layout。對于彈性效果,我們需要的是連接一個item和一個錨點間彈性連接的UIAttachmentBehavior,并能在滾動時設置新的錨點位置。我們在scroll的時候,只要使用UIKit Dynamics的計算結果,替代掉原來的位置更新計算(其實就是簡單的scrollView的contentOffset的改變),就可以模擬出彈性的效果了。
首先在-prepareLayout中為cell添加UIAttachmentBehavior。
//VVSpringCollectionViewFlowLayout.m
@interface VVSpringCollectionViewFlowLayout()
@property (nonatomic, strong) UIDynamicAnimator *animator;
@end@implementation VVSpringCollectionViewFlowLayout
//...-(void)prepareLayout {[super prepareLayout];if (!_animator) {_animator = [[UIDynamicAnimator alloc] initWithCollectionViewLayout:self];CGSize contentSize = [self collectionViewContentSize];NSArray *items = [super layoutAttributesForElementsInRect:CGRectMake(0, 0, contentSize.width, contentSize.height)];for (UICollectionViewLayoutAttributes *item in items) {UIAttachmentBehavior *spring = [[UIAttachmentBehavior alloc] initWithItem:item attachedToAnchor:item.center];spring.length = 0;spring.damping = 0.5;spring.frequency = 0.8;[_animator addBehavior:spring];}}
}
@end
prepareLayout將在CollectionView進行排版的時候被調用。首先當然是call一下super的prepareLayout,你肯定不會想要全都要自己進行設置的。接下來,如果是第一次調用這個方法的話,先初始化一個UIDynamicAnimator實例,來負責之后的動畫效果。iOS7 SDK中,UIDynamicAnimator類專門有一個針對UICollectionView的Category,以使UICollectionView能夠輕易地利用UIKit Dynamics的結果。在UIDynamicAnimator.h中能夠找到這個Category:
@interface UIDynamicAnimator (UICollectionViewAdditions)// When you initialize a dynamic animator with this method, you should only associate collection view layout attributes with your behaviors.
// The animator will employ thecollection view layout’s content size coordinate system.
- (instancetype)initWithCollectionViewLayout:(UICollectionViewLayout*)layout;// The three convenience methods returning layout attributes (if associated to behaviors in the animator) if the animator was configured with collection view layout
- (UICollectionViewLayoutAttributes*)layoutAttributesForCellAtIndexPath:(NSIndexPath*)indexPath;
- (UICollectionViewLayoutAttributes*)layoutAttributesForSupplementaryViewOfKind:(NSString *)kind atIndexPath:(NSIndexPath *)indexPath;
- (UICollectionViewLayoutAttributes*)layoutAttributesForDecorationViewOfKind:(NSString*)decorationViewKind atIndexPath:(NSIndexPath *)indexPath;@end
于是通過-initWithCollectionViewLayout:進行初始化后,這個UIDynamicAnimator實例便和我們的layout進行了綁定,之后這個layout對應的attributes都應該由綁定的UIDynamicAnimator的實例給出。就像下面這樣:
//VVSpringCollectionViewFlowLayout.m
@implementation VVSpringCollectionViewFlowLayout//...-(NSArray *)layoutAttributesForElementsInRect:(CGRect)rect {return [_animator itemsInRect:rect];
}-(UICollectionViewLayoutAttributes *)layoutAttributesForItemAtIndexPath:(NSIndexPath *)indexPath {return [_animator layoutAttributesForCellAtIndexPath:indexPath];
}
@end
讓我們回到-prepareLayout方法中,在創建了UIDynamicAnimator實例后,我們對于這個layout中的每個attributes對應的點,都創建并添加一個添加一個UIAttachmentBehavior(在iOS7 SDK中,UICollectionViewLayoutAttributes已經實現了UIDynamicItem接口,可以直接參與UIKit Dynamic的計算中去)。創建時我們希望collectionView的每個cell就保持在原位,因此我們設定了錨點為當前attribute本身的center。
接下來我們考慮滑動時的彈性效果的實現。在系統的信息app中,我們可以看到彈性效果有兩個特點:
- 隨著滑動的速度增大,初始的拉伸和壓縮的幅度將變大
- 隨著cell距離屏幕觸摸位置越遠,拉伸和壓縮的幅度
對于考慮到這兩方面的特點,我們所期望的滑動時的各cell錨點的變化應該是類似這樣的:
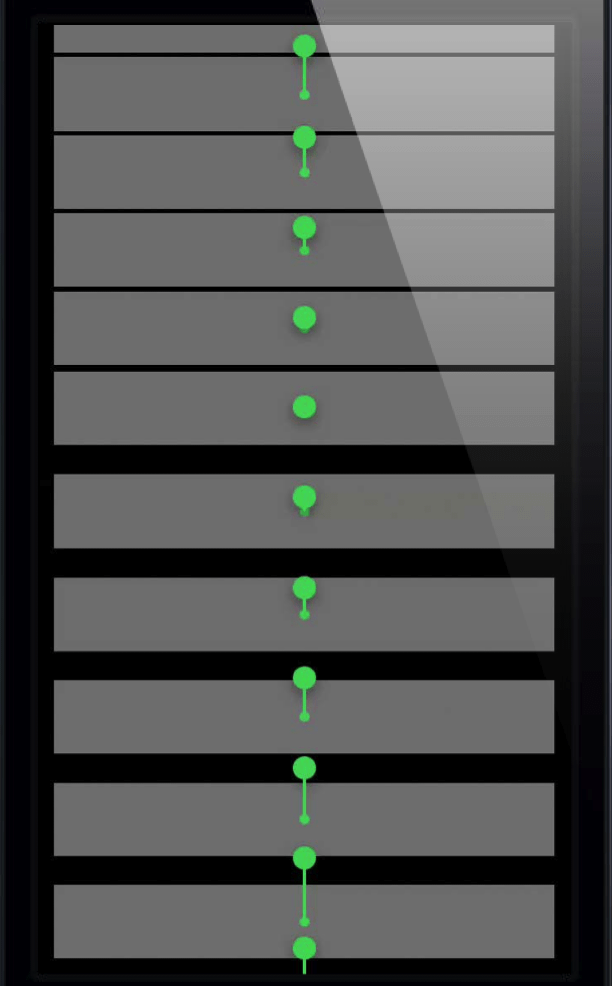
現在我們來實現這個錨點的變化。既然都是滑動,我們是不是可以考慮在UIScrollView的–scrollViewDidScroll:委托方法中來設定新的Behavior錨點值呢?理論上來說當然是可以的,但是如果這樣的話我們大概就不得不面臨著將剛才的layout實例設置為collectionView的delegate這樣一個事實。但是我們都知道layout應該做的事情是給collectionView提供必要的布局信息,而不應該負責去處理它的委托事件。處理collectionView的回調更恰當地應該由處于collectionView的controller層級的類來完成,而不應該由一個給collectionView提供數據和信息的類來響應。在UICollectionViewLayout中,我們有一個叫做-shouldInvalidateLayoutForBoundsChange:的方法,每次layout的bounds發生變化的時候,collectionView都會詢問這個方法是否需要為這個新的邊界和更新layout。一般情況下只要layout沒有根據邊界不同而發生變化的話,這個方法直接不做處理地返回NO,表示保持現在的layout即可,而每次bounds改變時這個方法都會被調用的特點正好可以滿足我們更新錨點的需求,因此我們可以在這里面完成錨點的更新。
//VVSpringCollectionViewFlowLayout.m
@implementation VVSpringCollectionViewFlowLayout//...-(BOOL)shouldInvalidateLayoutForBoundsChange:(CGRect)newBounds {UIScrollView *scrollView = self.collectionView;CGFloat scrollDelta = newBounds.origin.y - scrollView.bounds.origin.y;//Get the touch pointCGPoint touchLocation = [scrollView.panGestureRecognizer locationInView:scrollView];for (UIAttachmentBehavior *spring in _animator.behaviors) {CGPoint anchorPoint = spring.anchorPoint;CGFloat distanceFromTouch = fabsf(touchLocation.y - anchorPoint.y);CGFloat scrollResistance = distanceFromTouch / 500;UICollectionViewLayoutAttributes *item = [spring.items firstObject];CGPoint center = item.center;//In case the added value bigger than the scrollDelta, which leads an unreasonable effectcenter.y += (scrollDelta > 0) ? MIN(scrollDelta, scrollDelta * scrollResistance): MAX(scrollDelta, scrollDelta * scrollResistance);item.center = center;[_animator updateItemUsingCurrentState:item];}return NO;
}@end
首先我們計算了這次scroll的距離scrollDelta,為了得到每個item與觸摸點的之間的距離,我們當然還需要知道觸摸點的坐標touchLocation。接下來,可以根據距離對每個錨點進行設置了:簡單地計算了原來錨點與觸摸點之間的距離distanceFromTouch,并由此計算一個系數。接下來,對于當前的item,我們獲取其當前錨點位置,然后將其根據scrollDelta的數值和剛才計算的系數,重新設定錨點的位置。最后我們需要告訴UIDynamicAnimator我們已經完成了對冒點的更新,現在可以開始更新物理計算,并隨時準備collectionView來取LayoutAttributes的數據了。
也許你還沒有緩過神來?但是我們確實已經做完了,讓我們來看看實際的效果吧:
當然,通過調節damping,frequency和scrollResistance的系數等參數,可以得到彈性不同的效果,比如更多的震蕩或者更大的幅度等等。
這個layout實現起來非常簡單,我順便封裝了一下放到了Github上,大家有需要的話可以點擊這里下載并直接使用。
轉載自:https://onevcat.com/
)
)

![[codevs1039]數的劃分](http://pic.xiahunao.cn/[codevs1039]數的劃分)


)


函數以字符串形式寫入字符到磁盤文件)