摘要:隨著網站的訪問量越來越多,所以就考慮給網站增加服務器了,現在比較流行的做法就是給網站做集群環境,下面我把我做的過程記錄一下,方便日后查看,同時也希望可以幫助到有需要的朋友!
一:首先是環境:
1.jdk 1.6.0_45
2.tomcat 6.0.44
3.nginx 1.8.0
二:jdk,tomcat,nginx的安裝:
1.jdk的安裝請參考:點擊打開鏈接
2.nginx的安裝步驟
(1).首先下載nginx的windows版本,我這里下載的nginx 1.8.0版本,下載地址:點擊打開鏈接
(2).下載完成后,直接解壓到一個沒有中文的路徑下,我這里是解壓到:D:\server\nginx-1.8.0
(3).通過dos命令進入nginx-1.8.0目錄下啟動nginx即可
(4)Windows下操作Nginx命令
stop表示立即停止nginx,不保存相關信息
quit表示正常退出nginx,并保存相關信息
3.tomcat的安裝(直接到tomcat的官網下載解壓縮版的即可)
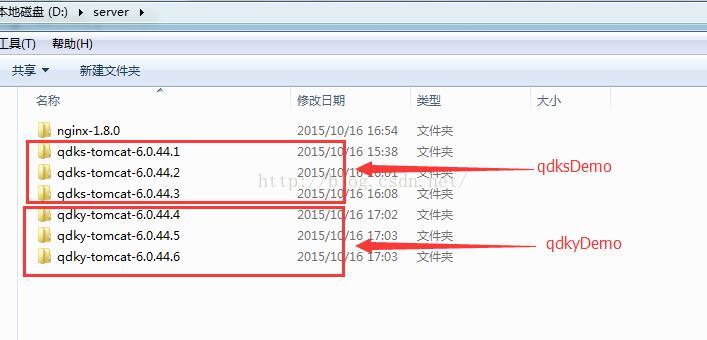
三:把下載下載的tomcat分別復制3個,一共是個,其中三個做qdksDemo的集群環境用,另外三個做qdkyDemo的集群環境用,具體截圖如下:
復制完成后,要分別修改每個tomcat的端口和session共享的配置,具體的配置如下:
1.第一處要修改的端口號
<Server port="8005" shutdown="SHUTDOWN"><Connector port="8081" protocol="HTTP/1.1" connectionTimeout="20000" redirectPort="8443" /><Connector port="8009" protocol="AJP/1.3" redirectPort="8443" /><Cluster className="org.apache.catalina.ha.tcp.SimpleTcpCluster"channelSendOptions="6"><Manager className="org.apache.catalina.ha.session.BackupManager"expireSessionsOnShutdown="false"notifyListenersOnReplication="true"mapSendOptions="6"/><!--<Manager className="org.apache.catalina.ha.session.DeltaManager"expireSessionsOnShutdown="false"notifyListenersOnReplication="true"/>--><Channel className="org.apache.catalina.tribes.group.GroupChannel"><Membership className="org.apache.catalina.tribes.membership.McastService"address="228.0.0.4"port="45564"frequency="500"dropTime="3000"/><Receiver className="org.apache.catalina.tribes.transport.nio.NioReceiver"address="auto"port="5000"selectorTimeout="100"maxThreads="6"/><Sender className="org.apache.catalina.tribes.transport.ReplicationTransmitter"><Transport className="org.apache.catalina.tribes.transport.nio.PooledParallelSender"/></Sender><Interceptor className="org.apache.catalina.tribes.group.interceptors.TcpFailureDetector"/><Interceptor className="org.apache.catalina.tribes.group.interceptors.MessageDispatch15Interceptor"/><Interceptor className="org.apache.catalina.tribes.group.interceptors.ThroughputInterceptor"/></Channel><Valve className="org.apache.catalina.ha.tcp.ReplicationValve"filter=".*\.gif|.*\.js|.*\.jpeg|.*\.jpg|.*\.png|.*\.htm|.*\.html|.*\.css|.*\.txt"/><Deployer className="org.apache.catalina.ha.deploy.FarmWarDeployer"tempDir="/tmp/war-temp/"deployDir="/tmp/war-deploy/"watchDir="/tmp/war-listen/"watchEnabled="false"/><ClusterListener className="org.apache.catalina.ha.session.ClusterSessionListener"/></Cluster>這樣一個tomcat的配置文件就修改完成了,其他5個tomcat的配置和這個流程一樣,只是對于的端口不能一樣
四:nginx的配置:
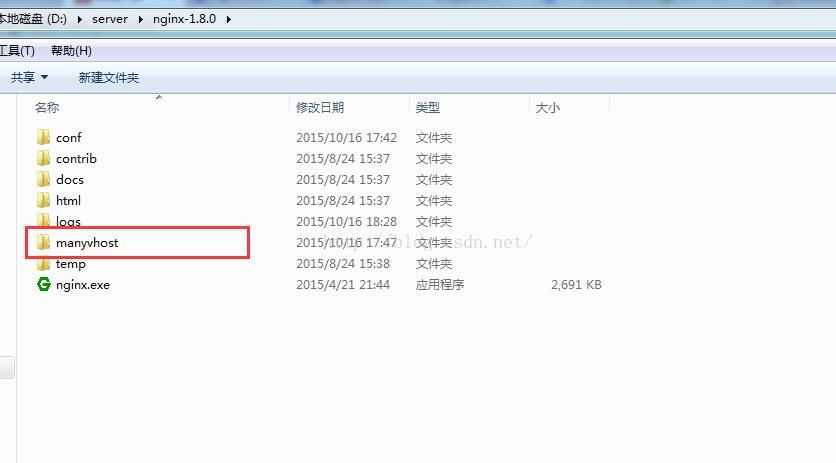
1.首先在nginx的目錄下新建一個新的文件夾來存放不同項目之間的集群配置文件,如下圖:
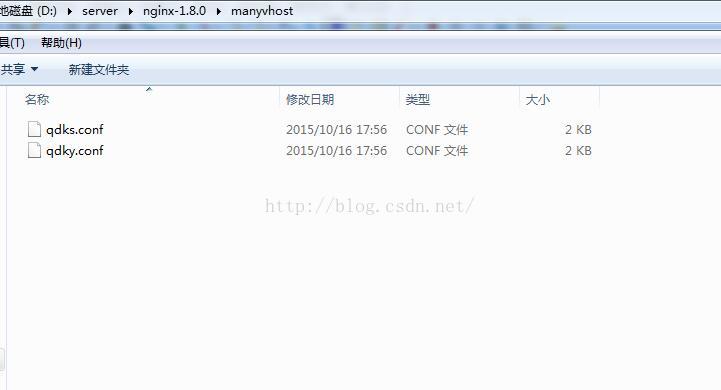
2.在manyvhost文件夾里面新建一個配置文件,分別對于兩個項目的集群配置,如下圖:
3.qdks.conf和qdky.conf的配置內容如下:
(1).qdks.conf
upstream  qdks  {  server   localhost:8081 weight=1;  server   localhost:8082 weight=1;server   localhost:8083 weight=1;
}
server {listen       8086;server_name 192.168.1.103;error_page   500 502 503 504  /50x.html;location = /50x.html {root   html;}root /data/projects/ycp/bill;# - rewrite: if( path ~ "^/assets/(.*)" ) goto "/public/assets/$1"#    location ~ ^/static/assets/(.*)$#    {#alias /data/projects/payment/web/public/assets/$1;#      access_log off;#      #expires 3d;#    }location / {index  index.html index.htm  index.jsp;}location ~ .* {# proxy_pass_header Server;proxy_set_header Host $http_host;# proxy_redirect off;proxy_set_header X-Real-IP $remote_addr;proxy_set_header X-Scheme $scheme;proxy_set_header X-Forwarded-For $proxy_add_x_forwarded_for;add_header Pragma "no-cache";proxy_pass http://qdks;}rewrite ^/admin/?$ /admin/login redirect;# for rewriterewrite ^/(channel|admin|mobile|api|web)/(.*)$ /public/index.php/$2 last;#redirect to mobile wap#rewrite ^$ /m redirect;#rewrite ^/$ /mobile/user redirect;}
(2).qdky.conf
upstream  qdky  {  server localhost:7081 weight=1;  server localhost:7082 weight=1;server localhost:7083 weight=1;
}
server {listen       7086;server_name  192.168.1.103;error_page   500 502 503 504  /50x.html;location = /50x.html {root   html;}root /data/projects/ycp/bill;# - rewrite: if( path ~ "^/assets/(.*)" ) goto "/public/assets/$1"#    location ~ ^/static/assets/(.*)$#    {#alias /data/projects/payment/web/public/assets/$1;#      access_log off;#      #expires 3d;#    }location / {index  index.html index.htm  index.jsp;}location ~ .* {# proxy_pass_header Server;proxy_set_header Host $http_host;# proxy_redirect off;proxy_set_header X-Real-IP $remote_addr;proxy_set_header X-Scheme $scheme;proxy_set_header X-Forwarded-For $proxy_add_x_forwarded_for;add_header Pragma "no-cache";proxy_pass http://qdky;}rewrite ^/admin/?$ /admin/login redirect;# for rewriterewrite ^/(channel|admin|mobile|api|web)/(.*)$ /public/index.php/$2 last;#redirect to mobile wap#rewrite ^$ /m redirect;#rewrite ^/$ /mobile/user redirect;}
這兩個配置文件就是我當前環境下的配置文件,其中qdks的項目的端口號8086,下面對應三個tomcat的端口為:8081,8082,8083;qdky的項目的端口號7086,下面對應三個tomcat的端口號為:7081,7082,7083
4.最后在nginx的conf目錄下的nginx.conf核心配置文件中引入上面的兩個項目的集群配置,如下:
#user  nobody;
worker_processes  1;error_log  logs/error.log;
error_log  logs/error.log  notice;
error_log  logs/error.log  info;pid        logs/nginx.pid;events {worker_connections  5000;
}http {include       mime.types;default_type  application/octet-stream;#隱藏nginx的版本號server_tokens off;#log_format  main  '$remote_addr - $remote_user [$time_local] "$request" '#                  '$status $body_bytes_sent "$http_referer" '#                  '"$http_user_agent" "$http_x_forwarded_for"';#access_log  logs/access.log  main;#access日志存放路徑和格式access_log  logs/access.log;#提升文件傳輸性能sendfile        on;#tcp_nopush     on;#keepalive_timeout  0;#keepalive_timeout  65;#設置客戶端能夠請求的單個文件大小client_max_body_size 300m;keepalive_timeout  75;#proxy參數#跟后端服務器連接的超時時間,發起握手等候響應超時時間proxy_connect_timeout 5;#連接成功后,等候后端服務器的響應時間proxy_read_timeout 600;#后端服務器數據回傳時間proxy_send_timeout 600;#代理請求緩存區proxy_buffer_size 16k;#同上,告訴nginx保存單個用的幾個buffer、最大用多空間proxy_buffers 4 64k;#如果系統很忙時可以申請更大的proxy_buffers,官方推薦*2proxy_busy_buffers_size 128k;proxy_temp_file_write_size 128k;#gzip  on;#開啟壓縮功能gzip on;gzip_min_length 1k;gzip_buffers 4 16k;gzip_http_version 1.1; gzip_comp_level 2;#壓縮級別從低到高1-9gzip_types text/plain application/x-javascript text/css application/xml;gzip_vary on;#qdksDemo和qdkyDemo項目的虛擬目錄(用絕對路徑表示)include  D:/server/nginx-1.8.0/manyvhost/qdks.conf;include  D:/server/nginx-1.8.0/manyvhost/qdky.conf;# another virtual host using mix of IP-, name-, and port-based configuration##server {#    listen       80;#    listen       somename:8080;#    server_name  somename  alias  another.alias;#    location / {#        root   html;#        index  index.html index.htm;#    }#}# HTTPS server##server {#    listen       443;#    server_name  localhost;#    ssl                  on;#    ssl_certificate      cert.pem;#    ssl_certificate_key  cert.key;#    ssl_session_timeout  5m;#    ssl_protocols  SSLv2 SSLv3 TLSv1;#    ssl_ciphers  HIGH:!aNULL:!MD5;#    ssl_prefer_server_ciphers   on;#    location / {#        root   html;#        index  index.html index.htm;#    }#}}
五:分別部署對應的項目,來測試我們上面配置的集群環境是否正常
1.下載對應的項目源代碼,下載后解壓到你的本地workspace下面,我的路徑是:D:\workspace_qdexam\qdksDemo和D:\workspace_qdexam\qdkyDemo
qdksDemo的下載地址:http://download.csdn.net/detail/sxdtzhaoxinguo/9187453
qdkyDemo的下載地址:http://download.csdn.net/detail/sxdtzhaoxinguo/9187455
2.分別部署到對應的tomcat下面,這里我采用的是直接映射路徑的方法
(1).qdksDemo的部署方法是,在對應的三個tomcat的conf\Catalina\localhost目錄下新建一個配置文件qdksDemo.xml,該配置文件的內容如下:
<Context path="/qdksDemo" docBase="D:\workspace_qdexam\qdksDemo\WebContent" debug="0" privileged="true"> </Context>(2).qdkyDemo的部署方法是,在對應的三個tomat的conf\Catalina\localhost目錄下新建一個配置文件qdkyDemo.xml,該配置文件的內容如下:
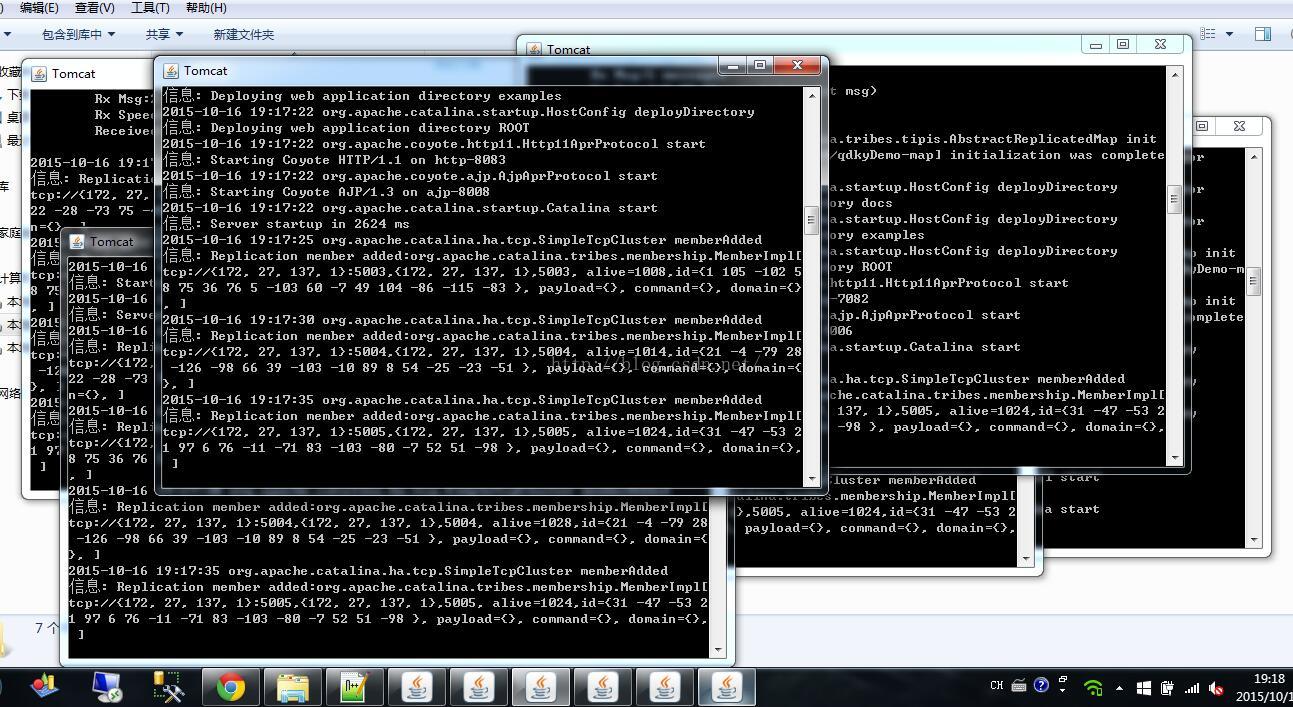
<Context path="/qdkyDemo" docBase="D:\workspace_qdexam\qdkyDemo\WebContent" debug="0" privileged="true"></Context>3.分別啟動這6個tomcat,如下圖:
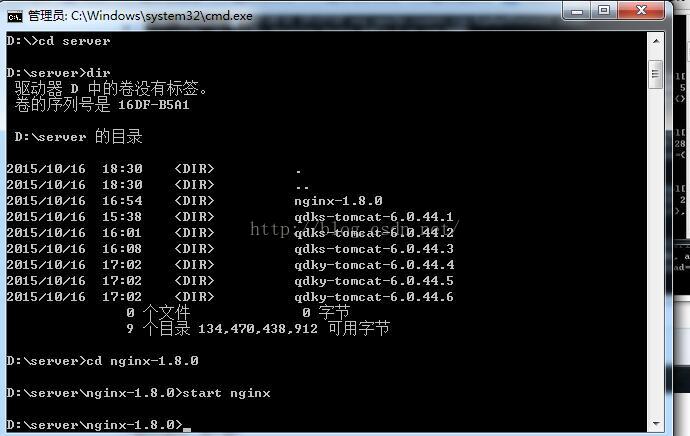
4.啟動nginx,如下圖:
5.最后通過瀏覽器訪問這兩個項目,如下圖:
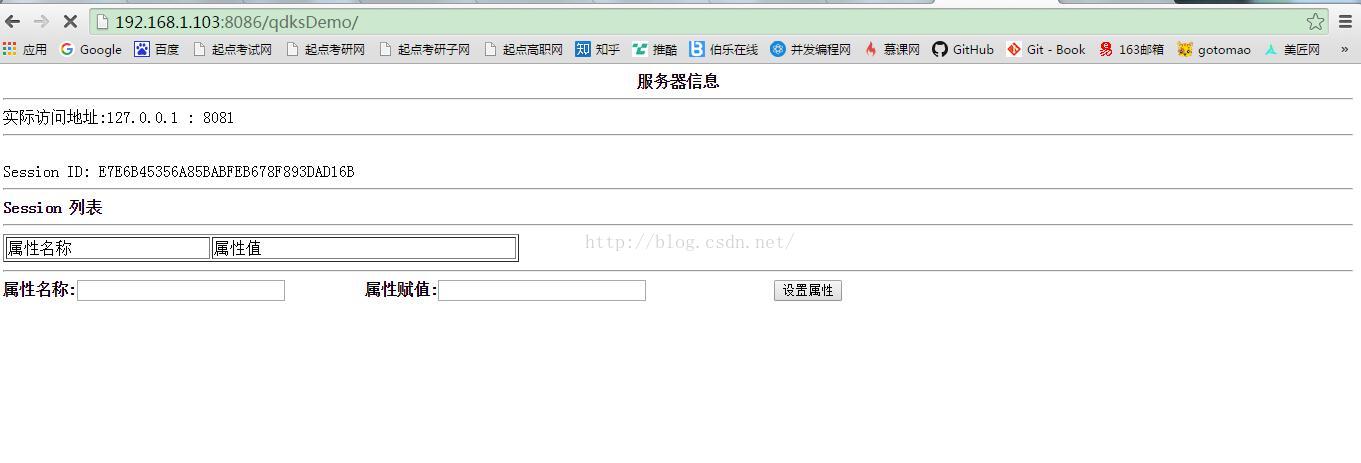
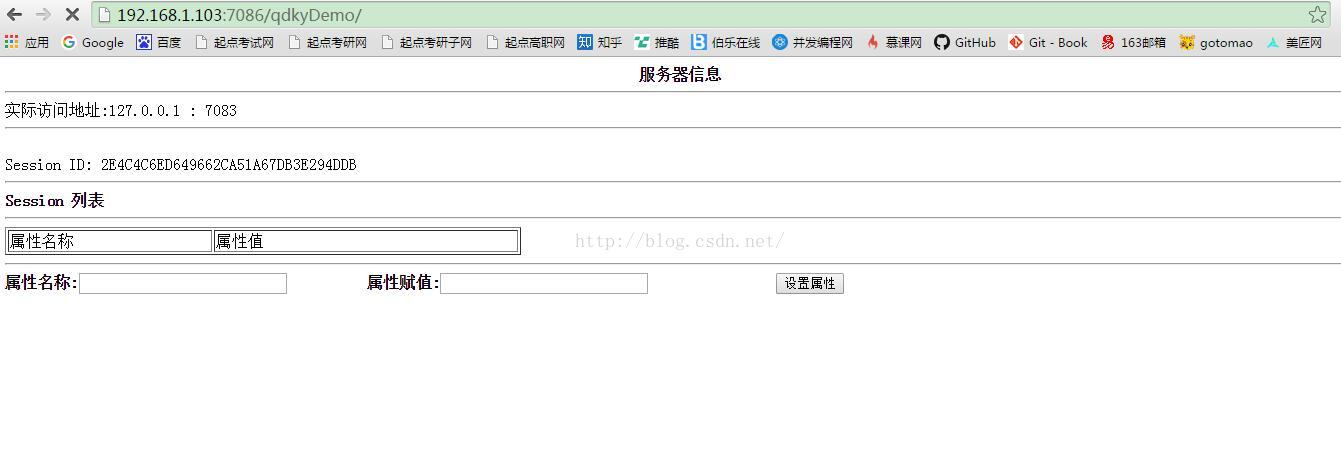
分別點擊刷新,你會發現上面的實際訪問端口會變,但是下面的Session ID是不變的,這就說明基于nginx和tocmat的集群搭建成功了!
最后我把我的tomcat和nginx都打包上傳,供大家參考!
tomcat的配置壓縮包下載地址:http://download.csdn.net/detail/sxdtzhaoxinguo/9187521
nginx的配置壓縮包下載地址:http://download.csdn.net/detail/sxdtzhaoxinguo/9187527


 批量更新列內容)
+列名稱)

