文章目錄
- 前言
- 一、點聚合是什么?
- 二、開發前準備
- 三、API示例
- 1.引入高德地圖
- 2.創建地圖實例
- 3.添加標點
- 4.刪除標點
- 5.刪除所有標點(覆蓋物)
- 6.聚合點
- 7.自定義聚合點樣式
- 8.清除聚合
- 9.打開窗體信息
- 四、實戰開發
- 需求要求
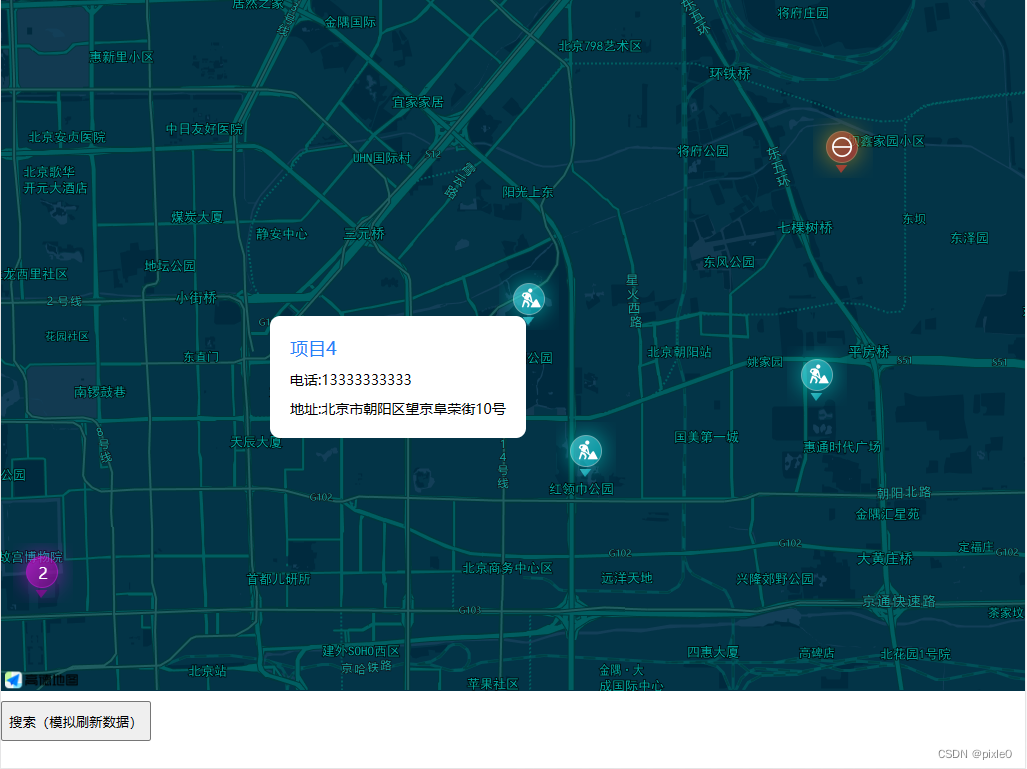
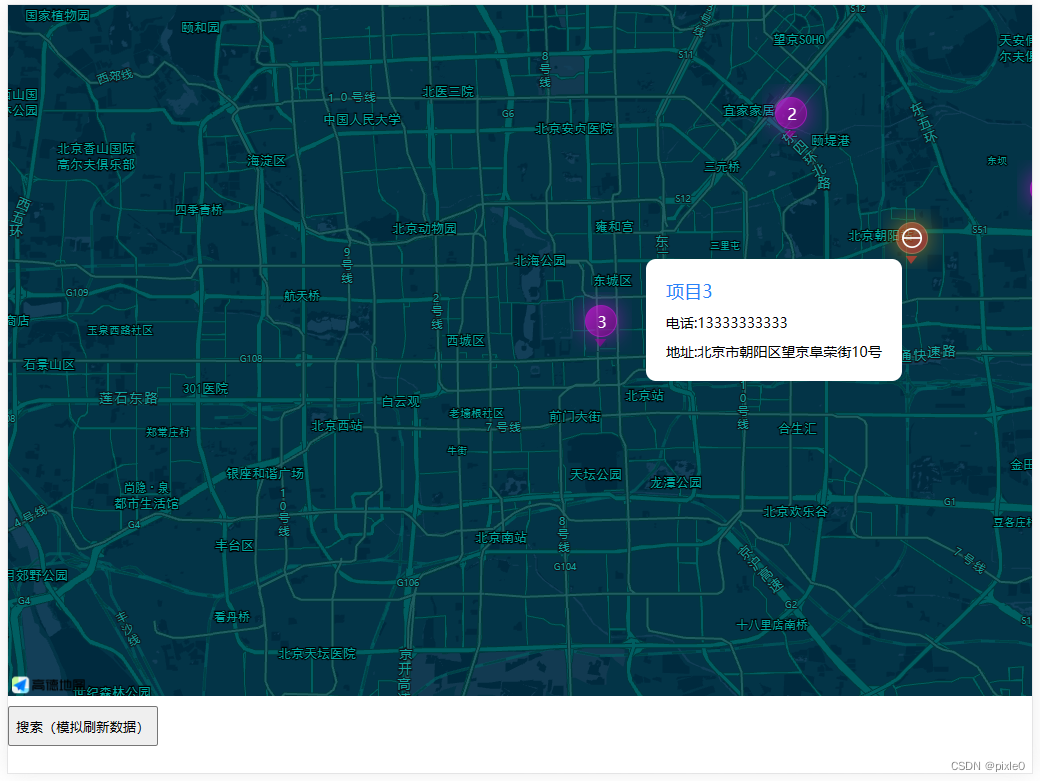
- 效果圖如下:
- 封裝思路分析
- 完整代碼
- 效果
前言
本文將講述如何利用高德地圖JS API實現地圖標點、聚合點、自定義圖標、點擊窗體信息展示等基本功能實現,結合實際項目中遇到場景需求進行演示和封裝高復用性組件
一、點聚合是什么?
當地圖中的標點很多的時候,縮小地圖層級時候會重疊在一起,這時候可以把局部區域重疊的點聚合成一個點并標注當前區域重合點個數來展示,隨著地圖縮放層級動態響應式渲染。

二、開發前準備
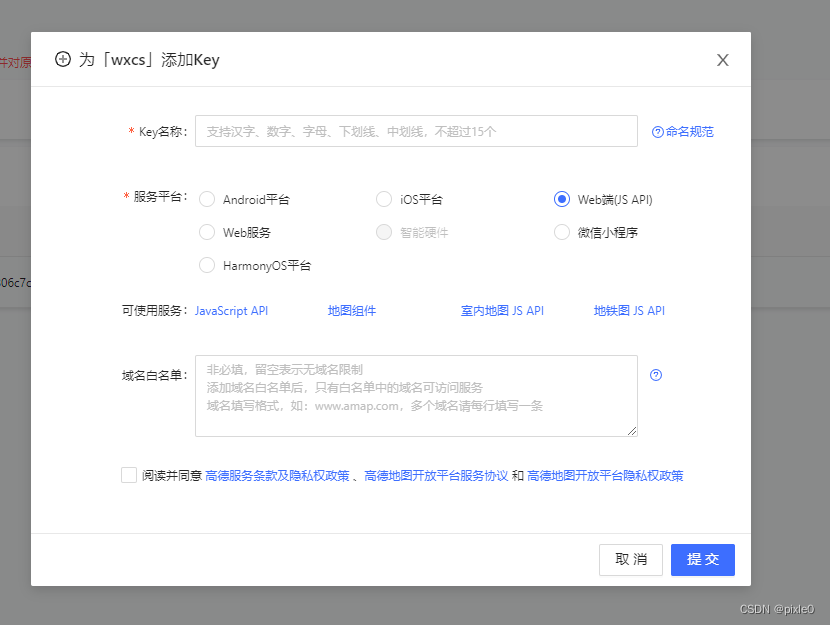
需要到高德開放平臺-控制臺申請key,我的應用——添加key——服務平臺選擇Web端(JS API)
三、API示例
接下來將以Vue項目演示API功能
1.引入高德地圖
入口文件index.html引入高德sdk,key填寫申請的key
<script src="https://webapi.amap.com/maps?v=1.4.15&key=您申請的key值"></script>
2.創建地圖實例
創建一個地圖容器
<div id="map"></div>
`創建一個地圖實例,之后功能將依賴該實例,vue要在mounted周期函數內執行
 mounted() {
//地圖實例let map = new AMap.Map('map',//地圖容器id{resizeEnable: true, //是否監控地圖容器尺寸變化zoom:11, //初始化地圖層級center: [116.397428, 39.90923], //初始化地圖中心點//  mapStyle:'amap://styles/blue',//地圖樣式(背景)可選,可以在后臺新建自定義樣式});}
地圖樣式通過如下設置:
mapStyle:"amap://styles/${theme}"
其中theme值官方集成了多種樣式如下:
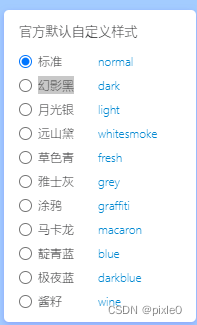
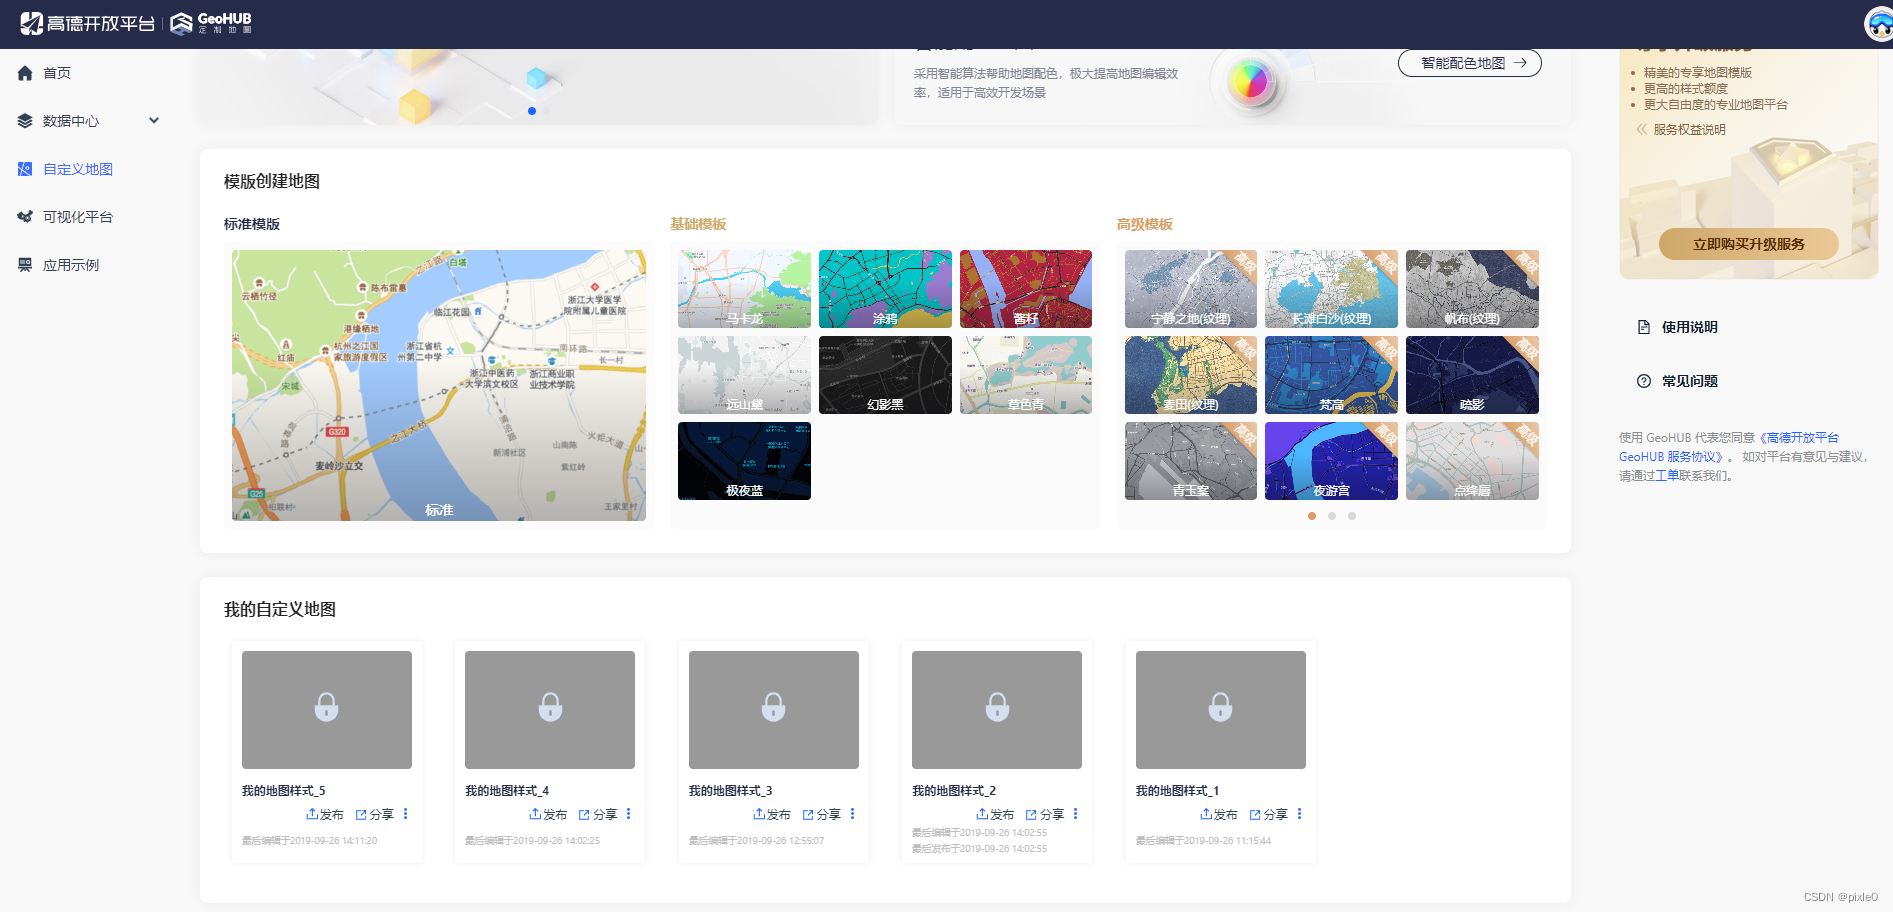
如官方提供的樣式不滿足也可以自定義,前往https://geohub.amap.com/mapstyle/index創建
引入創建的ID替換即可
mapStyle:'amap://styles/08539321a17cd7c322f76950f2cxxxxx'
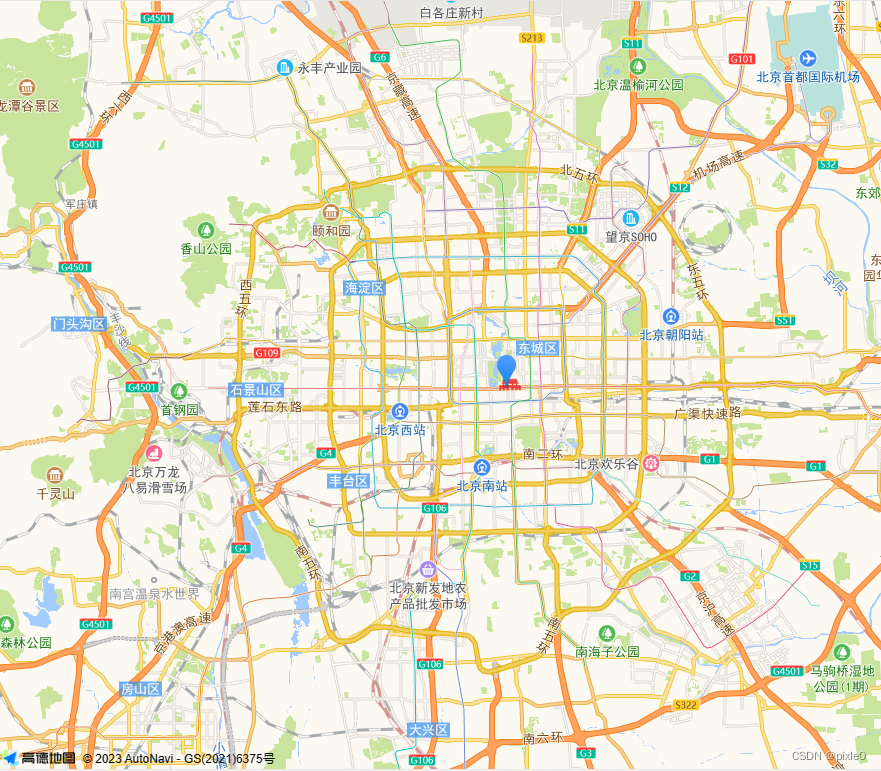
3.添加標點
//新建一個標點let marker = new AMap.Marker({position:[116.397428, 39.90923], //位置offset: new AMap.Pixel(-13, -30),//偏移//icon:'', //圖標可選,可以使用本地或者在線圖標});//監聽標點點擊事件marker.on('click',e=>{console.log(e,'click')})//標點添加到地圖上map.add(marker)
4.刪除標點
刪除一個或者多個標點,入參markers數組表示標點對象集合
let marker = new AMap.Marker({position:[116.39, 39.90], //位置});let marker2 = new AMap.Marker({position:[117.39, 40.90], //位置});map.add(marker)map.add(marker2)//刪除第一個標點map.remove([marker]);
5.刪除所有標點(覆蓋物)
map.clearMap()
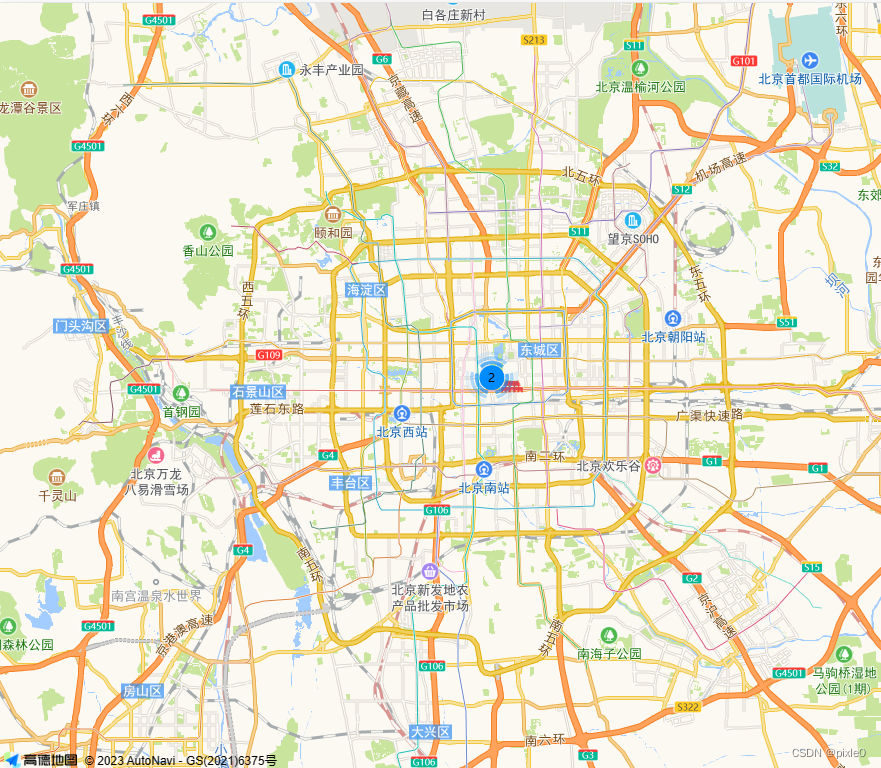
6.聚合點
//添加2個標點let marker = new AMap.Marker({position:[116.397428, 39.90923], //位置});let marker2 = new AMap.Marker({p position:[116.3680, 39.9200], //位置});map.add(marker)map.add(marker2)/*設置聚合*@param map:地圖實例*@param markers:標點對象數組*/let cluster = new AMap.MarkerClusterer(map, markers, {gridSize:80});
未聚合
聚合效果:
7.自定義聚合點樣式
聚合點自定義樣式通過設置renderClusterMarker字段配置渲染函數,并在渲染函數中通過dom操作生成樣式節點插入聚合點父節點上
//聚合點實例let cluster = new AMap.MarkerClusterer(map, markers, {gridSize: 80,renderClusterMarker:renderClusterMarker,//自定義樣式渲染});//渲染函數function renderClusterMarker(context) {var div = document.createElement("div");div.style.width = "50px";div.style.height = "50px";div.style.lineHeight = "50px";div.style.backgroundImage = `url(/static/images/icon.png)`;//自定義圖標背景div.style.backgroundSize = "100%";div.style.backgroundRepeat = "no-repeat";div.innerHTML = context.count;//聚合個數div.style.color = "#fff";div.style.fontSize = "16px";div.style.paddingBottom = "10px";div.style.boxSizing = "border-box";div.style.textAlign = "center";var size = Math.round(30 + Math.pow(context.count / markers.length, 1 / 5) * 20//markers所有標點對象集合);context.marker.setOffset(new AMap.Pixel(-size / 2, -size / 2));context.marker.setContent(div);}

8.清除聚合
每次重新渲染設置聚合需要清除之前,不然數量會疊加
//cluster:聚合點實例cluster&&cluster.setMap(null);
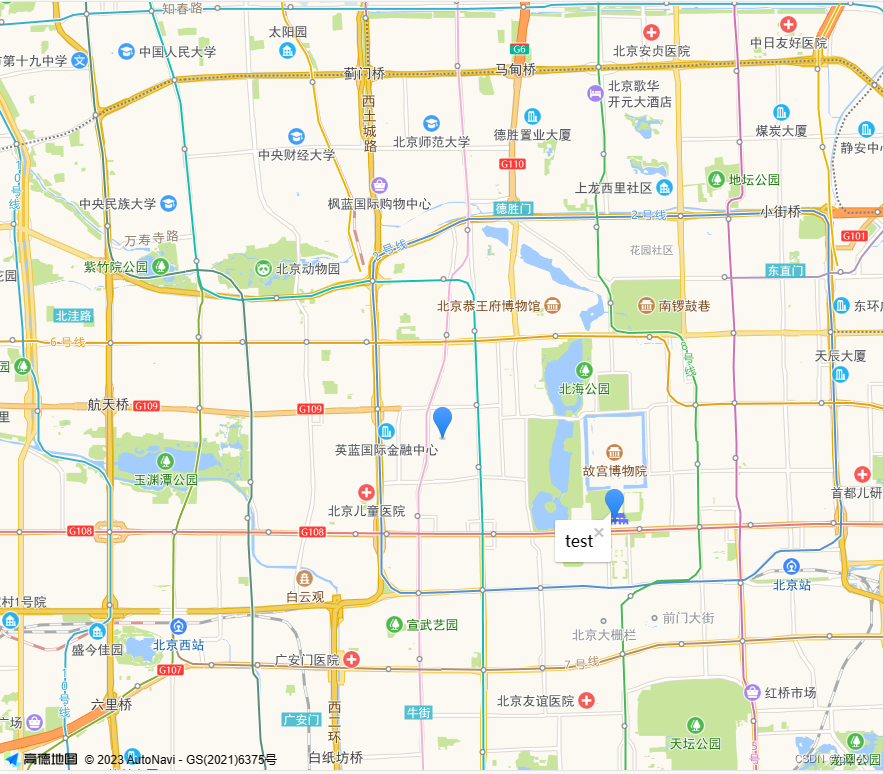
9.打開窗體信息
//新建一個標點let marker = new AMap.Marker({position:[116.397428, 39.90923], //位置offset: new AMap.Pixel(-13, -30),//偏移//icon:'', //圖標可選,可以使用本地或者在線圖標});//監聽標點點擊事件(顯示窗體信息)marker.on('click',e=>{//創建窗體實例let infoWindow =new AMap.InfoWindow({content:'test',//窗體內容,支持插入dom.innerHTML anchor:'top-right'//錨點,窗體相對鼠標點擊位置});//顯示窗體//map:地圖實例,[lng,lat]:窗體在地圖中位置infoWindow.open(map,[e.lnglat.lng,e.lnglat.lat])})//標點添加到地圖上map.add(marker)anchor可取值:top-left、top-center、top-right、middle-left、center、middle-right、bottom-left、 bottom-center、bottom-right
四、實戰開發
需求要求
1.假設需要在地圖上標注各種工程項目位置,工程項目分為3中類型,在建工程,已完成工程,延期工程不同類型分別對應不同圖標
2.實現聚合功能,聚合圖標自定義
3.點擊對應工程項目彈窗顯示項目信息
4.外部有搜索條件可以進行數據搜索,搜索完重新渲染地圖,比如搜索xxxx至xxxx時間內在建工程,或者根據類型搜索等
5.大屏功能進行地圖樣式換膚
6.封裝成通用組件方便下次開發使用
效果圖如下:
封裝思路分析
怎樣封裝才能方便使用呢?
對于組件封裝我們可以采用倒推法,先寫父組件里面的引用然后倒推實現子組件邏輯。
我們很容易想到在父組件內這樣引用地圖組件
<amap :center="mapCenter" :zoom="zoom" :markers="markers"></amap>
傳入地圖中心點(center)、層級(zoom)以及標點經緯度數組(markers)就能自動渲染,有了這個錐形后我們在繼續擴展。
聚合樣式和信息窗體要如何設計才能適應不同場景的自定義呢?
對于vue自定義內容首當其沖能想到的當然是slot,用插槽形式暴露給調用方就能自由diy
<amap :center="mapCenter" :zoom="zoom" :markers="markers"><!-- 聚合樣式 --><template v-slot:cluster></template><!-- 窗體樣式 --><template v-slot:infoWindow></template>
</amap>
整個調用我們已經推導出來了,但還有一個問題,窗體或者聚合插槽中渲染數據要怎么樣拿到?這個數據是和每個標點一一對應。我們可以通過標點參數(markers)傳入數據在通過作用域插槽傳出,最終成型為:
<amap :center="mapCenter" :zoom="zoom" :markers="markers"><!-- 聚合樣式 --><template v-slot:cluster></template><!-- 窗體樣式 --><template v-slot:infoWindow="{ data }"></template></amap>
很可惜經過研究聚合點個數數據無法通過作用域插槽傳出,我們可以在封裝的組件中通過dom操作直接在插槽節點內添加一個span節點寫入個數居中顯示,寫死這個渲染節點,這樣除了這個數字剩下圖標樣式都可以通過插槽自定義。
完整代碼
先封裝高德地圖工具類
amap.js
/*** 高德地圖工具類*/
class amap {/*** 構造函數* @param  id :地圖容器id* @param  params 地圖配置參數*/constructor(id, params) {this.markers = [];//所有標點數組集合this.cluster=null;//聚合點實例this.map = new AMap.Map(id, {...params});}/*** 添加標點* @param markers:標點數組,item支持經緯度或者對象* @param clickEvent:標點點擊事件回調*/addMarkers(markers = [], clickEvent = () => { }) {for (let item of markers) {let params = {offset: new AMap.Pixel(-13, -30)};if (Array.isArray(item)) {params.position = item;} else if (typeof item === "object") {params = { ...item,...params };}//新建一個標點let marker = new AMap.Marker(params);//標點點擊事件marker.on("click", (e) => {typeof clickEvent === 'function' && clickEvent({ ...params, lnglat: e.lnglat })});//標點添加到地圖上this.map.add(marker);//保存到實例this.markers.push(marker)}}//清空地圖覆蓋物clearMap() {this.markers=[]this.map.clearMap();}/*** 聚合點* @param renderClusterMarker:聚合點自定義渲染函數*/clusterMarker(renderClusterMarker) {//清除之前的聚合this.cluster&&this.cluster.setMap(null);  //設置聚合this.cluster= new AMap.MarkerClusterer(this.map, this.markers, {gridSize: 80,renderClusterMarker: renderClusterMarker});}//打開信息窗口showInfoWindow({ lng, lat, ...params }) {//創建窗體實例let infoWindow = new AMap.InfoWindow(params);//顯示窗體//map:地圖實例,[lng,lat]:窗體在地圖中位置infoWindow.open(this.map, [lng, lat])}//關閉信息窗口closeInfoWindow() {this.map.clearInfoWindow();}}export default amap
高德地圖組件
amap.vue
<template><div id="amap-container" class="amap-container" :style="layoutStyle"><!-- 自定義渲染樣式 --><div class="cust-cluster-wrap"><slot name="cluster"></slot></div><div class="cust-infoWindow-wrap"><slot name="infoWindow" :data="currentMarkerData"></slot></div></div>
</template><script>
import amap from "./amap";
export default {name: "Amap",props: {//地圖寬單位pxwidth: {type: [Number, String],default: "100%",},//地圖高單位pxheight: {type: [Number, String],default: "100%",},//地圖實例化參數mapParams: {type: Object,default: () => {},},//地圖中心點center: {type: Array,default: () => [116.397428, 39.90923],},//地圖層級zoom: {type: Number,default: 11,},//標點markers: {type: Array,default: () => [],},//是否聚合點isCluster: {type: Boolean,default: true,},//點擊標點是否顯示信息窗口isShowInfoWindow: {type: Boolean,default: true,},//信息窗口配置參數infoWindowParams: {type: Object,default: () => {},},//是否點擊地圖關閉信息窗口closeIwOnClickMap: {type: Boolean,default: true,},},data() {return {map: null, //地圖實例cluster: null, //聚合點實例currentMarkerData: {},};},computed: {//設置地圖容器寬高layoutStyle() {//%或者px兼容處理const getAttrVal = (val) =>val.toString().includes("%") ? val : `${val}px`;return {width: getAttrVal(this.width),height: getAttrVal(this.height),};},//是否自定義聚合點樣式isCustcluster() {return this.$scopedSlots.cluster;},//是否自定義信息窗口isCustInfoWindow() {return this.$scopedSlots.infoWindow;},},watch: {//監聽標點數據重新渲染markers: {handler(val) {if (this.map) {//清空地圖標點this.map.clearMap();//重新渲染this.addMarkers(val);this.isCluster && this.clusterMarker(); //設置聚合點}},immediate: false,deep: true,},},mounted() {this.createMap(); //創建地圖this.addMarkers(this.markers); //添加標點this.isCluster && this.clusterMarker(); //設置聚合點},beforeDestroy() {//銷毀地圖this.map && this.map.map.destroy();},methods: {//創建地圖實例createMap() {this.map = new amap("amap-container", {...this.mapParams,zoom: this.zoom,center: this.center,});//地圖加載完成this.map.map.on("complete", () => {this.$emit("initComplete");});//地圖點擊事件this.map.map.on("click", (e) => {this.closeIwOnClickMap&&this.closeInfoWindow()this.$emit("mapClick", e);});},//標點addMarkers(markers = []) {this.map.addMarkers(markers, (e) => {this.currentMarkerData = e;//點擊標點顯示信息窗口if (this.isShowInfoWindow) {//等待currentMarkerData數據渲染更新完成在打開信息窗口this.$nextTick(() => {this.map.showInfoWindow({lat: e.lnglat.lat,lng: e.lnglat.lng,...this.infoWindowParams,isCustom: this.isCustInfoWindow,content: this.getCustInfoWindowDom() || e.infoWindowContent || "",});});}//派發標點點擊事件this.$emit("markerClick", e);});},//聚合標點clusterMarker() {//自定義渲染函數function renderClusterMarker(context) {//獲取自定義聚合點DOMlet custClusterDom =document.getElementsByClassName("cust-cluster-wrap")[0];let div = document.createElement("div");div.innerHTML = custClusterDom.innerHTML;let span = document.createElement("span");span.style.position = "absolute";span.style.top = "50%";span.style.left = "50%";span.style.transform = "translate(-50%,-50%)";span.style.zIndex = "99";//設置聚合數span.innerHTML = context.count;//插入聚合數量span節點div.children[0].appendChild(span);let size = Math.round(30 + Math.pow(context.count / this.map.markers.length, 1 / 5) * 20);context.marker.setOffset(new AMap.Pixel(-size / 2, -size / 2));context.marker.setContent(div);}//聚合this.map &&this.map.clusterMarker(this.isCustcluster ? renderClusterMarker.bind(this) : undefined);},//獲取自定義窗口DomgetCustInfoWindowDom() {if (!this.isCustInfoWindow) return;return document.getElementsByClassName("cust-infoWindow-wrap")[0].innerHTML;},//關閉信息窗口closeInfoWindow() {this.map.closeInfoWindow();},},
};
</script><style lang="scss" scoped>
.amap-container {width: 100%;height: 100%;
}
.cust-cluster-wrap {position: fixed;top: 0;left: 0;transform: translate(-100%, -100%);
}
.cust-infoWindow-wrap {position: fixed;top: 0;left: 0;transform: translate(-100%, -100%);
}
</style>
頁面調用:
inde.vue
<template><div class="container"><!-- 地圖區域 --><div class="map-wrap"><amap:center="mapCenter":zoom="zoom":mapParams="mapParams":markers="markers":infoWindowParams="infoWindowParams"isCluster@initComplete="onInitComplete"@mapClick="onMapClick"><!-- 聚合樣式 --><template v-slot:cluster><div class="cluster"><img class="icon" src="/static/images/icon.png" /></div></template><!-- 窗體樣式 --><template v-slot:infoWindow="{ data }"><div class="infoWindow"><div class="name">{{ data.projectName }}</div><div class="row">電話:{{ data.phone }}</div><div class="row">地址:{{ data.address }}</div></div></template></amap></div><!-- 搜索按鈕 --><button class="search" @click="onSearch">搜索(模擬刷新數據)</button></div>
</template><script>
import amap from "./component/amap/amap.vue";
export default {components: {amap,},data() {return {markers: [], //標點集合mapCenter: [116.397428, 39.90923],zoom: 13,mapParams: {mapStyle: "amap://styles/blue", //地圖樣式},infoWindowParams: {anchor: "top-right",offset: new AMap.Pixel(0, 15), //偏移},};},created() {this.onSearch();},mounted() {},methods: {//加載完成onInitComplete() {console.log("加載完成");},//點擊地圖onMapClick(e) {console.log(e, "點擊地圖");},//搜索onSearch() {this.markers = [];this.$nextTick(() => {//模擬接口生成數據for (let i = 0; i < parseInt(Math.random() * 20); i++) {let [lng, lat] = this.mapCenter;let position = [lng + i * Math.random() * 0.05, lat + i * 0.01];this.markers.push({position,//經緯度icon: `/static/images/map_icon${parseInt(Math.random() * 3) + 1}.png`,//標點圖標projectName: `項目${i}`,//項目名稱phone: "13333333333",//電話address: "北京市朝陽區望京阜榮街10號",//地址});}});},},
};
</script><style lang="scss" scoped>
.container {width: 100%;height: 100%;
}
.map-wrap {height: 90%;width: 100%;.cluster {height: 60px;width: 60px;border-radius: 50%;color: #fff;font-size: 16px;line-height: 50px;.icon {width: 100%;position: absolute;top: 0;left: 0;height: 100%;}}.infoWindow {padding: 20px;box-sizing: border-box;border-radius: 10px;background: #fff;.name {font-size: 18px;color: rgb(39, 130, 248);}.row {margin-top: 10px;font-size: 14px;}}
}
.search {margin-top: 10px;width: 150px;height: 40px;
}
</style>
效果
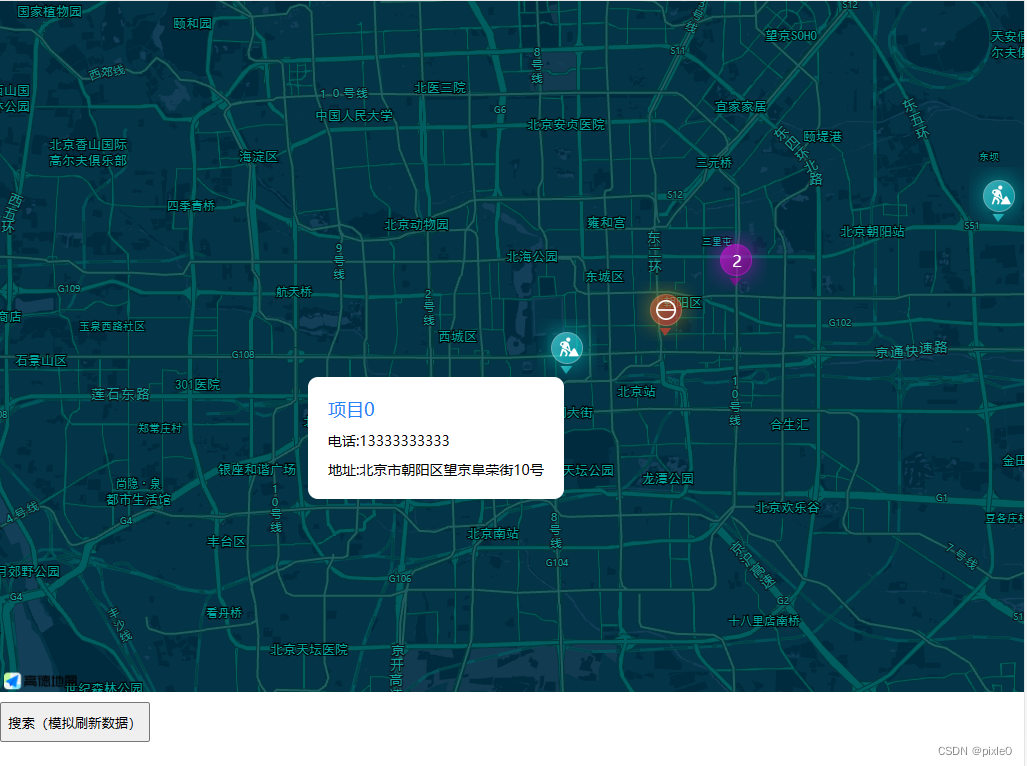
搜索刷新后

Git在公司中團隊內合作和跨團隊合作和分支操作的全部流程(一篇就夠))


: invalid next size)


