
前言
本文記錄學習planning模塊時的一些筆記,總體流程參照https://zhuanlan.zhihu.com/p/61982682中的流程圖,如上圖所示。
planning_component
modules/planning/planning_component.cc

PlanningComponent::Init部分首先完成規劃模式的選擇:
if (FLAGS_use_navigation_mode) {planning_base_ = std::make_unique<NaviPlanning>(injector_);} else {planning_base_ = std::make_unique<OnLanePlanning>(injector_);}
再完成相應的消息訂閱
routing_reader_ = node_->CreateReader<RoutingResponse>(
traffic_light_reader_ = node_->CreateReader<TrafficLightDetection>(
pad_msg_reader_ = node_->CreateReader<PadMessage>(
story_telling_reader_ = node_->CreateReader<Stories>(
relative_map_reader_ = node_->CreateReader<MapMsg>(
最后消息發布
planning_writer_ = node_->CreateWriter<ADCTrajectory>(rerouting_writer_ = node_->CreateWriter<RoutingRequest>(planning_learning_data_writer_ = node_->CreateWriter<PlanningLearningData>(
PlanningComponent::Proc的主要是檢查數據,并且執行注冊好的Planning,生成路線并且發布。
bool PlanningComponent::Proc(...) {// 1. 檢查是否需要重新規劃線路。CheckRerouting();// 2. 數據放入local_view_中,并且檢查輸入數據。...// 3. 執行注冊好的Planning,生成線路。planning_base_->RunOnce(local_view_, &adc_trajectory_pb);// 4. 發布消息planning_writer_->Write(std::make_shared<ADCTrajectory>(adc_trajectory_pb));// 5. 最后記錄history->Add(adc_trajectory_pb);
}
RunOnce在NaviPlanning和OnLanePlanning都有,本文以常用的OnLanePlanning為例。
PS1
prediction_obstacles從channel中獲得的指針,類型為PredictionObstacles,代碼文件在modules/prediction/proto/prediction_obstacle.proto中,該類型的消息來自預測模塊,包含了以下信息:Header頭結構:包含了這條消息發布的時刻(以秒為單位),目前位置的模塊名,該消息的序列號(每個模塊各自維護的)等,幾乎每個消息都包含有這個頭結構,下面就不提及了。PredictionObstacle預測模塊中的若干個障礙物行為:有感知模塊中的障礙物(PerceptionObstacle),它包括障礙物的 id,它的三維坐標、速度加速度、邊界大小(長高寬)、特殊的形狀、類型(行人、非機動車、機動車)、運動軌跡等;還有時間戳,記錄 GPS 給出的時刻;還有預測的時間長度;多種可能的運動軌跡;障礙物的運動趨勢、優先級等。- 開始的時間戳:記錄預測開始的時刻
- 結束時間戳:預測結束的時刻
- 自動駕駛車輛的運動趨勢,停止、正常行駛還是正在變道等
Scenery現在的場景
chassis從channel獲得的指針,類型為Chassis,這條消息直接來自總線 CanBus,代碼文件在modules/canbus/proto/chassis.proto中,該類包含了很多信息,主要是汽車底盤所給出的機械狀態信息,比如:- 駕駛模式,有手動駕駛、自動駕駛、僅控制方向、僅控制速度以及緊急模式
- 檔位情況、引擎轉速、車輛速度、里程表、燃油情況、電池電量等
- 剎車、油門踏板的力度,方向盤的旋轉角度,車輪轉速
- 轉向燈、霧燈、大燈的工作情況
localization_estimate從channel中獲得的指針,類型為LocalizationEstimate,代碼文件在modules/localization/proto/localization.proto中,這條消息來自定位模塊,該類主要包含了:Pose位置姿勢,包括車頭朝向,在地圖上的線速度、線加速度和相對位置,角速度、仰角度等- 測量上述姿勢的時刻
- 車輛已經經過的軌跡點列
- MSF 定位狀態與質量
PS2
std::mutex是C++11標準中提供的一種互斥鎖機制,用于保護共享資源的訪問。當多個線程需要同時訪問共享資源時,為了避免出現數據競爭等問題,需要使用互斥鎖進行同步控制。
std::mutex是一種基本的互斥鎖類型,可以通過lock()函數鎖定互斥鎖,通過unlock()函數釋放互斥鎖。當一個線程持有互斥鎖時,其他線程想要獲取該互斥鎖將會被阻塞,直到持有該互斥鎖的線程將鎖釋放。
例如,當多個線程需要同時訪問同一個共享變量時,可以在訪問之前使用std::mutex進行鎖定,保證每個線程都可以安全地訪問該變量。例如:
#include <mutex>
#include <thread>
#include <iostream>int shared_data = 0;
std::mutex mutex;void work(int id) {for (int i = 0; i < 10000; ++i) {mutex.lock();shared_data++;mutex.unlock();}std::cout << "Thread " << id << " finished." << std::endl;
}int main() {std::thread t1(work, 1);std::thread t2(work, 2);t1.join();t2.join();std::cout << "Shared data: " << shared_data << std::endl;return 0;
}
在上述例子中,兩個線程都會對shared_data變量進行10000次的自增操作,為了避免出現數據競爭,我們在對shared_data進行訪問之前都使用了std::mutex進行了鎖定,保證了線程的安全性。
on_lane_planning
modules/planning/on_lane_planning.cc

OnLanePlanning::Init主要實現分配具體的Planner,啟動參考線提供器(reference_line_provider_)。啟動參考線提供器,會另啟動一個線程,執行一個定時任務,每隔50ms提供一次參考線。注意:分配Planner的部分在OnLanePlanning實例化時就已經完成。
分配Planner的實現部分
modules/planning/planner/on_lane_planner_dispatcher.cc
std::unique_ptr<Planner> OnLanePlannerDispatcher::DispatchPlanner(const PlanningConfig& planning_config,const std::shared_ptr<DependencyInjector>& injector) {return planner_factory_.CreateObject(planning_config.standard_planning_config().planner_type(0), injector);
}
可以在modules/planning/conf/planning_config.pb.txt配置文件中看到配置Planner的類型:
standard_planning_config {planner_type: PUBLIC_ROADplanner_public_road_config {}
}
OnLanePlanning 的主邏輯在OnLanePlanning::RunOnce中,內容比較多,有些還沒仔細看,大致完成了一下的內容:
void OnLanePlanning::RunOnce(const LocalView& local_view,ADCTrajectory* const ptr_trajectory_pb) {//  更新汽車狀態和參考線的狀態,如果狀態無效,直接返回//  ...  // 是否為出現導航路線變換,如果是 初始化 planner//  加上預估的規劃觸發的周期 得到 stitchingTrajectory// planning is triggered by prediction data, but we can still use an estimated// cycle time for stitchingstatus = InitFrame(frame_num, stitching_trajectory.back(), vehicle_state);//  判斷是否符合交通規則//  開始正在的規劃 planner 開始規劃status = Plan(start_timestamp, stitching_trajectory, ptr_trajectory_pb);//  記錄規劃所花費的時間//  ...
}
status = Plan(start_timestamp, stitching_trajectory, ptr_trajectory_pb);中有如下代碼,此部分的Plan是指分配的planner的Plan()函數
auto status = planner_->Plan(stitching_trajectory.back(), frame_.get(),ptr_trajectory_pb);
PS1
make_unique是一個C++11中的函數模板,用于創建并返回一個獨占指針(unique_ptr)。它的作用是將一個裸指針封裝成一個unique_ptr對象,并確保該對象是唯一持有它所指向的對象。這可以有效避免內存泄漏和多個指針指向同一個對象的問題。
public_road_planner
modules/planning/planner/public_road/public_road_planner.cc
接著來看public_road_planner的實現。

PublicRoadPlanner::Init實例化一個全局的scenario_manager_對象來進行場景管理。
Status PublicRoadPlanner::Init(const PlanningConfig& config) {config_ = config;scenario_manager_.Init(config);return Status::OK();
}
PublicRoadPlanner::Plan主要完成以下工作
Status PublicRoadPlanner::Plan(const TrajectoryPoint& planning_start_point,Frame* frame,ADCTrajectory* ptr_computed_trajectory) {// 更新場景,決策當前應該執行什么場景scenario_manager_.Update(planning_start_point, *frame);// 獲取當前場景scenario_ = scenario_manager_.mutable_scenario();// 調用Scenario的Process函數,對具體的場景進行處理auto result = scenario_->Process(planning_start_point, frame);if (FLAGS_enable_record_debug) {auto scenario_debug = ptr_computed_trajectory->mutable_debug()->mutable_planning_data()->mutable_scenario();scenario_debug->set_scenario_type(scenario_->scenario_type());scenario_debug->set_stage_type(scenario_->GetStage());scenario_debug->set_msg(scenario_->GetMsg());}// 當前場景完成if (result == scenario::Scenario::STATUS_DONE) {// only updates scenario manager when previous scenario's status is// STATUS_DONEscenario_manager_.Update(planning_start_point, *frame);} else if (result == scenario::Scenario::STATUS_UNKNOWN) {// 當前場景失敗return Status(common::PLANNING_ERROR, "scenario returned unknown");}return Status::OK();
}
Scenario
Introduction

Apollo規劃模塊的框架以場景調度為基本決策框架,場景調度本質上是一個雙層狀態機,頂層是基于場景的管理器,底層是一系列小模塊的任務組合,由此來構建出Apollo planning的整體框架。
 在執行的每一個場景中,又分為一個或多個階段,稱為stage;而每一個stage又包含一個或多個任務,稱為task。執行一個場景,最終就是順序執行不同階段的不同任務。由此可見,Scenario在Apollo規劃決策中占據著重要的地位。
Scenario 類型
在apollo中,Scenario被定義了十余種類型,在官方文檔Planing 2.0綜述中有對各個場景的直觀描述。例如下圖是LANE_FOLLOW場景的示意圖。

在apollo8.0中,可以從modules/planning/proto/planning_config.proto文件中看到關于Scenario的相關類型定義:
message ScenarioConfig {message StageConfig {// 階段配置// 階段類型optional StageType stage_type = 1;// 是否啟用該階段配置,默認值為trueoptional bool enabled = 2 [default = true];// 運行時使用的任務列表,按照順序排列// 決定了這些任務的運行時順序// 任務類型repeated TaskConfig.TaskType task_type = 3;// 未排序的任務配置列表// 任務配置repeated TaskConfig task_config = 4;}// 場景類型optional ScenarioType scenario_type = 1;// 場景配置,使用oneof是為了確保只有一個字段被設置oneof scenario_config {// 車道跟隨場景配置ScenarioLaneFollowConfig lane_follow_config = 2;// 無保護交叉口場景配置ScenarioBareIntersectionUnprotectedConfig bare_intersection_unprotected_config = 3;// 緊急靠邊停車場景配置ScenarioEmergencyPullOverConfig emergency_pull_over_config = 4;// 緊急停車場景配置ScenarioEmergencyStopConfig emergency_stop_config = 5;// 學習模型樣本場景配置ScenarioLearningModelSampleConfig learning_model_sample_config = 6;// 窄街道U型轉彎場景配置ScenarioNarrowStreetUTurnConfig narrow_street_u_turn_config = 7;// 停車即走場景配置ScenarioParkAndGoConfig park_and_go_config = 8;// 靠邊停車場景配置ScenarioPullOverConfig pull_over_config = 9;// 無保護停車標志左轉場景配置ScenarioStopSignUnprotectedConfig stop_sign_unprotected_config = 10;// 交通信號燈保護左轉場景配置ScenarioTrafficLightProtectedConfig traffic_light_protected_config = 11;// 無保護交通信號燈左轉場景配置ScenarioTrafficLightUnprotectedLeftTurnConfig traffic_light_unprotected_left_turn_config = 12;// 無保護交通信號燈右轉場景配置ScenarioTrafficLightUnprotectedRightTurnConfig traffic_light_unprotected_right_turn_config = 13;// 代客停車場景配置ScenarioValetParkingConfig valet_parking_config = 14;// 讓路標志場景配置ScenarioYieldSignConfig yield_sign_config = 15;// 死胡同場景配置(掉頭)ScenarioDeadEndTurnAroundConfig deadend_turnaround_config = 18;}// 運行時使用的階段列表,第一個是默認階段// 階段類型repeated StageType stage_type = 16;// 運行時使用的階段配置列表,未排序// 階段配置repeated StageConfig stage_config = 17;
}
接著來看看Scenario Manager做了些什么。
modules/planning/scenarios/scenario_manager.cc
場景注冊
// modules/planning/scenarios/scenario_manager.cc
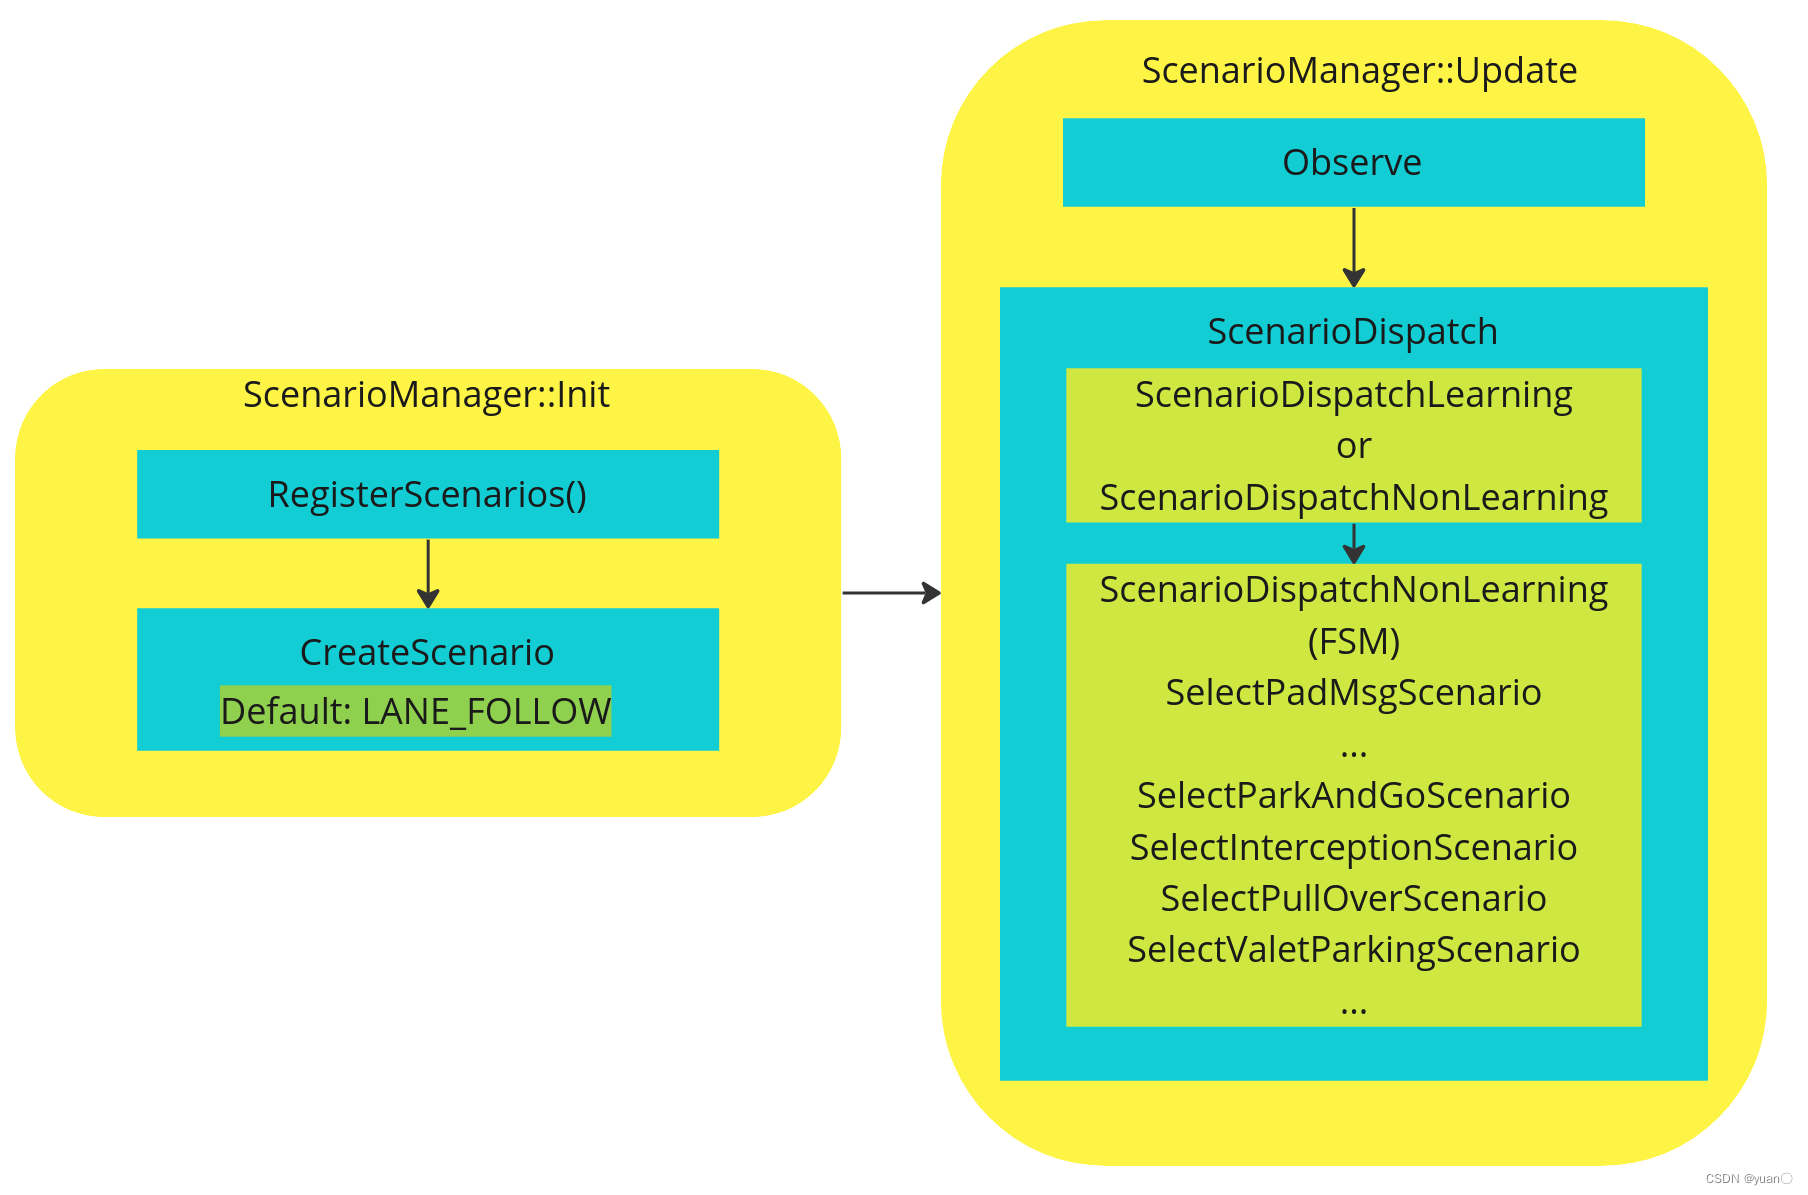
bool ScenarioManager::Init(const PlanningConfig& planning_config) {planning_config_.CopyFrom(planning_config);// 注冊場景RegisterScenarios();// 默認為LANE_FOLLOWdefault_scenario_type_ = ScenarioType::LANE_FOLLOW;current_scenario_ = CreateScenario(default_scenario_type_);return true;
}
ScenarioManager負責實際的場景注冊,Init函數負責對場景的初始化,首先調用::RegisterScenario這個函數對各個場景配置文件進行讀取和注冊;在開始創建LANE_FOLLOW作為默認運行場景。
// modules/planning/planner/public_road/public_road_planner.cc
Status PublicRoadPlanner::Init(const PlanningConfig& config) {config_ = config;scenario_manager_.Init(config);return Status::OK();
}
在PublicRoadPlanner初始化時會調用配置文件里的參數來建立這個對象,ScenarioManager會實例化一個全局的scenario_manager_對象來進行場景管理。
場景轉換
// 更新場景
void ScenarioManager::Update(const common::TrajectoryPoint& ego_point,const Frame& frame) {ACHECK(!frame.reference_line_info().empty());// 獲取當前要處理的overlapsObserve(frame);// 場景分發ScenarioDispatch(frame);
}
ScenarioManager除了負責場景的配置與注冊外也負責對場景進行轉換。場景轉換在ScenarioManager::Update中實現,這個函數有兩個輸入,車輛當前的狀態信息ego_point,和planning循環計算所需要的其他相關信息frame。ScenarioManager::Update首先調用Observe函數,用以獲取當前要處理的overlaps.
// 獲取當前要處理的overlaps
void ScenarioManager::Observe(const Frame& frame) {// init first_encountered_overlap_map_first_encountered_overlap_map_.clear();const auto& reference_line_info = frame.reference_line_info().front();const auto& first_encountered_overlaps =reference_line_info.FirstEncounteredOverlaps();for (const auto& overlap : first_encountered_overlaps) {if (overlap.first == ReferenceLineInfo::PNC_JUNCTION ||overlap.first == ReferenceLineInfo::SIGNAL ||overlap.first == ReferenceLineInfo::STOP_SIGN ||overlap.first == ReferenceLineInfo::YIELD_SIGN) {first_encountered_overlap_map_[overlap.first] = overlap.second;}}
}
在apollo里 overlap 是指地圖上任意重合的東西,比如PNC_JUNCTION里是道路之間有相互重合,SIGNAL是信號燈與道路有重合,STOP_SIGN是停止標志與道路有重合,YIELD_SIGN是讓行標志與道路有重合。
// 通過一個有限狀態機,決定當前的場景
// 會根據配置選擇基于規則還是基于學習的決策方法。
void ScenarioManager::ScenarioDispatch(const Frame& frame) {ACHECK(!frame.reference_line_info().empty());ScenarioType scenario_type;int history_points_len = 0;if (injector_->learning_based_data() &&injector_->learning_based_data()->GetLatestLearningDataFrame()) {history_points_len = injector_->learning_based_data()->GetLatestLearningDataFrame()->adc_trajectory_point_size();}if ((planning_config_.learning_mode() == PlanningConfig::E2E ||planning_config_.learning_mode() == PlanningConfig::E2E_TEST) &&history_points_len >= FLAGS_min_past_history_points_len) {scenario_type = ScenarioDispatchLearning();} else {scenario_type = ScenarioDispatchNonLearning(frame);}ADEBUG << "select scenario: " << ScenarioType_Name(scenario_type);// update PlanningContextUpdatePlanningContext(frame, scenario_type);if (current_scenario_->scenario_type() != scenario_type) {current_scenario_ = CreateScenario(scenario_type);}
}
當遇到這些overlaps時,在函數ScenarioDispatch中對其進行具體的處理或者場景切換。ScenarioDispatch會根據配置選擇基于規則還是基于學習的決策方法。
接著來看ScenarioDispatchNonLearning函數:
ScenarioType ScenarioManager::ScenarioDispatchNonLearning(const Frame& frame) {// default: LANE_FOLLOWScenarioType scenario_type = default_scenario_type_;// Pad Msg scenario(駕駛員意圖?)scenario_type = SelectPadMsgScenario(frame);if (scenario_type == default_scenario_type_) {// check current_scenario (not switchable)switch (current_scenario_->scenario_type()) {case ScenarioType::LANE_FOLLOW:case ScenarioType::PULL_OVER:break;case ScenarioType::BARE_INTERSECTION_UNPROTECTED:case ScenarioType::EMERGENCY_PULL_OVER:case ScenarioType::PARK_AND_GO:case ScenarioType::STOP_SIGN_PROTECTED:case ScenarioType::STOP_SIGN_UNPROTECTED:case ScenarioType::TRAFFIC_LIGHT_PROTECTED:case ScenarioType::TRAFFIC_LIGHT_UNPROTECTED_LEFT_TURN:case ScenarioType::TRAFFIC_LIGHT_UNPROTECTED_RIGHT_TURN:case ScenarioType::VALET_PARKING:case ScenarioType::YIELD_SIGN:// must continue until finishif (current_scenario_->GetStatus() !=Scenario::ScenarioStatus::STATUS_DONE) {scenario_type = current_scenario_->scenario_type();}break;default:break;}}// ParkAndGo / starting scenarioif (scenario_type == default_scenario_type_) {if (FLAGS_enable_scenario_park_and_go) {scenario_type = SelectParkAndGoScenario(frame);}}// intersection scenariosif (scenario_type == default_scenario_type_) {scenario_type = SelectInterceptionScenario(frame);}// pull-over scenarioif (scenario_type == default_scenario_type_) {if (FLAGS_enable_scenario_pull_over) {scenario_type = SelectPullOverScenario(frame);}}// VALET_PARKING scenarioif (scenario_type == default_scenario_type_) {scenario_type = SelectValetParkingScenario(frame);}return scenario_type;
}
首先,確定一個默認的場景類型,即LANE_FOLLOW。然后,判斷是否有駕駛員意圖,如果有,則將場景類型改為相應的意圖場景類型。如果沒有,則進入下一步邏輯。接著檢查當前的場景類型,如果是LANE_FOLLOW或PULL_OVER,直接break;若是其他場景,且其他場景還未執行完畢,則繼續執行當前場景。如果當前場景已完成,則進入下一步邏輯。PARK_AND_GO和PULL_OVER若有相關配置,則執行相應的函數。注意:每次切換場景都從默認場景開始,最后回到默認場景。
Scenario::Process
由PublicRoadPlanner::Plan的流程可知,在獲取完當前場景之后,會調用Scenario的Process函數,對具體的場景進行處理。接下來便來看看Scenario的Process函數:
modules/planning/scenarios/scenario.cc
Scenario::ScenarioStatus Scenario::Process(const common::TrajectoryPoint& planning_init_point, Frame* frame) {// stage類型unknowif (current_stage_ == nullptr) {AWARN << "Current stage is a null pointer.";return STATUS_UNKNOWN;}// stage全部執行完成if (current_stage_->stage_type() == StageType::NO_STAGE) {scenario_status_ = STATUS_DONE;return scenario_status_;}// 當前處于某一stage,調用這個stage的Process()函數,處理具體規劃邏輯auto ret = current_stage_->Process(planning_init_point, frame);switch (ret) {case Stage::ERROR: {AERROR << "Stage '" << current_stage_->Name() << "' returns error";scenario_status_ = STATUS_UNKNOWN;break;}case Stage::RUNNING: {scenario_status_ = STATUS_PROCESSING;break;}// 讀取當前stage完成的狀態,并對下一個stage進行處理case Stage::FINISHED: {auto next_stage = current_stage_->NextStage();if (next_stage != current_stage_->stage_type()) {AINFO << "switch stage from " << current_stage_->Name() << " to "<< StageType_Name(next_stage);if (next_stage == StageType::NO_STAGE) {scenario_status_ = STATUS_DONE;return scenario_status_;}if (stage_config_map_.find(next_stage) == stage_config_map_.end()) {AERROR << "Failed to find config for stage: " << next_stage;scenario_status_ = STATUS_UNKNOWN;return scenario_status_;}current_stage_ = CreateStage(*stage_config_map_[next_stage], injector_);if (current_stage_ == nullptr) {AWARN << "Current stage is a null pointer.";return STATUS_UNKNOWN;}}if (current_stage_ != nullptr &¤t_stage_->stage_type() != StageType::NO_STAGE) {scenario_status_ = STATUS_PROCESSING;} else {scenario_status_ = STATUS_DONE;}break;}default: {AWARN << "Unexpected Stage return value: " << ret;scenario_status_ = STATUS_UNKNOWN;}}return scenario_status_;
}
Scenario都是順序執行,只需要判斷這一階段是否結束,然后轉到下一個階段就可以了。CreateStage生成相應的stage,之后再進行stage的process。
Stage
以Lanefollowstage為例進行介紹。
modules/planning/scenarios/lane_follow/lane_follow_stage.cc
Stage::StageStatus LaneFollowStage::Process(const TrajectoryPoint& planning_start_point, Frame* frame) {bool has_drivable_reference_line = false;ADEBUG << "Number of reference lines:\t"<< frame->mutable_reference_line_info()->size();unsigned int count = 0;// 遍歷所有的參考線,直到找到可用來規劃的參考線后退出for (auto& reference_line_info : *frame->mutable_reference_line_info()) {// TODO(SHU): need refactorif (count++ == frame->mutable_reference_line_info()->size()) {break;}ADEBUG << "No: [" << count << "] Reference Line.";ADEBUG << "IsChangeLanePath: " << reference_line_info.IsChangeLanePath();// 找到可用來行駛的參考線,退出循環if (has_drivable_reference_line) {reference_line_info.SetDrivable(false);break;}// 執行LaneFollow的規劃auto cur_status =PlanOnReferenceLine(planning_start_point, frame, &reference_line_info);// 判斷規劃結果是否OKif (cur_status.ok()) {// 如果發生lanechange,判斷reference_line的costif (reference_line_info.IsChangeLanePath()) {ADEBUG << "reference line is lane change ref.";ADEBUG << "FLAGS_enable_smarter_lane_change: "<< FLAGS_enable_smarter_lane_change;if (reference_line_info.Cost() < kStraightForwardLineCost &&(LaneChangeDecider::IsClearToChangeLane(&reference_line_info) ||FLAGS_enable_smarter_lane_change)) {// If the path and speed optimization succeed on target lane while// under smart lane-change or IsClearToChangeLane under older versionhas_drivable_reference_line = true;reference_line_info.SetDrivable(true);LaneChangeDecider::UpdatePreparationDistance(true, frame, &reference_line_info, injector_->planning_context());ADEBUG << "\tclear for lane change";} else {LaneChangeDecider::UpdatePreparationDistance(false, frame, &reference_line_info,injector_->planning_context());reference_line_info.SetDrivable(false);ADEBUG << "\tlane change failed";}} else {// 如果沒有lanechange,stage執行結果為OK,則has_drivable_reference_line置位trueADEBUG << "reference line is NOT lane change ref.";has_drivable_reference_line = true;}} else {reference_line_info.SetDrivable(false);}}return has_drivable_reference_line ? StageStatus::RUNNING: StageStatus::ERROR;
}
Process主要是查找可供規劃的參考線,之后在PlanOnReferenceLine函數中進行具體的執行。同時還對變道的狀況進行規劃,如果規劃成功后,還需要判斷目標車道的變道cost,如果cost太高,那么就會舍棄掉這條目標車道的reference_line, 此時放棄變道的規劃,繼續循環使用原車道的reference_line進行規劃。
PlanOnReferenceLine函數
Status LaneFollowStage::PlanOnReferenceLine(const TrajectoryPoint& planning_start_point, Frame* frame,ReferenceLineInfo* reference_line_info) {// 判斷是否有lanechange意圖,如果否增加當前參考線的cost?有點疑問,增加了變道的可能if (!reference_line_info->IsChangeLanePath()) {reference_line_info->AddCost(kStraightForwardLineCost);}ADEBUG << "planning start point:" << planning_start_point.DebugString();ADEBUG << "Current reference_line_info is IsChangeLanePath: "<< reference_line_info->IsChangeLanePath();// 順序執行stage中的任務auto ret = Status::OK();for (auto* task : task_list_) {const double start_timestamp = Clock::NowInSeconds();// 執行每個task的具體邏輯ret = task->Execute(frame, reference_line_info);const double end_timestamp = Clock::NowInSeconds();const double time_diff_ms = (end_timestamp - start_timestamp) * 1000;ADEBUG << "after task[" << task->Name()<< "]:" << reference_line_info->PathSpeedDebugString();ADEBUG << task->Name() << " time spend: " << time_diff_ms << " ms.";RecordDebugInfo(reference_line_info, task->Name(), time_diff_ms);// 如果task執行失敗,退出task執行序列,并且記錄失敗信息if (!ret.ok()) {AERROR << "Failed to run tasks[" << task->Name()<< "], Error message: " << ret.error_message();break;}// TODO(SHU): disable reference line order changes for now// updated reference_line_info, because it is changed in// lane_change_decider by PrioritizeChangeLane().// reference_line_info = &frame->mutable_reference_line_info()->front();// ADEBUG << "Current reference_line_info is IsChangeLanePath: "//        << reference_line_info->IsChangeLanePath();}RecordObstacleDebugInfo(reference_line_info);// check path and speed results for path or speed fallbackreference_line_info->set_trajectory_type(ADCTrajectory::NORMAL);// 如果task執行失敗,則使用備用的規劃軌跡if (!ret.ok()) {PlanFallbackTrajectory(planning_start_point, frame, reference_line_info);}// 對規劃的軌跡進行合成,如果合成失敗,返回失敗狀態DiscretizedTrajectory trajectory;if (!reference_line_info->CombinePathAndSpeedProfile(planning_start_point.relative_time(),planning_start_point.path_point().s(), &trajectory)) {const std::string msg = "Fail to aggregate planning trajectory.";AERROR << msg;return Status(ErrorCode::PLANNING_ERROR, msg);}// determine if there is a destination on reference line.double dest_stop_s = -1.0;for (const auto* obstacle :reference_line_info->path_decision()->obstacles().Items()) {if (obstacle->LongitudinalDecision().has_stop() &&obstacle->LongitudinalDecision().stop().reason_code() ==STOP_REASON_DESTINATION) {SLPoint dest_sl = GetStopSL(obstacle->LongitudinalDecision().stop(),reference_line_info->reference_line());dest_stop_s = dest_sl.s();}}// 增加障礙物的代價for (const auto* obstacle :reference_line_info->path_decision()->obstacles().Items()) {if (obstacle->IsVirtual()) {continue;}if (!obstacle->IsStatic()) {continue;}if (obstacle->LongitudinalDecision().has_stop()) {bool add_stop_obstacle_cost = false;if (dest_stop_s < 0.0) {add_stop_obstacle_cost = true;} else {SLPoint stop_sl = GetStopSL(obstacle->LongitudinalDecision().stop(),reference_line_info->reference_line());if (stop_sl.s() < dest_stop_s) {add_stop_obstacle_cost = true;}}if (add_stop_obstacle_cost) {static constexpr double kReferenceLineStaticObsCost = 1e3;reference_line_info->AddCost(kReferenceLineStaticObsCost);}}}if (FLAGS_enable_trajectory_check) {if (ConstraintChecker::ValidTrajectory(trajectory) !=ConstraintChecker::Result::VALID) {const std::string msg = "Current planning trajectory is not valid.";AERROR << msg;return Status(ErrorCode::PLANNING_ERROR, msg);}}reference_line_info->SetTrajectory(trajectory);reference_line_info->SetDrivable(true);return Status::OK();
}
Task
還是以Lanefollow為例,Task的配置部分在此處。modules/planning/conf/scenario/lane_follow_config.pb.txt
stage_config: {stage_type: LANE_FOLLOW_DEFAULT_STAGEenabled: truetask_type: LANE_CHANGE_DECIDERtask_type: PATH_REUSE_DECIDERtask_type: PATH_LANE_BORROW_DECIDERtask_type: PATH_BOUNDS_DECIDERtask_type: PIECEWISE_JERK_PATH_OPTIMIZERtask_type: PATH_ASSESSMENT_DECIDERtask_type: PATH_DECIDERtask_type: RULE_BASED_STOP_DECIDERtask_type: SPEED_BOUNDS_PRIORI_DECIDERtask_type: SPEED_HEURISTIC_OPTIMIZERtask_type: SPEED_DECIDERtask_type: SPEED_BOUNDS_FINAL_DECIDERtask_type: PIECEWISE_JERK_SPEED_OPTIMIZER# task_type: PIECEWISE_JERK_NONLINEAR_SPEED_OPTIMIZERtask_type: RSS_DECIDER
參考以及推薦閱
[1] Apollo星火計劃學習筆記——第七講自動駕駛規劃技術原理1
[2] Apollo Planning決策規劃代碼詳細解析 (1):Scenario選擇
[3] apollo介紹之planning模塊(四)
[4] 解析百度Apollo之決策規劃模塊
[5] Apollo規劃模塊(一):scenario
[6] Apollo星火計劃學習筆記——Apollo決策規劃技術詳解及實現(以交通燈場景檢測為例)
[7] Apollo Planning 模塊


)


