基于 Jenkins+Docker+Git 的簡單 CI 流程實踐(上)
在如今的互聯網時代,隨著軟件開發復雜度的不斷提高,軟件開發和發布管理也越來越重要。目前已經形成一套標準的流程,最重要的組成部分就是 持續集成 及 持續交付、部署。在此,我們在京東云上以一個案例簡單實踐下 CI 流程。
1.相關概念及工具介紹
1.1 CI/CD
持續集成(Continuous Integration,CI),它屬于開發人員的自動化流程。成功的 CI 意味著應用代碼的新更改會定期構建、測試并合并到共享存儲庫中。該解決方案可以解決在一次開發中有太多應用分支,從而導致相互沖突的問題。
持續交付(Continuous Delivery,CD),通常是指開發人員對應用的更改會自動進行錯誤測試并上傳到存儲庫(如 GitHub 或容器注冊表),然后 由運維團隊將其部署到實時生產環境中。這旨在解決開發和運維團隊之間可見性及溝通較差的問題。因此,持續交付的目的就是確保盡可能減少部署新代碼時所需的工作量。
持續部署(Continuous Deployment,CD),這是另一種 “CD”,指的是 自動將開發人員的更改從存儲庫發布到生產環境,以供客戶使用。它主要為了解決因手動流程降低應用交付速度,從而使運維團隊超負荷的問題。
1.2 Jenkins
Jenkins 是一個開源軟件項目,是基于 Java 開發的一種 持續集成 工具,用于監控持續重復的工作,旨在提供一個開放易用的軟件平臺,使軟件的持續集成變成可能。
1.3 Docker
Docker 是一個開源的應用容器引擎,讓開發者可以打包他們的應用以及依賴包到一個可移植的容器中,然后發布到任何流行的 Linux 機器上,也可以實現虛擬化。容器是完全使用沙箱機制,相互之間不會有任何接口。
1.4 Git
Git 是一個開源的分布式版本控制系統,提供代碼倉庫,可以有效、高速地處理從很小到非常大的項目版本管理。 Git 是 L i n u s T o r v a l d s Linus\ Torvalds Linus?Torvalds 為了幫助管理 Linux 內核開發而開發的一個開放源碼的版本控制軟件。
2.前期準備
2.1 CI 流程設計圖

2.2 工作流程
- 開發人員提交代碼到 Git 版本倉庫。
- Jenkins 人工/定時觸發項目構建。
- Jenkins 拉取代碼、代碼編譯、打包鏡像、推送到鏡像倉庫。
- Jenkins 在 Docker 主機創建容器并發布。

2.3 主機環境規劃
| 主機名稱 | 介紹 | 公網 | 內網 |
|---|---|---|---|
docker-jenkins | 項目構建;拉取代碼、代碼編譯、打包鏡像、推送鏡像到鏡像倉庫 | 116.196.85.174 | 10.0.0.20 |
docker-git | 代碼倉庫 | 116.196.86.207 | 10.0.0.22 |
docker-harbor | 私有鏡像倉庫 | 116.196.88.91 | 10.0.0.21 |
buildimage | build docker 鏡像 | 116.196.89.139 | 10.0.0.4 |
3.主機創建
在京東云控制臺創建4臺云主機,地址:https://console.jdcloud.com/
配置如下,購買時數量直接選擇 4 4 4,購買完成后再修改名稱,分別為:docker-jenkins、docker-git、docker-harbor、buildimage。


創建、修改名稱后如下:

4.環境配置
4.1 云主機 docker-git
(1)修改主機名為:docker-git
[root@112 ~]# hostnamectl set-hostname docker-git
[root@112 ~]# hostname  docker-git
[root@112 ~]# logout
[root@docker-git ~]#
Ctrl+D 退出后重新登陸生效。
(2)部署 Git 代碼版本倉庫
安裝:
[root@docker-git ~]# yum install git -y
配置 git 用戶:
[root@docker-git ~]# useradd git
[root@docker-git ~]# passwd git

創建庫:
[root@docker-git ~]# su git
[git@docker-git root]$ cd
[git@docker-git ~]$ mkdir tomcat-java-demo.git
[git@docker-git ~]$ cd tomcat-java-demo.git/
[git@docker-git tomcat-java-demo.git]$ git --bare init
Initialized empty Git repository in /home/git/tomcat-java-demo.git/
[git@docker-git tomcat-java-demo.git]$ ls
branches  config  description  HEAD  hooks  info  objects  refs
[git@docker-git tomcat-java-demo.git]$

4.2 云主機 docker-jenkins
(1)修改主機名為:docker-jenkins
[root@113 ~]# hostnamectl set-hostname docker-jenkins
[root@113 ~]# hostname  docker-jenkins
[root@113 ~]# logout
[root@docker-jenkins ~]#
Ctrl+D 退出后重新登陸生效。
(2)jenkins 環境部署
部署 jdk 環境及 maven:
[root@docker-jenkins tomcat-java-demo]# cd
[root@docker-jenkins ~]# mkdir tools
[root@docker-jenkins ~]# cd tools
[root@docker-jenkins tools]# wget https://pocenv-hcc.oss.cn-north-1.jcloudcs.com/jdk-8u191-linux-x64.tar.gz;tar zxf jdk-8u191-linux-x64.tar.gz;mv jdk1.8.0_191/ /usr/local/;ln -s /usr/local/jdk1.8.0_191/ /usr/local/jdk;
[root@docker-jenkins tools]# vim /etc/profile
######## JDK #######
JAVA_HOME=/usr/local/jdk1.8.0_191
JAVA_BIN=/usr/local/jdk1.8.0_191/bin
PATH=$PATH:$JAVA_BIN
CLASSPATH=$JAVA_HOME/lib/dt.jar:$JAVA_HOME/lib/tools.jar
export JAVA_HOME JAVA_BIN PATH CLASSPATH
[root@docker-jenkins tools]# source /etc/profile
[root@docker-jenkins tools]# java -version
java version "1.8.0_191"
Java(TM) SE Runtime Environment (build 1.8.0_191-b12)
Java HotSpot(TM) 64-Bit Server VM (build 25.191-b12, mixed mode)
[root@docker-jenkins tools]# wget https://pocenv-hcc.oss.cn-north-1.jcloudcs.com/apache-maven-3.5.0-bin.tar.gz;tar zxf apache-maven-3.5.0-bin.tar.gz;mv apache-maven-3.5.0 /usr/local/maven
[root@docker-jenkins tools]#
安裝 Jenkins,下載 Tomcat 二進制包,將 war 包移動到 webapps 下即可。
[root@docker-jenkins tools]# wget https://pocenv-hcc.oss.cn-north-1.jcloudcs.com/jenkins.war
[root@docker-jenkins tools]# wget https://pocenv-hcc.oss.cn-north-1.jcloudcs.com/apache-tomcat-8.5.38.tar.gz
[root@docker-jenkins tools]# tar zxf apache-tomcat-8.5.38.tar.gz
[root@docker-jenkins tools]# ls
apache-maven-3.5.0-bin.tar.gz  apache-tomcat-8.5.38  apache-tomcat-8.5.38.tar.gz  jdk-8u191-linux-x64.tar.gz  jenkins.war
[root@docker-jenkins tools]# mv apache-tomcat-8.5.38 /usr/local/tomcat-jenkins
[root@docker-jenkins tools]# ls /usr/local/tomcat-jenkins/webapps/
docs  examples  host-manager  manager  ROOT
[root@docker-jenkins tools]# rm -rf /usr/local/tomcat-jenkins/webapps/*
[root@docker-jenkins tools]# mv jenkins.war /usr/local/tomcat-jenkins/webapps/ROOT.war
[root@docker-jenkins tools]# ll /usr/local/tomcat-jenkins/webapps/
total 75520
-rw-r--r--. 1 root root 77330344 Mar 15 00:55 ROOT.war
[root@docker-jenkins tools]# cd /usr/local/tomcat-jenkins/bin/
[root@docker-jenkins bin]# ./startup.sh
Using CATALINA_BASE:   /usr/local/tomcat-jenkins
Using CATALINA_HOME:   /usr/local/tomcat-jenkins
Using CATALINA_TMPDIR: /usr/local/tomcat-jenkins/temp
Using JRE_HOME:        /usr/local/jdk1.8
Using CLASSPATH:       /usr/local/tomcat-jenkins/bin/bootstrap.jar:/usr/local/tomcat-jenkins/bin/tomcat-juli.jar
Tomcat started.
[root@docker-jenkins bin]#
啟動后,瀏覽器訪問(docker-jenkins):http://Jenkins主機公網IP:8080/,按提示輸入密碼,登錄即可。
在 /root/.jenkins/secrets/initialAdminPassword 文件里,查看密碼后填入即可。

按照你自己的需求安裝插件。


設置管理員。


開始使用 Jenkins。

(3)安裝 DOCKER CE(Docker 的社區版)
安裝所需包:
yum install -y yum-utils device-mapper-persistent-data lvm2 -y
設置穩定存儲庫:
yum-config-manager --add-repo https://download.docker.com/linux/centos/docker-ce.repo -y
安裝 DOCKER CE(這一步比較慢,耐心等會兒!):
yum install docker-ce docker-ce-cli containerd.io -y
啟動 Docker:
systemctl start docker
4.3 云主機 docker-harbor
(1)修改主機名為:docker-harbor
[root@c-dfjgjesgqe ~]# hostnamectl set-hostname docker-harbor
[root@c-dfjgjesgqe ~]# hostname  docker-harbor
Ctrl+D 退出后重新登陸生效。
(2)企業級 Harbor 鏡像倉庫部署
Habor 是由 VMWare 公司開源的容器鏡像倉庫。事實上,Habor 是在 Docker Registry 上進行了相應的企業級擴展,從而獲得了更加廣泛的應用,這些新的企業級特性包括:管理用戶界面,基于角色的訪問控制,AD/LDAP 集成 以及 審計日志 等,足以滿足基本企業需求。
Harbor 各組件介紹:
| 組件 | 功能 |
|---|---|
harbor-adminserver | 配置管理中心 |
harbor-db | MySQL 數據庫 |
harbor-jobservice | 負責鏡像復制 |
harbor-log | 記錄操作日志 |
harbor-ui | Web 管理頁面和 API |
nginx | 前端代理,負責前端頁面和鏡像上傳 / 下載轉發 |
redis | 會話 |
registry | 鏡像存儲 |
Harbor 安裝有 3 3 3 種方式
- 在線安裝:從 Docker Hub 下載 Harbor 相關鏡像,因此安裝軟件包非常小。
- 離線安裝:安裝包包含部署的相關鏡像,因此安裝包比較大。
- OVA 安裝程序:當用戶具有 vCenter 環境時,使用此安裝程序,在部署 OVA 后啟動 Harb。
在此我們使用第二種離線安裝方式來搭建基于 https 訪問的 harbor 鏡像倉庫。
1)下載并解壓離線安裝包
harbor 離線包下載地址:https://github.com/goharbor/harbor/releases
為方便下載,我在京東云對象存儲上也存了一份,可直接 wget:https://pocenv-hcc.oss.cn-north-1.jcloudcs.com/harbor-offline-installer-v1.7.4.tgz
[root@docker-harbor ~]# yum install vim wget openssl -y
[root@docker-harbor ~]# wget https://pocenv-hcc.oss.cn-north-1.jcloudcs.com/harbor-offline-installer-v1.7.4.tgz
[root@docker-harbor ~]# tar zxf harbor-offline-installer-v1.7.4.tgz
[root@docker-harbor ~]# cd harbor
[root@docker-harbor harbor]# ll
total 570744
drwxr-xr-x 3 root root        23 Apr  1 15:05 common
-rw-r--r-- 1 root root       939 Mar  4 15:33 docker-compose.chartmuseum.yml
-rw-r--r-- 1 root root       975 Mar  4 15:33 docker-compose.clair.yml
-rw-r--r-- 1 root root      1434 Mar  4 15:33 docker-compose.notary.yml
-rw-r--r-- 1 root root      5608 Mar  4 15:33 docker-compose.yml
-rw-r--r-- 1 root root      8033 Mar  4 15:33 harbor.cfg
-rw-r--r-- 1 root root 583086399 Mar  4 15:33 harbor.v1.7.4.tar.gz
-rwxr-xr-x 1 root root      5739 Mar  4 15:33 install.sh
-rw-r--r-- 1 root root     11347 Mar  4 15:33 LICENSE
-rw-r--r-- 1 root root   1263409 Mar  4 15:33 open_source_license
-rwxr-xr-x 1 root root     36337 Mar  4 15:33 prepare
2)自簽 http 證書
獲取權威認證證書。
[root@docker-harbor harbor]# mkdir ssl
[root@docker-harbor harbor]# cd ssl
[root@docker-harbor ssl]# openssl genrsa -out ca.key 4096
Generating RSA private key, 4096 bit long modulus
...................................++
.....................................................................................................................................++
e is 65537 (0x10001)
[root@docker-harbor ssl]# openssl req -x509 -new -nodes -sha512 -days 3650 -subj "/C=ZH/ST=ShangHai/L=ShangHai/O=example/OU=Personal/CN=reg.marin.com" -key ca.key -out ca.crt
[root@docker-harbor ssl]# ll
total 8
-rw-r--r-- 1 root root 2037 Apr  4 18:41 ca.crt
-rw-r--r-- 1 root root 3243 Apr  4 18:41 ca.key
獲取服務端證書。
1.Create your own Private Key:
[root@docker-harbor ssl]# openssl genrsa -out reg.marin.com.key 4096
Generating RSA private key, 4096 bit long modulus
.............................................++
............................................................................................................................................................................................................................++
e is 65537 (0x10001)
[root@docker-harbor ssl]# openssl req -sha512 -new -subj "/C=ZH/ST=ShangHai/L=ShangHai/O=example/OU=Personal/CN=reg.marin.com" -key reg.marin.com.key -out reg.marin.com.csr
[root@docker-harbor ssl]# ll
total 16
-rw-r--r-- 1 root root 2037 Apr  4 18:41 ca.crt
-rw-r--r-- 1 root root 3243 Apr  4 18:41 ca.key
-rw-r--r-- 1 root root 1708 Apr  4 18:42 reg.marin.com.csr
-rw-r--r-- 1 root root 3243 Apr  4 18:42 reg.marin.com.key
[root@docker-harbor ssl]# cat > v3.ext <<-EOF
> authorityKeyIdentifier=keyid,issuer
> basicConstraints=CA:FALSE
> keyUsage = digitalSignature, nonRepudiation, keyEncipherment, dataEncipherment
> extendedKeyUsage = serverAuth
> subjectAltName = @alt_names
>
> [alt_names]
> DNS.1=reg.marin.com
> DNS.2=reg.marin
> DNS.3=marin
> EOF
[root@docker-harbor ssl]# openssl x509 -req -sha512 -days 3650 -extfile v3.ext -CA ca.crt -CAkey ca.key -CAcreateserial -in reg.marin.com.csr -out reg.marin.com.crt
Signature ok
subject=/C=ZH/ST=ShangHai/L=ShangHai/O=example/OU=Personal/CN=reg.marin.com
Getting CA Private Key
[root@docker-harbor ssl]# ll
total 28
-rw-r--r-- 1 root root 2037 Apr  4 18:41 ca.crt
-rw-r--r-- 1 root root 3243 Apr  4 18:41 ca.key
-rw-r--r-- 1 root root   17 Apr  4 18:44 ca.srl
-rw-r--r-- 1 root root 2098 Apr  4 18:44 reg.marin.com.crt
-rw-r--r-- 1 root root 1708 Apr  4 18:42 reg.marin.com.csr
-rw-r--r-- 1 root root 3243 Apr  4 18:42 reg.marin.com.key
-rw-r--r-- 1 root root  260 Apr  4 18:43 v3.ext
修改 harbor 配置,以及為 Docker 配置服務端證書,key 和 CA。
[root@docker-harbor ssl]# cd ..
[root@docker-harbor harbor]# vim harbor.cfg
......
hostname = reg.marin.com
ui_url_protocol = https
ssl_cert = ./ssl/reg.marin.com.crt
ssl_cert_key = ./ssl/reg.marin.com.key
harbor_admin_password = 123456
......
密碼也可以不修改,默認登錄用戶:admin,密碼:Harbor12345。
Docker 守護進程會將 .crt 文件解釋為 CA 證書,將 .cert 文件解釋為客戶機證書,先將 .crt 文件轉換一份 .cert 文件。
[root@docker-harbor harbor]# cd ssl/
[root@docker-harbor ssl]# mkdir -p /etc/docker/certs.d/reg.marin.com
[root@docker-harbor ssl]# openssl x509 -inform PEM -in reg.marin.com.crt -out reg.marin.com.cert
[root@docker-harbor ssl]# cp reg.marin.com.cert reg.marin.com.key ca.crt /etc/docker/certs.d/reg.marin.com/
到此自簽成功!
3)安裝 DOCKER CE
安裝所需包:
yum install -y yum-utils device-mapper-persistent-data lvm2 -y
設置穩定存儲庫:
yum-config-manager --add-repo https://download.docker.com/linux/centos/docker-ce.repo -y

安裝 DOCKER CE(這一步比較慢,耐心等會兒!):
yum install docker-ce docker-ce-cli containerd.io -y

啟動 Docker:
systemctl start docker
通過運行 hello-world 鏡像驗證是否正確安裝了 Docker CE:
docker run hello-world

4)初始化及安裝驗證
初始化安裝:
[root@docker-harbor ssl]#
[root@docker-harbor ssl]# cd ..
[root@docker-harbor harbor]# ./prepare
Generated and saved secret to file: /data/secretkey
Generated configuration file: ./common/config/nginx/nginx.conf
Generated configuration file: ./common/config/adminserver/env
Generated configuration file: ./common/config/core/env
Generated configuration file: ./common/config/registry/config.yml
Generated configuration file: ./common/config/db/env
Generated configuration file: ./common/config/jobservice/env
Generated configuration file: ./common/config/jobservice/config.yml
Generated configuration file: ./common/config/log/logrotate.conf
Generated configuration file: ./common/config/registryctl/env
Generated configuration file: ./common/config/core/app.conf
Generated certificate, key file: ./common/config/core/private_key.pem, cert file: ./common/config/registry/root.crt
The configuration files are ready, please use docker-compose to start the service.
執行 install.sh 腳本,安裝 harbor 倉庫。
注意:在執行 install.sh 腳本之前,先檢查兩個問題:
docker-compose是否安裝,否則在運行install.sh時會失敗,報錯 “? Need to install docker-compose(1.7.1+) by yourself first and run this script again.”docker服務是否正常運行,否則在運行install.sh會失敗,報錯 “Cannot connect to the Docker daemon at unix:///var/run/docker.sock. Is the docker daemon running?”
安裝 Compose。
運行此命令以下載 Docker Compose 的當前穩定版本:
curl -L "https://github.com/docker/compose/releases/download/1.24.0/docker-compose-$(uname -s)-$(uname -m)" -o /usr/local/bin/docker-compose
對二進制文件應用可執行權限:
chmod +x /usr/local/bin/docker-compose
執行 install.sh 腳本,安裝 harbor 倉庫:
[root@docker-harbor harbor]# ./install.sh[Step 0]: checking installation environment ...Note: docker version: 18.09.4Note: docker-compose version: 1.24.0[Step 1]: loading Harbor images ...
bffe2a0fec66: Loading layer [==================================================>]  33.22MB/33.22MB
38e174bed467: Loading layer [==================================================>]  8.964MB/8.964MB
427e4936ae66: Loading layer [==================================================>]  35.77MB/35.77MB
3bfd5214250a: Loading layer [==================================================>]  2.048kB/2.048kB
f30df776629d: Loading layer [==================================================>]  3.072kB/3.072kB
f87afad43f43: Loading layer [==================================================>]   22.8MB/22.8MB
......
953717aa0afc: Loading layer [==================================================>]   22.8MB/22.8MB
Loaded image: goharbor/registry-photon:v2.6.2-v1.7.4[Step 2]: preparing environment ...
Clearing the configuration file: ./common/config/adminserver/env
Clearing the configuration file: ./common/config/core/env
Clearing the configuration file: ./common/config/core/app.conf
Clearing the configuration file: ./common/config/core/private_key.pem
Clearing the configuration file: ./common/config/db/env
......
Generated certificate, key file: ./common/config/core/private_key.pem, cert file: ./common/config/registry/root.crt
The configuration files are ready, please use docker-compose to start the service.[Step 3]: checking existing instance of Harbor ...[Step 4]: starting Harbor ...
Creating network "harbor_harbor" with the default driver
Creating harbor-log ... done
Creating redis              ... done
Creating registryctl        ... done
Creating harbor-db          ... done
Creating harbor-adminserver ... done
Creating registry           ... done
Creating harbor-core        ... done
Creating harbor-jobservice  ... done
Creating harbor-portal      ... done
Creating nginx              ... done? ----Harbor has been installed and started successfully.----Now you should be able to visit the admin portal at https://reg.marin.com.
For more details, please visit https://github.com/goharbor/harbor .

瀏覽器訪問驗證。
瀏覽器訪問要做域名解析,在本地 hosts(C:\Windows\System32\drivers\etc\hosts)文件中加入:116.196.88.91 reg.marin.com。

訪問:https://reg.marin.com,并登錄。

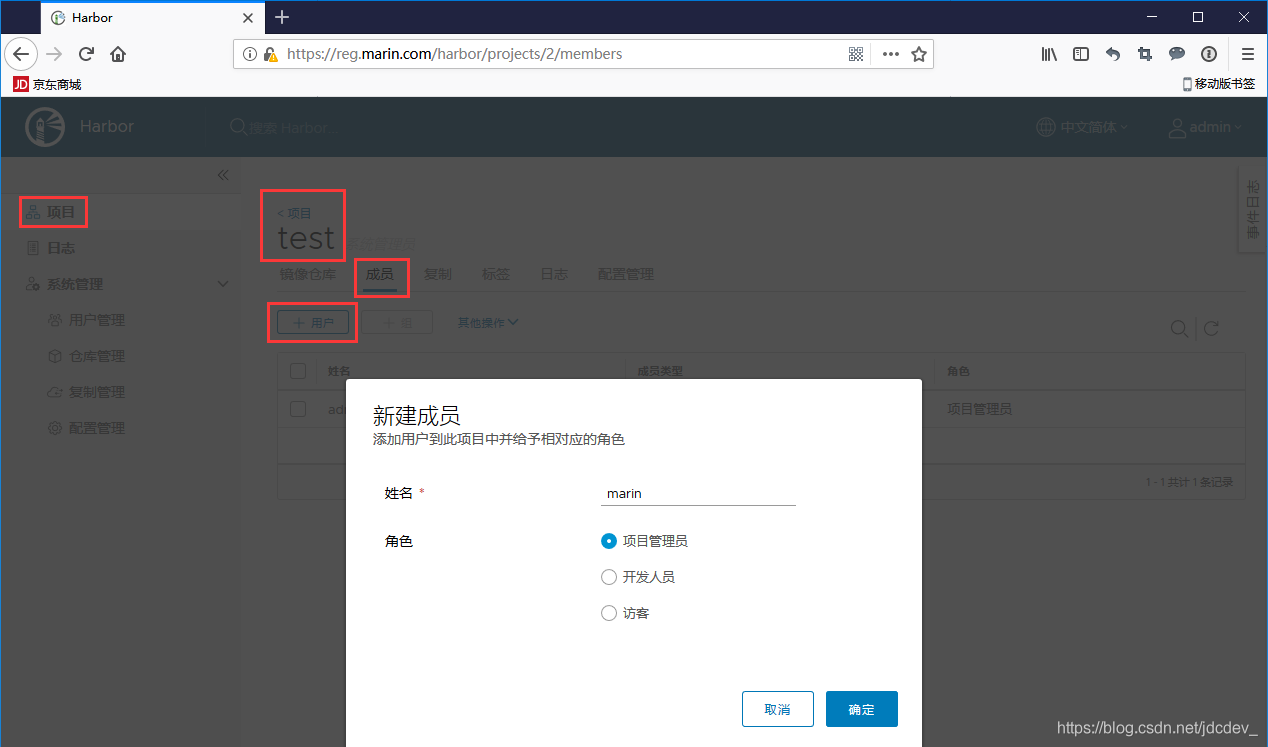
登錄后界面基本操作:
- 新建項目
test。

- 新建用戶
marin。

- 將用戶
marin設置為test項目管理員。

)


)


【系統架構設計師】)