如何在Android中利用 GestureDetector進行手勢檢測
發布時間:2020-11-26 16:15:21
來源:億速云
閱讀:92
作者:Leah
今天就跟大家聊聊有關如何在Android中利用 GestureDetector進行手勢檢測,可能很多人都不太了解,為了讓大家更加了解,小編給大家總結了以下內容,希望大家根據這篇文章可以有所收獲。
一、概述
當用戶觸摸屏幕的時候,會產生許多手勢,例如down,up,scroll,filing等等。
一般情況下,我們知道View類有個View.OnTouchListener內部接口,通過重寫他的onTouch(View v, MotionEvent event)方法,我們可以處理一些touch事件,但是這個方法太過簡單,如果需要處理一些復雜的手勢,用這個接口就會很麻煩(因為我們要自己根據用戶觸摸的軌跡去判斷是什么手勢)。
Android sdk給我們提供了GestureDetector(Gesture:手勢Detector:識別)類,通過這個類我們可以識別很多的手勢,主要是通過他的onTouchEvent(event)方法完成了不同手勢的識別。雖然他能識別手勢,但是不同的手勢要怎么處理,應該是提供給程序員實現的。
GestureDetector這個類對外提供了兩個接口和一個外部類
接口:OnGestureListener,OnDoubleTapListener
內部類:SimpleOnGestureListener
這個外部類,其實是兩個接口中所有函數的集成,它包含了這兩個接口里所有必須要實現的函數而且都已經重寫,但所有方法體都是空的;不同點在于:該類是static class,程序員可以在外部繼承這個類,重寫里面的手勢處理方法。
下面我們先看OnGestureListener接口;
二、GestureDetector.OnGestureListener---接口
1、基本講解如果我們寫一個類并implements OnGestureListener,會提示有幾個必須重寫的函數,加上之后是這個樣子的:private?class?gesturelistener?implements?GestureDetector.OnGestureListener{
public?boolean?onDown(MotionEvent?e)?{
//?TODO?Auto-generated?method?stub
return?false;
}
public?void?onShowPress(MotionEvent?e)?{
//?TODO?Auto-generated?method?stub
}
public?boolean?onSingleTapUp(MotionEvent?e)?{
//?TODO?Auto-generated?method?stub
return?false;
}
public?boolean?onScroll(MotionEvent?e1,?MotionEvent?e2,
float?distanceX,?float?distanceY)?{
//?TODO?Auto-generated?method?stub
return?false;
}
public?void?onLongPress(MotionEvent?e)?{
//?TODO?Auto-generated?method?stub
}
public?boolean?onFling(MotionEvent?e1,?MotionEvent?e2,?float?velocityX,
float?velocityY)?{
//?TODO?Auto-generated?method?stub
return?false;
}
}
可見,這里總共重寫了六個函數,這些函數都在什么情況下才會觸發呢,下面講一下:
OnDown(MotionEvent e):用戶按下屏幕就會觸發;
onShowPress(MotionEvent e):如果是按下的時間超過瞬間,而且在按下的時候沒有松開或者是拖動的,那么onShowPress就會執行,具體這個瞬間是多久,我也不清楚呃……
onLongPress(MotionEvent e):長按觸摸屏,超過一定時長,就會觸發這個事件
觸發順序:
onDown->onShowPress->onLongPress
onSingleTapUp(MotionEvent e):從名子也可以看出,一次單獨的輕擊抬起操作,也就是輕擊一下屏幕,立刻抬起來,才會有這個觸發,當然,如果除了Down以外還有其它操作,那就不再算是Single操作了,所以也就不會觸發這個事件
觸發順序:
點擊一下非常快的(不滑動)Touchup:
onDown->onSingleTapUp->onSingleTapConfirmed
點擊一下稍微慢點的(不滑動)Touchup:
onDown->onShowPress->onSingleTapUp->onSingleTapConfirmed
onFling(MotionEvent e1, MotionEvent e2, float velocityX,float velocityY) :滑屏,用戶按下觸摸屏、快速移動后松開,由1個MotionEvent ACTION_DOWN, 多個ACTION_MOVE, 1個ACTION_UP觸發
參數解釋:
e1:第1個ACTION_DOWN MotionEvent
e2:最后一個ACTION_MOVE MotionEvent
velocityX:X軸上的移動速度,像素/秒
velocityY:Y軸上的移動速度,像素/秒
onScroll(MotionEvent e1, MotionEvent e2,float distanceX, float distanceY):在屏幕上拖動事件。無論是用手拖動view,或者是以拋的動作滾動,都會多次觸發,這個方法在ACTION_MOVE動作發生時就會觸發
滑屏:手指觸動屏幕后,稍微滑動后立即松開
onDown-----》onScroll----》onScroll----》onScroll----》………----->onFling
拖動:
onDown------》onScroll----》onScroll------》onFiling
可見,無論是滑屏,還是拖動,影響的只是中間OnScroll觸發的數量多少而已,最終都會觸發onFling事件!
2、實例
要使用GestureDetector,有三步要走:
1.創建OnGestureListener監聽函數:
可以使用構造實例:GestureDetector.OnGestureListener?listener?=?new?GestureDetector.OnGestureListener(){
};
也可以構造類:private?class?gestureListener?implements?GestureDetector.OnGestureListener{
}
2.創建GestureDetector實例mGestureDetector:
構造函數有下面三個,根據需要選擇:
GestureDetector gestureDetector=new GestureDetector(GestureDetector.OnGestureListener listener);
GestureDetector gestureDetector=new GestureDetector(Context context,GestureDetector.OnGestureListener listener);
GestureDetector gestureDetector=new GestureDetector(Context context,GestureDetector.SimpleOnGestureListener listener);
3、onTouch(View v, MotionEvent event)中攔截:public?boolean?onTouch(View?v,?MotionEvent?event)?{
return?mGestureDetector.onTouchEvent(event);
}
4.控件綁定TextView?tv?=?(TextView)findViewById(R.id.tv);
tv.setOnTouchListener(this);
現在進入實例階段:
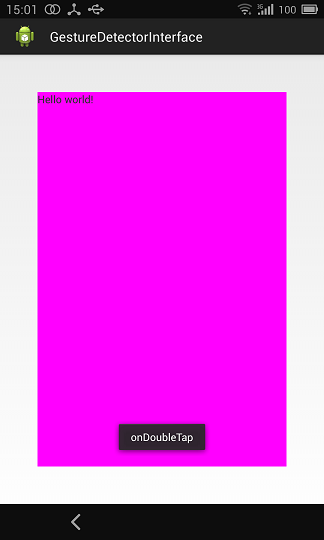
首先,在主布局頁面添加一個textView,并將其放大到整屏,方便在其上的手勢識別,代碼為:
xmlns:tools="http://schemas.android.com/tools"
android:layout_width="match_parent"
android:layout_height="match_parent"
tools:context="com.example.gesturedetectorinterface.MainActivity"?>
android:id="@+id/tv"
android:layout_width="fill_parent"
android:layout_height="fill_parent"
android:layout_margin="50dip"
android:background="#ff00ff"
android:text="@string/hello_world"?/>
然后在JAVA代碼中,依據上面的三步走原則,寫出代碼,并在所有的手勢下添加上Toast提示并寫上Logpublic?class?MainActivity?extends?Activity?implements?OnTouchListener{
private?GestureDetector?mGestureDetector;
@Override
protected?void?onCreate(Bundle?savedInstanceState)?{
super.onCreate(savedInstanceState);
setContentView(R.layout.activity_main);
mGestureDetector?=?new?GestureDetector(new?gestureListener());?//使用派生自OnGestureListener
TextView?tv?=?(TextView)findViewById(R.id.tv);
tv.setOnTouchListener(this);
tv.setFocusable(true);
tv.setClickable(true);
tv.setLongClickable(true);
}
/*
*?在onTouch()方法中,我們調用GestureDetector的onTouchEvent()方法,將捕捉到的MotionEvent交給GestureDetector
*?來分析是否有合適的callback函數來處理用戶的手勢
*/
public?boolean?onTouch(View?v,?MotionEvent?event)?{
return?mGestureDetector.onTouchEvent(event);
}
private?class?gestureListener?implements?GestureDetector.OnGestureListener{
//?用戶輕觸觸摸屏,由1個MotionEvent?ACTION_DOWN觸發
public?boolean?onDown(MotionEvent?e)?{
Log.i("MyGesture",?"onDown");
Toast.makeText(MainActivity.this,?"onDown",?Toast.LENGTH_SHORT).show();
return?false;
}
/*
*?用戶輕觸觸摸屏,尚未松開或拖動,由一個1個MotionEvent?ACTION_DOWN觸發
*?注意和onDown()的區別,強調的是沒有松開或者拖動的狀態
*
*?而onDown也是由一個MotionEventACTION_DOWN觸發的,但是他沒有任何限制,
*?也就是說當用戶點擊的時候,首先MotionEventACTION_DOWN,onDown就會執行,
*?如果在按下的瞬間沒有松開或者是拖動的時候onShowPress就會執行,如果是按下的時間超過瞬間
*?(這塊我也不太清楚瞬間的時間差是多少,一般情況下都會執行onShowPress),拖動了,就不執行onShowPress。
*/
public?void?onShowPress(MotionEvent?e)?{
Log.i("MyGesture",?"onShowPress");
Toast.makeText(MainActivity.this,?"onShowPress",?Toast.LENGTH_SHORT).show();
}
//?用戶(輕觸觸摸屏后)松開,由一個1個MotionEvent?ACTION_UP觸發
///輕擊一下屏幕,立刻抬起來,才會有這個觸發
//從名子也可以看出,一次單獨的輕擊抬起操作,當然,如果除了Down以外還有其它操作,那就不再算是Single操作了,所以這個事件?就不再響應
public?boolean?onSingleTapUp(MotionEvent?e)?{
Log.i("MyGesture",?"onSingleTapUp");
Toast.makeText(MainActivity.this,?"onSingleTapUp",?Toast.LENGTH_SHORT).show();
return?true;
}
//?用戶按下觸摸屏,并拖動,由1個MotionEvent?ACTION_DOWN,?多個ACTION_MOVE觸發
public?boolean?onScroll(MotionEvent?e1,?MotionEvent?e2,
float?distanceX,?float?distanceY)?{
Log.i("MyGesture22",?"onScroll:"+(e2.getX()-e1.getX())?+"?"+distanceX);
Toast.makeText(MainActivity.this,?"onScroll",?Toast.LENGTH_LONG).show();
return?true;
}
//?用戶長按觸摸屏,由多個MotionEvent?ACTION_DOWN觸發
public?void?onLongPress(MotionEvent?e)?{
Log.i("MyGesture",?"onLongPress");
Toast.makeText(MainActivity.this,?"onLongPress",?Toast.LENGTH_LONG).show();
}
//?用戶按下觸摸屏、快速移動后松開,由1個MotionEvent?ACTION_DOWN,?多個ACTION_MOVE,?1個ACTION_UP觸發
public?boolean?onFling(MotionEvent?e1,?MotionEvent?e2,?float?velocityX,
float?velocityY)?{
Log.i("MyGesture",?"onFling");
Toast.makeText(MainActivity.this,?"onFling",?Toast.LENGTH_LONG).show();
return?true;
}
};
}
源碼在博客底部給出。
三、GestureDetector.OnDoubleTapListener---接口
1、構建
有兩種方式設置雙擊監聽:
方法一:新建一個類同時派生自OnGestureListener和OnDoubleTapListener:private?class?gestureListener?implements?GestureDetector.OnGestureListener,GestureDetector.OnDoubleTapListener{
}
方法二:使用GestureDetector::setOnDoubleTapListener();函數設置監聽://構建GestureDetector實例
mGestureDetector?=?new?GestureDetector(new?gestureListener());?//使用派生自OnGestureListener
private?class?gestureListener?implements?GestureDetector.OnGestureListener{
}
//設置雙擊監聽器
mGestureDetector.setOnDoubleTapListener(new?doubleTapListener());
private?class?doubleTapListener?implements?GestureDetector.OnDoubleTapListener{
}
注意:大家可以看到無論在方法一還是在方法二中,都需要派生自GestureDetector.OnGestureListener,前面我們說過GestureDetector 的構造函數,如下:
GestureDetector gestureDetector=new GestureDetector(GestureDetector.OnGestureListener listener);
GestureDetector gestureDetector=new GestureDetector(Context context,GestureDetector.OnGestureListener listener);
GestureDetector gestureDetector=new GestureDetector(Context context,GestureDetector.SimpleOnGestureListener listener);
可以看到,在構造函數中,除了后面要講的SimpleOnGestureListener 以外的其它兩個構造函數都必須是OnGestureListener的實例。所以要想使用OnDoubleTapListener的幾個函數,就必須先實現OnGestureListener。
2、函數講解
首先看一下OnDoubleTapListener接口必須重寫的三個函數:private?class?doubleTapListener?implements?GestureDetector.OnDoubleTapListener{
public?boolean?onSingleTapConfirmed(MotionEvent?e)?{
//?TODO?Auto-generated?method?stub
return?false;
}
public?boolean?onDoubleTap(MotionEvent?e)?{
//?TODO?Auto-generated?method?stub
return?false;
}
public?boolean?onDoubleTapEvent(MotionEvent?e)?{
//?TODO?Auto-generated?method?stub
return?false;
}
}
onSingleTapConfirmed(MotionEvent e):單擊事件。用來判定該次點擊是SingleTap而不是DoubleTap,如果連續點擊兩次就是DoubleTap手勢,如果只點擊一次,系統等待一段時間后沒有收到第二次點擊則判定該次點擊為SingleTap而不是DoubleTap,然后觸發SingleTapConfirmed事件。觸發順序是:OnDown->OnsingleTapUp->OnsingleTapConfirmed
關于onSingleTapConfirmed和onSingleTapUp的一點區別: OnGestureListener有這樣的一個方法onSingleTapUp,和onSingleTapConfirmed容易混淆。二者的區別是:onSingleTapUp,只要手抬起就會執行,而對于onSingleTapConfirmed來說,如果雙擊的話,則onSingleTapConfirmed不會執行。
onDoubleTap(MotionEvent e):雙擊事件
onDoubleTapEvent(MotionEvent e):雙擊間隔中發生的動作。指觸發onDoubleTap以后,在雙擊之間發生的其它動作,包含down、up和move事件;下圖是雙擊一下的Log輸出:
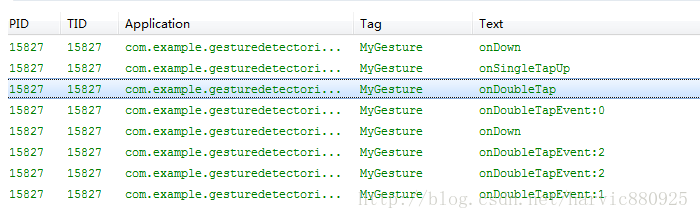
兩點總結:
1、從上圖可以看出,在第二下點擊時,先觸發OnDoubleTap,然后再觸發OnDown(第二次點擊)
2、其次在觸發OnDoubleTap以后,就開始觸發onDoubleTapEvent了,onDoubleTapEvent后面的數字代表了當前的事件,0指ACTION_DOWN,1指ACTION_UP,2 指ACTION_MOVE
在上一個例子的基礎上,我們再添加一個雙擊監聽類,實現如下:public?class?MainActivity?extends?Activity?implements?OnTouchListener{
private?GestureDetector?mGestureDetector;
@Override
protected?void?onCreate(Bundle?savedInstanceState)?{
super.onCreate(savedInstanceState);
setContentView(R.layout.activity_main);
mGestureDetector?=?new?GestureDetector(new?gestureListener());?//使用派生自OnGestureListener
mGestureDetector.setOnDoubleTapListener(new?doubleTapListener());
TextView?tv?=?(TextView)findViewById(R.id.tv);
tv.setOnTouchListener(this);
tv.setFocusable(true);
tv.setClickable(true);
tv.setLongClickable(true);
}
/*
*?在onTouch()方法中,我們調用GestureDetector的onTouchEvent()方法,將捕捉到的MotionEvent交給GestureDetector
*?來分析是否有合適的callback函數來處理用戶的手勢
*/
public?boolean?onTouch(View?v,?MotionEvent?event)?{
return?mGestureDetector.onTouchEvent(event);
}
//OnGestureListener監聽
private?class?gestureListener?implements?GestureDetector.OnGestureListener{
public?boolean?onDown(MotionEvent?e)?{
Log.i("MyGesture",?"onDown");
Toast.makeText(MainActivity.this,?"onDown",?Toast.LENGTH_SHORT).show();
return?false;
}
public?void?onShowPress(MotionEvent?e)?{
Log.i("MyGesture",?"onShowPress");
Toast.makeText(MainActivity.this,?"onShowPress",?Toast.LENGTH_SHORT).show();
}
public?boolean?onSingleTapUp(MotionEvent?e)?{
Log.i("MyGesture",?"onSingleTapUp");
Toast.makeText(MainActivity.this,?"onSingleTapUp",?Toast.LENGTH_SHORT).show();
return?true;
}
public?boolean?onScroll(MotionEvent?e1,?MotionEvent?e2,
float?distanceX,?float?distanceY)?{
Log.i("MyGesture22",?"onScroll:"+(e2.getX()-e1.getX())?+"?"+distanceX);
Toast.makeText(MainActivity.this,?"onScroll",?Toast.LENGTH_LONG).show();
return?true;
}
public?void?onLongPress(MotionEvent?e)?{
Log.i("MyGesture",?"onLongPress");
Toast.makeText(MainActivity.this,?"onLongPress",?Toast.LENGTH_LONG).show();
}
public?boolean?onFling(MotionEvent?e1,?MotionEvent?e2,?float?velocityX,
float?velocityY)?{
Log.i("MyGesture",?"onFling");
Toast.makeText(MainActivity.this,?"onFling",?Toast.LENGTH_LONG).show();
return?true;
}
};
//OnDoubleTapListener監聽
private?class?doubleTapListener?implements?GestureDetector.OnDoubleTapListener{
public?boolean?onSingleTapConfirmed(MotionEvent?e)?{
Log.i("MyGesture",?"onSingleTapConfirmed");
Toast.makeText(MainActivity.this,?"onSingleTapConfirmed",?Toast.LENGTH_LONG).show();
return?true;
}
public?boolean?onDoubleTap(MotionEvent?e)?{
Log.i("MyGesture",?"onDoubleTap");
Toast.makeText(MainActivity.this,?"onDoubleTap",?Toast.LENGTH_LONG).show();
return?true;
}
public?boolean?onDoubleTapEvent(MotionEvent?e)?{
Log.i("MyGesture",?"onDoubleTapEvent");
Toast.makeText(MainActivity.this,?"onDoubleTapEvent",?Toast.LENGTH_LONG).show();
return?true;
}
};
}
雙擊一下,部分截圖如下:
雙擊所對應的觸發事件順序:

輕輕單擊一下,對應的事件觸發順序為:

源碼在博客底部給出。
四、GestureDetector.SimpleOnGestureListener---類
它與前兩個不同的是:
1、這是一個類,在它基礎上新建類的話,要用extends派生而不是用implements繼承!
2、OnGestureListener和OnDoubleTapListener接口里的函數都是強制必須重寫的,即使用不到也要重寫出來一個空函數但在SimpleOnGestureListener類的實例或派生類中不必如此,可以根據情況,用到哪個函數就重寫哪個函數,因為SimpleOnGestureListener類本身已經實現了這兩個接口的所有函數,只是里面全是空的而已。
下面利用SimpleOnGestureListener類來重新實現上面的幾個效果,代碼如下:public?class?MainActivity?extends?Activity?implements?OnTouchListener?{
private?GestureDetector?mGestureDetector;
@Override
protected?void?onCreate(Bundle?savedInstanceState)?{
super.onCreate(savedInstanceState);
setContentView(R.layout.activity_main);
mGestureDetector?=?new?GestureDetector(new?simpleGestureListener());
TextView?tv?=?(TextView)findViewById(R.id.tv);
tv.setOnTouchListener(this);
tv.setFocusable(true);
tv.setClickable(true);
tv.setLongClickable(true);
}
public?boolean?onTouch(View?v,?MotionEvent?event)?{
//?TODO?Auto-generated?method?stub
return?mGestureDetector.onTouchEvent(event);
}
private?class?simpleGestureListener?extends
GestureDetector.SimpleOnGestureListener?{
/*****OnGestureListener的函數*****/
public?boolean?onDown(MotionEvent?e)?{
Log.i("MyGesture",?"onDown");
Toast.makeText(MainActivity.this,?"onDown",?Toast.LENGTH_SHORT)
.show();
return?false;
}
public?void?onShowPress(MotionEvent?e)?{
Log.i("MyGesture",?"onShowPress");
Toast.makeText(MainActivity.this,?"onShowPress",?Toast.LENGTH_SHORT)
.show();
}
public?boolean?onSingleTapUp(MotionEvent?e)?{
Log.i("MyGesture",?"onSingleTapUp");
Toast.makeText(MainActivity.this,?"onSingleTapUp",
Toast.LENGTH_SHORT).show();
return?true;
}
public?boolean?onScroll(MotionEvent?e1,?MotionEvent?e2,
float?distanceX,?float?distanceY)?{
Log.i("MyGesture",?"onScroll:"?+?(e2.getX()?-?e1.getX())?+?"?"
+?distanceX);
Toast.makeText(MainActivity.this,?"onScroll",?Toast.LENGTH_LONG)
.show();
return?true;
}
public?void?onLongPress(MotionEvent?e)?{
Log.i("MyGesture",?"onLongPress");
Toast.makeText(MainActivity.this,?"onLongPress",?Toast.LENGTH_LONG)
.show();
}
public?boolean?onFling(MotionEvent?e1,?MotionEvent?e2,?float?velocityX,
float?velocityY)?{
Log.i("MyGesture",?"onFling");
Toast.makeText(MainActivity.this,?"onFling",?Toast.LENGTH_LONG)
.show();
return?true;
}
/*****OnDoubleTapListener的函數*****/
public?boolean?onSingleTapConfirmed(MotionEvent?e)?{
Log.i("MyGesture",?"onSingleTapConfirmed");
Toast.makeText(MainActivity.this,?"onSingleTapConfirmed",
Toast.LENGTH_LONG).show();
return?true;
}
public?boolean?onDoubleTap(MotionEvent?e)?{
Log.i("MyGesture",?"onDoubleTap");
Toast.makeText(MainActivity.this,?"onDoubleTap",?Toast.LENGTH_LONG)
.show();
return?true;
}
public?boolean?onDoubleTapEvent(MotionEvent?e)?{
Log.i("MyGesture",?"onDoubleTapEvent");
Toast.makeText(MainActivity.this,?"onDoubleTapEvent",
Toast.LENGTH_LONG).show();
return?true;
}
}
}
到此,有關GestureDetector的所有基礎知識都講解完了,下面給出一個小應用——識別用戶是向左滑還是向右滑!
源碼在博客底部給出。
五、OnFling應用——識別向左滑還是向右滑
這部分就有點意思了,可以說是上面知識的一個小應用,我們利用OnFling函數來識別當前用戶是在向左滑還是向右滑,從而打出日志。先看下OnFling的參數:
boolean onFling(MotionEvent e1, MotionEvent e2, float velocityX,float velocityY)
參數解釋:
e1:第1個ACTION_DOWN MotionEvent
e2:最后一個ACTION_MOVE MotionEvent
velocityX:X軸上的移動速度,像素/秒
velocityY:Y軸上的移動速度,像素/秒
首先,先說一下實現的功能:當用戶向左滑動距離超過100px,且滑動速度超過100 px/s時,即判斷為向左滑動;向右同理.代碼如下:public?class?MainActivity?extends?Activity?implements?OnTouchListener?{
private?GestureDetector?mGestureDetector;
@Override
protected?void?onCreate(Bundle?savedInstanceState)?{
super.onCreate(savedInstanceState);
setContentView(R.layout.activity_main);
mGestureDetector?=?new?GestureDetector(new?simpleGestureListener());
TextView?tv?=?(TextView)findViewById(R.id.tv);
tv.setOnTouchListener(this);
tv.setFocusable(true);
tv.setClickable(true);
tv.setLongClickable(true);
}
public?boolean?onTouch(View?v,?MotionEvent?event)?{
//?TODO?Auto-generated?method?stub
return?mGestureDetector.onTouchEvent(event);
}
private?class?simpleGestureListener?extends
GestureDetector.SimpleOnGestureListener?{
/*****OnGestureListener的函數*****/
final?int?FLING_MIN_DISTANCE?=?100,?FLING_MIN_VELOCITY?=?200;
//?觸發條件?:
//?X軸的坐標位移大于FLING_MIN_DISTANCE,且移動速度大于FLING_MIN_VELOCITY個像素/秒
//?參數解釋:
//?e1:第1個ACTION_DOWN?MotionEvent
//?e2:最后一個ACTION_MOVE?MotionEvent
//?velocityX:X軸上的移動速度,像素/秒
//?velocityY:Y軸上的移動速度,像素/秒
public?boolean?onFling(MotionEvent?e1,?MotionEvent?e2,?float?velocityX,
float?velocityY)?{
if?(e1.getX()?-?e2.getX()?>?FLING_MIN_DISTANCE
&&?Math.abs(velocityX)?>?FLING_MIN_VELOCITY)?{
//?Fling?left
Log.i("MyGesture",?"Fling?left");
Toast.makeText(MainActivity.this,?"Fling?Left",?Toast.LENGTH_SHORT).show();
}?else?if?(e2.getX()?-?e1.getX()?>?FLING_MIN_DISTANCE
&&?Math.abs(velocityX)?>?FLING_MIN_VELOCITY)?{
//?Fling?right
Log.i("MyGesture",?"Fling?right");
Toast.makeText(MainActivity.this,?"Fling?Right",?Toast.LENGTH_SHORT).show();
}
return?true;
}
}
}
看完上述內容,你們對如何在Android中利用 GestureDetector進行手勢檢測有進一步的了解嗎?如果還想了解更多知識或者相關內容,請關注億速云行業資訊頻道,感謝大家的支持。


 - JVM監控與調優【轉】)


