hugo 能做web開發嗎
After hosting with Netlify for a few years, I decided to head back to self hosting. There are a few reasons for that, but the main reasoning was that I had more control over how things worked.
在Netlify托管了幾年之后,我決定回到自助托管。 這樣做有幾個原因,但是主要的原因是我對事情的運作方式有更多的控制權。
In this post, I'll show you my workflow for deploying my Hugo generated site (www.jaredwolff.com).
在這篇文章中,我將向您展示部署Hugo生成的網站( www.jaredwolff.com )的工作流程。
Instead of using what most people would go for, I'll be doing all of this using a FreeBSD Jails-based server. Plus I'll show you some tricks I've learned over the years on bulk image resizing and more.
我將不使用大多數人想要的東西,而是使用基于FreeBSD Jails的服務器來完成所有這些工作。 另外,我將向您展示我多年來在批量圖像調整大小上學到的一些技巧。
Let's get to it.
讓我們開始吧。
在哪里托管? (Where to host?)
If you want to host your own service, you'll need a server. That's where a VPS provider like Digital Ocean or Vultr comes in. I've been a fan and have used Digital Ocean for a while now.
如果要托管自己的服務,則需要一臺服務器。 那就是VPS提供商(例如Digital Ocean或Vultr)加入的地方。我一直是粉絲,并且使用Digital Ocean已有一段時間了。
To set up a new server here are some steps:
要設置新服務器,請執行以下步驟:
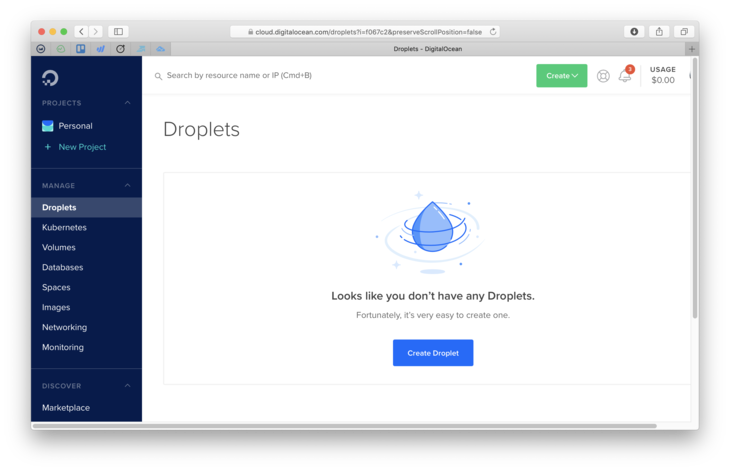
Login to Digital Ocean. If you don’t have Digital Ocean and would like to support this blog click here to create an account.
登錄到數字海洋。 如果您沒有Digital Ocean并想支持此博客,請單擊此處創建一個帳戶。
Go to
Account Settings->Securityand make sure you have an SSH key setup.轉到
Account Settings->Security,并確保您具有SSH密鑰設置。Create a new FreeBSD droplet. Make sure you use the UFS version
創建一個新的FreeBSD Droplet。 確保使用UFS版本
Make sure you select the $5 a month plan. For simple installs, this is more than enough!
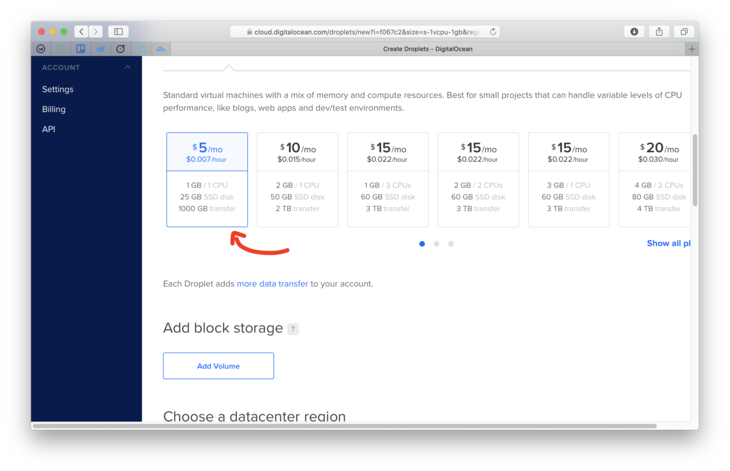
確保選擇每月5美元的計劃。 對于簡單的安裝,這已綽綽有余!
Make sure your SSH key is selected
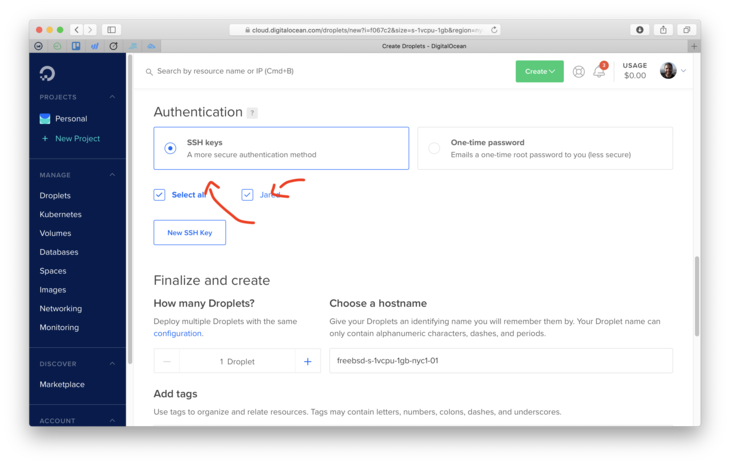
確保選擇了您的SSH密鑰
Finally click that green Create Droplet button!
最后,點擊綠色的創建液滴按鈕!
SSH in once you’re done:
ssh root@<yourserverip>完成后即可使用SSH:
ssh root@<yourserverip>
使用Bastille設置FreeBSD服務器 (Setting up your FreeBSD server with Bastille)
Up until recently, everything was running on a Docker based platform using Exoframe. It was easy and almost brainless.
直到最近,一切都使用Exoframe在基于Docker的平臺上運行。 這很容易,幾乎沒有頭腦。
The downside was that Docker takes up wayyyy too many resources. Plus managing files within a Docker container is as much or more work than hosting it natively. Oh, and have you checked how much space Docker has been using on your machine lately? On my development machine its was about 19GB of space. 😬
缺點是Docker占用了太多的資源。 另外,在Docker容器中管理文件比在本地托管它要多得多或更多。 哦,您是否檢查了Docker最近在您的計算機上使用了多少空間? 在我的開發機器上,它大約有19GB的空間。 😬
So what's the alternative?
那有什么選擇呢?
FreeBSD Jails using Bastille.
使用巴士底獄的FreeBSD Jails。
I've been playing with Bastille for a few months now. The more I use it, the more it makes 100% sense.
我已經和巴士底獄在一起玩了幾個月。 我使用的越多,它就越具有100%的意義。
Bastille allows you to create (now) portable lightweight FreeBSD based jails. These jails are "containers" that have virtually no overhead. There's no daemon (the operating system is the "daemon"!). Plus, jails are secure compared to the can of worms that Docker is. Yes, you may have to compile and port some utilities. Most though are already supported in FreeBSD's package manager pkg.
Bastille允許您創建(現在)基于FreeBSD的輕量級便攜式監獄。 這些監獄實際上是沒有任何開銷的“容器”。 沒有守護程序(操作系統是“守護程序”!)。 另外,與Docker相比,監獄更安全。 是的,您可能必須編譯并移植一些實用程序。 FreeBSD的軟件包管理器pkg已經支持了大多數。
In this section you'll learn how to get a jail running with caddy so you can securely host your site.
在本部分中,您將學習如何使用caddy進行監禁,以便安全地托管您的網站。
Let's keep the momentum going!
讓我們繼續前進!
Once you get the IP address for your server, you should login:
獲取服務器的IP地址后,您應該登錄:
ssh root@123.456.789.10You should get a MOTD message and an sh prompt. Woo!
您應該收到一條MOTD消息和一個sh提示。 !
FreeBSD 12.1-RELEASE-p2 GENERICWelcome to FreeBSD!
...#
Let's install a few important bits using pkg (FreeBSD's package manager):
讓我們使用pkg (FreeBSD的軟件包管理器)安裝一些重要的部分:
pkg install restic rsync bastilleWe'll be using restic for backups, rsync for transferring files and bastille for jail setup.
我們將使用restic進行備份,使用rsync傳輸文件,使用bastille進行監獄設置。
You also have to set up some static routes in your pf.conf. Here's an example of mine:
您還必須在pf.conf設置一些靜態路由。 這是我的一個例子:
ext_if="vtnet0"# Caddy related
caddy_addr=10.10.2.20set block-policy return
scrub in on $ext_if all fragment reassemble
set skip on lotable <jails> persist
nat on $ext_if from <jails> to any -> $ext_if# container routes
rdr pass inet proto tcp from any to port 80 -> $caddy_addr port 8880
rdr pass inet proto tcp from any to port 443 -> $caddy_addr port 4443# Enable dynamic rdr (see below)
rdr-anchor "rdr/*"block in all
pass out quick modulate state
antispoof for $ext_if inet
pass in inet proto tcp from any to any port ssh flags S/SA keep state
This is a standard pf.conf file for bastille. Make sure you edit caddy_addr to the IP you chose.
這是bastille的標準pf.conf文件。 確保將caddy_addr編輯為caddy_addr的IP。
Now let's start the firewall. You will get kicked out of your ssh session:
現在讓我們啟動防火墻。 您將被踢出ssh會話:
sysrc pf_enable="YES"
service pf start
Then let's get some bastille configuration out of the way:
然后讓我們進行一些bastille配置:
# set up bastille networking
sysrc cloned_interfaces+=lo1
sysrc ifconfig_lo1_name="bastille0"
service netif cloneup# bootstrap the base jail and start bastille
bastille bootstrap 12.1-RELEASE update
sysrc bastille_enable="YES"
service bastille start
This will set up your networking, and fetch the latest default base jail you'll use later.
這將建立您的網絡,并獲取您以后將使用的最新的默認基礎監獄。
Next, let's set up the jail:
接下來,讓我們設置監獄:
bastille create caddy 12.1-STABLE 10.10.2.20
bastille start caddy
Then install caddy
然后安裝caddy
#install the binary
fetch https://github.com/caddyserver/caddy/releases/download/v1.0.4/caddy_v1.0.4_freebsd_amd64.tar.gz
tar xvf caddy_v1.0.4_freebsd_amd64.tar.gz caddy
bastille cp caddy caddy /usr/local/bin/
rm caddy#create the caddy user
bastille cmd caddy pw useradd caddy -m -s /usr/sbin/nologin#install ca root file
bastille pkg caddy install ca_root_nss
When installing ca_root_nss , pkg will have to initialize. Accept the prompts. Once you're done here we'll move on to the next step!
安裝ca_root_nss ,必須初始化pkg 。 接受提示。 完成這里的操作后,我們將繼續下一步!
Once installation is complete, we should also configure caddy to start on boot. The easiest way to do that is use this rc.d script:
安裝完成后,我們還應該將caddy配置為在啟動時啟動。 最簡單的方法是使用以下rc.d腳本:
#!/bin/sh# $FreeBSD: head/net/caddy/files/caddy.in 452063 2017-10-14 12:58:24Z riggs $
#
# PROVIDE: caddy
# REQUIRE: LOGIN
# KEYWORD: shutdown
#
# Add the following lines to /etc/rc.conf.local or /etc/rc.conf
# to enable this service:
#
# caddy_enable (bool):	Set to NO by default.
#				Set it to YES to enable caddy.
# caddy_user (user):		Set user to run caddy.
#				Default is "caddy".
# caddy_group (group):	Set group to run caddy.
#				Default is "caddy".
# caddy_conf (path):		Path to caddy configuration file.
#				Default is /usr/local/etc/caddyfile.conf. /etc/rc.subrname=caddy
rcvar=caddy_enableload_rc_config $name: ${caddy_enable:="NO"}
: ${caddy_user:="caddy"}
: ${caddy_group:="caddy"}
: ${caddy_conf:="/usr/local/etc/caddyfile.conf"}
: ${caddy_log:="/home/caddy/caddy.log"}
: ${caddy_env:="CADDYPATH=/home/caddy/"}
: ${caddy_https_port:="4443"}
: ${caddy_http_port:="8880"}pidfile="/var/run/caddy.pid"
procname="/usr/local/bin/caddy"
command="/usr/sbin/daemon"
command_args="-f -p ${pidfile} /usr/bin/env ${caddy_env} ${procname} -agree -http-port ${caddy_http_port}  -https-port ${caddy_https_port} -conf=${caddy_conf} -log=${caddy_log} ${caddy_args}"
extra_commands="reload"start_precmd=caddy_startprecmd
reload_cmd=caddy_reloadcmdcaddy_startprecmd()
{if [ ! -e ${pidfile} ]; theninstall -o ${caddy_user} -g ${caddy_group} /dev/null ${pidfile};fi
}caddy_reloadcmd()
{kill -s USR1 $(cat ${pidfile})
}run_rc_command "$1"
Remove the caddy executable if you haven't already. Then create a new file with vi. This will be your rc.d script!
如果還沒有,請刪除caddy可執行文件。 然后使用vi創建一個新文件。 這將是您的rc.d腳本!
vi caddyThen paste the contents of the above script in there, save and exit.
然后將上面腳本的內容粘貼到其中,保存并退出。
Make sure the file is executable by using chmod and copy to the Caddy container.
通過使用chmod確保文件是可執行文件,并將其復制到Caddy容器中。
chmod +x caddy
bastille cp caddy caddy /usr/local/etc/rc.d/
Finally, we'll need a Caddyfile. Here's an example of one:
最后,我們需要一個Caddyfile。 這是一個例子:
stage.jaredwolff.com {tls hello@jaredwolff.comlog /home/caddy/stage.jaredwolff.com.logroot /var/www/stage.jaredwolff.com/gziplog stderr
}
log refers to this site specific access log.
log是指此站點特定的訪問日志。
root refers to where the root public folder is on your machine. In my case it's the common /var/www/<name of site>. Set your paths and remember them. We'll need them later!
root指的是根public文件夾是你的機器上。 就我而言,這是常見的/var/www/<name of site> 。 設置路徑并記住它們。 我們稍后將需要它們!
To have Caddy generate certs for this subdomain, you'll have to set the tls option. An email is all that's needed.
要讓Caddy為該子域生成證書,您必須設置tls選項。 只需一封電子郵件。
For more on the Caddyfile structure check out the documentation.
有關Caddyfile結構的更多信息, 請查閱文檔。
Make a file called caddyfile.conf and copy it to /usr/local/etc/ in your Caddy container:
創建一個名為caddyfile.conf的文件,并將其復制到Caddy容器中的/usr/local/etc/中:
vi caddyfile.conf
# Paste your caddyfile contents and save
bastille cp caddy caddyfile.conf /usr/local/etc/
You should now redirect your DNS to the server IP. That way Caddy can generate/fetch the correct certificates. Then you can start Caddy with:
現在,您應該將DNS重定向到服務器IP。 這樣,Caddy可以生成/獲取正確的證書。 然后,您可以通過以下方式啟動Caddy:
bastille service caddy caddy startYou can check the log at /usr/home/caddy/caddy.log to make sure that your domain provisioned correctly.
您可以在/usr/home/caddy/caddy.log檢查日志,以確保正確配置了您的域。
Side note: Getting setup with SSL certs is tough at first, especially if you're migrating from another server. Your site will have to go down for a little bit while you switch your DNS settings and start caddy.
旁注:首先,很難通過SSL證書進行設置,特別是如果要從另一臺服務器進行遷移。 當您切換DNS設置并啟動caddy您的站點將不得不關閉一小段時間。
(That's if you're using standard caddy 1.0. You can also use the DNS provider plugins here which make things a little easier.)
(如果您使用的是標準的caddy 1.0,則也可以在此處使用DNS提供程序插件,這使事情變得簡單一些。)
Now that we have caddy up and running it's time to copy our hugo generated assets over using rsync. We're off to the next step!
現在我們已經有了caddy和運行它的時候我們復制hugo產生的資產超過使用rsync 。 我們要進行下一步!
使構建和部署變得容易 (Make building and deploying easy)

I spend a ton of time writing C code, and that means I spend tons of time using Makefiles. For many, make (or gmake for GNU make) is the bane of their existence.
我花費大量時間編寫C代碼,這意味著我花費大量時間使用Makefiles。 對于許多人來說, make (或GNU make的gmake )是它們存在的禍根。
For building and deploying, make makes it easy to create reusable recipes. That way you know you can deploy with confidence every time.
對于構建和部署, make使創建可重復使用的配方變得容易。 這樣,您便知道每次都可以放心地進行部署。
My Makefile borrows from the one that Victoria Drake had posted not too long ago. I changed it up a bit to match my needs.
我的Makefile借鑒了Victoria Drake不久前發布的內容 。 我做了一些修改以滿足我的需求。
Let's take a tour and see what's inside:
讓我們看一下里面的東西:
.POSIX:HUGO_VERSION := 0.66.0OPTIMIZED_DIR := optimized
CONTENT_DIR := content
DEST_DIR := publicSERVER := 123.456.789.10
USER := user
The first section contains all the variables that I use to tell the functions later on what to do. It also has a reference to the .POSIX target. This means that the Makefile will be as portable between different versions of make.
第一部分包含所有我稍后用來告訴函數做什么的變量。 它還具有對.POSIX目標的引用。 這意味著Makefile將在make不同版本之間具有可移植性。
Then, I popped in some logic to determine whether I'm deploying to stage or production:
然后,我彈出一些邏輯來確定是要部署到舞臺還是生產:
# Set the place where it's deployed to.
ifdef PRODUCTION
$(info Building for production. 🚀)
TARGET := www
else
$(info Building for development. 🚀)
BASEURL := --baseURL "https://stage.jaredwolff.com"
TARGET := stage
endif
By default, recipes below will use the development workflow. To use the production workflow, you can invoke make like this:
默認情況下,以下配方將使用開發工作流程。 要使用生產工作流程,您可以這樣調用make :
PRODUCTION=1 make buildThis does add some extra friction to the deploy process. It's a good step though. That way you're sure the deploy is going to the right place!
這確實給部署過程增加了一些額外的摩擦。 這是一個好步驟。 這樣,您就可以確定部署的正確位置!
# Full path
DEPLOY_DIR := /usr/local/bastille/jails/caddy/root/path/to/$(TARGET).jaredwolff.com
Using the TARGET variable above, I then define the path to my server assets. I'm using Bastille to organize my jails, so the path is extra long. (yea, lengthly long) This allows us to use rsync to deploy the files with ease.
然后,使用上面的TARGET變量,定義服務器資產的路徑。 我正在使用巴士底獄(Bastille)整理監獄,因此路徑很長。 (是的,很長)這使我們可以使用rsync輕松部署文件。
Now here come the fun bits. To do a full bulk resize, I'm using the wildcard functionality of the Makefile.
現在來一些有趣的地方。 要進行完全批量調整,我使用了Makefile的wildcard功能。
IMAGES := \
$(wildcard $(CONTENT_DIR)/*/images/*.jpg) \
$(wildcard $(CONTENT_DIR)/*/images/*.JPG) \
$(wildcard $(CONTENT_DIR)/*/images/*.jpeg) \
$(wildcard $(CONTENT_DIR)/*/images/*.png) \
$(wildcard $(CONTENT_DIR)/*/*/images/*.jpg) \
$(wildcard $(CONTENT_DIR)/*/*/images/*.jpeg) \
$(wildcard $(CONTENT_DIR)/*/*/images/*.png) \
$(wildcard $(CONTENT_DIR)/*/*/images/*.JPG) \
In this case it will create a huge space delimited list of every image that is within my content directory. The biggest drawback of this method is that it's not space tolerant. An easy fix to this is to make sure that all my photos do not have spaces.
在這種情況下,它將為我的內容目錄中的每個圖像創建一個由空格分隔的列表。 這種方法的最大缺點是它不能容忍空間。 一個簡單的解決方法是確保我所有的照片都沒有空格。
Here's a quick and dirty bash command. You can use to rename files that have spaces and replace them with '_' characters:
這是一個快速而骯臟的bash命令。 您可以使用重命名具有空格的文件并將其替換為'_'字符:
for f in *\ *; do mv "$f" "${f// /_}"; doneNext, we rename these entries so the prefix is now the target directory. This will be useful when we want to resize:
接下來,我們重命名這些條目,以使前綴現在是目標目錄。 當我們要調整大小時,這將很有用:
OPTIMIZED_IMAGES := \
$(subst $(CONTENT_DIR)/,$(OPTIMIZED_DIR)/,$(IMAGES))
Now check out the optimize recipe:
現在查看optimize配方:
.PHONY: optimize
optimize: build $(OPTIMIZED_IMAGES)
@echo "🧂 Optimizing images"
rsync -r $(OPTIMIZED_DIR)/ $(DEST_DIR)/
du -sh $(CONTENT_DIR)/
du -sh $(DEST_DIR)/$(OPTIMIZED_IMAGES):
convert -strip -compress JPEG -resize '730>' $(subst $(OPTIMIZED_DIR)/,$(CONTENT_DIR)/,$@) $@
It first calls the build recipe and then also the $(OPTIMIZED_IMAGES) recipe. The later will optimize the image using the convert command from Imagemagick. In this case I'm only resizing files that are larger than 730px wide. Change yours accordingly so you can reap the benefits of an optimized site.
它首先調用build配方,然后調用$(OPTIMIZED_IMAGES)配方。 后者將使用Imagemagick的convert命令優化圖像。 在這種情況下,我只調整大于730px寬的文件的大小。 相應地更改您的站點 ,以便您可以獲取優化站點的好處。
After resizing, the recipe uses rsync to copy the files from the OPTIMIZED_DIR to DEST_DIR.
調整大小后,配方使用rsync將文件從OPTIMIZED_DIR復制到DEST_DIR.
If we take a look at the build recipe, I first building the assets. Then, I copy the photos from the content dir to optimized dir. The nice thing is that rsync will only move files that have changed. Thus it doesn't have to copy the files over and over and over again every time you build.
如果我們看一下build方法,那么我首先構建資產。 然后,我將照片從content目錄復制到optimized目錄。 令人高興的是, rsync將僅移動已更改的文件。 因此,您不必在每次構建時一遍又一遍地復制文件。
Finally, the deploy recipe.
最后, deploy配方。
.PHONY: deploy
deploy:
@echo rsync to $(DEPLOY_DIR)
@rsync -r --del public/ $(USER)@$(SERVER):$(DEPLOY_DIR)/
@echo making restic snapshot
@scp scripts/backup.sh $(USER)@$(SERVER):/root/backup.sh
@ssh $(USER)@$(SERVER) sh /root/backup.sh $(DEPLOY_DIR)
@echo "🚀 Site is deployed!"
You can see again that I'm using rsync to sync the contents of public/ to the server. Make sure you set the USER , SERVER and DEPLOY_DIR. In my case DEPLOY_DIR comes out to /usr/local/bastille/jails/caddy/root/var/www/www.jaredwolff.com
您可以再次看到我正在使用rsync將public/的內容同步到服務器。 確保設置了USER , SERVER和DEPLOY_DIR 。 在我的情況下, DEPLOY_DIR出現在/usr/local/bastille/jails/caddy/root/var/www/www.jaredwolff.com
When you do finally get a successful deploy you can double check everything is in the correct place. Then once everything looks good you can start up your caddy server using:
當您最終獲得成功的部署時,可以仔細檢查所有內容是否位于正確的位置。 然后,當一切看起來都不錯時,您可以使用以下方法啟動童車服務器:
bastille service caddy caddy startdeploy will also do something extra handy here. It will deploy my restic backup script and run it. I'll talk about this more in the backup section.
deploy也會在這里做些額外的方便。 它將部署我的restic備份腳本并運行它。 我將在備份部分中對此進行更多討論。
All in all, here's the full Makefile:
總而言之,這是完整的Makefile:
.POSIX:HUGO_VERSION := 0.66.0OPTIMIZED_DIR := optimized
CONTENT_DIR := content
DEST_DIR := publicSERVER := 155.138.230.8
USER := root# Set the place where it's deployed to.
ifdef PRODUCTION
$(info Building for production. 🚀)
TARGET := www
else
$(info Building for development. 🚀)
BASEURL := --baseURL "https://stage.jaredwolff.com"
TARGET := stage
endif# Full path
DEPLOY_DIR := /usr/local/bastille/jails/caddy/root/var/www/$(TARGET).jaredwolff.comIMAGES := \
$(wildcard $(CONTENT_DIR)/*/images/*.jpg) \
$(wildcard $(CONTENT_DIR)/*/images/*.JPG) \
$(wildcard $(CONTENT_DIR)/*/images/*.jpeg) \
$(wildcard $(CONTENT_DIR)/*/images/*.png) \
$(wildcard $(CONTENT_DIR)/*/*/images/*.jpg) \
$(wildcard $(CONTENT_DIR)/*/*/images/*.jpeg) \
$(wildcard $(CONTENT_DIR)/*/*/images/*.png) \
$(wildcard $(CONTENT_DIR)/*/*/images/*.JPG) \OPTIMIZED_IMAGES := \
$(subst $(CONTENT_DIR)/,$(OPTIMIZED_DIR)/,$(IMAGES)).PHONY: all
all: build optimize.PHONY: clean
clean:
rm -rf public/
rm -rf optimized/.PHONY: serve
serve:
@hugo serve -D.PHONY: ssh
ssh:
@ssh $(USER)@$(SERVER).PHONY: build
build:
@echo "🍳 Generating site"
hugo --gc --minify -d $(DEST_DIR) $(BASEURL)
rsync -av --del -f"+ */" -f"- *" $(CONTENT_DIR)/ $(OPTIMIZED_DIR)/.PHONY: optimize
optimize: build $(OPTIMIZED_IMAGES)
@echo "🧂 Optimizing images"
rsync -r $(OPTIMIZED_DIR)/ $(DEST_DIR)/
du -sh $(CONTENT_DIR)/
du -sh $(DEST_DIR)/$(OPTIMIZED_IMAGES):
convert -strip -compress JPEG -resize '730>' $(subst $(OPTIMIZED_DIR)/,$(CONTENT_DIR)/,$@) $@.PHONY: deploy
deploy:
@echo rsync to $(DEPLOY_DIR)
@rsync -r --del public/ $(USER)@$(SERVER):$(DEPLOY_DIR)/
@echo making restic snapshot
@scp scripts/backup.sh $(USER)@$(SERVER):/root/backup.sh
@ssh $(USER)@$(SERVER) sh /root/backup.sh $(DEPLOY_DIR)
@echo "🚀 Site is deployed!"
There are a few other handy nuggets in there you may want to use. clean, serve and ssh have been very helpful when testing and connecting.
您可能還需要使用其他一些方便的塊。 clean , serve和ssh在測試和連接時都非常有用。
In the end you'll have a two step deploy process. The first generates your site with optimized images. The second is deploying to a server for static hosting.
最后,您將分兩步進行部署。 第一個生成具有優化圖像的網站。 第二個是部署到服務器以進行靜態托管。
增量備份 (Incremental Backup)

After discovering Restic I've been sold on how handy it has been for all my incremental backup needs. In the case of my server, I'm using to back up the root folder of my site. That way, if I need to roll back, I can do so with a few short steps.
在發現Restic之后,我被賣出了滿足我所有增量備份需求的方法。 對于我的服務器,我正在用來備份網站的根文件夾。 這樣,如果我需要回滾,可以通過幾個簡單的步驟來完成。
Here's how you can set up a local restic repo.
這是設置本地restic庫的方法。
設定 (Setting it up)
Initializing the repo is simple. The most important part is making sure you don't lose/forget your password!
初始化倉庫很簡單。 最重要的部分是確保您不會丟失/忘記密碼!
# restic init -r /root/backupsenter password for new repository:enter password again:created restic repository 32e14c7052 at /root/backupsPlease note that knowledge of your password is required to accessthe repository. Losing your password means that your data isirrecoverably lost.Set the RESTIC_PASSWORD environment variable to avoid entering your password. To make it permanent you'll have to place export RESTIC_PASSWORD="Your password here!" within the .profile file in /root/.
設置RESTIC_PASSWORD環境變量,以避免輸入密碼。 要使其永久存在,您必須export RESTIC_PASSWORD="Your password here!"放置export RESTIC_PASSWORD="Your password here!" 在/root/的.profile文件中。
備份 (Backing Up)
Invoking restic over SSH is tough. So our next best bet?
通過SSH調用restic很難。 那么我們的下一個最佳選擇?
Transfer a (very brief) shell script to the server and run it after a deploy. Here's the contents of what I'm using today:
將(非常簡短的)shell腳本傳輸到服務器并在部署后運行它。 這是我今天使用的內容:
#!/bin/sh
export RESTIC_PASSWORD="Your password here!"
restic backup $1 -r /root/backups/
Side note: As I sit here and look at this script, for security reasons you can replace "Your password here!" with $2 which is the second argument to the script. That way you don't need to commit/push the password stored in a static file!
旁注:當我坐在這里查看此腳本時,出于安全原因,您可以替換“此處的密碼!”。 $ 2是腳本的第二個參數。 這樣,您無需提交/推送存儲在靜態文件中的密碼!
This first sets your backup password. Then it runs restic using the first command line argument as the path. So, to run a backup with this script, it would look something like this:
這首先設置您的備份密碼。 然后使用第一個命令行參數作為路徑運行restic 。 因此,要使用此腳本運行備份,它將類似于以下內容:
./backup.sh /path/to/your/public/folder/Note: you do need to initialize your restic backup before you start backing up. It will barf at you otherwise!
注意: 在開始備份之前,您確實需要初始化restic備份。 否則它會對你大吼!
In my case I'm placing the incremental backups on a different folder of my machine. That way they're easily accessible and fast.
就我而言,我將增量備份放置在計算機的其他文件夾中。 這樣,它們就可以輕松訪問并且快速 。
查看您的備份 (Viewing your backups)
To view your backups you can run the following command:
要查看備份,可以運行以下命令:
# restic snapshots -r /root/backups -g paths -c
enter password for repository:
repository e140b5e4 opened successfully, password is correct
snapshots for (paths [/usr/local/bastille/jails/caddy/root/var/www/www.jaredwolff.com]):
ID        Time                 Host         Tags
--------------------------------------------------
d3328066  2020-03-10 00:30:58  vultr.guest
f3360819  2020-03-10 04:03:03  vultr.guest
231dd134  2020-03-10 04:44:00  vultr.guest
3c1be26a  2020-03-10 04:56:19  vultr.guest
e96c947c  2020-03-10 05:03:00  vultr.guest
34c3682a  2020-03-10 14:01:37  vultr.guest
fbccdb8c  2020-03-10 14:04:26  vultr.guest
9ce11146  2020-03-10 15:38:49  vultr.guest
046b3da3  2020-03-10 15:47:06  vultr.guest
9c28d4bc  2020-03-10 15:48:25  vultr.guest
469dc228  2020-03-10 15:48:54  vultr.guest
6f78af72  2020-03-10 17:00:21  vultr.guest
29ad17b2  2020-03-10 20:18:23  vultr.guest
ed22ce1f  2020-03-10 20:20:24  vultr.guest
9c8c1b03  2020-03-11 13:56:40  vultr.guest
b6cfcfec  2020-03-11 14:08:14  vultr.guest
e8546005  2020-03-11 14:27:22  vultr.guest
49a134fe  2020-03-17 00:47:58  vultr.guest
c0beb283  2020-03-18 20:44:52  vultr.guest
--------------------------------------------------
You can use this list to determine if you need to roll back a deploy.
您可以使用此列表來確定是否需要回滾部署。
恢復中 (Restoring)
Restoring from a backup, especially in a live environment, needs to be quick. After viewing your backups you can restore a specific backup by using its ID.
從備份還原,尤其是在實時環境中,需要快速進行。 查看備份后,您可以使用其ID還原特定的備份。
restic restore d3328066This will restore the files back to the backup made on 2020-03-10 00:30:58. Awesome. Plus it won't overwrite every single file. It will only apply the differences from the current state and the stored state.
這會將文件還原回2020-03-10 00:30:58進行的備份。 太棒了 另外,它不會覆蓋每個文件。 它將僅應用與當前狀態和存儲狀態的差異。
結論 (Conclusion)
We've covered a ton of ground in this post. You've learned how to:
在這篇文章中,我們已經做了很多工作。 您已經學會了如何:
- Deploy your own server using Vultr 使用Vultr部署自己的服務器
- Use Bastille to create Container-like Jails 使用巴士底獄創建類似容器的監獄
- Set up Caddy to serve static file assets with TLS 設置Caddy以使用TLS提供靜態文件資產
Deploy the files using a fairly simple Makefile and
rsync使用相當簡單的Makefile和
rsync部署文件Back up after every deploy using
restic每次部署后使用
restic進行restic
In the end we have a robust, secure and simple platform for hosting static files and services.
最后,我們有了一個強大,安全和簡單的平臺來托管靜態文件和服務。
Stay tuned as there are more posts like this coming your way soon! In the meantime check out my other posts.
請繼續關注,因為很快會有更多此類帖子發布! 同時,請查看我的其他帖子。
Thanks for reading and see you next time! 👍
感謝您的閱讀,下次見! 👍
You can find other articles like this at www.jaredwolff.com.
您可以在www.jaredwolff.com上找到其他類似的文章。
翻譯自: https://www.freecodecamp.org/news/my-latest-self-hosted-hugo-workflow/
hugo 能做web開發嗎


智能指針(就是自動delete空間))

