目錄
BeanFactory與ApplicationContext
BeanFactory
ApplicationContext
容器實現
BeanFactory實現
ApplicationContext實現
ClassPathXmlApplicationContext的實現
AnnotationConfigApplicationContext的實現
AnnotationConfigServletWebServerApplicationContext的實現
BeanFactory與ApplicationContext
BeanFactory
BeanFactory是ApplicationContext的父接口。是Spring的核心容器,ApplicationContext的主要的方法均是調用BeanFactory的方法。比如說下面獲取bean對象案例中
@SpringBootApplication
public class CodeApplication {public static void main(String[] args) {ConfigurableApplicationContext ctx = SpringApplication.run(CodeApplication.class, args);ctx.getBean("abc");}
}
通過Ctrl+alt+b鍵可以看到具體的實現方法如下,先獲取BeanFactory對象后調用BeanFactory對象的getBean()方法。
@Overridepublic Object getBean(String name) throws BeansException {assertBeanFactoryActive();return getBeanFactory().getBean(name);}BeanFactory表面只能getBean(),實際上控制反轉,基本的依賴注入、直至Bean的生命周期的各種功能,都由它的實現類體提供。
ApplicationContext
相比較BeanFactory,ApplicationContext多了哪些功能?
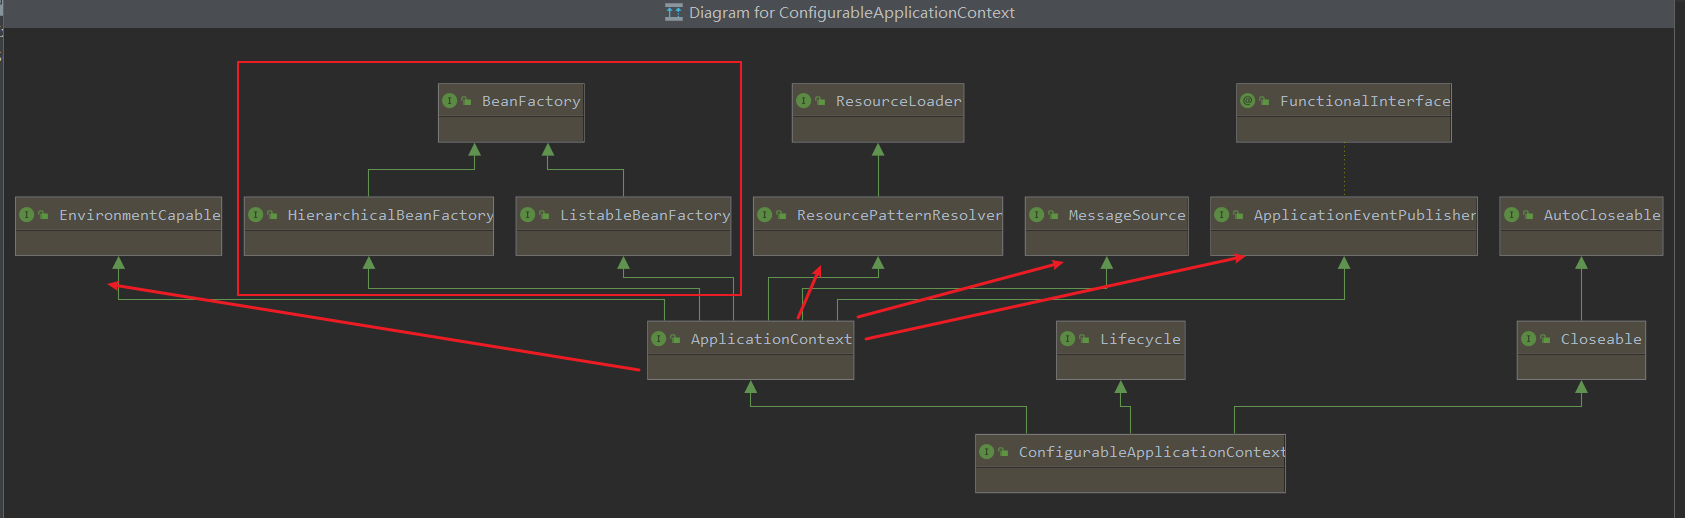
由類圖可以看出,ApplicationContext除了繼承BeanFactory的兩個接口,也繼承了四個其他接口。
接下來分別用代碼查看具體做了什么。
首先是翻譯。不過該翻譯需要自己導入文本
首先在resource包下創建messages開頭的properties文件。在里面編寫key=value樣式的翻譯

在主程序中編寫代碼。可以正常輸出翻譯后的內容。

第二個就是路徑查找資源

第三個是從環境中獲取配置值

第四個是發布事件
這個可以用于解耦,比如用戶注冊成功后,可能需要發送短信通知,又或是郵件通知。不知道如何去通知時,不能隨意更改注冊部分的功能,這時可以通過發布事件來處理。
首先自定義事件,需要繼承ApplicationEvent類。
//自定義事件,需要繼承ApplicationEvent
public class UserRegisterEvent extends ApplicationEvent {public UserRegisterEvent(Object source) {super(source);}
}
@Component
public class Component1 {@Autowiredprivate ApplicationEventPublisher publisher;public void register(){System.out.println("用戶注冊");//發布者發布一個UserRegisterEvent事件,從this這個對象發出publisher.publishEvent(new UserRegisterEvent(this));}
}@Component
public class Component2 {@EventListenerpublic void send(UserRegisterEvent event){System.out.println("發送信息"+event);}
}@SpringBootApplication
public class CodeApplication {public static void main(String[] args) {ConfigurableApplicationContext ctx = SpringApplication.run(CodeApplication.class, args);Component1 publisher = ctx.getBean(Component1.class);publisher.register();}
}運行結果如下?
用戶注冊
發送信息com.zmt.test.UserRegisterEvent[source=com.zmt.test.Component1@1d3ac898]
容器實現
BeanFactory實現
從空項目中從頭實現BeanFactory
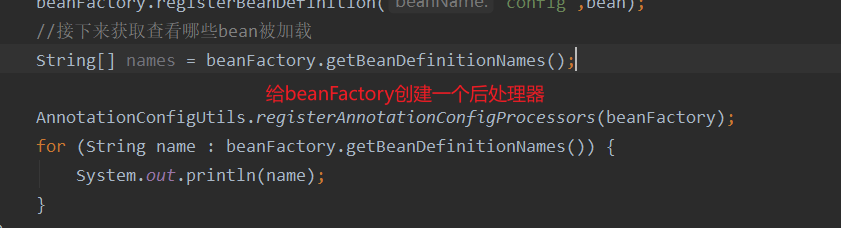
public class TestBeanFactory {public static void main(String[] args) {/*** 從頭實現BeanFactory*///創建bean工廠DefaultListableBeanFactory beanFactory = new DefaultListableBeanFactory();//beanDefinition定義,存儲class,scope,初始化方法,銷毀方法等信息AbstractBeanDefinition bean = BeanDefinitionBuilder.genericBeanDefinition(Config.class).setScope("singleton").getBeanDefinition();beanFactory.registerBeanDefinition("config",bean);//接下來獲取查看哪些bean被加載String[] names = beanFactory.getBeanDefinitionNames();for (String name : names) {System.out.println(name);}}@Configurationstatic class Config {@Beanpublic Bean1 bean1(){return new Bean1();}@Beanpublic Bean2 bean2(){return new Bean2();}}static class Bean1 {@Autowiredprivate Bean2 bean2;public Bean1() {System.out.println("構造bean1");}public Bean2 getBean2() {return bean2;}}static class Bean2 {public Bean2() {System.out.println("構造bean2");}}
}
運行結果如下?
config
由此可以看出,這些注解都沒有被解析。只有初始時定義的bean被加載。想要解析注解,需要給beanFactory添加一個后處理器。
運行結果如下?
config
org.springframework.context.annotation.internalConfigurationAnnotationProcessor
org.springframework.context.annotation.internalAutowiredAnnotationProcessor
org.springframework.context.annotation.internalCommonAnnotationProcessor
org.springframework.context.event.internalEventListenerProcessor
org.springframework.context.event.internalEventListenerFactory
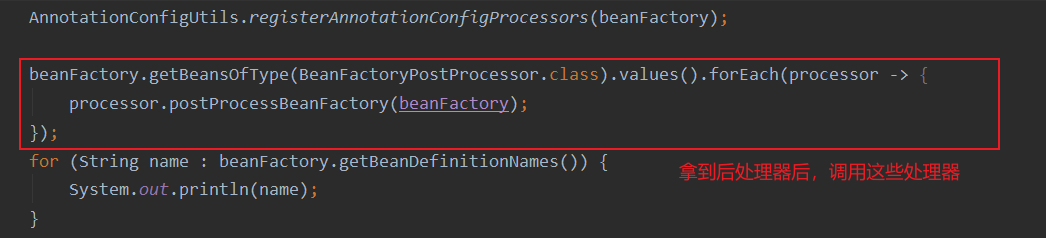
可以看到添加了五個處理器。接下來調用這些處理器去解析注解
運行結果如下?
config
org.springframework.context.annotation.internalConfigurationAnnotationProcessor
org.springframework.context.annotation.internalAutowiredAnnotationProcessor
org.springframework.context.annotation.internalCommonAnnotationProcessor
org.springframework.context.event.internalEventListenerProcessor
org.springframework.context.event.internalEventListenerFactory
bean1
bean2
這里看到,可以成功解析注解了,測試Bean1中的getBean2方法發現

bean2并沒有被注入,很顯然時@Autowried沒有起作用。我們需要再寫一個Bean后處理器(針對bean的生命周期各個階段進行擴展)。
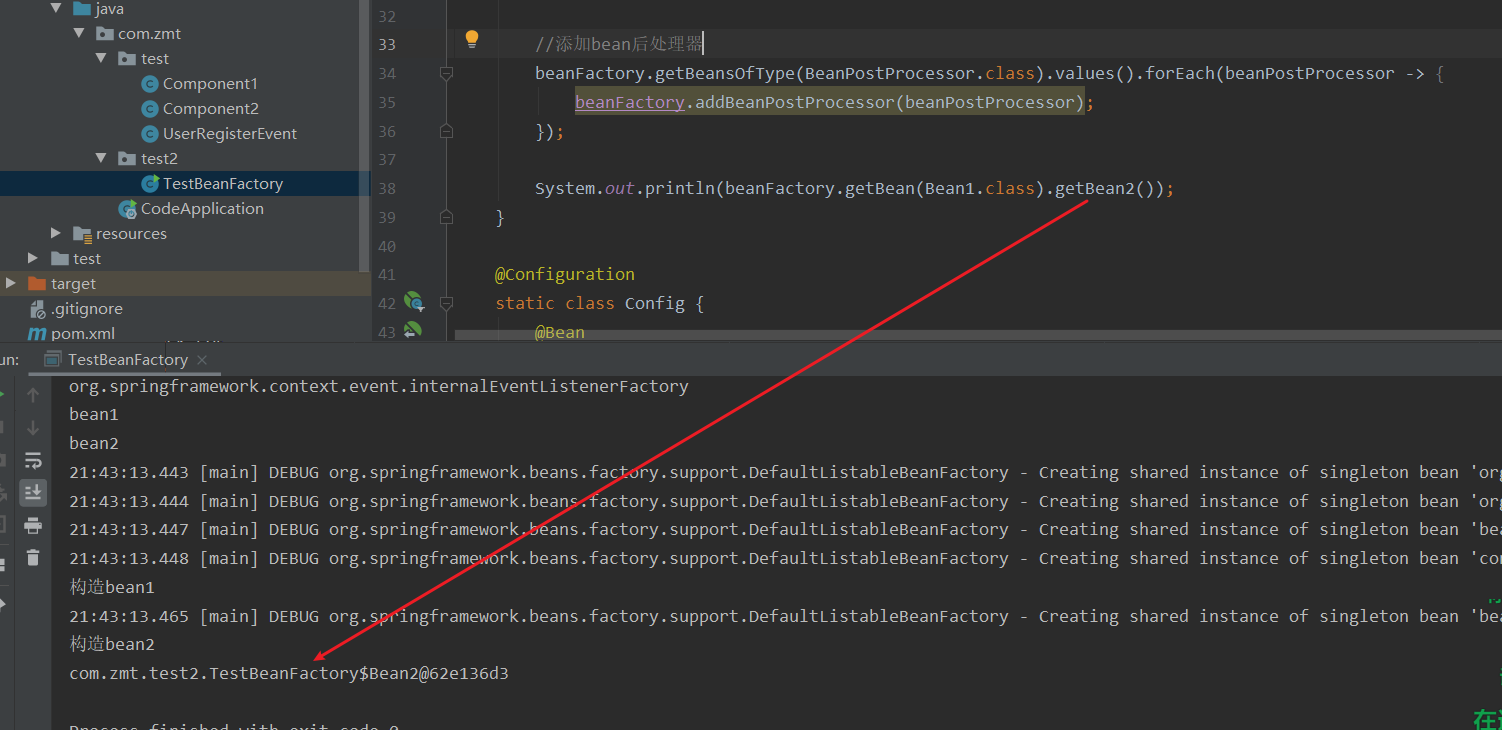
也從另一方面體現了,只有當只用bean對象時才會被創建,不使用時只會在beanFactory中保存bean信息。
如果需要提前加載bean,則需要調用方法beanFactory.preInstantiateSingletons()。
具體代碼如下
public class TestBeanFactory {public static void main(String[] args) {/*** 從頭實現BeanFactory*///創建bean工廠DefaultListableBeanFactory beanFactory = new DefaultListableBeanFactory();//beanDefinition定義,存儲class,scope,初始化方法,銷毀方法等信息AbstractBeanDefinition beanDefinition = BeanDefinitionBuilder.genericBeanDefinition(Config.class).setScope("singleton").getBeanDefinition();//將beanDefinition注冊到beanFactory中beanFactory.registerBeanDefinition("config", beanDefinition);//為BeanFactory添加一些常用的Bean工廠后處理器AnnotationConfigUtils.registerAnnotationConfigProcessors(beanFactory);//調用bean工廠后處理器的方法beanFactory.getBeansOfType(BeanFactoryPostProcessor.class).values().forEach(processor -> processor.postProcessBeanFactory(beanFactory));for (String name : beanFactory.getBeanDefinitionNames()) {System.out.println(name);}//將BeanDefinition中的Bean后處理器添加bean后處理器beanFactory.getBeansOfType(BeanPostProcessor.class).values().forEach(beanFactory::addBeanPostProcessor);//單例對象事先創建,而不是創建時才創建bean對象beanFactory.preInstantiateSingletons();System.out.println(beanFactory.getBean(Bean1.class).getBean2());}@Configurationstatic class Config {@Beanpublic Bean1 bean1() {return new Bean1();}@Beanpublic Bean2 bean2() {return new Bean2();}}static class Bean1 {@Autowiredprivate Bean2 bean2;public Bean1() {System.out.println("構造bean1");}public Bean2 getBean2() {return bean2;}}static class Bean2 {public Bean2() {System.out.println("構造bean2");}}
}
從上述代碼中我們可以得到以下結論
- beanFactory不會主動調用Bean工廠后處理器
- beanFactory不會主動添加Bean后處理器
- beanFactory不會主動初始化單例bean
- beanFactory不會解析${}與#{}
ApplicationContext實現
ClassPathXmlApplicationContext的實現
<?xml version="1.0" encoding="UTF-8"?>
<beans xmlns="http://www.springframework.org/schema/beans"xmlns:xsi="http://www.w3.org/2001/XMLSchema-instance"xsi:schemaLocation="http://www.springframework.org/schema/beans http://www.springframework.org/schema/beans/spring-beans.xsd"><bean id="bean1" class="com.zmt.test3.Bean1"/><bean id="bean2" class="com.zmt.test3.Bean2"><property name="bean1" ref="bean1"/></bean>
</beans>
public static void testClassPathXmlApplication(){ClassPathXmlApplicationContext context = new ClassPathXmlApplicationContext("application.xml");for (String beanDefinitionName : context.getBeanDefinitionNames()) {System.out.println(beanDefinitionName);}System.out.println(context.getBean(Bean2.class).getBean1());
}運行結果如下?
bean1
bean2
com.zmt.test3.Bean1@5f3a4b84
applicationContext讀取xml中的配置具體操作如下
public static void main(String[] args){//創建BeanFactoryDefaultListableBeanFactory beanFactory = new DefaultListableBeanFactory();//創建xml讀取器XmlBeanDefinitionReader reader = new XmlBeanDefinitionReader(beanFactory);System.out.println("讀取配置文件前");for (String beanDefinitionName : beanFactory.getBeanDefinitionNames()) {System.out.println(beanDefinitionName);}//讀取xml文件reader.loadBeanDefinitions("application.xml");System.out.println("讀取配置文件后");for (String beanDefinitionName : beanFactory.getBeanDefinitionNames()) {System.out.println(beanDefinitionName);}
}
運行結果如下??
讀取配置文件前
20:52:54.539 [main] DEBUG org.springframework.beans.factory.xml.XmlBeanDefinitionReader - Loaded 2 bean definitions from class path resource [application.xml]
讀取配置文件后
bean1
bean2
讀取xml文件的實現方式還有一種FileSystemXmlApplicationContext,這種實現方式與ClassPathXmlApplicationContext的區別在于前者可以指定配置文件在磁盤中的路徑或是src下的路徑,其他與后者無異。
AnnotationConfigApplicationContext的實現
@Configuration
public class Config{@Beanpublic Bean1 bean1(){return new Bean1();}//也可以通過添加@Autowired注解在Bean2中注入bean1對象@Beanpublic Bean2 bean2(Bean1 bean1){Bean2 bean2 = new Bean2();bean2.setBean1(bean1);return bean2;}
}
public static void testAnnotationConfigApplicationContext(){AnnotationConfigApplicationContext context = new AnnotationConfigApplicationContext(Config.class);for (String beanDefinitionName : context.getBeanDefinitionNames()) {System.out.println(beanDefinitionName);}System.out.println(context.getBean(Bean2.class).getBean1());
}運行結果如下??
org.springframework.context.annotation.internalConfigurationAnnotationProcessor
org.springframework.context.annotation.internalAutowiredAnnotationProcessor
org.springframework.context.annotation.internalCommonAnnotationProcessor
org.springframework.context.event.internalEventListenerProcessor
org.springframework.context.event.internalEventListenerFactory
codeApplication.Config
bean1
bean2
com.zmt.test3.Bean1@96def03
由此可以看出,相比于ClassPahtXmlApplicationContext中,AnnotationConfigApplicationContext會自動添加常用的后處理器并主動調用這些后處理器
AnnotationConfigServletWebServerApplicationContext的實現
這個是用于web環境下的容器實現,既支持Java配置類又支持servlet與servlet的web容器
public static void testAnnotationConfigServletWebServerApplicationContext(){AnnotationConfigServletWebServerApplicationContext context = new AnnotationConfigServletWebServerApplicationContext(WebConfig.class);for (String beanDefinitionName : context.getBeanDefinitionNames()) {System.out.println(beanDefinitionName);}
}
@Configuration
public class WebConfig{//創建一個web容器@Beanpublic ServletWebServerFactory servletWebServerFactory(){return new TomcatServletWebServerFactory();}//前端控制器,用來分發Servlet@Beanpublic DispatcherServlet dispatcherServlet(){return new DispatcherServlet();}//將前端控制器注冊到Web容器當中@Beanpublic DispatcherServletRegistrationBean registrationBean(DispatcherServlet dispatcherServlet){return new DispatcherServletRegistrationBean(dispatcherServlet,"/");}//創建一個控制器用來處理前端請求@Bean("/hello")//當Bean注解中以/開頭時,后面的內容除了作為bean名稱外,還要充當網絡訪問路徑public Controller controller1(){return new Controller() {@Overridepublic ModelAndView handleRequest(HttpServletRequest request, HttpServletResponse response) throws Exception {response.getWriter().print("hello");return null;}};}
}運行結果如下??
org.springframework.context.annotation.internalConfigurationAnnotationProcessor
org.springframework.context.annotation.internalAutowiredAnnotationProcessor
org.springframework.context.annotation.internalCommonAnnotationProcessor
org.springframework.context.event.internalEventListenerProcessor
org.springframework.context.event.internalEventListenerFactory
codeApplication.WebConfig
servletWebServerFactory
dispatcherServlet
registrationBean
/hello
訪問/hello路徑結果如下?


)
)


)
及簡單應用)


)