目錄
一:資源限制
1、資源限制原因
2、Pod 和 容器 的資源請求和限制
3、CPU 資源單位
4、內存 資源單位?
5、事例
(1)事例一
(2)事例二
?二:重啟策略
1、重啟策略模式
2、事例
三:探針
1、探針簡介
2、探針的三種規則
3、Probe支持三種檢查方法
4、事例
(1)exec方式
(2)httpGet方式
(3)tcpSocket方式
(4)就緒檢測
(5)就緒檢測2
一:資源限制
1、資源限制原因
當定義 Pod 時可以選擇性地為每個容器設定所需要的資源數量。 最常見的可設定資源是 CPU 和內存大小,以及其他類型的資源。
當為 Pod 中的容器指定了 request 資源時,代表容器運行所需的最小資源量,調度器就使用該信息來決定將 Pod 調度到哪個節點上。當還為容器指定了 limit 資源時,kubelet 就會確保運行的容器不會使用超出所設的 limit 資源量。kubelet 還會為容器預留所設的 request 資源量, 供該容器使用。
如果 Pod 運行所在的節點具有足夠的可用資源,容器可以使用超出所設置的 request 資源量。不過,容器不可以使用超出所設置的 limit 資源量。
如果給容器設置了內存的 limit 值,但未設置內存的 request 值,Kubernetes 會自動為其設置與內存 limit 相匹配的 request 值。 類似的,如果給容器設置了 CPU 的 limit 值但未設置 CPU 的 request 值,則 Kubernetes 自動為其設置 CPU 的 request 值 并使之與 CPU 的 limit 值匹配。
官網示例:
https://kubernetes.io/docs/concepts/configuration/manage-compute-resources-container/
2、Pod 和 容器 的資源請求和限制
spec.containers[].resources.requests.cpu?? ??? ?//定義創建容器時預分配的CPU資源
spec.containers[].resources.requests.memory?? ??? ?//定義創建容器時預分配的內存資源
spec.containers[].resources.limits.cpu?? ??? ??? ?//定義 cpu 的資源上限?
spec.containers[].resources.limits.memory?? ??? ?//定義內存的資源上限
3、CPU 資源單位
CPU 資源的 request 和 limit 以 cpu 為單位。Kubernetes 中的一個 cpu 相當于1個 vCPU(1個超線程)。
Kubernetes 也支持帶小數 CPU 的請求。spec.containers[].resources.requests.cpu 為 0.5 的容器能夠獲得一個 cpu 的一半 CPU 資源(類似于Cgroup對CPU資源的時間分片)。表達式 0.1 等價于表達式 100m(毫核),表示每 1000 毫秒內容器可以使用的 CPU 時間總量為 0.1*1000 毫秒。
Kubernetes 不允許設置精度小于 1m 的 CPU 資源。?
4、內存 資源單位?
內存的 request 和 limit 以字節為單位。可以以整數表示,或者以10為底數的指數的單位(E、P、T、G、M、K)來表示, 或者以2為底數的指數的單位(Ei、Pi、Ti、Gi、Mi、Ki)來表示。
如:1KB=10^3=1000,1MB=10^6=1000000=1000KB,1GB=10^9=1000000000=1000MB
1KiB=2^10=1024,1MiB=2^20=1048576=1024KiB
PS:在買硬盤的時候,操作系統報的數量要比產品標出或商家號稱的小一些,主要原因是標出的是以 MB、GB為單位的,1GB 就是1,000,000,000Byte,而操作系統是以2進制為處理單位的,因此檢查硬盤容量時是以MiB、GiB為單位,1GiB=2^30=1,073,741,824,相比較而言,1GiB要比1GB多出1,073,741,824-1,000,000,000=73,741,824Byte,所以檢測實際結果要比標出的少一些。
5、事例
(1)事例一
apiVersion: v1
kind: Pod
metadata:name: frontend
spec:containers:- name: appimage: images.my-company.example/app:v4env:- name: MYSQL_ROOT_PASSWORDvalue: "password"resources:requests:memory: "64Mi"cpu: "250m"limits:memory: "128Mi"cpu: "500m"- name: log-aggregatorimage: images.my-company.example/log-aggregator:v6resources:requests:memory: "64Mi"cpu: "250m"limits:memory: "128Mi"cpu: "500m"此例子中的 Pod 有兩個容器。每個容器的 request 值為 0.25 cpu 和 64MiB 內存,每個容器的 limit 值為 0.5 cpu 和 128MiB 內存。那么可以認為該 Pod 的總的資源 request 為 0.5 cpu 和 128 MiB 內存,總的資源 limit 為 1 cpu 和 256MiB 內存。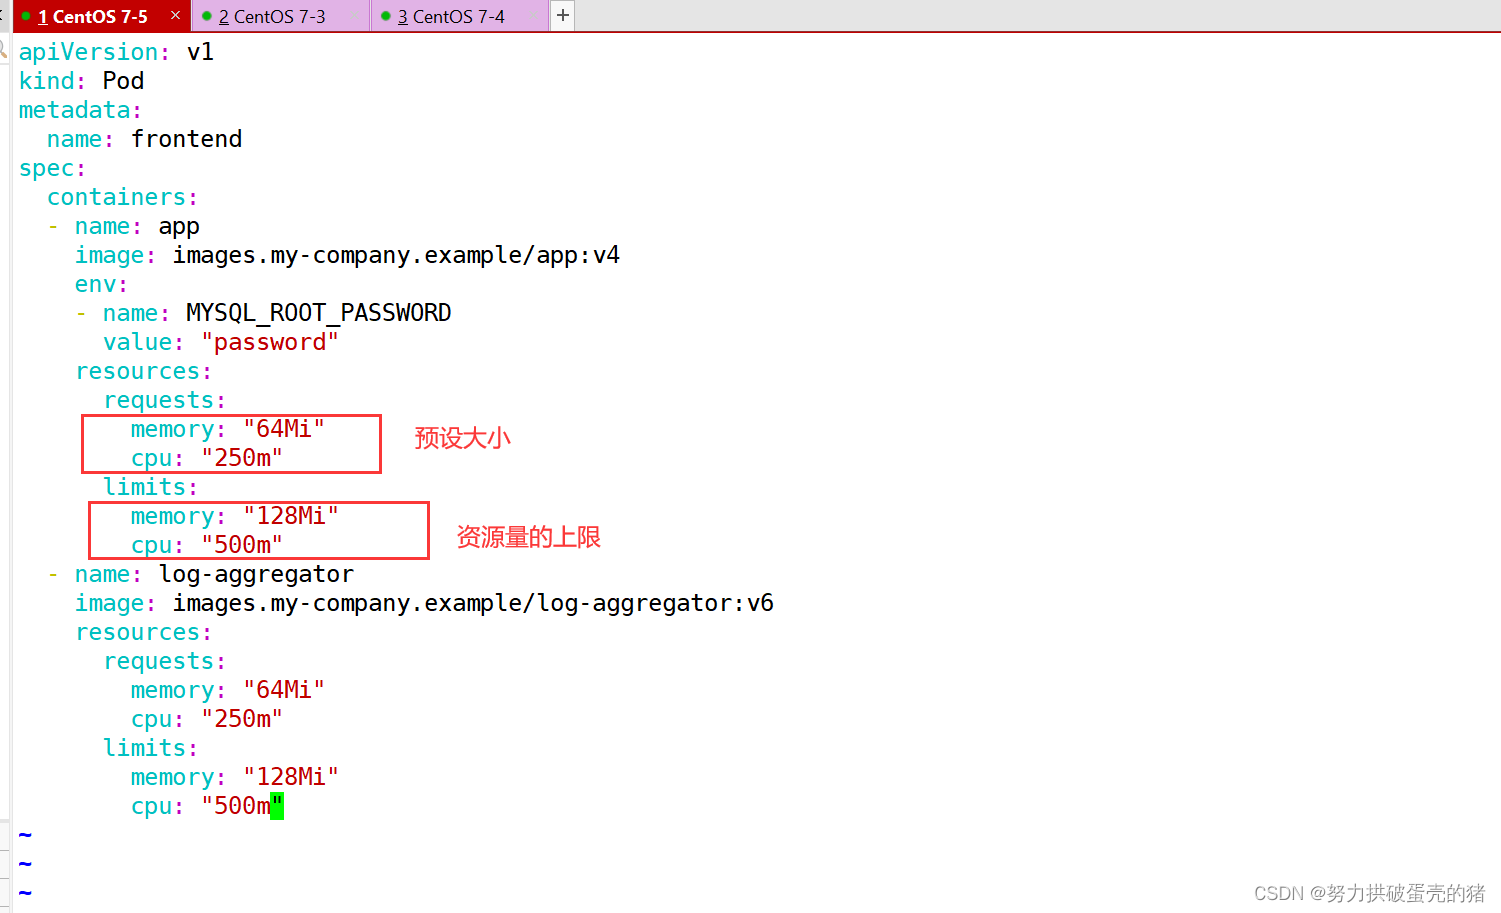
(2)事例二
vim pod2.yaml
apiVersion: v1
kind: Pod
metadata:name: frontend
spec:containers:- name: webimage: nginxenv:- name: WEB_ROOT_PASSWORDvalue: "password"resources:requests:memory: "64Mi"cpu: "250m"limits:memory: "128Mi"cpu: "500m"- name: dbimage: mysqlenv:- name: MYSQL_ROOT_PASSWORDvalue: "abc123"resources:requests:memory: "512Mi"cpu: "0.5"limits:memory: "1Gi"cpu: "1"kubectl apply -f pod2.yaml
kubectl describe pod frontendkubectl get pods -o wide
NAME ? ? ? READY ? STATUS ? ?RESTARTS ? AGE ? IP ? ? ? ? ? NODE ? ? NOMINATED NODE ? READINESS GATES
frontend ? 2/2 ? ? Running ? 5 ? ? ? ? ?15m ? 10.244.2.4 ? node02 ? <none> ? ? ? ? ? <none>kubectl describe nodes node02?? ??? ??? ??? ?#由于當前虛擬機有2個CPU,所以Pod的CPU Limits一共占用了50%
Namespace ? ? ? ? ? ? ? ? ?Name ? ? ? ? ? ? ? ? ? ? ? ? ? CPU Requests ?CPU Limits ?Memory Requests ?Memory Limits ?AGE--------- ? ? ? ? ? ? ? ? ?---- ? ? ? ? ? ? ? ? ? ? ? ? ? ------------ ?---------- ?--------------- ?------------- ?---default ? ? ? ? ? ? ? ? ? ?frontend ? ? ? ? ? ? ? ? ? ? ? 500m (25%) ? ?1 (50%) ? ? 128Mi (3%) ? ? ? 256Mi (6%) ? ? 16mkube-system ? ? ? ? ? ? ? ?kube-flannel-ds-amd64-f4pbp ? ?100m (5%) ? ? 100m (5%) ? 50Mi (1%) ? ? ? ?50Mi (1%) ? ? ?19hkube-system ? ? ? ? ? ? ? ?kube-proxy-pj4wp ? ? ? ? ? ? ? 0 (0%) ? ? ? ?0 (0%) ? ? ?0 (0%) ? ? ? ? ? 0 (0%) ? ? ? ? 19h
Allocated resources:(Total limits may be over 100 percent, i.e., overcommitted.)Resource ? ? ? ? ? Requests ? ?Limits-------- ? ? ? ? ? -------- ? ?------cpu ? ? ? ? ? ? ? ?600m (30%) ?1100m (55%)memory ? ? ? ? ? ? 178Mi (4%) ?306Mi (7%)ephemeral-storage ?0 (0%) ? ? ?0 (0%)

?二:重啟策略
1、重啟策略模式
重啟策略(restartPolicy):當 Pod 中的容器退出時通過節點上的 kubelet 重啟容器。適用于 Pod 中的所有容器。
1、Always:當容器終止退出后,總是重啟容器,默認策略
2、OnFailure:當容器異常退出(退出狀態碼非0)時,重啟容器;正常退出則不重啟容器
3、Never:當容器終止退出,從不重啟容器。
#注意:K8S 中不支持重啟 Pod 資源,只有刪除重建。
? ? ? 在用 yaml 方式創建 Deployment 和 StatefulSet 類型時,restartPolicy 只能是 Always,kubectl run 創建 Pod 可以選擇 Always,OnFailure,Never 三種策略kubectl edit deployment nginx-deployment
......restartPolicy: Always
2、事例
//示例
vim pod3.yaml
apiVersion: v1
kind: Pod
metadata:name: foo
spec:containers:- name: busyboximage: busyboxargs:- /bin/sh- -c- sleep 30; exit 3kubectl apply -f pod3.yaml//查看Pod狀態,等容器啟動后30秒后執行exit退出進程進入error狀態,就會重啟次數加1
kubectl get pods
NAME ? ? ? ? ? ? ? ? ? ? ? ? ? ? ?READY ? STATUS ? ? ? ? ? ? RESTARTS ? AGE
foo ? ? ? ? ? ? ? ? ? ? ? ? ? ? ? 1/1 ? ? Running ? ? ? ? ? ?1 ? ? ? ? ?50skubectl delete -f pod3.yamlvim pod3.yaml
apiVersion: v1
kind: Pod
metadata:name: foo
spec:containers:- name: busyboximage: busyboxargs:- /bin/sh- -c- sleep 30; exit 3restartPolicy: Never
#注意:跟container同一個級別kubectl apply -f pod3.yaml//容器進入error狀態不會進行重啟
kubectl get pods -w
三:探針
1、探針簡介
健康檢查:又稱為探針(Probe)?
探針是由kubelet對容器執行的定期診斷。
2、探針的三種規則
●livenessProbe :判斷容器是否正在運行。如果探測失敗,則kubelet會殺死容器,并且容器將根據 restartPolicy 來設置 Pod 狀態。 如果容器不提供存活探針,則默認狀態為Success。
●readinessProbe :判斷容器是否準備好接受請求。如果探測失敗,端點控制器將從與 Pod 匹配的所有 service endpoints 中剔除刪除該Pod的IP地址。 初始延遲之前的就緒狀態默認為Failure。如果容器不提供就緒探針,則默認狀態為Success。
●startupProbe(這個1.17版本增加的):判斷容器內的應用程序是否已啟動,主要針對于不能確定具體啟動時間的應用。如果配置了 startupProbe 探測,則在 startupProbe 狀態為 Success 之前,其他所有探針都處于無效狀態,直到它成功后其他探針才起作用。 如果 startupProbe 失敗,kubelet 將殺死容器,容器將根據 restartPolicy 來重啟。如果容器沒有配置 startupProbe, 則默認狀態為 Success。
#注:以上規則可以同時定義。在readinessProbe檢測成功之前,Pod的running狀態是不會變成ready狀態的。
3、Probe支持三種檢查方法
●exec :在容器內執行指定命令。如果命令退出時返回碼為0則認為診斷成功。
●tcpSocket :對指定端口上的容器的IP地址進行TCP檢查(三次握手)。如果端口打開,則診斷被認為是成功的。
●httpGet :對指定的端口和uri路徑上的容器的IP地址執行HTTPGet請求。如果響應的狀態碼大于等于200且小于400,則診斷被認為是成功的
每次探測都將獲得以下三種結果之一:
●成功(Success):表示容器通過了檢測。
●失敗(Failure):表示容器未通過檢測。
●未知(Unknown):表示檢測沒有正常進行。
官網示例:
https://kubernetes.io/docs/tasks/configure-pod-container/configure-liveness-readiness-startup-probes/
4、事例
(1)exec方式
示例1:exec方式
apiVersion: v1
kind: Pod
metadata:labels:test: livenessname: liveness-exec
spec:containers:- name: livenessimage: k8s.gcr.io/busyboxargs:- /bin/sh- -c- touch /tmp/healthy; sleep 30; rm -rf /tmp/healthy; sleep 60livenessProbe:exec:command:- cat- /tmp/healthyfailureThreshold: 1initialDelaySeconds: 5periodSeconds: 5#initialDelaySeconds:指定 kubelet 在執行第一次探測前應該等待5秒,即第一次探測是在容器啟動后的第6秒才開始執行。默認是 0 秒,最小值是 0。
#periodSeconds:指定了 kubelet 應該每 5 秒執行一次存活探測。默認是 10 秒。最小值是 1。
#failureThreshold: 當探測失敗時,Kubernetes 將在放棄之前重試的次數。 存活探測情況下的放棄就意味著重新啟動容器。就緒探測情況下的放棄 Pod 會被打上未就緒的標簽。默認值是 3。最小值是 1。
#timeoutSeconds:探測的超時后等待多少秒。默認值是 1 秒。最小值是 1。(在 Kubernetes 1.20 版本之前,exec 探針會忽略 timeoutSeconds 探針會無限期地 持續運行,甚至可能超過所配置的限期,直到返回結果為止。)可以看到 Pod 中只有一個容器。kubelet 在執行第一次探測前需要等待 5 秒,kubelet 會每 5 秒執行一次存活探測。kubelet 在容器內執行命令 cat /tmp/healthy 來進行探測。如果命令執行成功并且返回值為 0,kubelet 就會認為這個容器是健康存活的。 當到達第 31 秒時,這個命令返回非 0 值,kubelet 會殺死這個容器并重新啟動它。vim exec.yaml
apiVersion: v1
kind: Pod
metadata:name: liveness-execnamespace: default
spec:containers:- name: liveness-exec-containerimage: busyboximagePullPolicy: IfNotPresentcommand: ["/bin/sh","-c","touch /tmp/live ; sleep 30; rm -rf /tmp/live; sleep 3600"]livenessProbe:exec:command: ["test","-e","/tmp/live"]initialDelaySeconds: 1periodSeconds: 3kubectl create -f exec.yamlkubectl describe pods liveness-exec
Events:Type ? ? Reason ? ? Age ? ? ? ? ? ? ? From ? ? ? ? ? ? ? Message---- ? ? ------ ? ? ---- ? ? ? ? ? ? ?---- ? ? ? ? ? ? ? -------Normal ? Scheduled ?51s ? ? ? ? ? ? ? default-scheduler ?Successfully assigned default/liveness-exec-pod to node02Normal ? Pulled ? ? 46s ? ? ? ? ? ? ? kubelet, node02 ? ?Container image "busybox" already present on machineNormal ? Created ? ?46s ? ? ? ? ? ? ? kubelet, node02 ? ?Created container liveness-exec-containerNormal ? Started ? ?45s ? ? ? ? ? ? ? kubelet, node02 ? ?Started container liveness-exec-containerWarning ?Unhealthy ?8s (x3 over 14s) ?kubelet, node02 ? ?Liveness probe failed:Normal ? Killing ? ?8s ? ? ? ? ? ? ? ?kubelet, node02 ? ?Container liveness-exec-container failed liveness probe,will be restartedkubectl get pods -w
NAME ? ? ? ? ? ? ? ?READY ? STATUS ? ?RESTARTS ? AGE
liveness-exec ? ? ? 1/1 ? ? Running ? 1 ? ? ? ? ?85s
(2)httpGet方式
//示例2:httpGet方式
apiVersion: v1
kind: Pod
metadata:labels:test: livenessname: liveness-http
spec:containers:- name: livenessimage: k8s.gcr.io/livenessargs:- /serverlivenessProbe:httpGet:path: /healthzport: 8080httpHeaders:- name: Custom-Headervalue: AwesomeinitialDelaySeconds: 3periodSeconds: 3在這個配置文件中,可以看到 Pod 也只有一個容器。initialDelaySeconds 字段告訴 kubelet 在執行第一次探測前應該等待 3 秒。periodSeconds 字段指定了 kubelet 每隔 3 秒執行一次存活探測。kubelet 會向容器內運行的服務(服務會監聽 8080 端口)發送一個 HTTP GET 請求來執行探測。如果服務器上 /healthz 路徑下的處理程序返回成功代碼,則 kubelet 認為容器是健康存活的。如果處理程序返回失敗代碼,則 kubelet 會殺死這個容器并且重新啟動它。任何大于或等于 200 并且小于 400 的返回代碼標示成功,其它返回代碼都標示失敗。vim httpget.yaml
apiVersion: v1
kind: Pod
metadata:name: liveness-httpgetnamespace: default
spec:containers:- name: liveness-httpget-containerimage: soscscs/myapp:v1imagePullPolicy: IfNotPresentports:- name: httpcontainerPort: 80livenessProbe:httpGet:port: httppath: /index.htmlinitialDelaySeconds: 1periodSeconds: 3timeoutSeconds: 10kubectl create -f httpget.yamlkubectl exec -it liveness-httpget -- rm -rf /usr/share/nginx/html/index.htmlkubectl get pods
NAME ? ? ? ? ? ? ? READY ? STATUS ? ?RESTARTS ? AGE
liveness-httpget ? 1/1 ? ? Running ? 1 ? ? ? ? ?2m44s
(3)tcpSocket方式
//示例3:tcpSocket方式
apiVersion: v1
kind: Pod
metadata:name: goproxylabels:app: goproxy
spec:containers:- name: goproxyimage: k8s.gcr.io/goproxy:0.1ports:- containerPort: 8080readinessProbe:tcpSocket:port: 8080initialDelaySeconds: 5periodSeconds: 10livenessProbe:tcpSocket:port: 8080initialDelaySeconds: 15periodSeconds: 20這個例子同時使用 readinessProbe 和 livenessProbe 探測。kubelet 會在容器啟動 5 秒后發送第一個 readinessProbe 探測。這會嘗試連接 goproxy 容器的 8080 端口。如果探測成功,kubelet 將繼續每隔 10 秒運行一次檢測。除了 readinessProbe 探測,這個配置包括了一個 livenessProbe 探測。kubelet 會在容器啟動 15 秒后進行第一次 livenessProbe 探測。就像 readinessProbe 探測一樣,會嘗試連接 goproxy 容器的 8080 端口。如果 livenessProbe 探測失敗,這個容器會被重新啟動。vim tcpsocket.yaml
apiVersion: v1
kind: Pod
metadata:name: probe-tcp
spec:containers:- name: nginximage: soscscs/myapp:v1livenessProbe:initialDelaySeconds: 5timeoutSeconds: 1tcpSocket:port: 8080periodSeconds: 10failureThreshold: 2kubectl create -f tcpsocket.yamlkubectl exec -it probe-tcp ?-- netstat -natp
Active Internet connections (servers and established)
Proto Recv-Q Send-Q Local Address ? ? ? ? ? Foreign Address ? ? ? ? State ? ? ? PID/Program name ? ?
tcp ? ? ? ?0 ? ? ?0 0.0.0.0:80 ? ? ? ? ? ? ?0.0.0.0:* ? ? ? ? ? ? ? LISTEN ? ? ?1/nginx: master prokubectl get pods -w
NAME ? ? ? ?READY ? STATUS ? ?RESTARTS ? AGE
probe-tcp ? 1/1 ? ? Running ? ? ? ? ? ? 0 ? ? ? ? ?1s
probe-tcp ? 1/1 ? ? Running ? ? ? ? ? ? 1 ? ? ? ? ?25s ? ? ? #第一次是 init(5秒) + period(10秒) * 2
probe-tcp ? 1/1 ? ? Running ? ? ? ? ? ? 2 ? ? ? ? ?45s ? ? ? #第二次是 period(10秒) + period(10秒) ?重試了兩次
probe-tcp ? 1/1 ? ? Running ? ? ? ? ? ? 3 ? ? ? ? ?65s
(4)就緒檢測
//示例4:就緒檢測
vim readiness-httpget.yaml
apiVersion: v1
kind: Pod
metadata:name: readiness-httpgetnamespace: default
spec:containers:- name: readiness-httpget-containerimage: soscscs/myapp:v1imagePullPolicy: IfNotPresentports:- name: httpcontainerPort: 80readinessProbe:httpGet:port: 80path: /index1.htmlinitialDelaySeconds: 1periodSeconds: 3livenessProbe:httpGet:port: httppath: /index.htmlinitialDelaySeconds: 1periodSeconds: 3timeoutSeconds: 10kubectl create -f readiness-httpget.yaml//readiness探測失敗,無法進入READY狀態
kubectl get pods?
NAME ? ? ? ? ? ? ? ?READY ? STATUS ? ?RESTARTS ? AGE
readiness-httpget ? 0/1 ? ? Running ? 0 ? ? ? ? ?18skubectl exec -it readiness-httpget sh# cd /usr/share/nginx/html/# ls
50x.html ? ?index.html# echo 123 > index1.html?# exitkubectl get pods?
NAME ? ? ? ? ? ? ? ?READY ? STATUS ? ?RESTARTS ? AGE
readiness-httpget ? 1/1 ? ? Running ? 0 ? ? ? ? ?2m31skubectl exec -it readiness-httpget -- rm -rf /usr/share/nginx/html/index.htmlkubectl get pods -w
NAME ? ? ? ? ? ? ? ?READY ? STATUS ? ?RESTARTS ? AGE
readiness-httpget ? 1/1 ? ? Running ? 0 ? ? ? ? ?4m10s
readiness-httpget ? 0/1 ? ? Running ? 1 ? ? ? ? ?4m15s
(5)就緒檢測2
//示例5:就緒檢測2
vim readiness-myapp.yaml
apiVersion: v1
kind: Pod
metadata:name: myapp1labels:app: myapp
spec:containers:- name: myappimage: soscscs/myapp:v1ports:- name: httpcontainerPort: 80readinessProbe:httpGet:port: 80path: /index.htmlinitialDelaySeconds: 5periodSeconds: 5timeoutSeconds: 10?
---
apiVersion: v1
kind: Pod
metadata:name: myapp2labels:app: myapp
spec:containers:- name: myappimage: soscscs/myapp:v1ports:- name: httpcontainerPort: 80readinessProbe:httpGet:port: 80path: /index.htmlinitialDelaySeconds: 5periodSeconds: 5timeoutSeconds: 10?
---
apiVersion: v1
kind: Pod
metadata:name: myapp3labels:app: myapp
spec:containers:- name: myappimage: soscscs/myapp:v1ports:- name: httpcontainerPort: 80readinessProbe:httpGet:port: 80path: /index.htmlinitialDelaySeconds: 5periodSeconds: 5timeoutSeconds: 10?
---
apiVersion: v1
kind: Service
metadata:name: myapp
spec:selector:app: myapptype: ClusterIPports:- name: httpport: 80targetPort: 80kubectl create -f readiness-myapp.yamlkubectl get pods,svc,endpoints -o wide
NAME ? ? ? ? READY ? STATUS ? ?RESTARTS ? AGE ? ? IP ? ? ? ? ? ?NODE ? ? NOMINATED NODE ? READINESS GATES
pod/myapp1 ? 1/1 ? ? Running ? 0 ? ? ? ? ?3m42s ? 10.244.2.13 ? node02 ? <none> ? ? ? ? ? <none>
pod/myapp2 ? 1/1 ? ? Running ? 0 ? ? ? ? ?3m42s ? 10.244.1.15 ? node01 ? <none> ? ? ? ? ? <none>
pod/myapp3 ? 1/1 ? ? Running ? 0 ? ? ? ? ?3m42s ? 10.244.2.14 ? node02 ? <none> ? ? ? ? ? <none>NAME ? ? ? ? ? ? ? ? TYPE ? ? ? ?CLUSTER-IP ? ? EXTERNAL-IP ? PORT(S) ? AGE ? ? SELECTOR
......
service/myapp ? ? ? ?ClusterIP ? 10.96.138.13 ? <none> ? ? ? ?80/TCP ? ?3m42s ? app=myappNAME ? ? ? ? ? ? ? ? ? ENDPOINTS ? ? ? ? ? ? ? ? ? ? ? ? ? ? ? ? ? ? ?AGE
......
endpoints/myapp ? ? ? ?10.244.1.15:80,10.244.2.13:80,10.244.2.14:80 ? 3m42skubectl exec -it pod/myapp1 -- rm -rf /usr/share/nginx/html/index.html//readiness探測失敗,Pod 無法進入READY狀態,且端點控制器將從 endpoints 中剔除刪除該 Pod 的 IP 地址
kubectl get pods,svc,endpoints -o wide
NAME ? ? ? ? READY ? STATUS ? ?RESTARTS ? AGE ? ? IP ? ? ? ? ? ?NODE ? ? NOMINATED NODE ? READINESS GATES
pod/myapp1 ? 0/1 ? ? Running ? 0 ? ? ? ? ?5m17s ? 10.244.2.13 ? node02 ? <none> ? ? ? ? ? <none>
pod/myapp2 ? 1/1 ? ? Running ? 0 ? ? ? ? ?5m17s ? 10.244.1.15 ? node01 ? <none> ? ? ? ? ? <none>
pod/myapp3 ? 1/1 ? ? Running ? 0 ? ? ? ? ?5m17s ? 10.244.2.14 ? node02 ? <none> ? ? ? ? ? <none>NAME ? ? ? ? ? ? ? ? TYPE ? ? ? ?CLUSTER-IP ? ? EXTERNAL-IP ? PORT(S) ? AGE ? ? SELECTOR
......
service/myapp ? ? ? ?ClusterIP ? 10.96.138.13 ? <none> ? ? ? ?80/TCP ? ?5m17s ? app=myappNAME ? ? ? ? ? ? ? ? ? ENDPOINTS ? ? ? ? ? ? ? ? ? ? ? AGE
......
endpoints/myapp ? ? ? ?10.244.1.15:80,10.244.2.14:80 ? 5m17s//啟動、退出動作
vim post.yaml
apiVersion: v1
kind: Pod
metadata:name: lifecycle-demo
spec:containers:- name: lifecycle-demo-containerimage: soscscs/myapp:v1lifecycle: ? #此為關鍵字段postStart:exec:command: ["/bin/sh", "-c", "echo Hello from the postStart handler >> /var/log/nginx/message"] ? ? ?preStop:exec:command: ["/bin/sh", "-c", "echo Hello from the poststop handler >> /var/log/nginx/message"]volumeMounts:- name: message-logmountPath: /var/log/nginx/readOnly: falseinitContainers:- name: init-myserviceimage: soscscs/myapp:v1command: ["/bin/sh", "-c", "echo 'Hello initContainers' ? >> /var/log/nginx/message"]volumeMounts:- name: message-logmountPath: /var/log/nginx/readOnly: falsevolumes:- name: message-loghostPath:path: /data/volumes/nginx/log/type: DirectoryOrCreatekubectl create -f post.yamlkubectl get pods -o wide
NAME ? ? ? ? ? ? READY ? STATUS ? ?RESTARTS ? AGE ? ?IP ? ? ? ? ? ?NODE ? ? NOMINATED NODE ? READINESS GATES
lifecycle-demo ? 1/1 ? ? Running ? 0 ? ? ? ? ?2m8s ? 10.244.2.28 ? node02 ? <none> ? ? ? ? ? <none>kubectl exec -it lifecycle-demo -- cat /var/log/nginx/message
Hello initContainers
Hello from the postStart handler//在 node02 節點上查看
[root@node02 ~]# cd /data/volumes/nginx/log/
[root@node02 log]# ls
access.log ?error.log ?message
[root@node02 log]# cat message?
Hello initContainers
Hello from the postStart handler
#由上可知,init Container先執行,然后當一個主容器啟動后,Kubernetes 將立即發送 postStart 事件。//刪除 pod 后,再在 node02 節點上查看
kubectl delete pod lifecycle-demo[root@node02 log]# cat message?
Hello initContainers
Hello from the postStart handler
Hello from the poststop handler
#由上可知,當在容器被終結之前, Kubernetes 將發送一個 preStop 事件。
:實現 ZIP 壓縮與解壓)
![[Leetcode] [Tutorial] 多維動態規劃(未完待續)](http://pic.xiahunao.cn/[Leetcode] [Tutorial] 多維動態規劃(未完待續))


 的對應關系)


)


函數)
