Enter
以下面這個簡單的代碼進行分析
const svg = d3.select('svg');
// svg.style('background-color', 'red'); testconst height = +svg.attr('height');
//+ equals paresFloat()
const width = +svg.attr('width');const makeFruit = type =>( {type} );	//這種寫法好像能夠直接得到一個屬性名為'type',值為變量type值的對象const fruits = d3.range(5).map(() => makeFruit('apple') );// console.log(fruits);svg.selectAll('circle').data(fruits).enter().append('circle').attr('cx', (d,i) => i*100+10).attr('cy', height/2).attr('r', 10).attr('fill', 'red');
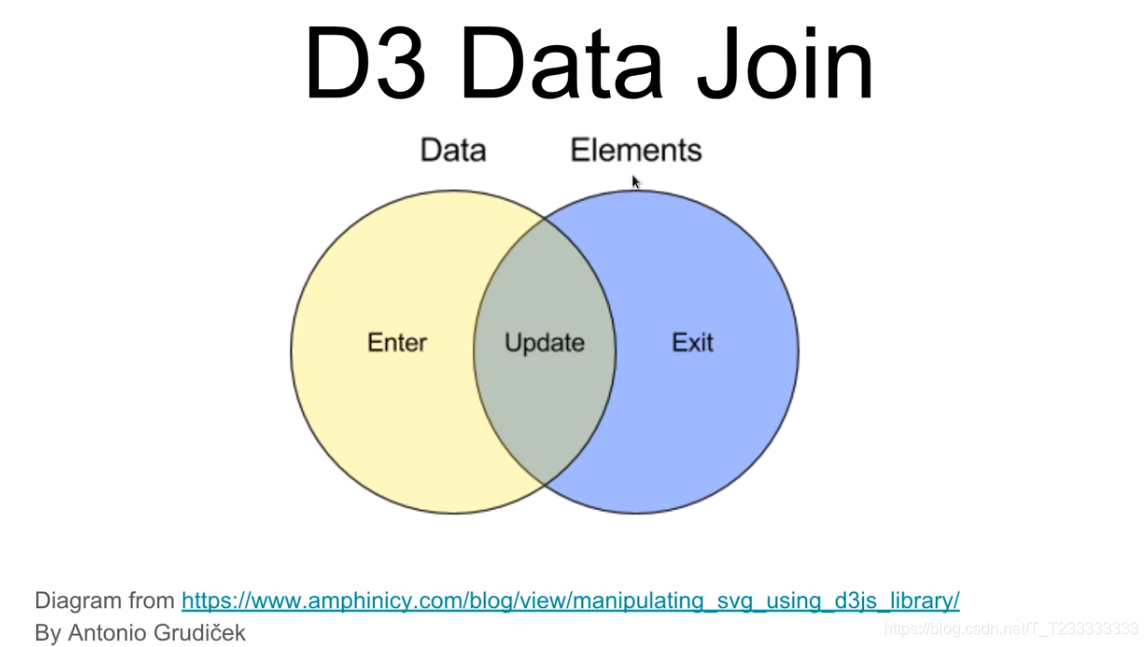
在選擇selectAll()以后相當于選擇了上圖的Elements部分,data(fruits)相當于上圖的Data部分,在一起以后就得到了上面的Data Join。然后我們再根據自己的需求選擇想要的部分進行處理。
Enter是不在Elements中的Data中的元素的集合Update是既在Elments集合中又在Data集合中的元素集合Exit是僅在Elements集合中的元素集合
我們得到了集合以后就能使用append函數和attr函數進行設置。

Exit
經常我們綁定的數據發生變化以后我們想要對已經不在數據集中的元素進行處理。這個時候只需要再綁定一次數據,然后對其中的exit()部分進行設置即可。例如下面的例子:
const svg = d3.select('svg');
// svg.style('background-color', 'red'); testconst height = +svg.attr('height');
//+ equals paresFloat()
const width = +svg.attr('width');const render = (selection, { fruits }) => {const circles = selection.selectAll('circle').data(fruits);circles.enter().append('circle').attr('cx', (d,i) => i*100+10).attr('cy', height/2).attr('r', 10).attr('fill', 'red');circles.exit().remove();// .attr('fill', 'black');
}const makeFruit = type =>( {type} );	//這種寫法好像能夠直接得到一個屬性名為'type',值為變量type值的對象const fruits = d3.range(5).map(() => makeFruit('apple') );render(svg, { fruits } );// console.log(fruits);setTimeout(()=>{fruits.pop();render(svg, { fruits } );
}, 1000);
實現的效果就是原本屏幕上有五個點,經過一秒鐘以后最后一個點消失了。
Update
如果我們對數據中的一部分做了一些改動,又希望能夠在圖形中顯示出來,就可以在update中進行修改。需要注意的是:在我們綁定數據以后默認就是update集合。例如:
const svg = d3.select('svg');
// svg.style('background-color', 'red'); testconst height = +svg.attr('height');
//+ equals paresFloat()
const width = +svg.attr('width');const colorScale = d3.scaleOrdinal().domain(['apple', 'lemon']).range(['red', 'yellow']);const radiusScale = d3.scaleOrdinal().domain(['apple', 'lemon']).range([50, 20]);const render = (selection, { fruits }) => {const circles = selection.selectAll('circle').data(fruits);circles.enter().append('circle').attr('cx', (d,i) => i*150+50).attr('cy', height/2).attr('r', d => radiusScale(d.type)).attr('fill', d => colorScale(d.type) );circles.exit().remove();// .attr('fill', 'black');circles.attr('cx', (d,i) => i*150+50).attr('cy', height/2).attr('r', d => radiusScale(d.type)).attr('fill', d => colorScale(d.type) );
}const makeFruit = type =>( {type} ); //這種寫法好像能夠直接得到一個屬性名為'type',值為變量type值的對象const fruits = d3.range(5).map(() => makeFruit('apple') );render(svg, { fruits } );// console.log(fruits);setTimeout(()=>{fruits.pop();render(svg, { fruits } );
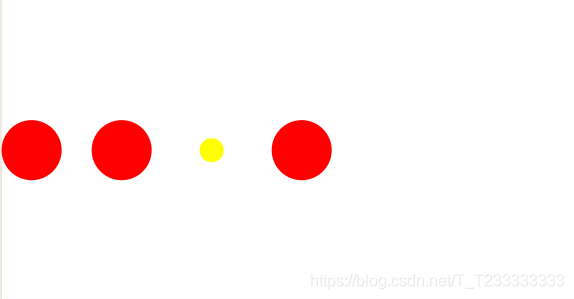
}, 1000);setTimeout(()=>{fruits[2].type = 'lemon';render(svg, { fruits } );
}, 2000);最終的效果:

Merge
有時候我們需要對多個部分進行相同的操作,當然可以對每個部分都寫相同的代碼,只是那樣顯得有些繁瑣。我們可以使用merge()函數將多個selection進行合并,傳入的參數是需要合并的部分。例如在上面的代碼中我們需要對enter和update都設置圓的半徑的顏色,我們就可以在enter后面合并update(update即就是綁定數據后的變量)。進行修改以后就可以得到下面更加簡潔的代碼。
fruitBowl.js
const colorScale = d3.scaleOrdinal().domain(['apple', 'lemon']).range(['red', 'yellow']);const radiusScale = d3.scaleOrdinal().domain(['apple', 'lemon']).range([50, 20]);export const fruitBowl = (selection, props) => {const {fruits, height} = props;const circles = selection.selectAll('circle').data(fruits);circles.enter().append('circle').attr('cx', (d,i) => i*150+50).attr('cy', height/2).merge(circles) //both enter section and update section.attr('r', d => radiusScale(d.type)).attr('fill', d => colorScale(d.type));circles.exit().remove();// .attr('fill', 'black');}
index.js
import { fruitBowl } from './fruitBowl.js';const svg = d3.select('svg');
// svg.style('background-color', 'red'); testconst makeFruit = type =>( {type} );	//這種寫法好像能夠直接得到一個屬性名為'type',值為變量type值的對象let fruits = d3.range(5).map(() => makeFruit('apple') );const render = () => {fruitBowl(svg, {fruits, height : +svg.attr('height')})
};render();// console.log(fruits);setTimeout(()=>{fruits.pop();render();
}, 1000);setTimeout(()=>{fruits[2].type = 'lemon';render();
}, 2000);setTimeout(()=>{fruits = fruits.filter((d, i) => i!=1);render();
}, 3000);
Animated Transitions(動畫過渡)
為了添加動畫效果我們可以使用transition()函數設置屬性,這樣屬性的變化就是漸進的,我們可以同時設置duration(x)來設置變化需要x ms。例如:
const colorScale = d3.scaleOrdinal().domain(['apple', 'lemon']).range(['red', 'yellow']);const radiusScale = d3.scaleOrdinal().domain(['apple', 'lemon']).range([50, 20]);export const fruitBowl = (selection, props) => {const {fruits, height} = props;const circles = selection.selectAll('circle').data(fruits);circles.enter().append('circle').attr('cx', (d,i) => i*150+50).attr('cy', height/2).attr('r', 0).merge(circles)	//both enter section and update section.attr('fill', d => colorScale(d.type)).transition().duration(1000).attr('r', d => radiusScale(d.type));circles.exit().transition().duration(1000).attr('r', 0).remove();// .attr('fill', 'black');
}
Object constancy
在觀察上面代碼第三秒效果的時候我們會發現,我們想要刪除第二個圓點,實際上的效果卻是第二個圓點從紅色變成了黃色,然后變小了,第三個圓點變成了紅色然后變大了,第四個圓點消失了。這顯然不是我們想要的結果,我們想要的應該是第二個圓點消失了,然后后面的圓點向前移動。
產生這種現象的原因在于d3中對數據唯一性的處理。默認情況下d3是通過下標唯一標識數據的。因此產生上面現象的原因是我們修改數組以后,d3按照新數組的情況進行了處理:第四個數據已經沒有了,所以在exit里面進行刪除,前面的屬性發生了變化然后直接進行處理。
我們需要做的是幫助d3標識不同的數據,方法就是在綁定數據的時候使用data函數的數組后面再傳入一個函數,用于標識數據。
在這個實例中我們給原本的對象數組的每個元素添加新的屬性id,用來進行區分,然后傳入的函數就是返回每個元素的id屬性。這樣d3就會將每個元素的id作為區分的標準。
代碼如下:
fruitBowl.js
const circles = selection.selectAll('circle').data(fruits, d => d.id);
index.js
const makeFruit = (type, i) =>( {type,id : i
} );	//這種寫法好像能夠直接得到一個屬性名為'type',值為變量type值的對象let fruits = d3.range(5).map((d,i) => makeFruit('apple', i) );
進行上面的修改以后會發現效果的確是第二個圓點消失了,但是后面的圓點卻沒有向前移動。為了解決這個問題我們應該將對位置的設置放在merge后的transition函數中,這樣每次綁定數據都會對enter和update中的元素設置位置。
代碼如下:
fruitBowl.js
const colorScale = d3.scaleOrdinal().domain(['apple', 'lemon']).range(['red', 'yellow']);const radiusScale = d3.scaleOrdinal().domain(['apple', 'lemon']).range([50, 20]);const xPosition = (d,i) => i*150+50;export const fruitBowl = (selection, props) => {const {fruits, height} = props;const circles = selection.selectAll('circle').data(fruits, d => d.id);circles.enter().append('circle').attr('cy', height/2).attr('cx', xPosition).attr('r', 0).merge(circles) //both enter section and update section.attr('fill', d => colorScale(d.type)).transition().duration(1000).attr('cx', xPosition).attr('r', d => radiusScale(d.type));circles.exit().transition().duration(1000).attr('r', 0).remove();// .attr('fill', 'black');}
vizhub 代碼:https://vizhub.com/Edward-Elric233/1a1bd422d4b349aba1735868ff453b5f
Nested(嵌套的) elements
只有圓圈可能難以理解表達的是什么意思,我們就需要加上文字text:
fruitBowl.js
const colorScale = d3.scaleOrdinal().domain(['apple', 'lemon']).range(['red', 'yellow']);const radiusScale = d3.scaleOrdinal().domain(['apple', 'lemon']).range([50, 20]);const xPosition = (d,i) => i*150+50;export const fruitBowl = (selection, props) => {const {fruits, height} = props;const circles = selection.selectAll('circle').data(fruits,  d => d.id);circles.enter().append('circle').attr('cy', height/2).attr('cx', xPosition).attr('r', 0).merge(circles)	//both enter section and update section.attr('fill', d => colorScale(d.type)).transition().duration(1000).attr('cx', xPosition).attr('r', d => radiusScale(d.type));circles.exit().transition().duration(1000).attr('r', 0).remove();// .attr('fill', 'black');const text = selection.selectAll('text').data(fruits,  d => d.id);text.enter().append('text').attr('y', height/2+100).attr('x', xPosition).merge(text)	//both enter section and update section.text(d => d.type).transition().duration(1000).attr('x', xPosition);text.exit().remove();
}
styles.css
text {font-size: 1.2em;text-anchor : middle;
}
注意text元素設置文字內容的函數是.text()
雖然上面的做法可行,但是當有很多元素組合在一起的時候就有點力不從心。因此我們更常用的做法是將一組元素放在g中,然后再對g的位置屬性等進行設置。
大概的做法就是先綁定數據以后給每個元素append一個g,然后再對g進行操作。
const colorScale = d3.scaleOrdinal().domain(['apple', 'lemon']).range(['red', 'yellow']);const radiusScale = d3.scaleOrdinal().domain(['apple', 'lemon']).range([50, 20]);const xPosition = (d,i) => i*150+50;export const fruitBowl = (selection, props) => {const {fruits, height} = props;const groups = selection.selectAll('g').data(fruits, d => d.id);const groupEnter = groups.enter().append('g').attr('transform', (d,i) => `translate(${i*150+50}, ${height/2})`);;groupEnter.merge(groups) //both enter section and update section.transition().duration(1000).attr('transform', (d,i) => `translate(${i*150+50}, ${height/2})`);groups.exit().select('circle').transition().duration(1000).style('fill', 'white').attr('r',0)setTimeout(() => groups.exit().select('circle').remove(),1000);// .attr('fill', 'black');groups.exit().select('text').transition().duration(1000).attr('fill', 'white');setTimeout(() => groups.exit().select('text').remove(), 1000);groupEnter.append('circle').attr('r', 0).merge(groups.select('circle')) //both enter section and update section.attr('fill', d => colorScale(d.type)).transition().duration(1000).attr('r', d => radiusScale(d.type));const text = groups.select('text');groupEnter.append('text').attr('y', 100).merge(text) //both enter section and update section.text(d => d.type)}
vizhub代碼:https://vizhub.com/Edward-Elric233/f33fac2e32134707896521d420d5e255
Singular elements
每次我用對selection操作的時候都會對其中的每個元素進行操作。特殊的,我們如果想要添加一個唯一的元素的話可以綁定一個個數為一的數組,內容可以隨意選定,一般情況下選擇[null]數組就比較好。然后在這個selection上進行操作。
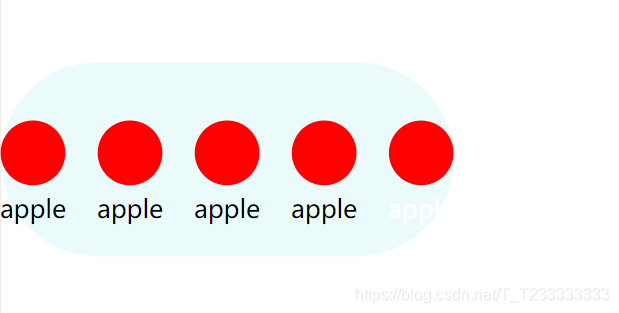
例如,我們想要給我們的動畫添加一個矩形的背景,就可以使用上面的方法添加一個。
const bowl = selection.selectAll('rect').data([null]).enter().append('rect').attr('y', 110).attr('width', 700).attr('height', 300).attr('rx', 300/2) //圓角矩形.attr('fill', '#ebfbfc');
最后的效果圖(實際上應該是動圖,這里沒有制作gif圖,可以在網站進行查看)

vizhub代碼:https://vizhub.com/Edward-Elric233/bc54edb3b722482590f498f3a1047a62


