目錄
- HOG是什么?
- HOG vs SIFT
- HOG步驟
- HOG在檢測行人中的方式
- Opencv實現
- HOGDescriptor的構造函數:
- 行人檢測HOG+SVM步驟
- 簡化版的HOG計算
HOG是什么?
方向梯度直方圖( Histogram of Oriented Gradient, HOG )特征是一種在計算機視覺和圖像處理中用來進行物體檢測的特征描述子。它通過
計算和統計圖像局部區域的梯度方向直方圖來構成特征。Hog特征結合SVM分類器已經被廣泛應用于圖像識別中。
HOG vs SIFT
SIFT :對特征點的描述方法
HOG :對一定區域的特征量的描述方法
1、可以表現較大的形狀
2、非常適合行人及車輛檢測
假設我們在智能駕駛中要檢測行人:
正樣本:
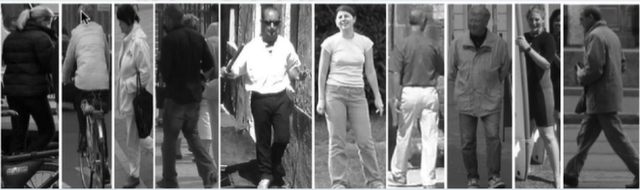
負樣本:

識別的本質是要找到正樣本和負樣本最本質的區別。例如行人在肩部具有橫向邊緣、兩臂具有豎向邊緣。而非行人樣本中的邊緣是雜亂無章的。因此可以通過構建梯度的直方圖來檢測形狀。由于直方圖損失了空間信息,所以HOG將圖像分割為一個一個小的區域(聯系閾值處理中的分塊處理法),對小的區域分別構建直方圖,然后拼接得到一個大的直方圖。
HOG的缺點: 速度慢,實時性差;難以處理遮擋問題。
HOG特征不具有旋轉魯棒性,以及尺度魯棒性
HOG步驟
1、Gamma矯正(增強圖像的對比度)
2、計算梯度信息
3、以cell(一個像素塊)為單位計算梯度直方圖
4、以block(幾個cell為一個block)為單位,對特征量進行歸一化
具體步驟:

一般來說對梯度方向進行九等分量化。
一般以3* 3的像素組成一個cell,這樣每個cell就可以得到一個9維的直方圖。
每 3*3個cell組成一個block,在每個block進行歸一化:

歸一化的目的:增強對亮度的魯棒性。
HOG在檢測行人中的方式
通常采用滑窗的方式:

計算滑窗中包含的像素的梯度直方圖,然后與行人模板中的直方圖進行對比(如利用各種矩),當兩者十分相似時,我們就認為這個區域是行人區域。
從而延生出的問題:
由于模板是固定大小的,因此只能檢測固定大小的行人。當圖像中的行人尺寸發生變化時,如何使用一個單一的模板檢測?
Opencv實現
OpenCV實現了兩種類型的基于HOG特征的行人檢測,分別是SVM和Cascade,OpenCV自帶的級聯分類器的文件的位置在“XX\opencv\sources\data\hogcascades”(OpenCV4.x版本可用)。
opencv自帶的人數檢測文件,所在位置在opencv的安裝目錄下(下面是我的安裝位置):
D:\Program Files\opencv\sources\samples\cpp
HOGDescriptor的構造函數:
CV_WRAP HOGDescriptor() : winSize(64,128), blockSize(16,16), blockStride(8,8),cellSize(8,8), nbins(9), derivAperture(1), winSigma(-1),histogramNormType(HOGDescriptor::L2Hys), L2HysThreshold(0.2), gammaCorrection(true),free_coef(-1.f), nlevels(HOGDescriptor::DEFAULT_NLEVELS), signedGradient(false){}
窗口大小 winSize(64,128), 塊大小blockSize(16,16), 塊滑動增量blockStride(8,8), 胞元大小cellSize(8,8), 梯度方向數nbins(9)。
上面這些都是HOGDescriptor的成員變量,括號里的數值是它們的默認值,它們反應了HOG描述子的參數。
 |  |  |
HOGDescriptor中有兩種Detector分別是:getDaimlerPeopleDetector、getDefaultPeopleDetector
行人檢測HOG+SVM步驟
參考的代碼:
#include <opencv2/objdetect.hpp>
#include <opencv2/highgui.hpp>
#include <opencv2/imgproc.hpp>
#include <opencv2/videoio.hpp>
#include <iostream>
#include <iomanip>using namespace cv;
using namespace std;class Detector
{//enum Mode { Default, Daimler } m;enum { Default, Daimler };//定義枚舉類型int m;HOGDescriptor hog, hog_d;
public:Detector(int a) : m(a), hog(), hog_d(Size(48, 96), Size(16, 16), Size(8, 8), Size(8, 8), 9)//構造函數,初始化對象時自動調用,m,hog,hog_d是數據成員,后跟一個放在圓括號中的初始化形式{hog.setSVMDetector(HOGDescriptor::getDefaultPeopleDetector());hog_d.setSVMDetector(HOGDescriptor::getDaimlerPeopleDetector());}void toggleMode() { m = (m == Default ? Daimler : Default); }string modeName() const { return (m == Default ? "Default" : "Daimler"); }vector<Rect> detect(InputArray img){// Run the detector with default parameters. to get a higher hit-rate// (and more false alarms, respectively), decrease the hitThreshold and// groupThreshold (set groupThreshold to 0 to turn off the grouping completely).vector<Rect> found;if (m == Default)hog.detectMultiScale(img, found, 0, Size(8, 8), Size(32, 32), 1.05, 2, false);else if (m == Daimler)hog_d.detectMultiScale(img, found, 0.5, Size(8, 8), Size(32, 32), 1.05, 2, true);return found;}void adjustRect(Rect& r) const{// The HOG detector returns slightly larger rectangles than the real objects,// so we slightly shrink the rectangles to get a nicer output.r.x += cvRound(r.width * 0.1);r.width = cvRound(r.width * 0.8);r.y += cvRound(r.height * 0.07);r.height = cvRound(r.height * 0.8);}
};
//修改參數區域
static const string keys = "{ help h   |   | print help message }"
"{ camera c | 0 | capture video from camera (device index starting from 0) }"
"{ video v  | D:/opencv/opencv4.0/opencv4.0.0/sources/samples/data/vtest.avi| use video as input }";int main(int argc, char** argv)
{CommandLineParser parser(argc, argv, keys);		//keys:描述可接受的命令行參數的字符串parser.about("This sample demonstrates the use ot the HoG descriptor.");//設置相關信息。相關信息會在 printMessage 被調用時顯示。if (parser.has("help")){parser.printMessage();return 0;}int camera = parser.get<int>("camera");string file = parser.get<string>("video");if (!parser.check())//檢查解析錯誤。當錯誤發生時返回true。錯誤可能是轉換錯誤、丟失參數等。{parser.printErrors();return 1;}VideoCapture cap;if (file.empty())cap.open(camera);elsecap.open(file.c_str());if (!cap.isOpened()){cout << "Can not open video stream: '" << (file.empty() ? "<camera>" : file) << "'" << endl;return 2;}cout << "Press 'q' or <ESC> to quit." << endl;cout << "Press <space> to toggle between Default and Daimler detector" << endl;//Default and Daimler detectorDetector detector(1);		//初始化使用Daimler detectorMat frame;for (;;){cap >> frame;if (frame.empty()){cout << "Finished reading: empty frame" << endl;break;}int64 t = getTickCount();vector<Rect> found = detector.detect(frame);t = getTickCount() - t;// show the window{ostringstream buf;buf << "Mode: " << detector.modeName() << " ||| "<< "FPS: " << fixed << setprecision(1) << (getTickFrequency() / (double)t);putText(frame, buf.str(), Point(10, 30), FONT_HERSHEY_PLAIN, 2.0, Scalar(0, 0, 255), 2, LINE_AA);}for (vector<Rect>::iterator i = found.begin(); i != found.end(); ++i){Rect& r = *i;detector.adjustRect(r);rectangle(frame, r.tl(), r.br(), cv::Scalar(0, 255, 0), 2);}imshow("People detector", frame);// interact with userconst char key = (char)waitKey(30);if (key == 27 || key == 'q') // ESC{cout << "Exit requested" << endl;break;}else if (key == ' '){detector.toggleMode();}}return 0;
}
簡化后的對單張圖片的檢測
#include <opencv2/objdetect.hpp>
#include <opencv2/highgui.hpp>
#include <opencv2/imgproc.hpp>
#include <opencv2/videoio.hpp>
#include <iostream>
#include <iomanip>using namespace cv;
using namespace std;class Detector
{//enum Mode { Default, Daimler } m;enum { Default, Daimler };//定義枚舉類型int m;HOGDescriptor hog, hog_d;
public:Detector(int a) : m(a), hog(), hog_d(Size(48, 96), Size(16, 16), Size(8, 8), Size(8, 8), 9)//構造函數,初始化對象時自動調用,m,hog,hog_d是數據成員,后跟一個放在圓括號中的初始化形式{hog.setSVMDetector(HOGDescriptor::getDefaultPeopleDetector());hog_d.setSVMDetector(HOGDescriptor::getDaimlerPeopleDetector());}void toggleMode() { m = (m == Default ? Daimler : Default); }string modeName() const { return (m == Default ? "Default" : "Daimler"); }vector<Rect> detect(InputArray img){// Run the detector with default parameters. to get a higher hit-rate// (and more false alarms, respectively), decrease the hitThreshold and// groupThreshold (set groupThreshold to 0 to turn off the grouping completely).vector<Rect> found;if (m == Default)hog.detectMultiScale(img, found, 0, Size(8, 8), Size(32, 32), 1.05, 2, false);else if (m == Daimler)hog_d.detectMultiScale(img, found, 0.5, Size(8, 8), Size(32, 32), 1.05, 2, true);return found;}void adjustRect(Rect& r) const{// The HOG detector returns slightly larger rectangles than the real objects,// so we slightly shrink the rectangles to get a nicer output.r.x += cvRound(r.width * 0.1);r.width = cvRound(r.width * 0.8);r.y += cvRound(r.height * 0.07);r.height = cvRound(r.height * 0.8);}
};int main(int argc, char** argv)
{Detector detector(1);		//初始化使用Daimler detectorMat img=imread("D:\\opencv_picture_test\\HOG行人檢測\\timg.jpg");vector<Rect> found = detector.detect(img);for (vector<Rect>::iterator i = found.begin(); i != found.end(); ++i){Rect& r = *i;detector.adjustRect(r);		rectangle(img, r.tl(), r.br(), cv::Scalar(0, 255, 0), 2);}imshow("People detector", img);waitKey(0);return 0;
}
結果:

簡化版的HOG計算

需要用到的知識點:

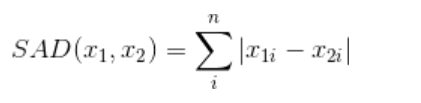
曼哈頓距離:
由于一般的建立數組的方法在【】中填變量是行不通的,這里我們采用動態建立數組的方法。在程序返回前必須將內存釋放

#include <opencv2/opencv.hpp>
#include "opencv2/features2d.hpp"
#include <iostream>
#include "windows.h"
#include <stdio.h>
#include <time.h>
#include <math.h>
//#include "My_ImageProssing_base.h"
#define WINDOW_NAME1 "【程序窗口1】"
#define WINDOW_NAME2 "【程序窗口2】"
using namespace cv;
using namespace std;
RNG g_rng(12345);Mat src_image;
Mat img1;
Mat img2;//*--------------------------手動實現HOG描述子-------------------------------------*/
int angle_lianghua(float angle)
{int result = angle/45;return result;
}
int main()
{//改變控制臺字體顏色system("color 02");//讀取圖像src_image = imread("D:\\opencv_picture_test\\HOG行人檢測\\hogTemplate.jpg");img1 = imread("D:\\opencv_picture_test\\HOG行人檢測\\img1.jpg");img2 = imread("D:\\opencv_picture_test\\HOG行人檢測\\img2.jpg");//出錯判斷if (!(src_image.data || img1.data || img2.data)){cout << "image load failed!" << endl;return -1;}//【1】計算hogTemplate//所有像素計算梯度和角度方向Mat gx, gy;Mat mag, angle;	//幅值和角度Sobel(src_image, gx, CV_32F, 1, 0, 1);Sobel(src_image, gy, CV_32F, 0, 1, 1);cartToPolar(gx, gy, mag, angle, false);		//false獲得的是角度int cellSize = 16;		//每個cell的大小int nx = src_image.cols / cellSize;	//每行有幾個int ny = src_image.rows / cellSize;	//每列有幾個int cellnums = nx * ny;	//有幾個cellint bins = cellnums * 8;float* ref_hist = new float[bins];memset(ref_hist, 0, sizeof(float) * bins);int binnum = 0;//計算一張圖for (int j = 0;j < ny;j++){for (int i = 0;i < nx;i++){//計算每個cell的直方圖for (int y = j * cellSize;y < (j + 1) * cellSize;y++){for (int x = i * cellSize;x < (i + 1) * cellSize;x++){//對角度進行量化int tempangle1 = 0;float tempangle2 = angle.at<float>(y, x);	//當前像素的角度值tempangle1 = angle_lianghua(tempangle2);	//當前cell的角度分量float magnitude = mag.at<float>(y, x);		//當前像素的幅度值ref_hist[tempangle1 + binnum * 8] += magnitude;				//在數組中加上當前的}}binnum++;	//cell數目+1}}//【2】計算img1//所有像素計算梯度和角度方向Mat gx_img1, gy_img1;Mat mag_img1, angle_img1;	//幅值和角度Sobel(img1, gx_img1, CV_32F, 1, 0, 1);Sobel(img1, gy_img1, CV_32F, 0, 1, 1);cartToPolar(gx_img1, gy_img1, mag_img1, angle_img1, false);		//false獲得的是角度nx = img1.cols / cellSize;	//每行有幾個ny = img1.rows / cellSize;	//每列有幾個cellnums = nx * ny;	//有幾個cellbins = cellnums * 8;float* ref_hist_img1 = new float[bins];memset(ref_hist_img1, 0, sizeof(float) * bins);binnum = 0;//計算一張圖for (int j = 0;j < ny;j++){for (int i = 0;i < nx;i++){//計算每個cell的直方圖for (int y = j * cellSize;y < (j + 1) * cellSize;y++){for (int x = i * cellSize;x < (i + 1) * cellSize;x++){//對角度進行量化int tempangle1 = 0;float tempangle2 = angle_img1.at<float>(y, x);	//當前像素的角度值tempangle1 = angle_lianghua(tempangle2);	//當前cell的角度分量float magnitude = mag_img1.at<float>(y, x);		//當前像素的幅度值ref_hist_img1[tempangle1 + binnum * 8] += magnitude;				//在數組中加上當前的}}binnum++;	//cell數目+1}}//【3】計算img2//所有像素計算梯度和角度方向Mat gx_img2, gy_img2;Mat mag_img2, angle_img2;	//幅值和角度Sobel(img2, gx_img2, CV_32F, 1, 0, 1);Sobel(img2, gy_img2, CV_32F, 0, 1, 1);cartToPolar(gx_img2, gy_img2, mag_img2, angle_img2, false);		//false獲得的是角度nx = img2.cols / cellSize;	//每行有幾個ny = img2.rows / cellSize;	//每列有幾個cellnums = nx * ny;	//有幾個cellbins = cellnums * 8;float* ref_hist_img2 = new float[bins];memset(ref_hist_img2, 0, sizeof(float) * bins);binnum = 0;//計算一張圖for (int j = 0;j < ny;j++){for (int i = 0;i < nx;i++){//計算每個cell的直方圖for (int y = j * cellSize;y < (j + 1) * cellSize;y++){for (int x = i * cellSize;x < (i + 1) * cellSize;x++){//對角度進行量化int tempangle1 = 0;float tempangle2 = angle_img2.at<float>(y, x);	//當前像素的角度值tempangle1 = angle_lianghua(tempangle2);	//當前像素的角度分量float magnitude = mag_img2.at<float>(y, x);		//當前像素的幅度值ref_hist_img2[tempangle1 + binnum * 8] += magnitude;				//在數組中加上當前的}}binnum++;	//cell數目+1}}//【4】分別計算ref_hist_img1和ref_hist\ref_hist_img2和ref_hist的矩int result1 = 0;int result2 = 0;for (int i = 0;i < bins;i++){//這里簡化運算,不計算平方根,而是計算absresult1 += abs(ref_hist[i]- ref_hist_img1[i]);result2 += abs(ref_hist[i] - ref_hist_img2[i]);}cout << result1 << endl;cout << result2 << endl;if (result1 < result2){cout << "img1更與原圖相似" << endl;}elsecout << "img2更與原圖相似" << endl;waitKey(0);delete[] ref_hist;delete[] ref_hist_img1;delete[] ref_hist_img2;return 0;
}
結果:

Reference:
OpenCV實戰4: HOG+SVM實現行人檢測
HOG detectMultiScale 參數分析
CommandLineParser類(命令行解析類)
C++語法:構造函數以及析構函數
《數字圖像處理PPT.李竹版》


+ASP.NET 4.0(MVC3))


)


)/(1-e^(-jw))=e^(-j2w)*sin(5w/2)/sin(w/2)的證明過程)


)

信號流圖求序列的DFT)


