賈斯汀(Justin),帕特(Pat)和我已經開始著手一個需要用戶界面進行管理和管理的副項目。 在與SmartGWT和GWT共同工作了一段時間之后,我們決定使用SmartGWT創建接口。 我們非常喜歡視覺組件(請查看SmartGWT展示柜 )以及它有助于快速開發的事實。
在本教程中,我將向您展示如何在短短幾個小時內為用戶界面創建原型。 該界面在很大程度上受Drools Guvnor應用程序的影響。 我們在許多項目中都使用了Drools,并且有Guvnor來創建業務規則。 我們只是喜歡用戶界面,它既美觀又實用。 查看一些Guvnor屏幕截圖 。
讓我們開始吧。 我假設您已經安裝了GWT SDK和Eclipse的Google插件 。 SmartGWT與GWT 1.5.3,GWT 1.6.4,GWT 1.7.x和GWT 2.0.x兼容。 當前,我正在使用GWT 2.1.0 SDK和SmartGWT 2.2版本。 從本質上講,這是有關SmartGWT的更高級的教程,因此您可能必須檢查一下我的介紹性文章“ SmartGWT入門以獲取出色的GWT接口”教程。 此外,另一個有用的資源是“布局用戶界面”教程,我們曾用來啟動我們自己的界面的開發。
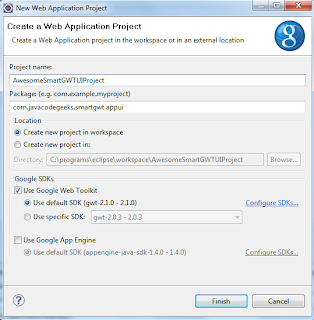
首先,我們在Eclipse中創建一個新的“ Web應用程序項目”。 我選擇“ AwesomeSmartGWTUIProject”作為項目名稱,選擇“ com.javacodegeeks.smartgwt.appui”作為程序包名稱。
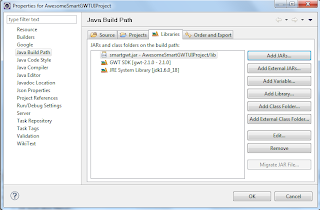
接下來,將提取的ZIP中的“ smartgwt.jar”文件添加到項目的類路徑中。 請注意,該文件也應添加到“ war / WEB-INF / lib”目錄中。
然后編輯模塊xml文件(名為“ AwesomeSmartGWTUIProject.gwt.xml”),并在標準“繼承”聲明之后添加以下行:
<inherits name="com.smartgwt.SmartGwt"/>另外,注釋掉聲明GWT主題用法的現有部分:
<!--<inherits name='com.google.gwt.user.theme.standard.Standard'/> -->這是模塊XML文件的外觀:
<?xml version="1.0" encoding="UTF-8"?>
<module rename-to='awesomesmartgwtuiproject'><!-- Inherit the core Web Toolkit stuff.                        --><inherits name='com.google.gwt.user.User'/><!-- Inherit the default GWT style sheet.  You can change       --><!-- the theme of your GWT application by uncommenting          --><!-- any one of the following lines.                            --><!-- <inherits name='com.google.gwt.user.theme.standard.Standard'/>  --><!-- <inherits name='com.google.gwt.user.theme.chrome.Chrome'/> --><!-- <inherits name='com.google.gwt.user.theme.dark.Dark'/>     --><!-- Other module inherits                                      --><inherits name="com.smartgwt.SmartGwt"/><!-- Specify the app entry point class.                         --><entry-point class='com.javacodegeeks.smartgwt.appui.client.AwesomeSmartGWTUIProject'/><!-- Specify the paths for translatable code                    --><source path='client'/><source path='shared'/></module>
下一步是刪除“ AwesomeSmartGWTUIProject.html”文件中存在的一些自動生成的代碼,尤其是H1和Table標記。 這是您應該得到的:
<!doctype html>
<!-- The DOCTYPE declaration above will set the    -->
<!-- browser's rendering engine into               -->
<!-- "Standards Mode". Replacing this declaration  -->
<!-- with a "Quirks Mode" doctype may lead to some -->
<!-- differences in layout.                        --><html><head><meta http-equiv="content-type" content="text/html; charset=UTF-8"><!--                                                               --><!-- Consider inlining CSS to reduce the number of requested files --><!--                                                               --><link type="text/css" rel="stylesheet" href="AwesomeSmartGWTUIProject.css"><!--                                           --><!-- Any title is fine                         --><!--                                           --><title>Web Application Starter Project</title><!--                                           --><!-- This script loads your compiled module.   --><!-- If you add any GWT meta tags, they must   --><!-- be added before this line.                --><!--                                           --><script type="text/javascript" language="javascript" src="awesomesmartgwtuiproject/awesomesmartgwtuiproject.nocache.js"></script></head><!--                                           --><!-- The body can have arbitrary html, or      --><!-- you can leave the body empty if you want  --><!-- to create a completely dynamic UI.        --><!--                                           --><body><!-- OPTIONAL: include this if you want history support --><iframe src="javascript:''" id="__gwt_historyFrame" tabIndex='-1' style="position:absolute;width:0;height:0;border:0"></iframe><!-- RECOMMENDED if your web app will not function without JavaScript enabled --><noscript><div style="width: 22em; position: absolute; left: 50%; margin-left: -11em; color: red; background-color: white; border: 1px solid red; padding: 4px; font-family: sans-serif">Your web browser must have JavaScript enabledin order for this application to display correctly.</div></noscript></body>
</html>
同樣,刪除所有存在于EntryPoint類中的名為“ AwesomeSmartGWTUIProject”的代碼,并僅保留一個空的onModuleLoad方法,如下所示:
package com.javacodegeeks.smartgwt.appui.client;import com.google.gwt.core.client.EntryPoint;public class AwesomeSmartGWTUIProject implements EntryPoint {public void onModuleLoad() {}}現在,我們準備開始編寫SmartGWT代碼,因此請確保已為SmartGWT Javadocs添加了書簽。 在構建接口時,我們將繼續使用兩個非常重要的類。
- HLayout :這是一個與布局相關的類,沿水平軸應用大小調整策略,即,其所有內部組件將以水平方式放置。
- VLayout :這是一個與布局相關的類,沿垂直軸應用大小調整策略,即,所有內部組件都將以垂直方式放置。
這些類都從父Layout擴展,因此它們繼承了addMember方法,該方法允許它們添加其他Canvas對象或Widget 。
使用各種布局對象,我們會將整個屏幕區域分解為特定的子區域(北,南,東,西和主區域)。 讓我們看看入口點類的第一個版本如何:
package com.javacodegeeks.smartgwt.appui.client;import com.google.gwt.core.client.EntryPoint;
import com.google.gwt.user.client.Window;
import com.google.gwt.user.client.ui.RootLayoutPanel;
import com.javacodegeeks.smartgwt.appui.client.ui.ApplicationMenu;
import com.javacodegeeks.smartgwt.appui.client.ui.HeaderArea;
import com.javacodegeeks.smartgwt.appui.client.ui.MainArea;
import com.javacodegeeks.smartgwt.appui.client.ui.NavigationArea;
import com.smartgwt.client.widgets.layout.HLayout;
import com.smartgwt.client.widgets.layout.VLayout;public class AwesomeSmartGWTUIProject implements EntryPoint {private static final int HEADER_HEIGHT = 85;private VLayout mainLayout;private HLayout northLayout;private HLayout southLayout;private VLayout eastLayout;private HLayout westLayout;public void onModuleLoad() {Window.enableScrolling(false);Window.setMargin("0px");// main layout occupies the whole areamainLayout = new VLayout();mainLayout.setWidth100();mainLayout.setHeight100();northLayout = new HLayout();northLayout.setHeight(HEADER_HEIGHT);VLayout vLayout = new VLayout();vLayout.addMember(new HeaderArea());vLayout.addMember(new ApplicationMenu());northLayout.addMember(vLayout);westLayout = new NavigationArea();westLayout.setWidth("15%");eastLayout = new MainArea();eastLayout.setWidth("85%");southLayout = new HLayout();southLayout.setMembers(westLayout, eastLayout);mainLayout.addMember(northLayout);mainLayout.addMember(southLayout);// add the main layout container to GWT's root panelRootLayoutPanel.get().add(mainLayout);}}
不用擔心編譯錯誤,我們稍后將創建必要的類。 如您所見,我們將整個屏幕區域劃分為較小的塊,并使用SmartGWT API將所有組件連接在一起。 請注意使用setWidth100和setHeight100方法,它們方便地允許特定組件占據整個可用區域。 最后, RootLayoutPanel是GWT類,它使我們可以訪問屏幕的根面板。 現在讓我們創建各種組件。
* ApplicationMenu:
package com.javacodegeeks.smartgwt.appui.client.ui;import com.smartgwt.client.types.Alignment;
import com.smartgwt.client.types.Overflow;
import com.smartgwt.client.widgets.Label;
import com.smartgwt.client.widgets.layout.HLayout;public class ApplicationMenu extends HLayout {private static final int APPLICATION_MENU_HEIGHT = 27;private Label label;public ApplicationMenu() {super();this.setHeight(APPLICATION_MENU_HEIGHT);label = new Label();label.setContents("Application Menu");label.setAlign(Alignment.CENTER);label.setOverflow(Overflow.HIDDEN);this.addMember(label);}}
這里沒什么特別的,我們只是在布局中添加了一個Label并將Alignment設置為居中。
*標頭區域:
package com.javacodegeeks.smartgwt.appui.client.ui;import com.smartgwt.client.types.Alignment;
import com.smartgwt.client.types.Overflow;
import com.smartgwt.client.widgets.Img;
import com.smartgwt.client.widgets.Label;
import com.smartgwt.client.widgets.layout.HLayout;public class HeaderArea extends HLayout {private static final int HEADER_AREA_HEIGHT = 60;public HeaderArea() {super();this.setHeight(HEADER_AREA_HEIGHT);Img logo = new Img("jcg_logo.png", 282, 60);Label name = new Label();name.setOverflow(Overflow.HIDDEN);  name.setContents("Java 2 Java Developers Resource Center"); HLayout westLayout = new HLayout();westLayout.setHeight(HEADER_AREA_HEIGHT);    westLayout.setWidth("70%");westLayout.addMember(logo);westLayout.addMember(name);Label signedInUser = new Label();signedInUser.setContents("Fabrizio Chami ");   HLayout eastLayout = new HLayout();eastLayout.setAlign(Alignment.RIGHT);  eastLayout.setHeight(HEADER_AREA_HEIGHT);eastLayout.setWidth("30%");eastLayout.addMember(signedInUser);this.addMember(westLayout);      this.addMember(eastLayout);}}
同樣,很簡單。 我們使用Img類添加了圖像,并提供了文件名。 請注意,圖像URL自動位于“ images”文件夾下,因此基本上“ jcg_logo.png”文件必須位于“ war / images”文件夾中。
*導航區域:
package com.javacodegeeks.smartgwt.appui.client;import com.smartgwt.client.types.Overflow;
import com.smartgwt.client.types.VisibilityMode;
import com.smartgwt.client.widgets.Label;
import com.smartgwt.client.widgets.layout.HLayout;
import com.smartgwt.client.widgets.layout.SectionStack;
import com.smartgwt.client.widgets.layout.SectionStackSection;public class NavigationArea extends HLayout {public NavigationArea() {super();this.setMembersMargin(20);  this.setOverflow(Overflow.HIDDEN);this.setShowResizeBar(true);final SectionStack sectionStack = new SectionStack();  sectionStack.setVisibilityMode(VisibilityMode.MULTIPLE);sectionStack.setShowExpandControls(true);sectionStack.setAnimateSections(true);sectionStack.setVisibilityMode(VisibilityMode.MUTEX);sectionStack.setOverflow(Overflow.HIDDEN);SectionStackSection section1 = new SectionStackSection("Section 1");section1.setExpanded(true);Label label1 = new Label();label1.setContents("Label1");section1.addItem(label1);SectionStackSection section2 = new SectionStackSection("Section 2");section2.setExpanded(false);Label label2 = new Label();label2.setContents("Label2");label2.setOverflow(Overflow.AUTO);label2.setPadding(10);section2.addItem(label2);SectionStackSection section3 = new SectionStackSection("Section 3");section3.setExpanded(false);Label label3 = new Label();label3.setContents("Label3");label3.setOverflow(Overflow.AUTO);label3.setPadding(10);section3.addItem(label3);sectionStack.addSection(section1);sectionStack.addSection(section2);sectionStack.addSection(section3);this.addMember(sectionStack);}}
對于導航區域,我們需要類似手風琴的組件。 這是在SmartGWT中通過我們向其中添加SectionStackSection實例的SectionStack類實現的。 我們可以向這些項目添加任意的小部件,但是為了簡單起見,現在我們僅添加一些Label 。 請注意setShowResizeBar方法的使用,該方法允許我們在布局中的該成員之后顯示調整大小的條,以允許調整其大小。
*主要區域:
package com.javacodegeeks.smartgwt.appui.client.ui;import com.smartgwt.client.types.Alignment;
import com.smartgwt.client.types.Overflow;
import com.smartgwt.client.widgets.Label;
import com.smartgwt.client.widgets.layout.VLayout;public class MainArea extends VLayout {private Label label;public MainArea() {super();label = new Label();label.setContents("Main Area");label.setAlign(Alignment.CENTER);label.setOverflow(Overflow.HIDDEN);this.addMember(label);}}
主要區域將托管我們界面的大部分小部件,但目前僅包括標簽。
好的,讓我們看看到目前為止我們做了什么。 啟動Eclipse配置(作為Web應用程序項目),然后將瀏覽器指向提供的URL:
http://127.0.0.1:8888/AwesomeSmartGWTUIProject.html?gwt.codesvr=127.0.0.1:9997
這是您應該看到的圖像:

幾分鐘的代碼還不錯。 不必弄亂CSS,HTML和JavaScript,我們已經創建了UI的框架,其中包括嚴格定義的子區域。 剩下的就是通過使用各種精美的小部件填充區域來增強它。
在本教程的下一部分中,我將向您介紹一些最高級的組件(例如樹和選項卡)。 現在,您可以在此處找到到目前為止創建的Eclipse項目。 請注意,我刪除了一些SmartGWT特定的內容(圖像等),因為它們使檔案過大。 這些應該由新項目自動創建。 “ gwt-servlet.jar”也已從“ war \ WEB-INF \ lib”目錄中刪除。
UI編碼愉快!
更新:我還發布了本教程的第二部分 。
- SmartGWT入門,提供出色的GWT界面
- 將JSON功能添加到您的GWT應用程序中
- 建立自己的GWT Spring Maven原型
- 將CAPTCHA添加到您的GWT應用程序
- GWT Spring和Hibernate進入數據網格世界
- GWT 2 Spring 3 JPA 2 Hibernate 3.5教程
翻譯自: https://www.javacodegeeks.com/2011/01/advanced-smartgwt-tutorial-part-1.html


)


