不幸的是,第一次在Eclipse中進行操作可能會非常耗時且令人沮喪。 Eclipse框架非常龐大,強大,有時甚至很復雜。 可能很難弄清楚哪些功能可用以及如何使用它們。
本教程介紹了自動化簡單的Java重構任務所需的所有Eclipse功能的基礎。 它顯示了如何在菜單中添加新項目以及如何分析,修改和格式化Java源代碼。 它還顯示了如何使用對話框與用戶進行交流。
它分為兩個部分。 這篇文章解釋了所有需要的理論。 在本部分的最后,您將已經對Eclipse框架有了足夠的了解,只需稍作搜索就可以完成該插件。 實際上,我們將創建一個插件,該插件將新項目添加到菜單中并收集執行重構所需的所有信息。
本教程的下一部分將展示如何創建對話框以及如何從插件修改Java源代碼。 它尚未發布。
樣本插件
我們創建具有兩個功能的示例插件:
- 檢查非空參數–修改所選方法以檢查其參數是否不為
null, - 自定義生成toString –將
toString方法添加到選定的類。
這兩個功能都將在源菜單中添加一個新項。 僅當用戶選擇Java方法時,“檢查??非空參數”項才會啟用。 該功能顯示一個對話框,允許用戶選擇方法參數的子集。 然后修改選定的方法以檢查選定的參數是否為空:
if (arg1==null || arg2==null || ... || argn==null)throw new IllegalStateException("The parameter may not be null.");僅當用戶選擇一個Java類時,才會啟用Custom generate toString項目。 它將顯示一個對話框及其所有屬性的列表。 用戶選擇屬于toString方法的屬性。 如果用戶選擇的屬性少于四個,則此功能將以下代碼添加到類中:
@Override
public String toString() {StringBuilder builder = new StringBuilder(this.getClass().getSimpleName());builder.append(" [ ");builder.append(b).append(", ").append(c).append(" ]");return builder.toString();
}
如果用戶選擇了更多或更少的四個屬性,則該功能將以下代碼添加到類中:
public String toString() {StringBuilder builder = new StringBuilder(this.getClass().getSimpleName());builder.append(" [ \n");builder.append("    a" + ": ").append(a).append("\n");builder.append("    b" + ": ").append(b).append("\n");builder.append("    c" + ": ").append(c).append("\n");builder.append("    d" + ": ").append(d).append("\n");builder.append(" ]");return builder.toString();
}
就這些。 該插件在Github上可用。
每個Eclipse版本都有多種風格。 最適合插件編寫者的版本稱為“ Eclipse for RCP and RAP Developers”。 RCP代表“富客戶端平臺”,它只是Eclipse平臺的另一個名稱。
從下載頁面下載并安裝“用于RCP和RAP開發人員的Eclipse”。
首先要做的是配置目標平臺。 目標平臺是eclipse的另一個實例。 它表示您的插件將使用的最低配置。 您的插件將針對目標平臺進行編譯。 它也將安裝到其中并在您要對其進行測試時在其中運行。
整個工作空間只能有一個活動目標平臺。 盡管這樣做更有意義,但它不是特定于項目的。
最簡單的方法是開發與運行時相同的Eclipse版本。 這是默認選項。 在這種情況下,您要做的就是向其中添加eclipse SDK。
安裝Eclipse SDK:
- 轉到“幫助”->“安裝新軟件...”。
- 選擇您的Eclipse更新站點,在本例中為“ Eclipse項目更新”
http://download.eclipse.org/eclipse/updates/3.更新網站。 - 檢查Eclipse SDK和Eclipse Platform SDK。
- 單擊下一步,接受許可并完成安裝。
這就對了。 不需要任何其他操作,您就可以創建第一個插件項目了 。
可以單獨下載和維護目標平臺。 如果要與較早的版本兼容,或者要對目標平臺配置有更大的控制權,請使用此選項。
如果您不感興趣,請跳到下一章。
查找并下載您認為用戶將擁有的任何內容的SDK。 如果找不到SDK,也可以使用“常規”版本。 但是,如果下載SDK,則將提供源代碼和javadocs。
例如,我們的插件需要Eclipse Indigo版本。 Eclipse Indigo的版本號是3.7,因此我們必須下載Eclipse 3.7 SDK 。 歸檔發行版頁面上提供了更早版本的Eclipse SDK的完整列表。
我們的插件將僅取決于eclipse本身,因此我們要做的就是將下載的SDK解壓縮到某個地方。 如果需要其他插件,我們也必須搜尋并下載其SDK。 我們還將解壓縮它們并復制到與Eclipse SDK相同的目錄中。
現在,我們必須配置RCP Eclipse以使用準備好的目標平臺。
定義并激活目標平臺:
- 轉到“窗口”->“首選項”->“插件開發”->“目標平臺”。
- 單擊添加。
- 選擇“無:從空目標定義開始”,然后單擊下一步。
- 填寫目標名稱。
- 單擊添加,選擇目錄,瀏覽至解壓縮的Eclipse SDK并完成。
- 將新的目標平臺檢查為“有效”。
最后,轉到“插件開發”首選項頁面,然后選中“在Java搜索中包括來自目標的所有插件”。
本章介紹如何創建一個簡單的插件項目以及如何對其進行調試。 簡單的插件沒有任何用處。 它只能顯示一條消息以證明其存在。
在本章的最后,我們將刪除示例消息,最后得到一個空的插件框架。
我們將使用Eclipse向導來生成插件。 從包資源管理器中調用向導:
- 右鍵單擊包瀏覽器,
- 選擇“新建”->“其他..”。
- 選擇“插件項目”,然后單擊“下一步”。
該向導有多個頁面。 在第一個上配置項目名稱和目標平臺。 您可以根據需要使用任何項目名稱,但是習慣上是以根java軟件包命名該項目。 例如,由于我們要將所有類都放入org.meri.eclipse.defensiveapitools包中,因此我們的項目名稱為org.meri.eclipse.defensiveapitools
目標平臺字段包含您要開發的Eclipse版本。 如果有人要使用您的插件,則將要求他下載數量相等或更大的Eclipse。 一個舊的不兼容的Eclipse將拒絕加載它。 我們可以為當前的Eclipse開發很好,所以我們選擇3.7。
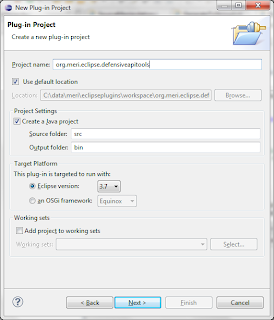
點擊下一步'。
第二頁包含基本項目信息。 隨意填寫ID,插件版本,名稱和提供程序。 第一個重要參數是執行環境。 該插件將僅在指定的Java上運行,或者永遠不在Java上運行。 在較早的JVM上運行的Eclipse只會忽略它。 我們選擇了J2SE-1.6。
驗證:
- 復選框“ Generate a activator,Java…”已選中,
- 復選框“此插件將為用戶界面做出貢獻”已選中,
- “是否要創建富客戶端平臺應用程序”的答案是否定的。
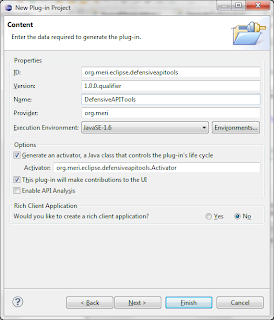
點擊下一步'。
選擇“ Hello,World Command”模板,然后單擊“ Finish”。 這將創建帶有示例菜單項的新插件。
該插件僅在正在運行的Eclipse中起作用。 Eclipse支持手動和自動JUnit測試。 在這兩種情況下,都將在第一章中配置的目標平臺內安裝并運行該插件。
本章僅顯示如何進行手動測試。 請參考其他資源,以學習如何為eclipse插件編寫junit測試。
安裝并運行插件:
- 右鍵點擊插件項目,
- 單擊“調試為”->“ Eclipse應用程序”。
系統將啟動新的Eclipse實例。 它的主菜單有一個新條目,稱為“樣本菜單”。
現在,您有兩個正在運行的Eclipse實例。 一個用于開發,另一個用于測試。 測試蝕在開發人員內部運行。 所有調試工具均可用。 您可以放置??斷點,檢查變量等:
- 在開發蝕中打開生成的
SampleHandler類, - 將斷點放在
execute方法中, - 回到日食,
- 選擇“示例菜單”和“示例命令”
執行將在新的斷點處停止。
我們已經看到該插件有效,因此我們可以從中刪除生成的示例菜單。
刪除示例菜單項及其處理程序:
- 打開plugin.xml文件,轉到擴展選項卡并刪除所有擴展。
- 找到并刪除生成的
SampleHandler類。
plugin.xml中的plugin標簽現在應該為空。 打開plugin.xml文件,然后轉到plugin.xml選項卡:
<?xml version="1.0" encoding="UTF-8"?>
<?eclipse version="3.4"?>
<plugin>
</plugin>Eclipse是一個巨大的框架,您可以在其中安裝無限數量的插件。 這創建了一個龐大的功能和插件系統,它們必須相互配合。 為了使該系統保持解耦和盡可能擴展,Eclipse框架使用適配器設計模式 。 這種模式非常普遍,無論您要編寫哪種插件,您都可能會遇到它。
此設計模式將一個類或接口轉換為另一個類或接口。 執行轉換的類稱為適配器。 該模式具有兩種不同的風格,并且eclipse框架都支持。 這兩種風格之間的區別在于誰創建了適配器。 它可以直接由要轉換的對象完成,也可以由獨立的適配器工廠完成。
第一個子章節顯示了如何編寫適配器。 第二個子章節是關于能夠創建自己的適配器的對象,第三個子章節是關于獨立適配器工廠的。 最后一個子章節將所有內容放在一起,并說明如何轉換未知類型的對象。
適配器是將一種類型轉換為另一種類型的對象。 它必須表示其他類型,例如,如果將對象轉換為類,則必須擴展該類。 如果將它們轉換為接口,則必須實現該接口。
通常,適配器會轉換具有所有必需功能但沒有正確API的對象。 否則,典型的適配器包含很少的邏輯。 它只包裝原始對象并將所有工作委托給它。
以下適配器能夠將Minus接口的實現轉換為Plus接口:
public class MinusToPlusAdapter implements Plus {private final Minus adaptee;public MinusToPlusAdapter(Minus minus) {super();this.adaptee = minus;}@Overridepublic int plus(int x, int y) {return adaptee.minus(x, -y);}}在此設計模式的簡單版本中,要轉換的對象創建了自己的適配器。
我們將展示如何創建與Eclipse框架兼容的適應性對象。 該子章節的其余部分列出了此適配器樣式風格的優點和缺點。
自適應對象必須實現IAdaptable接口。 該接口只有一個方法getAdapter(Class type) 。 它返回一個適配器到請求的類型,或者返回null 。
適應對象:
public class MinusImpl implements Minus, IAdaptable {public int minus(int x, int y) {return x - y;}public Object getAdapter(Class type) {if (Plus.class.equals(type))return new MinusToPlusAdapter(this);return null;}} getAdapter方法可能會也可能不會調用全局適配器管理器來創建適配器。 一些Eclipse對象將其稱為,有些則沒有。
自適應對象易于使用和調試。 該模式有助于保持類和接口層次結構的整潔。 它還提供了轉換類型和所需類型之間的一些解耦。
在以下情況下使用它:
- 轉換類型已經實現了太多接口。
- 轉換后的類型必須與兩個不同的功能兼容,并且每個功能都需要它擴展另一個類。
- 您希望將轉換后的類型和所需的接口/類分開。
- 適配器需要訪問方法的私有字段。
僅依賴于此模式版本的插件是不可擴展的。 第三方插件將無法向其中添加新的適配器。
此模式的第二個版本使用獨立的工廠來創建適配器。
我們將展示如何在eclipse框架內調用適配器工廠。 該子章節的其余部分列出了此適配器樣式風格的優點和缺點。
適配器由適配器工廠創建。 為了實現它們的獨立性,適配器工廠被隱藏在全局適配器管理器的后面。 客戶端代碼從不直接與適配器工廠通信。
適配器管理器公開一個getAdapter(Object obj, Class type)方法,該方法將調用委派給已安裝的適配器工廠。 此方法返回適配器或null 。
使用適配器管理器創建適配器:
(Plus) Platform.getAdapterManager().getAdapter(minus, Plus.class);適配器工廠可以通過編程方式或在plugin.xml中注冊到適配器管理器中。 由于我們的插件不需要執行此操作,因此我們將忽略該信息。 閱讀eclipse corner文章或Eclipse Adapters教程以獲取更多信息。
注意:不允許適配器工廠調用已轉換對象的getAdapter(Class type)方法。 這將導致無限循環,因為getAdapter對象的getAdapter方法可能會調用適配器管理器。
適配器工廠導致高度的去耦和可擴展性。 原始對象和所需類型的分離是絕對的。 它們之間沒有依賴性。 而是,獨立的適配器工廠取決于這兩者。
向適配器管理器詢問適配器可以使您的功能擴展。 任何人都可以貢獻適配器以將其對象與您的插件集成。
使用它來:
- 使您的插件可由第三方插件編寫者擴展,
- 集成兩個插件。
去耦具有更高的復雜性。 如果出現問題,可能很難找出故障適配器的來源。 同樣,找出可用的適配器比使用此模式的“可適配對象”版本要花費更多的時間。
如果您希望其他人擴展您的插件,請說明需要哪些適配器。 還記錄您要添加到系統中的適配器工廠。 尋找xml文件中的所有信息可能非常耗時。
使對象適應所需接口的最正確方法不假設對象使用的適配器模式版本。
請遵循三個步驟以使對象適應所需的接口或類:
- 如果對象實現或擴展了所需的接口,請使用該對象。
- 如果對象可以適應自身,請使用對象提供的適配器。
- 使用全局適配器管理器來適配對象。
使對象適應類型的完整實現:
public static Object getAdapter(Object obj, Class type) {// if the object implements or extends the desired interface, use itif (type.isInstance(obj))return obj;// if the object is able to adapt itself, let it do itif (obj instanceof IAdaptable) {IAdaptable adaptable = (IAdaptable) obj;Object adapter = adaptable.getAdapter(type);if (adapter != null)return adapter;}// delegate to the global adapter managerreturn Platform.getAdapterManager().getAdapter(obj, type);
}Eclipse框架使用兩個不同的層次結構來表示Java源代碼。 第一個稱為Java模型,第二個稱為抽象語法樹。 這些層次結構大多數是獨立的,具有不同的用途和用法。
Java模型層次結構是輕量級的,容錯的,快速重建的,并且其功能受到限制。 抽象語法樹提供了對Java源代碼的完全控制,但是重新創建的速度慢得多。 由于這些原因,Eclipse框架盡可能使用Java模型層次結構。 僅在必要時才使用抽象語法樹。
第一個子章節顯示了如何在插件中啟用這些層次結構。 第二個子章節包含Java模型的概述,最后一個包含抽象語法樹的概述。
這兩個層次結構都屬于org.eclipse.jdt.core插件。 如果要使用它們,我們必須將jdt core插件添加到插件依賴項中:
- 打開plugin.xml并轉到“依賴關系”標簽。
- 單擊“必需的插件”部分中的“添加”按鈕。
- 選擇
org.eclipse.jdt.core插件。
Eclipse將自動將插件依賴項添加到MANIFEST.MF文件的Require-Bundle部分。
Java模型是一組表示Java方法,類,接口和其他元素的接口。 它是輕量級的,容錯的并且可以快速重新創建。
Java模型層次結構提供有關Java代碼結構的基本信息。 它也可以對其進行簡單的更改。 例如,可以使用它來重命名或添加新的方法,類或接口。
Java模型層次結構的主要缺點是它不包含有關基礎源代碼的完整信息。 例如,它不包含方法主體。 結果,不可能執行更復雜的源代碼更改。
Java模型層次結構的根是IJavaElement接口。 擴展它的所有接口都屬于此層次結構。
抽象語法樹是代表Java方法,類,接口和其他元素的一組類。 它提供了有關Java代碼結構的完整信息,并且能夠對其進行任何更改。
抽象語法樹層次結構的主要缺點是重新創建的速度比Java模型慢。 它的容錯能力也較差。
抽象語法層次結構的根是ASTNode類。 擴展它的所有類都屬于此層次結構。
本章包含Eclipse用戶界面的快速概述。 在本文后面的內容中,我們將僅解釋UI那些部分的絕對基礎。
第一個子章節是有關Eclipse UI最突出的部分:視圖和編輯器。 第二小節介紹選擇服務。
Eclipse用戶界面的兩個最重要的可視組件是視圖和編輯器。 編輯器和視圖都可以顯示任何內容并以任何形式呈現。 兩者都可以是可編輯的或只讀的,但是只有編輯器才能將內容保持在未保存的臟狀態。
編輯器和視圖都稱為部分。 Eclipse文檔使用單詞part作為“編輯器或視圖”的快捷方式。
每個部分必須具有唯一的ID。 從技術上講,id是任意字符串。 但是,所有官方插件都遵循的約定是在ID前面加上插件名稱。 由于插件名稱通常等于插件根軟件包的名稱,因此約定可以保證ID的唯一性。
每個部分都必須實現IWorkbenchPart接口。 該接口被擴展了兩次,分別是IWorkbenchPart2和IWorkbenchPart3接口。 您可以直接實現它們,也可以擴展名為WorkbenchPart的默認實現。
所有零件均適用 。 IWorkbenchPart接口擴展了IAdaptable接口。 默認實現將getAdapter方法委托給全局適配器管理器。
編輯器通常用于編輯或瀏覽文檔或輸入對象。 在編輯器中所做的更改不會立即存儲。 內容已更改的編輯器處于臟狀態,直到調用保存操作。 如果關閉編輯器而不保存,則所有未保存的更改都將丟失。 它的默認實現稱為EditorPart 。
所有編輯器都顯示在頁面的同一區域中,無法最小化。 可能有多個相同類型的編輯器實例。
編輯器工具欄與全局工具欄一起顯示,其菜單似乎是主菜單的一部分。
使用IEditorInput接口的實例來標識由編輯器編輯的文檔或輸入對象。
視圖通常用于導航信息層次結構,打開編輯器或顯示在活動編輯器中打開的事物的其他信息。 在視圖中所做的修改將立即保存。 它的默認實現稱為ViewPart 。
視圖可以移動到頁面的任何部分,并且可以最小化。 每個工作臺頁面通常只有一個給定視圖的實例。
每個視圖都有其自己的本地工具欄和菜單。 還允許他們將按鈕貢獻給全局工具欄,并將菜單項貢獻給主菜單。
Eclipse選擇系統是相當標準的。 每個視圖和編輯器都會生成自己的選擇。 該框架還有一個全局選擇。 它通常包含對活動部分的選擇。
如果插件需要知道選定的對象,無論它們來自何處,都必須使用全局選擇。 如果該插件僅希望將自己與少量視圖和編輯器集成在一起,則它可能僅聽取他們的選擇。
本章介紹選擇后如何解釋。 Eclipse角落的文章描述了如何獲取當前選擇。
當前選擇始終實現ISelection接口。 該界面極其簡約。 它的唯一方法是能夠判斷選擇是否為空。
要獲取更多詳細信息,您必須將其轉換為其子類型之一。 我們的插件有兩個有趣的子類型:
-
ITextSelection–有關所選文本的信息。 如果未選擇任何文本,則包含光標位置。 -
IStructuredSelection–包含選定對象的列表。
結構化選擇可以包含任何類型的對象。 將它們轉換為所需的類或接口的最佳方法是使用適配器模式 。 簡單的instanceof和cast可能還不夠。 蝕食的物體通常可以適應多種類型,但是它們僅實現或擴展了其中的一些類型。
Eclipse菜單系統異常豐富且復雜。 至少有五種菜單類型。 外觀相同或相似的菜單可以通過多種方式調用。 為了使其更加有趣,Eclipse具有兩個不同的框架,它們能夠將新項目添加到所有這些菜單中。
每個Eclipse菜單框架都有其自己的章節,而這兩個章節都緊隨其后。 本章僅包含各種菜單類型的概述,插件添加菜單項的菜單概述以及這兩個菜單框架的概述。
Eclipse有五種菜單類型:
- 上下文菜單–鼠標右鍵單擊調用的菜單。 有時也稱為彈出菜單。
- 主菜單–菜單始終在GUI頂部可見。
- 主工具欄–主菜單下始終可見的工具欄。
- 視圖菜單–視圖中可用的菜單。 單擊視圖中的白色向下箭頭以調用它。
- 視圖工具欄–大多數視圖中都提供一個小工具欄。
與視圖不同,編輯器沒有自己的菜單或工具欄。 它們始終有助于主菜單或主工具欄。
“源”菜單包含諸如“組織導入”或“生成委托方法...”之類的項目,對于我們的兩個功能而言,這是合乎邏輯的地方。 它是由Java開發工具插件(JDT)貢獻的。
該菜單位于主菜單或上下文菜單中。 這兩個位置僅在某些情況下顯示它。
僅當活動視圖或編輯器支持時,主菜單才包含源菜單項。 以下列表包含導致源菜單出現的視圖和編輯器示例。 激活其中任何一個以在主菜單中查看它:
- Java編輯器
- 輸入層次結構視圖,
- 包瀏覽器視圖,
- 項目資源管理器視圖。
如果至少一個選定的項目代表Java文件,類,包方法或其他Java項目,則上下文菜單包含源菜單項目。 當然,這包括Java源代碼編輯器中的文本選擇。 使用源子菜單激活上下文菜單:
- 在編輯器中打開Java源文件,然后在內部右鍵單擊,
- 在包資源管理器中選擇Java文件或類,然后單擊鼠標右鍵。
也可以使用快捷方式“ Alt + Shift + S”來調用源菜單。
Eclipse有兩個不同的框架,它們可以將新項目添加到菜單中:
- 行動框架,
- 命令框架。
操作框架較舊且已過時。 命令框架是更新,靈活的,并且有點復雜。 它是優越的,應該用于任何新功能。
該命令框架與大多數菜單兼容,但并非與所有菜單兼容。 某些菜單尚未被重寫,因此您必須使用動作框架為其做出貢獻。 例如,主菜單中的源子菜單僅與動作框架兼容。
某些菜單與兩個框架都不兼容。 快捷鍵CTRLS + ALT + S調用的源菜單就是這樣的菜單。 無法為此做出貢獻。
注意:不可能對菜單有所貢獻。
命令框架能夠將項目添加到大多數Eclipse菜單中。 它被設計為迷你模型視圖控制器,并將UI與要執行的動作分開。
本章包含命令框架的基礎知識。 我們將解釋命令框架組件,并使用它們將新項目添加到源菜單中。 然后,我們將展示如何啟用和禁用菜單項。 僅當新菜單項在當前選擇中有用時,才會啟用它們。
菜單中的新增內容稱為菜單內容。 每個菜單項都需要知道在哪里繪制新項目,繪制哪些項目以及當有人單擊它們時會發生什么。
大多數Eclipse菜單都分配了唯一的ID。 如果要為菜單添加內容,則必須找到該ID,從中組成所謂的位置URI,然后將其分配給菜單添加內容。
除其他事項外,每個菜單項都可以在菜單中添加分隔符和命令 。 分隔符是不同菜單部分之間的灰色線。 放置在菜單中的命令表示可單擊的菜單項。 每個都有一個標簽,可能有一個圖標,并且可以啟用或禁用。
但是,該命令無法執行操作。 僅僅是將GUI與實際操作分開的抽象事物。 實際工作是在命令處理程序中完成的。
菜單ID是分配給菜單或子菜單的任意字符串。 每個菜單可以具有多個ID。 查找Eclipse菜單的菜單ID會非常令人沮喪和困難。
如果幸運的話,該ID將與Eclipse RCP中提供的Plugin Spy一起顯示。 它能夠顯示有關菜單項,UI元素和正在運行的Eclipse插件的信息。 如果您不走運,則必須自己找到ID。
如果您希望將一項添加到菜單或工具欄的頂層,那么事情就容易了。
常規應用程序菜單列表:
- Eclipse主菜單使用
org.eclipse.ui.main.menu。 ID僅指菜單的頂層,例如,該項目將與“文件”,“編輯”和“幫助”一起放置。 - Eclipse工具欄使用
org.eclipse.ui.main.toolbar。 - 上下文菜單使用
org.eclipse.ui.popup.anyid。
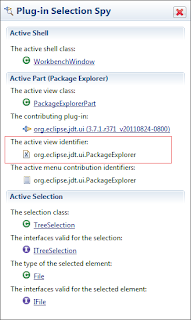
如果您希望對某些視圖內的菜單或工具欄有所幫助,請使用視圖ID。 幸運的是,插件間諜可以幫助您找到視圖ID。 在RCP Eclipse中打開視圖,然后按“ Alt + Shift + F1”。 Plugin Spy將打開一個包含視圖信息的彈出窗口:
查找子菜單的ID可能會更加復雜,因為Plugin Spy可能無法找到它。
使用“ Alt + Shift + F2”快捷方式啟動您要貢獻的插件間諜并打開菜單。 單擊任何菜單項,Plugin Spy將顯示有關它的各種信息。
使用插件間諜獲取源菜單位置URI:
- 在開發Eclipse中打開任何Java文件,
- 按“ Alt + Shift + F2”,
- 在Java文件中右鍵單擊
- 將鼠標懸停在“源”菜單項上,
- 點擊“清理...”項。
Eclipse將顯示以下彈出窗口:
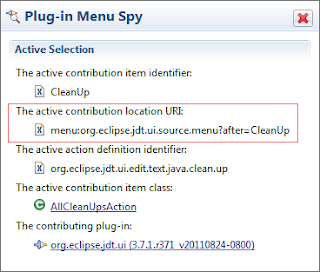
如果彈出窗口包含位置URI,那么我們快到了。 復制并將其粘貼到某處。 警告:“插件間諜”彈出窗口在復制文本之前和之后都會添加新行,因此看起來好像沒有任何內容被復制。
之間的部分:和? 是菜單ID。 例如,如果插件間諜顯示
menu:org.eclipse.jdt.ui.source.menu?after=CleanUp
menu:org.eclipse.jdt.ui.source.menu?after=CleanUp
org.eclipse.jdt.ui.source.menu如果Plugin Spy沒有顯示位置URI,則表明菜單項或菜單本身尚未重寫到命令框架中。 這是舊菜單項的Plugin Spy彈出窗口的樣子:

最好的選擇是在Google周圍搜索并查看有助于該菜單的插件的plugin.xml。 可能有人遇到相同的問題并設法解決了。
您可以從jdg2e上可用的舊菜單列表開始,但仍然不錯。 如果菜單已經存在于Eclipse 3.0中,則會在其中列出其菜單ID。 該表中沒有源菜單。
但是,其父菜單的ID是#CompilationUnitEditorContext ,例如,如果您右鍵單擊任何java文件都可用的菜單。 這將是可以接受的二等獎。
盡管使用命令框架對頂層菜單的貢獻很容易,但是未知的菜單ID使得對各種子菜單的貢獻變得困難甚至不可能。 如果找不到運氣,則必須使用舊的action框架 。
位置URI字符串包含三部分:方案,菜單ID和位置修飾符:
<scheme>:<menu-id>[?<placement-modifier>]Eclipse有三種方案:
-
menu–主應用程序菜單或視圖菜單, -
toolbar–主應用程序工具欄或視圖工具欄, -
popup–上下文菜單,例如,右鍵單擊所調用的任何菜單。
位置修飾符是可選的。 它具有<placement>=<id> 。 放置部分在after或before 。 ID是分隔符名稱,菜單ID或項目ID。 請注意,如果菜單不包含指定的ID,它將忽略您的貢獻。
按照約定,每個菜單都應聲明一個ID為'additions'的特殊項目。 在這里,菜單作者應該放置項目。 您不必尊重他們的意愿,某些菜單沒有此類項目。 即使特殊添加項在菜單中,您也可以將項目放置在任意位置。
幾個例子:
-
menu:org.eclipse.ui.main.menu?after=file–將項目添加到主菜單中的File和Edit子菜單之間。 -
toolbar:org.eclipse.ui.main.toolbar–將項目添加到主工具欄。 -
menu:org.eclipse.ui.navigator.ProjectExplorer–將項目添加到項目瀏覽器視圖中可用的菜單。 -
toolbar:org.eclipse.ui.navigator.ProjectExplorer–將項目添加到項目瀏覽器視圖中可用的工具欄。 -
popup:org.eclipse.ui.popup.any–將項目添加到上下文菜單。
將該項目放到源菜單中,而不用擔心確切的位置:
popup:org.eclipse.jdt.ui.source.menu注意:我們在位置URI中省略了可選的確切位置,因為它可能很棘手。 如果您還希望指定確切的位置,則必須確保每次調用菜單時都存在選定的位置。 不幸的是,僅僅因為菜單項看起來相同,并不意味著它確實是同一菜單項。
例如,如果我們將?after=CleanUp添加到上一個位置的末尾,則我們的菜單項將位于在Java編輯器中右鍵單擊調用的sources子菜單中的“ Clean Up…”項之后。 但是,在包資源管理器視圖中右鍵單擊所調用的源子菜單中,它是不可見的。
命令是抽象的事物,代表一個動作并具有唯一的ID。 可以將其放置在菜單中,并且可以為其分配快捷方式。
命令在plugin.xml文件中配置。 打開它并轉到擴展選項卡。 使用名為“所有擴展名”的左側部分:
- 單擊“添加”,然后選擇
org.eclipse.ui.commands擴展點。 - 右鍵單擊新的擴展點,然后選擇“新建”->“命令”。
- 填寫ID。 約定是將插件名稱用作命令ID的前綴。
- 填寫姓名。
我們創建了兩個命令。 一個名為“ Generate Custom toString”,另一個名為“ Check Non-Null Parameter”。 他們的ID是:
-
org.meri.eclipse.defensiveapitools.generatetostring -
org.meri.eclipse.defensiveapitools.checknonnullparameter
Eclipse自動生成相應的xml并將其放置到plugin.xml文件中。 轉到plugin.xml選項卡進行查看:
<extension point="org.eclipse.ui.commands"><commandid="org.meri.eclipse.defensiveapitools.generatetostring"name="Generate Custom toString"></command><commandid="org.meri.eclipse.defensiveapitools.checknonnullparameter"name="Check Non-Null Parameter"></command>
</extension>菜單貢獻是菜單的補充。 它知道在何處繪制自身,并包含應繪制的項目列表。 放置在菜單項中的所有項目將按照其在該列表中的位置所定義的順序一起顯示。
我們將配置一個新的菜單內容,并在其中添加兩個菜單項和兩個分隔符。 向其添加其他元素類型是類推。
菜單項在plugin.xml文件中配置。 打開它并轉到擴展選項卡。 使用名為“所有擴展名”的左側部分:
- 單擊“添加”,然后選擇
org.eclipse.ui.menus擴展點。 - 右鍵單擊新的擴展點,然后選擇“新建”->“菜單貢獻”。
- 填寫locationURI 。
- 將allPopups設置為
true。
Recall, that the source context menu location uri is:
-
popup:org.eclipse.jdt.ui.source.menu
Add commands to the menu contribution:
- Right click on the menu contribution and choose 'New' -> 'command'.
- Click Browse and find previously created command.
- Fill in label.
Eclipse automatically generates corresponding xml and places it to the plugin.xml file. Go to the plugin.xml tab to see it:
<extensionpoint="org.eclipse.ui.menus"><menuContributionallPopups="true"locationURI="popup:org.eclipse.jdt.ui.source.menu"><commandcommandId="org.meri.eclipse.defensiveapitools.generatetostring"label="Generate Custom toString"style="push"></command><commandcommandId="org.meri.eclipse.defensiveapitools.checknonnullparameter"label="Check Non-Null Parameter"style="push"></command></menuContribution>
</extension>
Test the menu. Run or debug the plugin and open any java file in the test Eclipse. Right click and choose the Source sub-menu. The menu contains two new items. As our commands have no handlers assigned, both items are disabled.
Add separator to the menu contribution:
- Right click on the menu contribution and choose 'New' -> 'separator'.
- Set visible to
true. - Fill in name.
The order of elements in the menu contribution defines the order of corresponding items in the menu. Drag and drop new separator to the place where you would like to see it.
Eclipse automatically generates corresponding xml and places it to the plugin.xml file. Go to the plugin.xml tab to see it:
<menuContributionallPopups="true"locationURI="popup:org.eclipse.jdt.ui.source.menu"><separatorname="org.meri.eclipse.defensiveapitools.begin"visible="true"></separator>... commands ...<separatorname="org.meri.eclipse.defensiveapitools.end"visible="true"></separator>
</menuContribution>
Test the menu again. Run or debug the plugin and open any java file in the test Eclipse. Right click and choose the Source sub-menu. Our menu items are surrounded by menu separators.
The command handler is the class that executes an action whenever users clicks on the menu item. Once we assign it to the command, the menu item created in previous chapter will be enabled.
This section is divided into three part. First two sections show how to create and configure a dummy handler. Third section explains where the handler can get the information about currently selected items, active editor and other UI state.
A command handler must implement the IHandler2 interface. The easiest way to implement it is to extend the abstract AbstractHandler class. This class provides standard implementation of all necessary methods except the execute method.
The execute method is called whenever user invoked the command. It has one parameter which contains information about the current state of the application. The execute method must return null .
Our first command handler is very simple:
public class GenerateToStringHandler extends AbstractHandler {@Overridepublic Object execute(ExecutionEvent event) throws ExecutionException {System.out.println("GenerateToStringHandler");// must return nullreturn null;}}The only thing we have to configure is which commands should be handled by our handler.
Note: It is also possible to assign multiple handlers to one command, but we will not do it. It is an advanced topic discussed in additional resources .
As usually, command handlers are configured in plugin.xml file. Open it and go to extensions tab. Use the left part named 'All Extensions':
- Click 'Add' and choose
org.eclipse.ui.handlersextension point. - Right click on the new extension point and choose 'New' -> 'handler'.
- Browse for the command id.
- Browse for the class implementing the command handler.
Eclipse automatically generates corresponding xml and places it to the plugin.xml file. Go to the plugin.xml tab to see it:
<extensionpoint="org.eclipse.ui.handlers"><handlerclass="org.meri.eclipse.defensiveapitools.generatetostring.GenerateToStringHandler"commandId="org.meri.eclipse.defensiveapitools.generatetostring"></handler><handlerclass="org.meri.eclipse.defensiveapitools.checknonnullparameter.CheckNonNullParameterHandler"commandId="org.meri.eclipse.defensiveapitools.checknonnullparameter"></handler>
</extension>
Run or debug the plugin and open any java file in the test Eclipse. Right click and choose the Source sub-menu. The 'Generate Custom toString' menu item is enabled. If you click on it, the command handler will print 'GenerateToStringHandler' into console in RCP Eclipse.
As we are going to invoke our feature from two different places, our command handler will delegate all real functionality to yet another class.
That another class will need some information about the context surrounding the command. Namely, 'Generate Custom toString' needs to know which class was selected and 'Check Non-Null Parameters' needs to know which method was selected.
Note: Eclipse generates mini-selection every time you place the cursor somewhere. You do not have to highlight the text inside editor.
The execute method obtains an instance of ExecutionEvent as a parameter. The execution event has reference to application context which contains various information about the state of the eclipse.
Use the HandlerUtil to get that information out of the execution event. Handler util is a static class and has a lot of getWHATEVER methods. We will need four of them:
-
getCurrentSelection– returns current selection, -
getActivePartId– returns id of active view or editor, -
getActiveEditorInput– returns object edited by the opened editor, -
getActiveShell– returned object will be needed for our plugin dialog.
private static final String JAVA_EDITOR_ID =
"org.eclipse.jdt.ui.CompilationUnitEditor";public Object execute(ExecutionEvent event) throws ExecutionException {//this object is needed to render wizards, messages and so on Shell activeShell = HandlerUtil.getActiveShell(event);//get selected items or text ISelection currentSelection = HandlerUtil.getCurrentSelection(event);//identify active GUI partString activePartId = HandlerUtil.getActivePartId(event);if (JAVA_EDITOR_ID.equals(activePartId)) {//get edited fileIEditorInput input = HandlerUtil.getActiveEditorInput(event);//currentSelection contains text selection inside input file//... locate class selected in that file ...} else {//currentSelection contains all selected classes //... collect all selected classes ...}return null;
}
Enabling, Disabling and Visibility
The menu item does not have to be visible and enabled all the time. Most commands are not universally usable.
Both our features are going to be visible all the time. However, we will have them enabled only under some conditions. 'Check Non-Null Parameters' will be enabled:
- inside java editor,
- if the current selection contains only modifiable java methods.
'Generate Custom toString' will be enabled:
- inside java editor,
- if the current selection contains only modifiable java classes or source files.
First, shortest section shows where to configure visibility and enablement. Next one describes xml language used to define visibility and enable conditions. Third section uses that language to test active editor and fourth tests selected objects. Final two sections put everything together and show conditions needed for our plugin.
If you want to make the menu item invisible, use the visibleWhen tag on a command reference inside a menu contribution. If you want to make the item disabled, use the enabledWhen tag on the command handler. Both tags works exactly the same way.
Open plugin.xml in an editor and go to the extensions tab. Right click either on the reference inside a menu contribution or command handler and choose either visibleWhen or enabledWhen .
If you right click on visibleWhen or enabledWhen tag, Eclipse will show a list of possible sub-tags. All those tags are part of xml boolean expression language and we will use them to define a condition. If the condition is satisfied, the menu item will be visible or enabled. If the condition is not satisfied, the menu item is either disabled or invisible.
One warning: not each tag shown on the list is directly usable. In this case, Eclipse simply shows all tags that defines a condition.
Usage of all listed tags is described on Eclipse help page . We will explain only five tags needed for our conditions:
-
or– logical or, -
with– specify the object under condition, -
iterate– iterator over a collection, -
equals– compares object under condition with a value, -
adapt– adapts object under condition to the specified one.
Or
The element or does logical or. Its child tags must represent conditions. If at least one of them returns true, the result is true.
With
The element with specifies the object under condition. This tag can access various variables that describe Eclipse state. Each variable has a name. All childs of the with tag will test their condition against the value of the specified variable.
This tag has one mandatory property variable . Use it to specify the variable name. We will use two variables:
- activeMenuSelection – collection of all objects selected by the user,
- activePartId – the id of currently active GUI part (view, editor, preference page …).
As any plugin can add its own variable, the complete list of all variables is impossible to find. The list of default variables is available on Eclipse wiki page .
Iterate
The element iterate is usable only inside the with tag and only if this tag specified a collection as the object under the test. Its child tags must represent conditions. Iterate iterates through all objects inside the collection and runs all child conditions on those objects.
The iterate tag has two arguments: operator and ifempty . The first argument value can be either and or or . Selected operator will be applied to evaluated conditions results. If no operator is specified, the iterator uses and .
The ifempty can be either true or false . This value will be returned if the collection under test is empty. If not specified then true is returned when the operator equals and and false is return if the operator equals or .
Equals
The element equals compares the object under test with its value argument. As the object under test may not be a string, the value argument is converted into the object. The exact conversion algorithm is described in Eclipse manual .
Adapt
The element adapt adapts the object under test to the interface or class specified in its type argument. It may have child tags that may process it further, but we will use it solely to check whether the object under test is adaptable to the desired interface.
If the menu was invoked from java editor, then id of the active part is the same as id of java editor. Therefore, we have to get java editor id and compare it to the value of activePartId expression variable.
To get the id, open any java file in RCP eclipse and press ALT + SHIFT + F1. Plugin Spy will show popup with various information about active GUI part. According to this popup, the java editor id is org.eclipse.jdt.ui.CompilationUnitEditor .
Combine the with and equals tags to compare the id:
<with variable="activePartId"><equals value="org.eclipse.jdt.ui.CompilationUnitEditor" />
</with>Current selection can contain multiple items and all of them should represent something we can work with. The adapter pattern and java model hierarchy have been designed exactly for these kind of situation.
Three interfaces from java model hierarchy are relevant to our features:
-
org.eclipse.jdt.core.IMethod– represents java methods, -
org.eclipse.jdt.core.IType– represents java classes and interfaces, -
org.eclipse.jdt.core.ICompilationUnit– represents java source file.
Therefore, we will iterate over the activeMenuSelection variable and check whether each selected object is adaptable to one of needed types. If no item is selected, the condition should return false .
A method is selected if it is possible to adapt all selected objects into the IMethod interface:
<with variable="activeMenuSelection"><iterate ifEmpty="false" operator="and"><adapt type="org.eclipse.jdt.core.IMethod" /></iterate>
</with>
A java source file or a class is selected if it is possible to adapt all selected objects into either ICompilationUnit or IType interface:
<with variable="activeMenuSelection"><iterate ifEmpty="false" operator="and"><or><adapt type="org.eclipse.jdt.core.IType" /><adapt type="org.eclipse.jdt.core.ICompilationUnit" /></or></iterate>
</with>
Note 1: Unfortunately, the xml expression language is not expressive enough to distinguish between classes and interfaces. An instance of IType interface represents class if its isClass method returns true , but xml language does not support method calls.
Note 2: We are cheating little bit here. It is not possible to modify compiled java methods and classes inside jar packages, but they are adaptable to java model interfaces too. Those objects are modifiable only if the method getCompilationUnit does not return null . As with the previous note, this is not possible to check from the xml expression language. Fortunately, we are contributing to the source sub-menu which is available only on modifiable java elements, so we do not have to solve this problem.
Note 3: In both cases, the correct solution would be to create own with variable and handle both problems in java. This is possible and easy, but out of scope of this article. If you wish to know how to do it, read the post on Lars Vogel blog.
Check Non-Null Parameters Enablement
To reiterate, the menu item 'Check Non-Null Parameters' will be enabled:
- inside java editor,
- if the current selection contains only modifiable java methods.
Use or to combine conditions created in previous chapters. This is the final condition:
<enabledWhen><or><with variable="activePartId"><equals value="org.eclipse.jdt.ui.CompilationUnitEditor" /></with><with variable="activeMenuSelection"><iterate ifEmpty="false" operator="and"><adapt type="org.eclipse.jdt.core.IMethod" /></iterate></with></or>
</enabledWhen>
Generate Custom toString Enablement
Recall, that the menu item 'Generate Custom toString' will be enabled:
- inside java editor,
- whenever java class is selected,
- whenever java file is selected.
Use or to combine conditions created in previous chapters. This is the final condition:
<enabledWhen><or><with variable="activePartId"><equals value="org.eclipse.jdt.ui.CompilationUnitEditor" /></with><with variable="activeMenuSelection"><iterate ifEmpty="false" operator="and"><or><adapt type="org.eclipse.jdt.core.IType" /><adapt type="org.eclipse.jdt.core.ICompilationUnit" /></or></iterate></with></or>
</enabledWhen>
Expression Language – Additional Resources
The complete explanation on how those conditions work is out of scope of this post. If you wish to read more, the basic and short article is on eclipse-tips blog and a detailed one is on Lars Vogel blog.
The detailed post explains also how to reuse conditions and how to create new with variable. It is definitely worth reading, especially if you plan to do something complicated.
Command Framework – Additional Resources
We simplified things a little in this chapter. The full functionality and possibilities of the command framework are out of scope of this article.
If you wish to know more, good tutorials are available on Lars Vogel blog or in IBM library .
Theoretically speaking, the actions framework is old and has been deprecated. The newer commands framework should be used for most purposes. Unfortunately, not all menus have been rewritten yet.
If the menu you are interested in has not been rewritten yet, you have to use the old actions framework to contribute to it.
As most menus are already compatible with the new command framework, we will show only the part of actions framework that is able to contribute to the source sub-menu in main menu. If you wish to read more about the actions framework, the last sub-chapter links to more detailed articles.
Two most important elements in the actions framework are action and action delegate. An action is assigned to menu items and knows the menu where it should be drawn. Action delegate is a class that does all the work whenever a menu item is invoked.
Each action delegate can be assigned to any number of actions. However, each action can have only one action delegate.
Items and menus definitions are kept either inside an action set or inside something called a contribution. There is not much difference between them, both action set and contribution contain list of actions and sub-menus to be drawn within menu system.
Eclipse framework has three types of actions contributions and each is able to specify a simple condition that must be satisfied to have a visible action:
-
viewerContribution– an action is available only inside specified view, -
objectContribution– an action is available only if specified object type has been selected, -
editorContribution– an action is available only inside editor menu or toolbar.
Note: it is also possible to assign a condition to an action. Action conditions are powerful, but out of scope of this article.
Both contribution and action set are placed directly inside an extension point. Each menu type has its own extension point:
-
org.eclipse.ui.actionSets– main menu or main toolbar, -
org.eclipse.ui.popupMenus– context menu, -
org.eclipse.ui.viewActions– local menu or toolbar in a view, -
org.eclipse.ui.editorActions– local menu or toolbar in an editor (recall that the editors menu is shown inside the main menu/toolbar), -
org.eclipse.ui.perspectiveExtensions– we will ignore that.
So, we have to create action delegate class, identify the menu we want to contribute to and configure an action inside a action set.
Action delegate implementation depends on where you want to place the associated action. Menus supply the action delegate with additional information that depends on the menu type. Therefore, each menu type requires it to implement different interface.
Each action delegate must implement IActionDelegate interface. That interface was later extended with some lifecycle methods, so if you need to initialize your action delegate or know when it is disposed, implement also IActionDelegate2 interface.
Which method is invoked when a menu item is clicked depends on implemented interfaces. An action delegate that does NOT implement IActionDelegate2 interface must place all the work inside the run method. However, an action delegate that implements the IActionDelegate2 interface must place all the work inside the runWithEvent . In this case, the run method is never called.
Which sub-interfaces of IActionDelegate interface you should use depends on where do you want to place the action. Some parent menus send additional information about active parts and the action delegate must be able to acquire it.
List of eclipse menus and expected action delegate interfaces:
- main menu or toolbar –
IWorkbenchWindowActionDelegate, - view menu or toolbar –
IViewActionDelegate, - view context menu –
IViewActionDelegateorIObjectActionDelegate, - editor menu or toolbar –
IEditorActionDelegate, - editor context menu –
IObjectActionDelegate.
Parent menu uses the method selectionChanged to inform the action delegate about current selection changes. However, selection changes are sent to the action delegate only after it was invoked for the first time. All prior selection changes are ignored.
The selectionChanged method is called for the first time right before the first call of run or runWithEvent method.
We are ready to implement our action delegates. As it was with the command handler in command framework, our action delegate will only collect information about current editor and selected objects or text. The real work is delegated to yet another class.
As we want to put our action to the main menu, we have to implement the IWorkbenchWindowActionDelegate interface. Main menu sends changes of current selection it to its action delegates, so all we have to do is to store it:
private ISelection selection;public void selectionChanged(IAction action, ISelection selection) {this.selection = selection;
}
Getting current editor is little bit more complicated. Main menu does not inform its items about active UI parts. However, it sends them an instance of IWorkbenchWindow upon initialization. Fortunately, the workbench window object is aware of almost everything that is going on in the eclipse.
The explanation of the workbench window object would take too much space and it is not that important. The important is, that it provides access to all kind of information about eclipse user interface.
Use workbench window to get active editor and its id:
private IWorkbenchWindow window;public void init(IWorkbenchWindow window) {this.window = window;
}private String getActivePartId() {return window.getPartService().getActivePartReference().getId();
}private IEditorPart getActiveEditor() {return window.getActivePage().getActiveEditor();
}
Finally, we are ready to implement the run method:
public class GenerateToStringActionDelegate implements IWorkbenchWindowActionDelegate {private static final String JAVA_EDITOR_ID =
"org.eclipse.jdt.ui.CompilationUnitEditor";public void run(IAction action) {//this object is needed to render wizards, messages and so on Shell activeShell = window.getShell();//get selected items or text ISelection currentSelection = selection;//identify active GUI partString activePartId = getActivePartId();//java editor must be handled differently than view selection if (JAVA_EDITOR_ID.equals(activePartId)) {//get edited fileIEditorInput input = getActiveEditor().getEditorInput();//currentSelection now contains text selection inside input file//... locate class selected in that file ...} else {//currentSelection now contains all classes inside //... collect all selected classes ...}System.out.println("GenerateToStringActionDelegate");}}Before you configure the action, you have to find the menu or toolbar path. It identifies a menu or toolbar where your action will be shown.
Each menu or sub-menu has its name and menu or toolbar path navigates those names. It starts with the top level menu name and continues with all sub-menu names. The final part is optional and specifies a location in the final menu. If it is missing, the item is placed to the end of the specified menu.
For example, the menu path #menuName/subMenuName/additions should be read as “place the item in the end of the additions group which is located inside the sub-menu subMenuName of the #menuName menu”.
Or, the menu path #menuName/subMenuName/ should be read as “place the item in the end of the sub-menu subMenuName of the #menuName menu”.
Important: Menu ids are the same as described in the command framework chapter . The id of the source menu id is org.eclipse.jdt.ui.source.menu . As the main source menu is a top level menu, menubarPath is:
org.eclipse.jdt.ui.source.menu/Action configuration is quite simple. Add an extension point, put either action set or contribution into it and place the action.
Which one of five extension points should be used depends on the menu. We want to add an action to the main menu, so we have to use the action sets extension point.
Open plugin.xml file and go to extensions tab. Use the left part named 'All Extensions'. First, configure an action set:
- Click 'Add' and choose
org.eclipse.ui.actionSetsextension point. - Right click on the new extension point and choose 'New' -> 'actionSet'.
- Fill in the action set id. The convention is to use plugin name as its prefix. Important: This field has some strange limitations. We could not really figure them out, so all we can say is that:
org.meri.eclipse.defensiveapitools.mainmenucontribworks
In any case, if nothing shows up in the menu, try to change this id.
- Fill in label. 可以是任何東西。
- Set visible to
true.
Second, add actions to the action set:
- Right click on the action set and choose 'New' -> 'action'.
- Fill in the action id. The convention is to use plugin name as id prefix.
- Fill in label. 可以是任何東西。
- Fill in either menubarPath or toolbarPath.
- Scroll down and browse for the action delegate in class field.
Eclipse automatically generates corresponding xml and places it to the plugin.xml file. Go to the plugin.xml tab to see it:
<extensionpoint="org.eclipse.ui.actionSets"><actionSetid="org.meri.eclipse.defensiveapitools.sourcemenu"label="Defensive API Tools "visible="true"><actionclass="org.meri.eclipse.defensiveapitools.generatetostring.
GenerateToStringActionDelegate"id="org.meri.eclipse.defensiveapitools.generatecustomtostring"label="Generate Custom toString"menubarPath="org.eclipse.jdt.ui.source.menu/"style="push"></action><actionclass="org.meri.eclipse.defensiveapitools.checknonnullparameter.
CheckNonNullParameterActionDelegate"id="org.meri.eclipse.defensiveapitools.checknonnullparameters"label="Check Non-Null Parameters"menubarPath="org.eclipse.jdt.ui.source.menu/"style="push"></action></actionSet>
</extension>
Run or debug the plugin and open any java file in the test Eclipse. Click on the Source main menu item. The menu contains two new items. Click on the Generate Custom toString' menu item, the action delegate will print 'GenerateToStringActionDelegate' into console in RCP Eclipse.
Walkthrough of all types of actions contributions is available in an eclipse corner article . Easy to read FAQ article explains actions in the main menu.
Actions framework supports also complicated conditions and filters to show actions only under some circumstances. If you have a reason to use that, the best starting point is in eclipse documentation .
Everything directly related to chapters in this post was already linked. We will add only a link on a very good series with various eclipse development tips .
If you have a problem and can not find an answer, you can also ask questions on official freenode #eclipse IRC channel.
Although we added only some new items into the menu so far, almost everything needed to finish the plugin is already there. If you do not insist on having the generated code formatted, you should be able to finish the generate toString feature just by browsing through java model hierarchy API.
Next part of this tutorial will show how to finish both features, including the formatting of the generated code. It will also explain how to create and work with abstract syntax tree and how to create a dialog to communicate with user.
Reference: Writing Eclipse Plugins Tutorial – Part 1 from our JCG partner Maria Jurcovicova at the This is Stuff blog.
翻譯自: https://www.javacodegeeks.com/2012/05/writing-eclipse-plugins-tutorial-part-1.html


的兩個模式)


)


)