使用注解開發
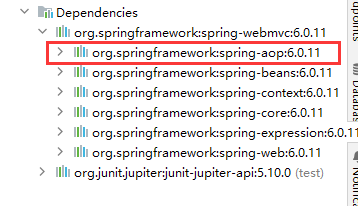
在Spring4之后,要使用注解開發,必須要保證AOP的包導入了
項目搭建:
-
在配置文件中導入約束,增加注解支持
<?xml version="1.0" encoding="UTF-8"?>
<beans xmlns="http://www.springframework.org/schema/beans"xmlns:xsi="http://www.w3.org/2001/XMLSchema-instance"xmlns:context="http://www.springframework.org/schema/context"xsi:schemaLocation="http://www.springframework.org/schema/beanshttps://www.springframework.org/schema/beans/spring-beans.xsdhttp://www.springframework.org/schema/contexthttps://www.springframework.org/schema/context/spring-context.xsd"><context:annotation-config/></beans>
<?xml version="1.0" encoding="UTF-8"?> <beans xmlns="http://www.springframework.org/schema/beans"xmlns:xsi="http://www.w3.org/2001/XMLSchema-instance"xmlns:context="http://www.springframework.org/schema/context"xsi:schemaLocation="http://www.springframework.org/schema/beanshttps://www.springframework.org/schema/beans/spring-beans.xsdhttp://www.springframework.org/schema/contexthttps://www.springframework.org/schema/context/spring-context.xsd"><!--指定要掃描的包,這個包下的注解就會生效--><context:component-scan base-package="xyz.luck1y.pojo"/><!--注解驅動的包,可以識別spring之外的注解,如前面說的@Resource等等--><context:annotation-config/></beans>
bean
-
實體類
@Component注解package xyz.luck1y.pojo;import org.springframework.stereotype.Component;// 等價于xml中的 <bean id="user" class="com.luck1y.pojo.User/> // @Component 意為組件,說明這個類已經被Spring管理啦,在xml中配置了組件掃描 @Component public class User {public String name = "劉子"; } -
xml配置
<?xml version="1.0" encoding="UTF-8"?> <beans xmlns="http://www.springframework.org/schema/beans"xmlns:xsi="http://www.w3.org/2001/XMLSchema-instance"xmlns:context="http://www.springframework.org/schema/context"xsi:schemaLocation="http://www.springframework.org/schema/beanshttps://www.springframework.org/schema/beans/spring-beans.xsdhttp://www.springframework.org/schema/contexthttps://www.springframework.org/schema/context/spring-context.xsd"><!--指定要掃描的包,這個包下的注解就會生效--><context:component-scan base-package="xyz.luck1y.pojo"/><!--注解驅動的包,可以識別spring之外的注解,如前面說的@Resource等等--><context:annotation-config/></beans> -
測試:
import org.springframework.context.support.ClassPathXmlApplicationContext;
import xyz.luck1y.pojo.User;public class MyTest {public static void main(String[] args) {ClassPathXmlApplicationContext context = new ClassPathXmlApplicationContext("applicationContext.xml");User user = context.getBean("user", User.class);System.out.println(user.name);}
}
屬性如何注入
package xyz.luck1y.pojo;import org.springframework.beans.factory.annotation.Value;
import org.springframework.stereotype.Component;// 等價于xml中的 <bean id="user" class="com.luck1y.pojo.User/>
// @Component 意為組件,說明這個類已經被Spring管理啦,在xml中配置了組件掃描
@Component
public class User {// 相當于<property name="name" value="劉子"/>// 如果是很復雜的配置,還是建議使用xml@Value("劉子")public String name;// 也可以寫在set方法上@Value("劉子")public void setName(String name) {this.name = name;}
}
衍生的注解
@Component有幾個衍生的注解,我們在web開發中,會按照MVC三層架構分層
-
dao層:
@Repository等價于pojo層的@Componentpackage xyz.luck1y.dao;import org.springframework.stereotype.Repository;@Repository public class UserDao { } -
service層:
@Service同樣等價于pojo層的@Componentpackage xyz.luck1y.service;import org.springframework.stereotype.Service;@Service public class UserService { } -
controller層:(也就是以前的servlet層)
@Controller還是等價于pojo層的@Componentpackage xyz.luck1y.controller;import org.springframework.stereotype.Controller;@Controller public class UserController { }
這樣寫的話,前面的xml配置文件中componment組件掃描范圍要擴大:
<context:component-scan base-package="xyz.luck1y"/>
這四個注解功能是一樣的,都是代表將某個類注冊到Spring容器中,裝配bean
作用域
// 單例
@Scope("singleton")
// 原型
@Scope("prototype")
小結
xml和注解:
- xml更加萬能,適用于任何場合!維護簡單方便
- 注解:不是自己的類用不了,無法引用別的類,維護相對復雜
最佳實踐:
- xml用來管理bean
- 注解用來完成屬性的注入
- 我們在使用的過程中需要注意必須要讓注解生效,即在配置文件中開啟注解支持
使用Java的方式配置Spring
完全不使用Spring的xml配置,全交給Java來做
JavaConfig是Spring的一個子項目,在Spring4之后,它成為了一個核心功能~
使用Java配置類來配置Spring
主配置類
package xyz.luck1y.config;import org.springframework.context.annotation.Bean;
import org.springframework.context.annotation.ComponentScan;
import org.springframework.context.annotation.Configuration;
import org.springframework.context.annotation.Import;
import xyz.luck1y.pojo.User;// 相當于掃描包
@ComponentScan("xyz.luck1y.pojo")
// 這個也會被Spring容器托管,注冊到容器中,因為它本來就是一個Component,它代表這是一個配置類,就是beans.xml
@Configuration
// 相當于xml中引入其他xml
@Import(MyConfig2.class)
public class MyConfig {// 注冊一個 bean 就相當于我們之前寫的<bean>標簽// id 標簽 就是這個方法的名字// class 標簽 就是這個方法的返回值類型@Beanpublic User getUser(){return new User();}
}
配置類2
package xyz.luck1y.config;import org.springframework.context.annotation.Configuration;@Configuration
public class MyConfig2 {
}
實體類:
package xyz.luck1y.pojo;import org.springframework.beans.factory.annotation.Value;
import org.springframework.stereotype.Component;@Component
public class User {@Value("劉子")public String name;public String getName() {return name;}public void setName(String name) {this.name = name;}@Overridepublic String toString() {return "User{" +"name='" + name + '\'' +'}';}
}
測試:
import org.springframework.context.annotation.AnnotationConfigApplicationContext;
import xyz.luck1y.config.MyConfig;
import xyz.luck1y.pojo.User;public class MyTest {public static void main(String[] args) {// 如果完全使用了配置類的方式去做,我們就只能通過AnnotationConfigApplicationContext 上下文來獲取容器,通過配置類.class獲取AnnotationConfigApplicationContext context = new AnnotationConfigApplicationContext(MyConfig.class);User user = context.getBean("user", User.class);System.out.println(user.getName());}
}
其實SpringBoot底層代碼都是用以上注解方式寫的,為什么說SpringBoot比Spring更強大呢,就是因為它在底層都固定寫好了這些注解,拿過來直接用就好了~
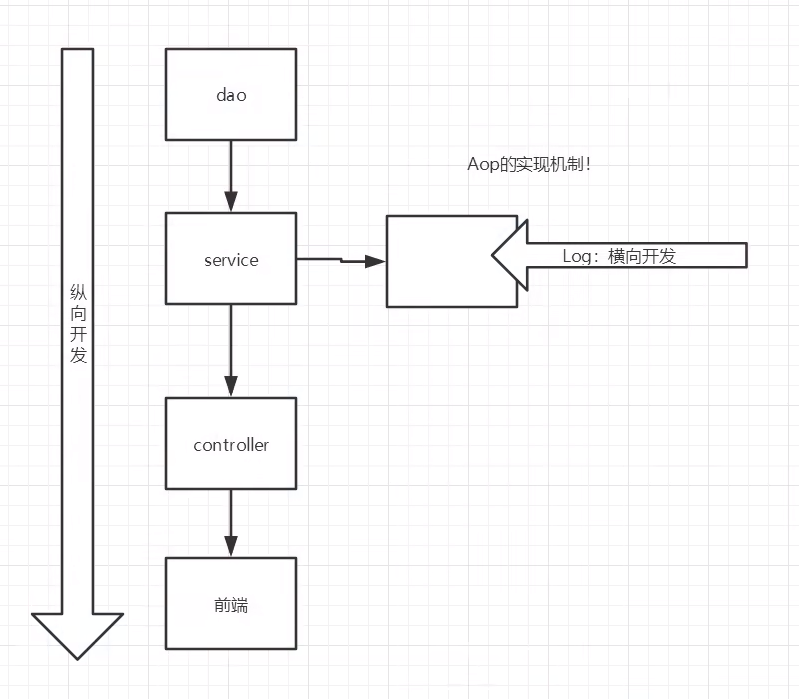
代理模式
多線程那塊提到過代理模式,這里再來學習一下代理模式
代理模式是SpringAOP的底層,SpringAOP和SpringMVC是面試重點
代理模式的分類:
- 靜態代理
- 動態代理
靜態代理
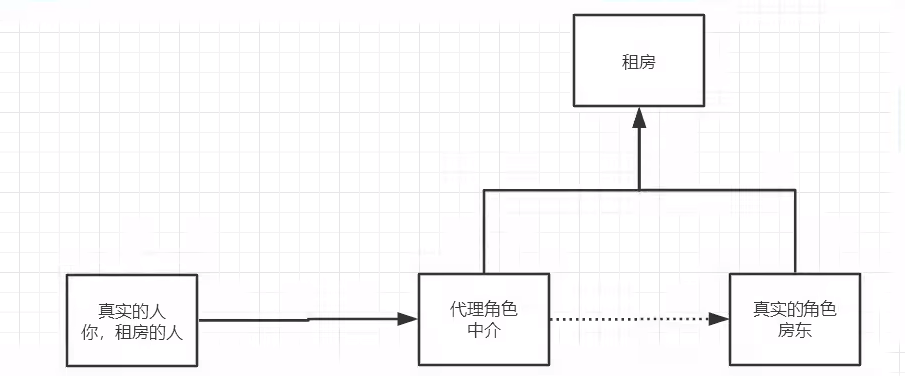
角色分析:
- 抽象角色:一般會使用接口或抽象類來解決
- 真實角色:被代理的角色
- 代理角色:代理真實角色,代理真實角色后,會做一系列的附屬操作
- 客戶:訪問代理對象的人
代理模式的好處:
- 可以使真實角色的操作更加純粹,不用去關注其他的公共業務
- 公共業務交給代理角色,實現了業務的分工(不需要給每一個房東都加相同的功能,這些相同的功能都提取到代理角色)
- 業務發生擴展的時候,方便集中管理
缺點:
- 一個真實角色就會產生一個代理角色,真實角色變多時,代碼量會翻倍,開發效率會變低
- 為了解決這個問題,便有了動態代理
測試:
-
租房接口
package xyz.luck1y;// 租房的接口 public interface Rent {public void rent(); } -
房東:真實角色
package xyz.luck1y;public class Host implements Rent {@Overridepublic void rent() {System.out.println("房東要出租房子");} } -
中介:代理角色
package xyz.luck1y;public class Proxy implements Rent {private Host host;public Proxy(){}public Proxy(Host host) {this.host = host;}@Overridepublic void rent() {seeHouse();host.rent();heTong();fee();}// 看房public void seeHouse(){System.out.println("中介帶你看房");}// 簽合同public void heTong(){System.out.println("簽署租賃合同");}// 收中介費public void fee(){System.out.println("收中介費");} } -
客戶我們:
package xyz.luck1y;public class Client {public static void main(String[] args) {// 房東要租房子Host host = new Host();// 代理,中介來幫房東租房子,但是中介一般有一些其他操作Proxy proxy = new Proxy(host);// 你不用面對房東,直接找中介租房就行proxy.rent();}
}
加深理解
-
接口:
package xyz.luck1y.Demo02;public interface UserService {public void add();public void delete();public void update();public void query(); } -
真實對象:
package xyz.luck1y.Demo02; // 真實對象 public class UserServiceImpl implements UserService {@Overridepublic void add() {System.out.println("增加了一個用戶");}@Overridepublic void delete() {System.out.println("刪除了一個用戶");}@Overridepublic void update() {System.out.println("修改了一個用戶");}@Overridepublic void query() {System.out.println("查詢了一個用戶");} } -
代理對象:
package xyz.luck1y.Demo02;public class UserServiceProxy implements UserService {private UserServiceImpl userService;public void setUserService(UserServiceImpl userService) {this.userService = userService;}@Overridepublic void add() {log("add");userService.add();}@Overridepublic void delete() {log("delete");userService.delete();}@Overridepublic void update() {log("update");userService.update();}@Overridepublic void query() {log("query");userService.query();}// 日志public void log(String msg){System.out.println("[Debug] 使用了" + msg + "方法");} } -
客戶端:
package xyz.luck1y.Demo02;public class Client {public static void main(String[] args) {UserServiceImpl userService = new UserServiceImpl();UserServiceProxy userServiceProxy = new UserServiceProxy();userServiceProxy.setUserService(userService);userServiceProxy.add();}
}
為什么不直接在原來的真實對象類加新的內容?
- 改動原有的業務代碼,在工作中是大忌,新增一個類,本來跑的好好的,崩了怎么辦~
加一個代理類,可以在原有業務代碼不變的基礎上進行安全地附加操作
關于AOP
動態代理
-
動態代理和靜態代理的角色一樣
-
動態代理的代理類是動態生成的不是我們直接寫好的
-
動態代理也分為兩大類:基于接口的動態代理、基于類的動態代理
-
基于接口的動態代理【我們在這里使用這種方式】:JDK的動態代理
-
基于類的動態代理:cglib
-
Java字節碼實現:javasist
-
需要了解兩個類:Proxy(代理),InvocationHandler(調用處理程序)
InvocationHandler:
一個接口,java.lang.reflect,反射包下
InvocationHandler是由代理實例的調用處理程序實現的接口,每個代理實例都有一個關聯的調用處理程序。當在代理實例上調用方法時,方法調用將被編碼并分派到其調用處理程序的invoke方法。
這個接口只有一個方法:Object invoke(Object proxy , 方法 method , Object[] args) throws Throwable
Proxy:
一個類,java.lang.reflect,反射包下
Proxy提供了創建動態代理類和實例的靜態方法,它也是由這些方法創建的所有動態代理類的超類。也就說說可以通過類來調用方法。
代碼實現:
自動生成代理類:
package xyz.luck1y.Demo03;import java.lang.reflect.InvocationHandler;
import java.lang.reflect.Method;
import java.lang.reflect.Proxy;// 用這個類自動生成代理類
public class ProxyInvocationHandler implements InvocationHandler {// 被代理的接口private Rent rent;public void setRent(Rent rent){this.rent = rent;}// 生成得到代理類public Object getProxy(){return Proxy.newProxyInstance(this.getClass().getClassLoader(), rent.getClass().getInterfaces(), this);}// 處理代理實例,并返回結果@Overridepublic Object invoke(Object proxy, Method method, Object[] args) throws Throwable {// 動態代理的本質就是通過反射機制實現log(method.getName());seeHose();Object result = method.invoke(rent, args);getFee();return null;}public void seeHose(){System.out.println("中介帶著看房子");}public void getFee(){System.out.println("收取中介費用");}public void log(String msg) {System.out.println("[Log] 執行了" + msg + "方法");}
}
客戶端:
package xyz.luck1y.Demo03;import xyz.luck1y.Demo02.UserServiceImpl;public class Client {public static void main(String[] args) {// 真實角色Host host = new Host();// 代理角色不存在ProxyInvocationHandler pih = new ProxyInvocationHandler();// 通過調用程序處理角色來處理我們要調用的接口對象pih.setRent(host);Rent proxy = (Rent) pih.getProxy();proxy.rent();}
}
房東和租房接口:
package xyz.luck1y.Demo03;public class Host implements Rent {@Overridepublic void rent() {System.out.println("房東要出租房子");}
}
package xyz.luck1y.Demo03;// 租房的接口
public interface Rent {public void rent();
}
測試結果:

進一步觀察:
package xyz.luck1y.Demo04;import xyz.luck1y.Demo03.Rent;import java.lang.reflect.InvocationHandler;
import java.lang.reflect.Method;
import java.lang.reflect.Proxy;// 用這個類自動生成代理類
public class ProxyInvocationHandler implements InvocationHandler {// 被代理的接口private Object target;public void setTarget(Object target){this.target = target;}// 生成得到代理類public Object getProxy(){return Proxy.newProxyInstance(this.getClass().getClassLoader(), target.getClass().getInterfaces(), this);}// 處理代理實例,并返回結果@Overridepublic Object invoke(Object proxy, Method method, Object[] args) throws Throwable {// 動態代理的本質就是通過反射機制實現log(method.getName());seeHose();Object result = method.invoke(target, args);getFee();return null;}public void seeHose(){System.out.println("中介帶著看房子");}public void getFee(){System.out.println("收取中介費用");}public void log(String msg) {System.out.println("[Log] 執行了" + msg + "方法");}
}
package xyz.luck1y.Demo04;import xyz.luck1y.Demo02.UserService;
import xyz.luck1y.Demo02.UserServiceImpl;
import xyz.luck1y.Demo03.Host;
import xyz.luck1y.Demo03.Rent;public class Client {public static void main(String[] args) {// 真實角色UserServiceImpl userService = new UserServiceImpl();// 代理角色不存在ProxyInvocationHandler pih = new ProxyInvocationHandler();pih.setTarget(userService);// 動態生成代理類UserService proxy = (UserService) pih.getProxy();proxy.add();}
}
動態代理的優點:
- 可以使真實角色的操作更加純粹,不用去關注真實角色的公共業務
- 公共業務交給代理角色,實現了業務的分工(例子中,不需要給每一個房東都加相同的功能,這些相同的功能都提取到代理角色)
- 業務發生擴展的時候,方便集中管理
- 一個動態代理類代理的是一個接口,一般就是對應的一類業務
- 一個動態代理類可以代理多個類,只要是實現類同一個接口即可。
AOP
什么是AOP
AOP (Aspect Oriented Programming)意為:面向切面編程,通過預編譯方式和運行期動態代理實現程序功能的統一維護的一種技術。AOP是0OP的延續,是軟件開發中一個熱點,也是Spring框架中的一個重要內容,是函數式編程的一種衍生范型。利用AOP可以對業務邏輯的各個部分進行隔離,從而使得業務邏輯各部分之間的耦合度降低,提高程序的可重用性,同時提高了開發的效率。
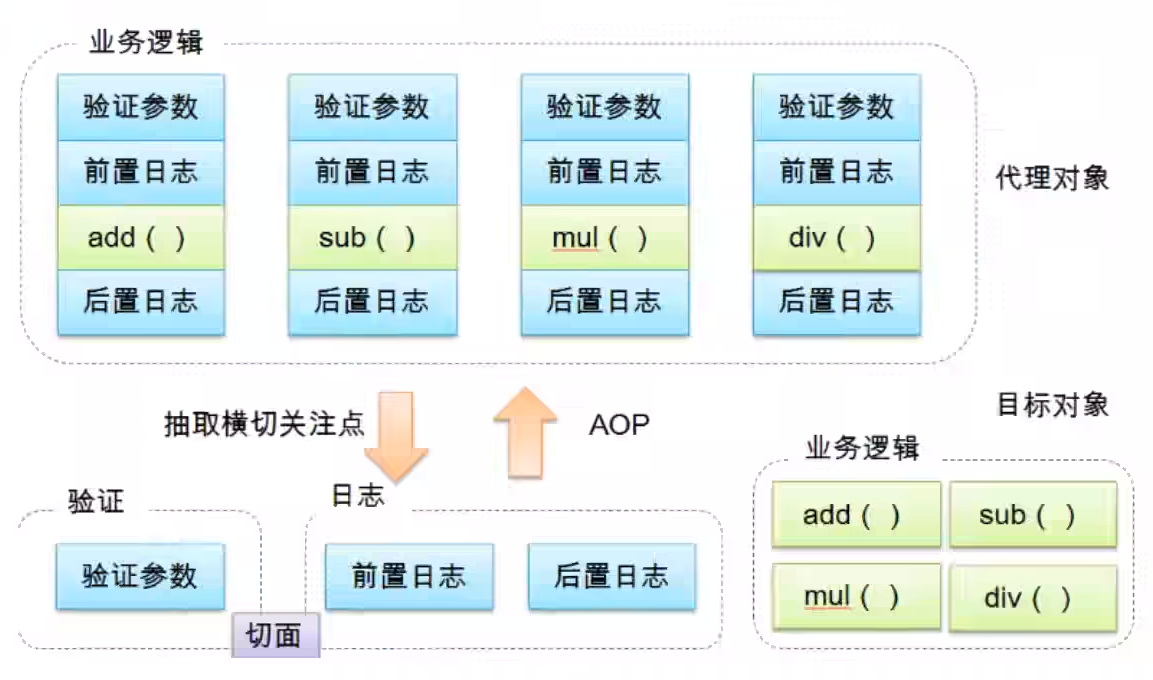
AOP在Spring中的作用
提供聲明式事務,允許用戶自定義切面
- 橫切關注點:跨越應用程序多個模塊的方法或功能,即,與我們業務邏輯無關的,但是我們需要關注的部分,就是橫切關注點。如日志、安全、緩存、事務等等
- 切面(Aspect):橫切關注點 被模塊化的特殊對象,即,它是一個類
- 通知(Advice):切面必須要完成的工作,即,它是類中的一個方法
- 目標(Target):被通知對象
- 代理(Proxy):向目標對象應用通知之后創建的對象
- 切入點(PointCut):切面通知執行的“地點”的定義
- 連接點(JoinPoint):與切入點匹配的執行點
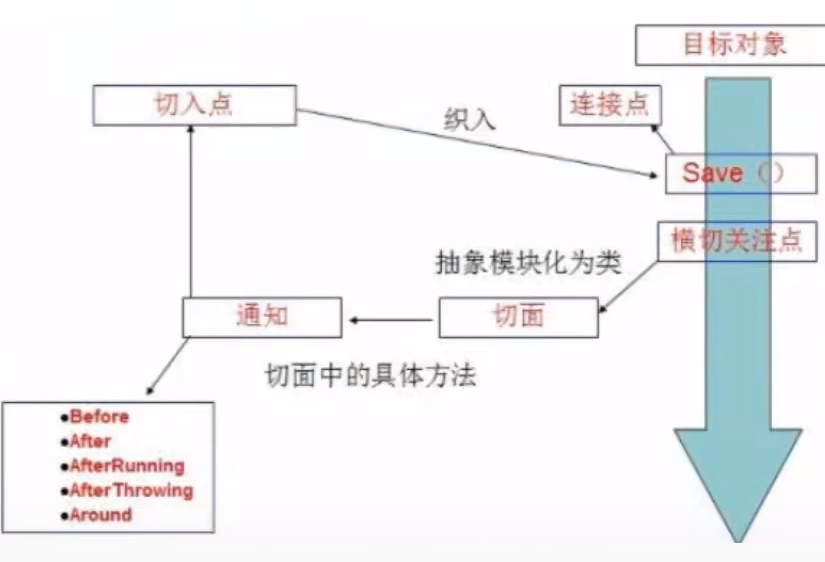
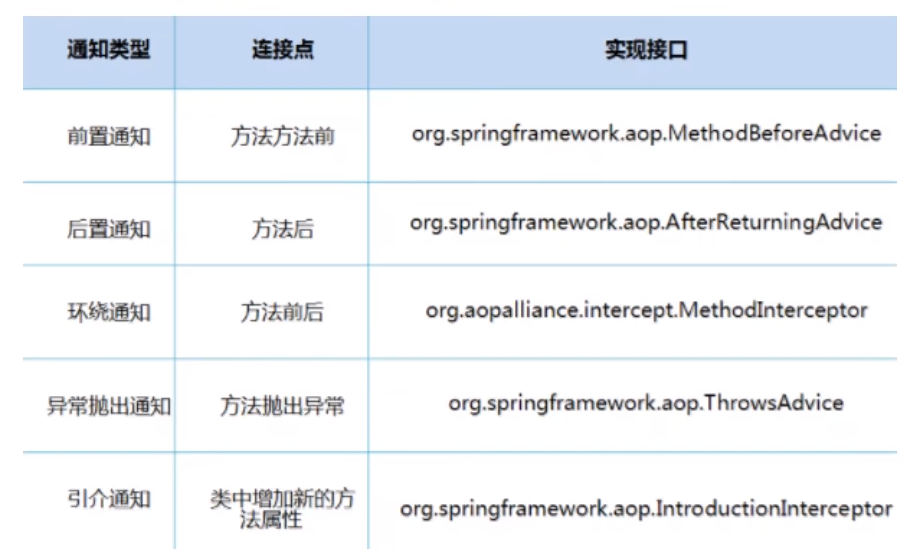
在SpringAOP中:通過Advice定義橫切邏輯,Spring支持五種類型的Advice:
即AOP可以在不改變原有代碼的情況下,為業務增加新的功能。
使用Spring實現AOP
AOP織入包,需要導入一個依賴包!
<dependency><groupId>org.aspectj</groupId><artifactId>aspectjweaver</artifactId><version>1.9.6</version>
</dependency>
方式一:使用Spring的API接口
接口:
package xyz.luck1y.service;public interface UserService {public void add();public void delete();public void update();public void select();
}
實現類:
package xyz.luck1y.service;public class UserServiceImpl implements UserService {@Overridepublic void add() {System.out.println("增加了一個用戶");}@Overridepublic void delete() {System.out.println("刪除了一個用戶");}@Overridepublic void update() {System.out.println("修改了一個用戶");}@Overridepublic void select() {System.out.println("查詢了一個用戶");}
}
AOP增加日志功能:
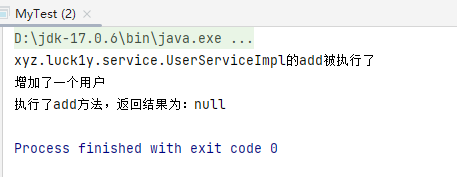
package xyz.luck1y.log;import org.springframework.aop.MethodBeforeAdvice;import java.lang.reflect.Method;public class Log implements MethodBeforeAdvice {// method:要執行的目標對象的方法// args:參數// target:目標對象@Overridepublic void before(Method method, Object[] args, Object target) throws Throwable {System.out.println(target.getClass().getName() + "的" + method.getName() + "被執行了");}
}
package xyz.luck1y.log;import org.springframework.aop.AfterReturningAdvice;import java.lang.reflect.Method;public class AfterLog implements AfterReturningAdvice {// returnValue:返回值@Overridepublic void afterReturning(Object returnValue, Method method, Object[] args, Object target) throws Throwable {System.out.println("執行了" + method.getName() + "方法,返回結果為:" + returnValue);}
}
xml配置文件:
注意在前面寫好aop約束
<?xml version="1.0" encoding="UTF-8"?>
<beans xmlns="http://www.springframework.org/schema/beans"xmlns:xsi="http://www.w3.org/2001/XMLSchema-instance"xmlns:aop="http://www.springframework.org/schema/aop"xsi:schemaLocation="http://www.springframework.org/schema/beanshttp://www.springframework.org/schema/beans/spring-beans.xsdhttp://www.springframework.org/schema/aophttp://www.springframework.org/schema/aop/spring-aop.xsd"><!--注冊bean--><bean id="userService" class="xyz.luck1y.service.UserServiceImpl"/><bean id="log" class="xyz.luck1y.log.Log"/><bean id="afterLog" class="xyz.luck1y.log.AfterLog"/><!--方式一:使用原生的Spring API接口--><!--配置aop:需要導入aop的約束--><aop:config><!--切入點:expression表達式,execution(要執行的位置! 修飾詞 返回值 類名 方法名 參數)  .. 代表有任意的參數--><aop:pointcut id="pointcut" expression="execution(* xyz.luck1y.service.UserServiceImpl.*(..))"/><!--執行環繞增加--><aop:advisor advice-ref="log" pointcut-ref="pointcut"/><aop:advisor advice-ref="afterLog" pointcut-ref="pointcut"/></aop:config>
</beans>
測試:
import org.springframework.context.ApplicationContext;
import org.springframework.context.support.ClassPathXmlApplicationContext;
import xyz.luck1y.service.UserService;public class MyTest {public static void main(String[] args) {ApplicationContext context = new ClassPathXmlApplicationContext("applicationContent.xml");// 動態代理代理的是接口,此處為 UserService 接口UserService userService = context.getBean("userService", UserService.class);userService.add();}
}
結果:
方式二:自定義類實現實現AOP
自定義切面插入類:
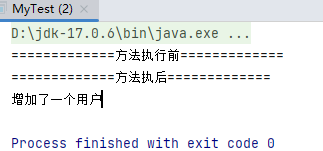
package xyz.luck1y.diy;public class DiyPointCut {public void before(){System.out.println("=============方法執行前=============");}public void after(){System.out.println("=============方法執后=============");}
}
配置文件:
<?xml version="1.0" encoding="UTF-8"?>
<beans xmlns="http://www.springframework.org/schema/beans"xmlns:xsi="http://www.w3.org/2001/XMLSchema-instance"xmlns:aop="http://www.springframework.org/schema/aop"xsi:schemaLocation="http://www.springframework.org/schema/beanshttp://www.springframework.org/schema/beans/spring-beans.xsdhttp://www.springframework.org/schema/aophttp://www.springframework.org/schema/aop/spring-aop.xsd"><!--注冊bean--><bean id="userService" class="xyz.luck1y.service.UserServiceImpl"/><bean id="log" class="xyz.luck1y.log.Log"/><bean id="afterLog" class="xyz.luck1y.log.AfterLog"/><!--方式二:自定義類--><!--比第一類簡單,但是功能沒有第一種強大--><bean id="diy" class="xyz.luck1y.diy.DiyPointCut"/><aop:config><!--自定義切面,ref:要引用的類--><aop:aspect ref="diy"><!--切入點--><aop:pointcut id="point" expression="execution(* xyz.luck1y.service.UserServiceImpl.*(..))"/><!--通知--><aop:before method="before" pointcut-ref="point"/><aop:before method="after" pointcut-ref="point"/></aop:aspect></aop:config>
</beans>
測試:
import org.springframework.context.ApplicationContext;
import org.springframework.context.support.ClassPathXmlApplicationContext;
import xyz.luck1y.service.UserService;public class MyTest {public static void main(String[] args) {ApplicationContext context = new ClassPathXmlApplicationContext("applicationContent.xml");// 動態代理代理的是接口,此處為 UserService 接口UserService userService = context.getBean("userService", UserService.class);userService.add();}
}
結果:
方式三:使用注解實現AOP
package xyz.luck1y.diy;
// 方式三:使用注解方式實現AOPimport org.aspectj.lang.ProceedingJoinPoint;
import org.aspectj.lang.Signature;
import org.aspectj.lang.annotation.After;
import org.aspectj.lang.annotation.Around;
import org.aspectj.lang.annotation.Aspect;
import org.aspectj.lang.annotation.Before;// 標注這個類是一個切面
@Aspect
public class AnnotationPointCut {@Before("execution(* xyz.luck1y.service.UserServiceImpl.*(..))")public void before(){System.out.println("========方法執行前========");}@After("execution(* xyz.luck1y.service.UserServiceImpl.*(..))")public void after(){System.out.println("========方法執行后========");}// 在環繞增強中,我們可以給定一個參數,代表我們要獲取處理切入的點@Around("execution(* xyz.luck1y.service.UserServiceImpl.*(..))")public void around(ProceedingJoinPoint joinPoint) throws Throwable {System.out.println("========環繞前========");// 獲得簽名Signature signature = joinPoint.getSignature();System.out.println("signature:" + signature);// 執行方法Object proceed = joinPoint.proceed();System.out.println("========環繞后========");System.out.println(proceed);}
}
<?xml version="1.0" encoding="UTF-8"?>
<beans xmlns="http://www.springframework.org/schema/beans"xmlns:xsi="http://www.w3.org/2001/XMLSchema-instance"xmlns:aop="http://www.springframework.org/schema/aop"xsi:schemaLocation="http://www.springframework.org/schema/beanshttp://www.springframework.org/schema/beans/spring-beans.xsdhttp://www.springframework.org/schema/aophttp://www.springframework.org/schema/aop/spring-aop.xsd"><!--注冊bean--><bean id="userService" class="xyz.luck1y.service.UserServiceImpl"/><bean id="log" class="xyz.luck1y.log.Log"/><bean id="afterLog" class="xyz.luck1y.log.AfterLog"/><!--方式三:使用注解--><bean id="annotationPointCut" class="xyz.luck1y.diy.AnnotationPointCut"/><!--開啟注解支持   JDK(默認實現)  CGLib--><!--proxy-target-class 設置為 false 為 JDK 實現,true 是 CGLib 實現--><aop:aspectj-autoproxy proxy-target-class="false"/>
</beans>
測試結果:


Unity開發Vision Pro——參考文檔)


)

