手勢識別是一種人機交互技術,通過識別人的手勢動作,從而實現對計算機、智能手機、智能電視等設備的操作和控制。
1.? opencv實現手部追蹤(定位手部關鍵點)
2.opencv實戰項目 實現手勢跟蹤并返回位置信息(封裝調用)
3.opencv實戰項目 手勢識別-手勢控制鼠標
4.opencv實戰項目 手勢識別-手勢控制鍵盤
未完待續
本專欄記錄作者的學習之旅會一直更新下去,歡迎訂閱一起學習進步
本項目是使用了谷歌開源的框架mediapipe,里面有非常多的模型提供給我們使用,例如面部檢測,身體檢測,手部檢測等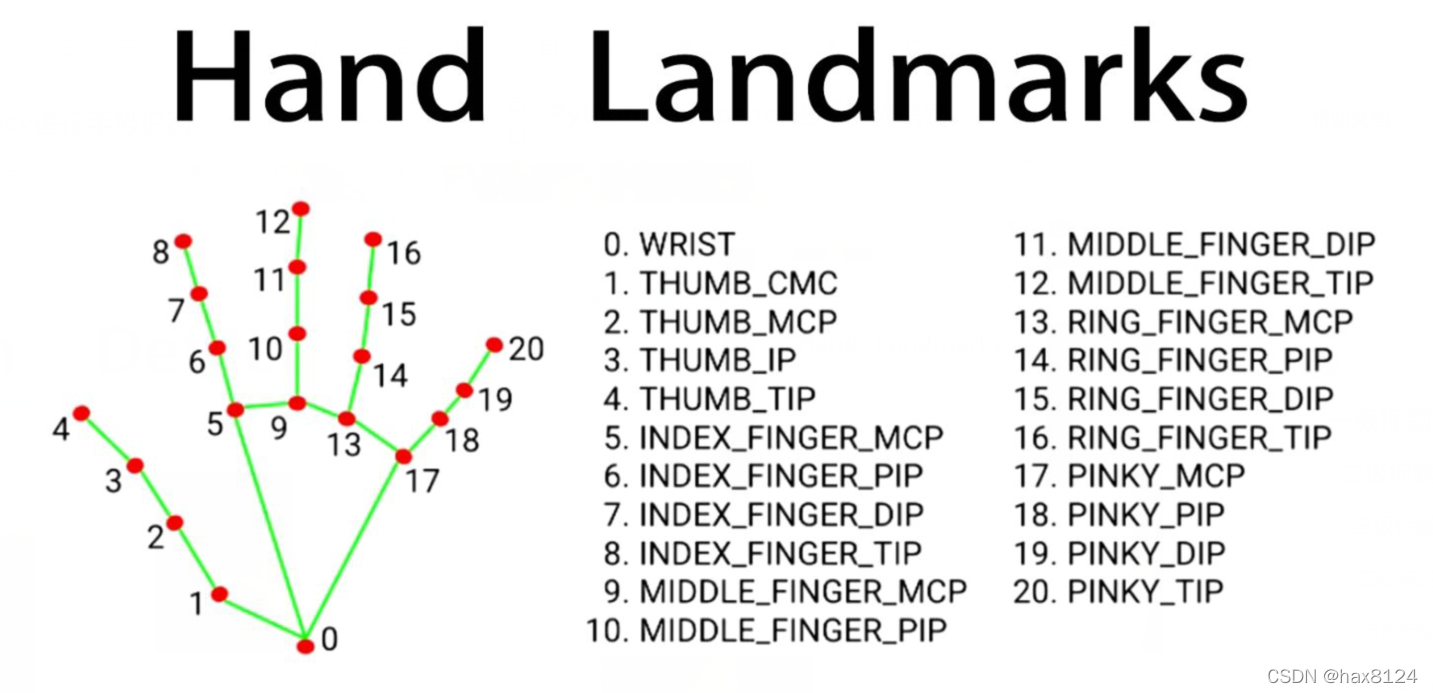
?代碼需要用到opencv? ?HandTraqckModule模塊? ?mediapipe模塊和一個鍵盤控制模塊pynput,cvzone模塊
一、HandTraqckModule模塊?
前面的文章中有封裝手部檢測模塊的教程,這邊簡單的介紹一下,有新增加的模塊可以簡單學習一下
import cv2
import mediapipe as mp
import mathclass HandDetector:"""Finds Hands using the mediapipe library. Exports the landmarksin pixel format. Adds extra functionalities like finding howmany fingers are up or the distance between two fingers. Alsoprovides bounding box info of the hand found."""def __init__(self, mode=False, maxHands=2, detectionCon=0.5, minTrackCon=0.5):""":param mode: In static mode, detection is done on each image: slower:param maxHands: Maximum number of hands to detect:param detectionCon: Minimum Detection Confidence Threshold:param minTrackCon: Minimum Tracking Confidence Threshold"""self.mode = modeself.maxHands = maxHandsself.detectionCon = detectionConself.minTrackCon = minTrackConself.mpHands = mp.solutions.handsself.hands = self.mpHands.Hands(self.mode, self.maxHands,self.detectionCon, self.minTrackCon)self.mpDraw = mp.solutions.drawing_utilsself.tipIds = [4, 8, 12, 16, 20]self.fingers = []self.lmList = []def findHands(self, img, draw=True):"""Finds hands in a BGR image.:param img: Image to find the hands in.:param draw: Flag to draw the output on the image.:return: Image with or without drawings"""imgRGB = cv2.cvtColor(img, cv2.COLOR_BGR2RGB)self.results = self.hands.process(imgRGB)if self.results.multi_hand_landmarks:for handLms in self.results.multi_hand_landmarks:if draw:self.mpDraw.draw_landmarks(img, handLms,self.mpHands.HAND_CONNECTIONS)return imgdef findPosition(self, img, handNo=0, draw=True):"""Finds landmarks of a single hand and puts them in a listin pixel format. Also finds the bounding box around the hand.:param img: main image to find hand in:param handNo: hand id if more than one hand detected:param draw: Flag to draw the output on the image.:return: list of landmarks in pixel format; bounding box"""xList = []yList = []bbox = []bboxInfo = []self.lmList = []if self.results.multi_hand_landmarks:myHand = self.results.multi_hand_landmarks[handNo]for id, lm in enumerate(myHand.landmark):h, w, c = img.shapepx, py = int(lm.x * w), int(lm.y * h)xList.append(px)yList.append(py)self.lmList.append([px, py])if draw:cv2.circle(img, (px, py), 5, (255, 0, 255), cv2.FILLED)xmin, xmax = min(xList), max(xList)ymin, ymax = min(yList), max(yList)boxW, boxH = xmax - xmin, ymax - yminbbox = xmin, ymin, boxW, boxHcx, cy = bbox[0] + (bbox[2] // 2), \bbox[1] + (bbox[3] // 2)bboxInfo = {"id": id, "bbox": bbox, "center": (cx, cy)}if draw:cv2.rectangle(img, (bbox[0] - 20, bbox[1] - 20),(bbox[0] + bbox[2] + 20, bbox[1] + bbox[3] + 20),(0, 255, 0), 2)return self.lmList, bboxInfodef fingersUp(self):"""Finds how many fingers are open and returns in a list.Considers left and right hands separately:return: List of which fingers are up"""if self.results.multi_hand_landmarks:myHandType = self.handType()fingers = []# Thumbif myHandType == "Right":if self.lmList[self.tipIds[0]][0] > self.lmList[self.tipIds[0] - 1][0]:fingers.append(1)else:fingers.append(0)else:if self.lmList[self.tipIds[0]][0] < self.lmList[self.tipIds[0] - 1][0]:fingers.append(1)else:fingers.append(0)# 4 Fingersfor id in range(1, 5):if self.lmList[self.tipIds[id]][1] < self.lmList[self.tipIds[id] - 2][1]:fingers.append(1)else:fingers.append(0)return fingersdef findDistance(self, p1, p2, img, draw=True):"""Find the distance between two landmarks based on theirindex numbers.:param p1: Point1 - Index of Landmark 1.:param p2: Point2 - Index of Landmark 2.:param img: Image to draw on.:param draw: Flag to draw the output on the image.:return: Distance between the pointsImage with output drawnLine information"""if self.results.multi_hand_landmarks:x1, y1 = self.lmList[p1][0], self.lmList[p1][1]x2, y2 = self.lmList[p2][0], self.lmList[p2][1]cx, cy = (x1 + x2) // 2, (y1 + y2) // 2if draw:cv2.circle(img, (x1, y1), 15, (255, 0, 255), cv2.FILLED)cv2.circle(img, (x2, y2), 15, (255, 0, 255), cv2.FILLED)cv2.line(img, (x1, y1), (x2, y2), (255, 0, 255), 3)cv2.circle(img, (cx, cy), 15, (255, 0, 255), cv2.FILLED)length = math.hypot(x2 - x1, y2 - y1)return length, img, [x1, y1, x2, y2, cx, cy]def handType(self):"""Checks if the hand is left or right:return: "Right" or "Left""""if self.results.multi_hand_landmarks:if self.lmList[17][0] < self.lmList[5][0]:return "Right"else:return "Left"def main():cap = cv2.VideoCapture(0)detector = HandDetector(detectionCon=0.8, maxHands=1)while True:# Get image framesuccess, img = cap.read()# Find the hand and its landmarksimg = detector.findHands(img)lmList, bboxInfo = detector.findPosition(img)print(detector.handType())# Displaycv2.imshow("Image", img)cv2.waitKey(1)if __name__ == "__main__":main()-
導入庫:導入了必要的庫,包括 OpenCV (
cv2) 用于圖像處理和顯示,Mediapipe (mediapipe) 用于手部檢測和跟蹤,以及數學庫 (math)。 -
HandDetector類:這是主要的手勢檢測器類,提供了多個方法來處理手部檢測和分析手勢。-
__init__方法:初始化檢測器的參數,例如檢測模式、最大檢測手數、檢測和跟蹤的置信度閾值等。 -
findHands方法:在給定的圖像中尋找手部,可以選擇是否繪制檢測結果。 -
findPosition方法:找到單個手部的關鍵點位置(landmarks)并將它們存儲在像素格式的列表中,同時計算手部的邊界框信息。 -
fingersUp方法:確定手勢中有多少個手指打開,將結果以列表形式返回。 -
findDistance方法:計算兩個指定關鍵點之間的距離,并在圖像上繪制結果。 -
handType方法:確定手的類型是左手還是右手。
-
具體就不展開講了
這個函數在有一個專門的包叫做cvzone里有,但是不知道是不是版本的問題,少了一些東西,運行不起來,只能自己手擼檢測模塊。
下面是主函數的代碼
import cv2
from cvzone.HandTrackingModule import HandDetector
from HandTrackingModule import *
from time import sleep
import numpy as np
import cvzone
from pynput.keyboard import Controllercap = cv2.VideoCapture(0)
cap.set(3, 1280)
cap.set(4, 720)detector =HandDetector(detectionCon=0.5)
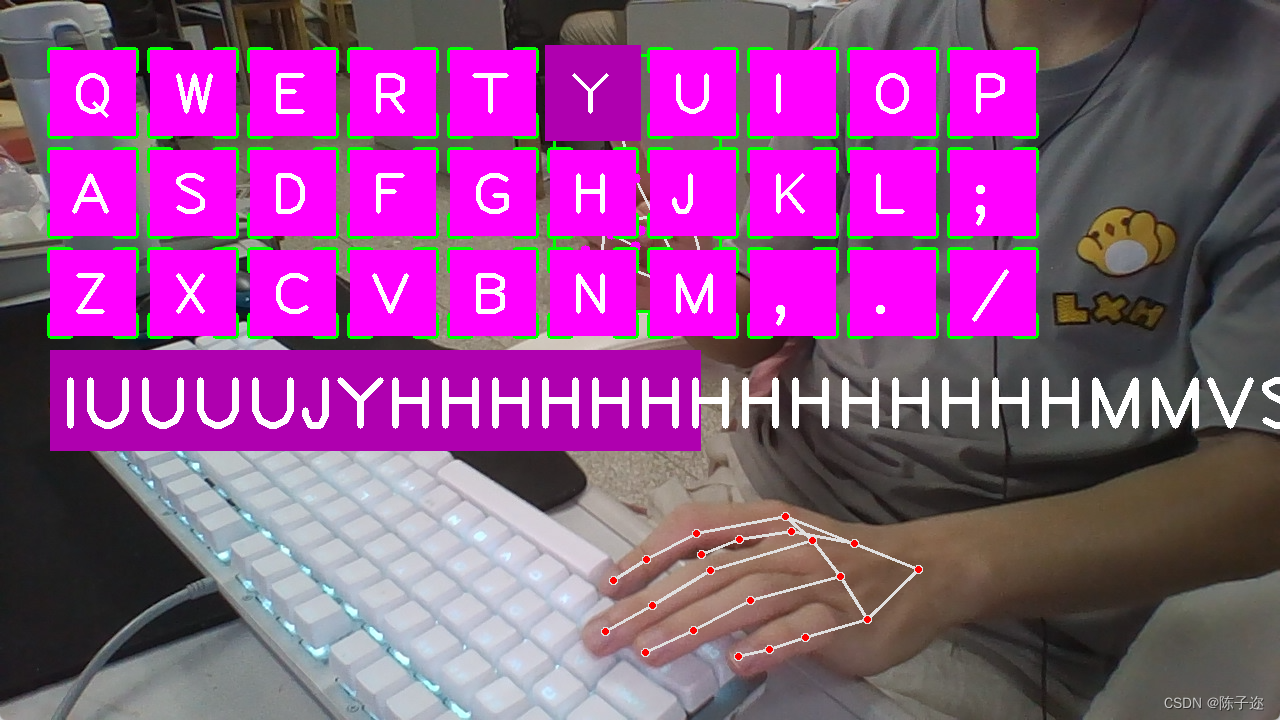
keys = [["Q", "W", "E", "R", "T", "Y", "U", "I", "O", "P"],["A", "S", "D", "F", "G", "H", "J", "K", "L", ";"],["Z", "X", "C", "V", "B", "N", "M", ",", ".", "/"]]
finalText = ""keyboard = Controller()def drawAll(img, buttonList):for button in buttonList:x, y = button.posw, h = button.sizecvzone.cornerRect(img, (button.pos[0], button.pos[1], button.size[0], button.size[1]),20, rt=0)cv2.rectangle(img, button.pos, (x + w, y + h), (255, 0, 255), cv2.FILLED)cv2.putText(img, button.text, (x + 20, y + 65),cv2.FONT_HERSHEY_PLAIN, 4, (255, 255, 255), 4)return img#
# def drawAll(img, buttonList):
# imgNew = np.zeros_like(img, np.uint8)
# for button in buttonList:
# x, y = button.pos
# cvzone.cornerRect(imgNew, (button.pos[0], button.pZXos[1], button.size[0], button.size[1]),
# 20, rt=0)
# cv2.rectangle(imgNew, button.pos, (x + button.size[0], y + button.size[1]),
# (255, 0, 255), cv2.FILLED)
# cv2.putText(imgNew, button.text, (x + 40, y + 60),
# cv2.FONT_HERSHEY_PLAIN, 2, (255, 255, 255), 3)
#
# out = img.copy()
# alpha = 0.5
# mask = imgNew.astype(bool)
# print(mask.shape)
# out[mask] = cv2.addWeighted(img, alpha, imgNew, 1 - alpha, 0)[mask]
# return outclass Button():def __init__(self, pos, text, size=[85, 85]):self.pos = posself.size = sizeself.text = textbuttonList = []
for i in range(len(keys)):for j, key in enumerate(keys[i]):buttonList.append(Button([100 * j + 50, 100 * i + 50], key))while True:success, img = cap.read()img = detector.findHands(img)lmList, bboxInfo = detector.findPosition(img)img = drawAll(img, buttonList)if lmList:for button in buttonList:x, y = button.posw, h = button.sizeif x < lmList[8][0] < x + w and y < lmList[8][1] < y + h:cv2.rectangle(img, (x - 5, y - 5), (x + w + 5, y + h + 5), (175, 0, 175), cv2.FILLED)cv2.putText(img, button.text, (x + 20, y + 65),cv2.FONT_HERSHEY_PLAIN, 4, (255, 255, 255), 4)l, _, _ = detector.findDistance(8, 12, img, draw=False)print(l)## when clickedif l < 30:keyboard.press(button.text)cv2.rectangle(img, button.pos, (x + w, y + h), (0, 255, 0), cv2.FILLED)cv2.putText(img, button.text, (x + 20, y + 65),cv2.FONT_HERSHEY_PLAIN, 4, (255, 255, 255), 4)finalText += button.textsleep(0.15)cv2.rectangle(img, (50, 350), (700, 450), (175, 0, 175), cv2.FILLED)cv2.putText(img, finalText, (60, 430),cv2.FONT_HERSHEY_PLAIN, 5, (255, 255, 255), 5)cv2.imshow("Image", img)cv2.waitKey(1)
-
導入庫:導入了需要的庫,包括 OpenCV (
cv2) 用于圖像處理和顯示,Mediapipe 中的 HandDetector 用于手部檢測,cvzone用于繪制按鈕外觀,numpy用于數組處理,pynput.keyboard中的 Controller 用于模擬鍵盤輸入,time用于延時。 -
設置攝像頭參數:通過 OpenCV 設置攝像頭的分辨率為 1280x720。
-
創建 HandDetector 實例:使用 HandDetector 類創建一個手勢檢測器實例,設置檢測的置信度閾值為 0.5。
-
創建按鈕列表:創建了一個包含虛擬鍵盤按鈕信息的列表,按鍵布局通過嵌套列表
keys定義。 -
創建
Button類:用于創建虛擬按鈕的類,每個按鈕包含位置、文本內容和大小。 -
主循環:進入一個無限循環,用于處理實時的攝像頭捕獲圖像幀。
-
讀取圖像幀:從攝像頭捕獲圖像幀。
-
手部檢測:使用手勢檢測器找出圖像中的手部和關鍵點。
-
繪制按鈕:調用
drawAll函數在圖像上繪制虛擬按鈕。 -
遍歷按鈕列表:對每個按鈕進行檢查,看是否有手指觸摸到按鈕。
-
如果手指在按鈕范圍內,繪制高亮效果。
-
計算手指觸摸點與按鈕中心的距離,如果小于一定閾值,則模擬鍵盤按下并記錄輸入。
-
-
繪制已輸入的文本:在圖像上繪制已輸入的文本。
-
顯示圖像:通過 OpenCV 顯示處理后的圖像。
-
等待鍵盤輸入:等待 1 毫秒,以便保持圖像窗口的響應性。
-
-
運行主程序:執行主循環,處理實時的攝像頭捕獲和手勢識別。
如果有遇到問題可以評論區留言,大家一起相互學習!


Flutter與Native頁面互相跳轉)


