系列文章
基于.NetCore開發博客項目 StarBlog - (1) 為什么需要自己寫一個博客?
基于.NetCore開發博客項目 StarBlog - (2) 環境準備和創建項目
基于.NetCore開發博客項目 StarBlog - (3) 模型設計
基于.NetCore開發博客項目 StarBlog - (4) markdown博客批量導入
基于.NetCore開發博客項目 StarBlog - (5) 開始搭建Web項目
基于.NetCore開發博客項目 StarBlog - (6) 頁面開發之博客文章列表
...
前言
前一篇文章把Web項目搭起來了,現在開始來寫頁面~
本文記錄博客文章列表的開發,包括參數、分類過濾、分頁、搜索、排序等內容。
ORM
本項目的ORM使用FreeSQL,前面「博客批量導入」的文章中有初步涉及到了,不過沒有介紹太多,這里再講一下幾個關鍵的地方。
不同于網上比較常見的EF Core,FreeSQL設計完模型之后不需要進行遷移操作,在開發模式下開啟自動結構同步(AutoSyncStructure)就能自動創建、修改數據表。
還有比較方便的一點是FreeSQL自帶了簡單的倉儲模式,不用再自己封裝一套,可以減少開發時的代碼量~
不過局限性也是有的,不封裝倉儲層的話,意味著service層代碼跟ORM綁定,以后如果切換ORM會帶來額外的重構成本。
打開StarBlog.Data項目,我們來寫一個擴展方法,新增Extensions目錄,在里面新增ConfigureFreeSql.cs
using?FreeSql;
using?Microsoft.Extensions.Configuration;
using?Microsoft.Extensions.DependencyInjection;namespace?StarBlog.Data.Extensions;public?static?class?ConfigureFreeSql?{public?static?void?AddFreeSql(this?IServiceCollection?services,?IConfiguration?configuration)?{var?freeSql?=?new?FreeSqlBuilder().UseConnectionString(DataType.Sqlite,?configuration.GetConnectionString("SQLite")).UseAutoSyncStructure(true).Build();services.AddSingleton(freeSql);//?倉儲模式支持services.AddFreeRepository();}
}然后編輯StarBlog.Web項目下的Program.cs,注冊一下FreeSQL的服務,用我們剛才寫的擴展方法。
using?StarBlog.Data.Extensions;builder.Services.AddFreeSql(builder.Configuration);在要用的地方注入就行了,比如
IBaseRepository<Post>?_postRepo;//?獲取全部文章
_postRepo.Select.ToList()
就很方便了,開箱即用~
Service
因為我們的后端既要渲染頁面,又要做RESTFul接口,所以要把業務邏輯抽象出來放在service層,避免在Controller里重復。
在StarBlog.Web項目的Services目錄里新增PostService.cs,我們要在這封裝跟文章有關的邏輯~
首先依賴注入,把需要用到的服務注入進來
public?class?PostService?{private?readonly?IBaseRepository<Post>?_postRepo;private?readonly?IBaseRepository<Category>?_categoryRepo;public?PostService(IBaseRepository<Post>?postRepo,IBaseRepository<Category>?categoryRepo)?{_postRepo?=?postRepo;_categoryRepo?=?categoryRepo;}
}
寫一個獲取全部文章的方法
public?List<Post>?GetAll()?{return?_postRepo.Select.ToList();
}
這樣就初步搞定了,接下來要來寫Controller
Controller
在StarBlog.Web項目的Controllers目錄下,新增BlogController.cs,用來實現跟博客有關的接口。
注入剛剛寫好的 PostService
public?class?BlogController?:?Controller?{private?readonly?PostService?_postService;public?BlogController(PostService?postService)?{_postService?=?postService;}
}
寫文章列表“接口”(MVC也算接口吧)
public?IActionResult?List()?{return?View(_postService.GetAll());
}
View
根據AspNetCore MVC項目的約定,要把網頁模板放在Views目錄下,按Controller分類
這個文章列表頁面,按照約定的路徑是:Views/Blog/List.cshtml,創建這個文件
@model?List<Post>
@{ViewData["Title"]?=?"博客列表";
}
<div?class="container?px-4?py-3">@foreach?(var?post?in?Model)?{<div?class="card?mb-3"><div?class="card-header">@Model.Category.Name</div><div?class="card-body"><h5?class="card-title">@Model.Title</h5><p?class="card-text">@Model.Summary</p><a?class="btn?btn-outline-secondary?stretched-link"asp-controller="Blog"?asp-action="Post"?asp-route-id="@Model.Id">查看全文</a></div></div>}
</div>
這樣簡單的文章列表就完成了
試試效果
運行項目,打開瀏覽器,輸入地址http://127.0.0.1:5038/Blog/List,可以看到文章列表如下,很簡單(簡陋),而且全部文章都顯示出來了,頁面很長,這很明顯并不是我們想要的最終效果。
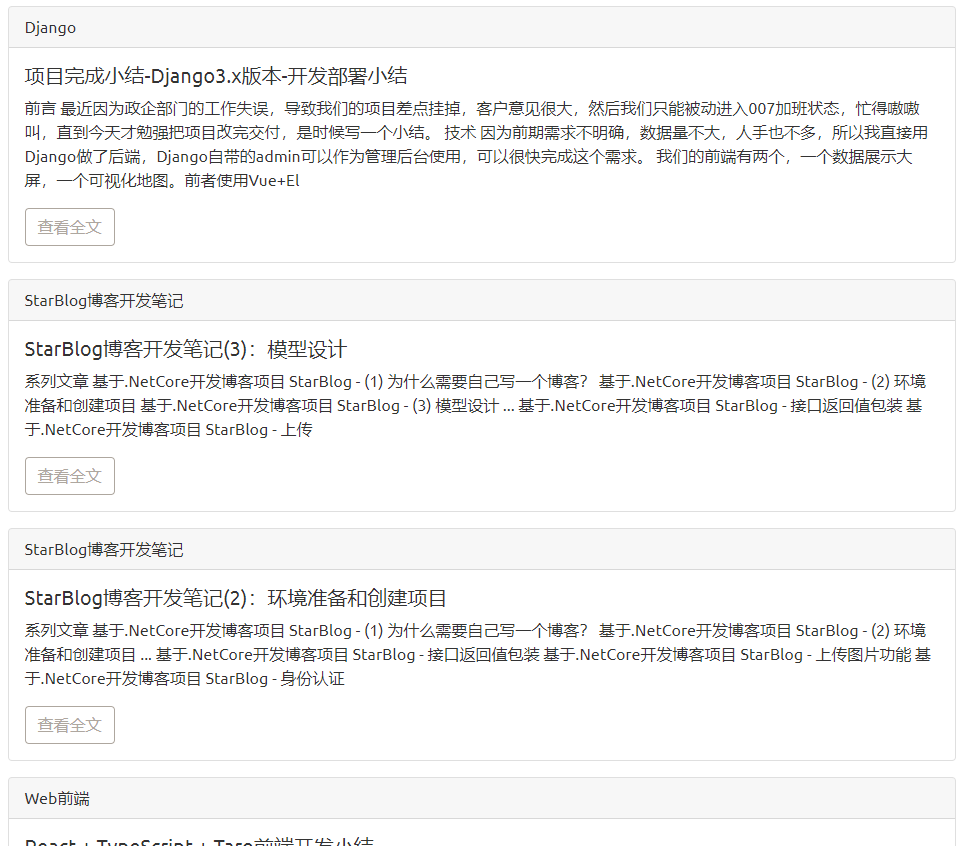
不急,接下來慢慢來優化。
分頁
首先是頁面把全部文章都顯示出來的問題,我們需要引入分頁功能
分頁可以自己實現,也可以用第三方組件,我們用的FreeSQL也支持分頁的API,這里我直接掏出之前做項目用過的X.PagedList,它封裝了分頁取數據和前端的分頁部件,比較方便。
直接nuget里安裝這兩個包就行:
X.PagedList
X.PagedList.Mvc.Core
使用很簡單,X.PagedList組件定義了List類型的擴展方法,直接在ORM讀取出來的List上用就行
_postRepo.Select.ToList().ToPagedList(pageNumber,?pageSize);返回類型是IPagedList<T>,除了當前頁面的數據,還包含有分頁的信息(當前頁面、總頁面數量、頁面大小、總數據量等),可以直接當List用。
然后X.PagedList組件還封裝了MVC模板上的HTML組件,使用也很簡單:
<nav?aria-label="Page?navigation?example">@Html.PagedListPager(Model.Posts,?page?=>?Url.Action(RazorHelper.GetCurrentActionName(ViewContext),?new?{page,?categoryId?=?Model.CurrentCategoryId}),new?PagedListRenderOptions?{LiElementClasses?=?new[]?{"page-item"},PageClasses?=?new[]?{"page-link"},UlElementClasses?=?new[]?{"pagination?justify-content-center"}})
</nav>
前端我要使用bootstrap的分頁組件,所以把bootstrap的class傳進去,如果是其他前端組件庫的話,只需要傳對應的class名稱就行。
渲染出來的頁面代碼是這樣的:
<div?class="pagination-container"><ul?class="pagination?justify-content-center"><li?class="active?page-item"><span?class="page-link">1</span></li><li?class="page-item"><a?class="page-link"?href="/Blog/List?page=2&categoryId=0">2</a></li><li?class="page-item"><a?class="page-link"?href="/Blog/List?page=3&categoryId=0">3</a></li><li?class="page-item"><a?class="page-link"?href="/Blog/List?page=4&categoryId=0">4</a></li><li?class="page-item"><a?class="page-link"?href="/Blog/List?page=5&categoryId=0">5</a></li><li?class="page-item"><a?class="page-link"?href="/Blog/List?page=6&categoryId=0">6</a></li><li?class="page-item"><a?class="page-link"?href="/Blog/List?page=7&categoryId=0">7</a></li><li?class="page-item"><a?class="page-link"?href="/Blog/List?page=8&categoryId=0">8</a></li><li?class="page-item"><a?class="page-link"?href="/Blog/List?page=9&categoryId=0">9</a></li><li?class="page-item"><a?class="page-link"?href="/Blog/List?page=10&categoryId=0">10</a></li><li?class="PagedList-ellipses?page-item"><a?class="PagedList-skipToNext?page-link"?href="/Blog/List?page=11&categoryId=0"?rel="next">…</a></li><li?class="PagedList-skipToNext?page-item"><a?class="page-link"?href="/Blog/List?page=2&categoryId=0"?rel="next">></a></li><li?class="PagedList-skipToLast?page-item"><a?class="page-link"?href="/Blog/List?page=64&categoryId=0">>></a></li></ul>
</div>顯示效果:

請求參數封裝
前面介紹的分頁需要在訪問頁面時傳入請求參數,這樣我們Controller的Action方法就需要加上pageNumber和pageSize這兩個參數,后面還要加文章分類篩選和搜索排序什么的,這樣參數太多了,全都寫在Action方法的參數里不優雅,好在AspNetCore提供了class作為參數的寫法。
在StarBlog.Web/ViewModels目錄下新建QueryFilters目錄,用來存不同接口的請求參數。
有些參數屬于不同接口都有的,合理利用面向對象,先寫個基類:QueryParameters.cs
public?class?QueryParameters?{///?<summary>///?最大頁面條目///?</summary>public?const?int?MaxPageSize?=?50;private?int?_pageSize?=?10;///?<summary>///?頁面大小///?</summary>public?int?PageSize?{get?=>?_pageSize;set?=>?_pageSize?=?(value?>?MaxPageSize)???MaxPageSize?:?value;}///?<summary>///?當前頁碼///?</summary>public?int?Page?{?get;?set;?}?=?1;///?<summary>///?搜索關鍵詞///?</summary>public?string??Search?{?get;?set;?}///?<summary>///?排序字段///?</summary>public?string??SortBy?{?get;?set;?}
}文章請求參數在此基礎上還增加了狀態、分類等,從上面這個基類派生一個新類就好:PostQueryParameters.cs
public?class?PostQueryParameters?:?QueryParameters?{///?<summary>///?僅請求已發布文章///?</summary>public?bool?OnlyPublished?{?get;?set;?}?=?false;///?<summary>///?文章狀態///?</summary>public?string??Status?{?get;?set;?}///?<summary>///?分類ID///?</summary>public?int?CategoryId?{?get;?set;?}?=?0;///?<summary>///?排序字段///?</summary>public?new?string??SortBy?{?get;?set;?}?=?"-LastUpdateTime";
}
service改造
我們的核心邏輯都是在service中實現的,請求參數肯定也要傳入給service來使用。
依然是先前的GetPagedList方法,給其加上各種篩選條件之后是這樣:
public?IPagedList<Post>?GetPagedList(PostQueryParameters?param)?{var?querySet?=?_postRepo.Select;//?是否發布if?(param.OnlyPublished)?{querySet?=?_postRepo.Select.Where(a?=>?a.IsPublish);}//?狀態過濾if?(!string.IsNullOrEmpty(param.Status))?{querySet?=?querySet.Where(a?=>?a.Status?==?param.Status);}//?分類過濾if?(param.CategoryId?!=?0)?{querySet?=?querySet.Where(a?=>?a.CategoryId?==?param.CategoryId);}//?關鍵詞過濾if?(!string.IsNullOrEmpty(param.Search))?{querySet?=?querySet.Where(a?=>?a.Title.Contains(param.Search));}//?排序if?(!string.IsNullOrEmpty(param.SortBy))?{//?是否升序var?isAscending?=?!param.SortBy.StartsWith("-");var?orderByProperty?=?param.SortBy.Trim('-');querySet?=?querySet.OrderByPropertyName(orderByProperty,?isAscending);}return?querySet.Include(a?=>?a.Category).ToList().ToPagedList(param.Page,?param.PageSize);
}
根據傳入的參數,可以實現狀態過濾、分類過濾、關鍵詞過濾、排序和分頁功能。
ViewModel
一個MVC頁面只能指定一個Model,雖然可以用弱類型的ViewBag或者ViewData,但是弱類型不好維護,我們來定義一個ViewModel給頁面使用。
先確定要在文章列表頁面顯示哪些內容,例如顯示當前選擇的文章分類、所有分類列表。
在StarBlog.Web的ViewModels目錄下,新建BlogListViewModel.cs,根據我們要展示的內容,定義模型如下
using?StarBlog.Data.Models;
using?X.PagedList;namespace?StarBlog.Web.ViewModels;?public?class?BlogListViewModel?{public?Category?CurrentCategory?{?get;?set;?}public?int?CurrentCategoryId?{?get;?set;?}public?IPagedList<Post>?Posts?{?get;?set;?}public?List<Category>?Categories?{?get;?set;?}
}
搞定。
controller改造
經過前面的鋪墊,controller這里就簡單了,不過還有要注意的地方,本項目是包含后端渲染和RESTFul接口兩部分的,因此controller要寫兩個,service只要一個就行。
RESTFul接口我后面再具體介紹,可以先看看改造后的RESTFul接口controller的代碼:
[AllowAnonymous]
[HttpGet]
public?ApiResponsePaged<Post>?GetList([FromQuery]?PostQueryParameters?param)?{var?pagedList?=?_postService.GetPagedList(param);return?new?ApiResponsePaged<Post>?{Message?=?"Get?posts?list",Data?=?pagedList.ToList(),Pagination?=?pagedList.ToPaginationMetadata()};
}
代碼很簡單,這個獲取文章列表的接口,就單純只需要給分頁和過濾后的列表數據就行。
而MVC的接口就沒這么簡單,要顯示在頁面上的東西,全都要在后端做渲染,包括我們在前面說的要顯示當前分類、所有分類列表。
代碼長這樣:
public?IActionResult?List(int?categoryId?=?0,?int?page?=?1,?int?pageSize?=?5)?{var?categories?=?_categoryRepo.Where(a?=>?a.Visible).IncludeMany(a?=>?a.Posts).ToList();categories.Insert(0,?new?Category?{?Id?=?0,?Name?=?"All",?Posts?=?_postRepo.Select.ToList()?});return?View(new?BlogListViewModel?{CurrentCategory?=?categoryId?==?0???categories[0]?:?categories.First(a?=>?a.Id?==?categoryId),CurrentCategoryId?=?categoryId,Categories?=?categories,Posts?=?_postService.GetPagedList(new?PostQueryParameters?{CategoryId?=?categoryId,Page?=?page,PageSize?=?pageSize,OnlyPublished?=?true})});
}
傳入參數只需要三個:
分類ID
當前頁面
頁面大小
這個接口要做的事比較多
獲取所有分類
判斷當前分類
獲取文章列表
最終返回我們前面定義的BlogListViewModel
然后在頁面模板里就可以用了。
View改造
第一件事把model換成BlogListViewModel
然后就是根據ViewModel里的數據進行頁面渲染,都是Bootstrap提供的頁面組件,代碼比較長我就不貼了,頁面模板的完整代碼可以在這看到:https://github.com/Deali-Axy/StarBlog/blob/master/StarBlog.Web/Views/Blog/List.cshtml
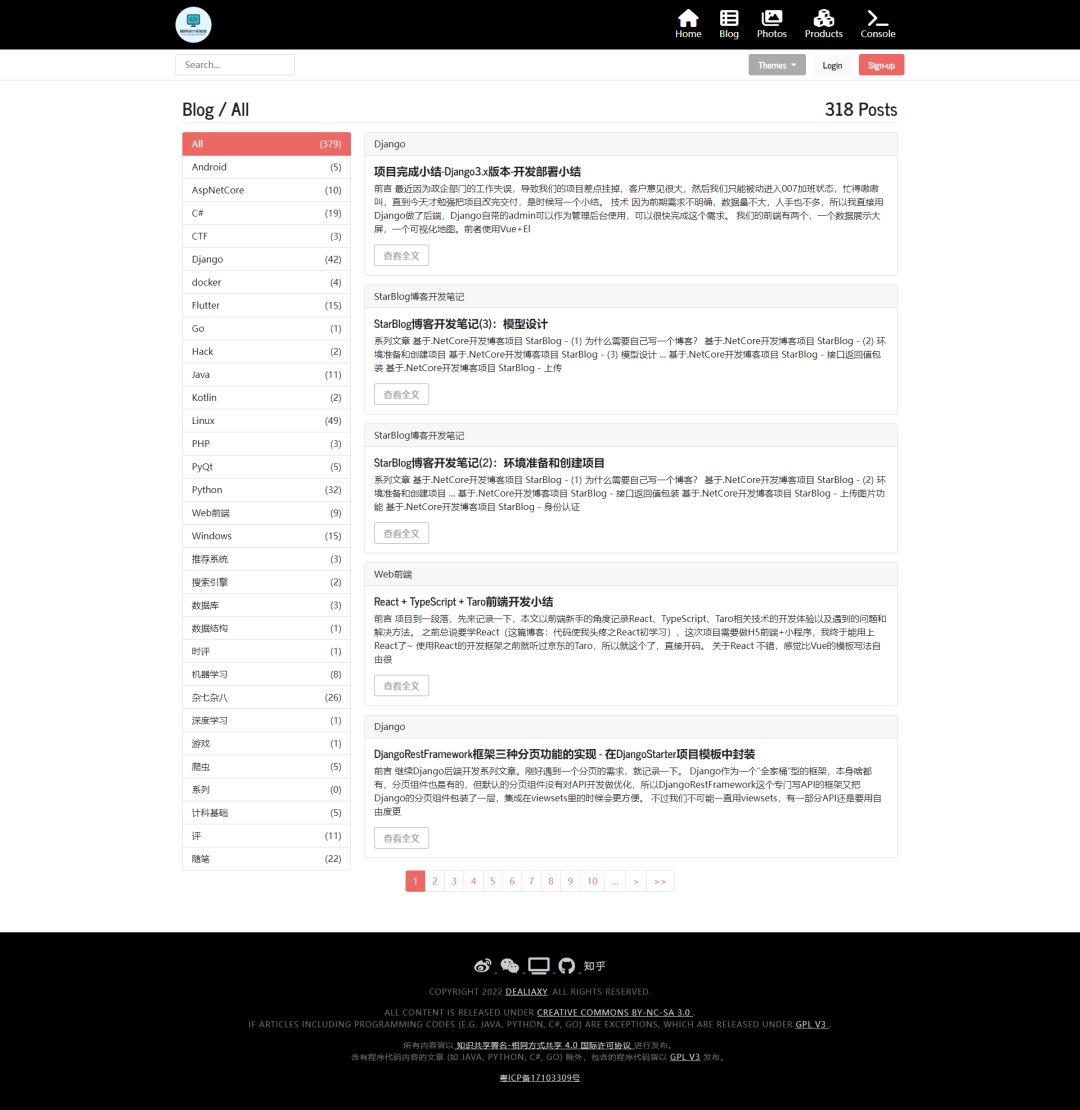
最終效果
截了個長圖,最終的頁面效果就是這樣了~
小結
如果你看到了這里,說明你是個有耐心的人 O(∩_∩)O哈哈~,同時對本項目是比較感興趣的,先感謝大家的支持~
本文一不小心就寫得比較長了,本來是想以那種每篇文章比較短的形式做一個連載,這樣讀起來不會有太大的壓力,沒想到稍微一展開講就涉及到很多內容,接下來的文章我得優化優化~
最近一段時間,公眾號后臺、微信都有收到朋友的催更,或者是抱怨我更新得太慢,實在是抱歉,最近被工作上的事情搞得有點暈頭轉向的,下班回家后晚上就只想看會書或者玩一下游戲放松,懈怠了,看到有這么多大佬在關注我的項目,頓時又充滿動力了!沖沖沖,接下來爭取每兩天更新一篇,歡迎繼續關注 ~
~


循環有多容易?你看一眼就懷...)


(9*9 乘法表)尋找電腦中的盲盒彩蛋)


加載Python神器!亮劍!)
【python】)
