在.NET7的Preview5中,優化了asp.net core中的JWT驗證,不用像以前繁瑣了,更重要的是帶來了一組生成Token的工具,可以讓開發人員或測試人員不需登錄獲取Token,而達到測試的目的。
創建項目
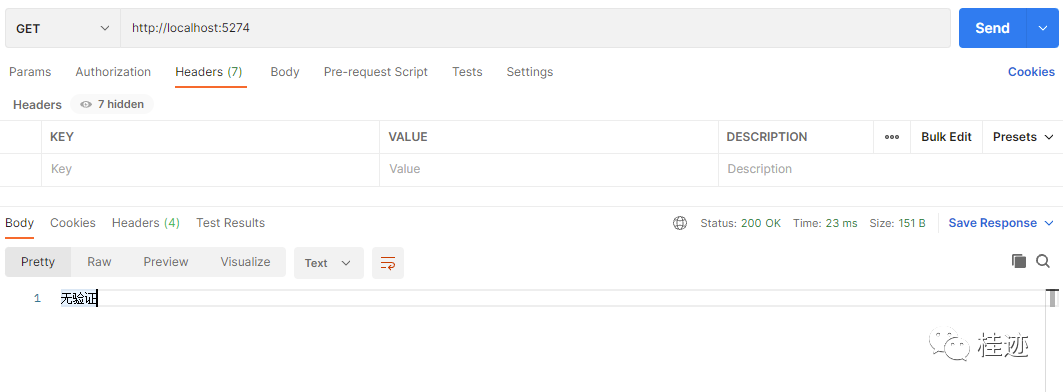
現在來看一下怎么使用,首選創建項目,/是無驗證,/myhome是有驗證
var?builder?=?WebApplication.CreateBuilder(args);
builder.Authentication.AddJwtBearer();
app.MapGet("/",?()?=>?"無驗證");
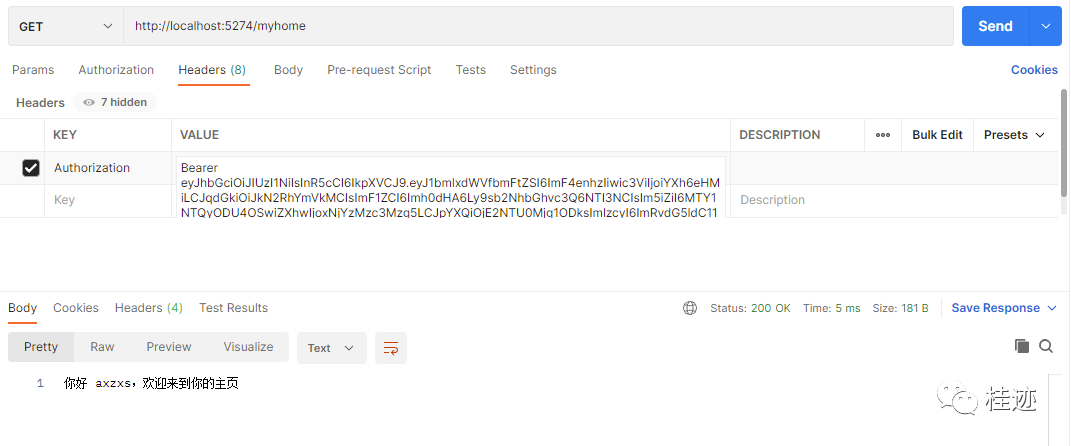
app.MapGet("/myhome", (ClaimsPrincipal user) => $"你好 {user.Identity?.Name},歡迎來到你的主頁").RequireAuthorization();
app.Run();用工具生成Token
本次共引入了兩個工具user-secrets和user-jwts,通過名稱,大家也能了解到一個是和加密相關,一個和JWT的token相關,它們分別擁有的命令如下圖:
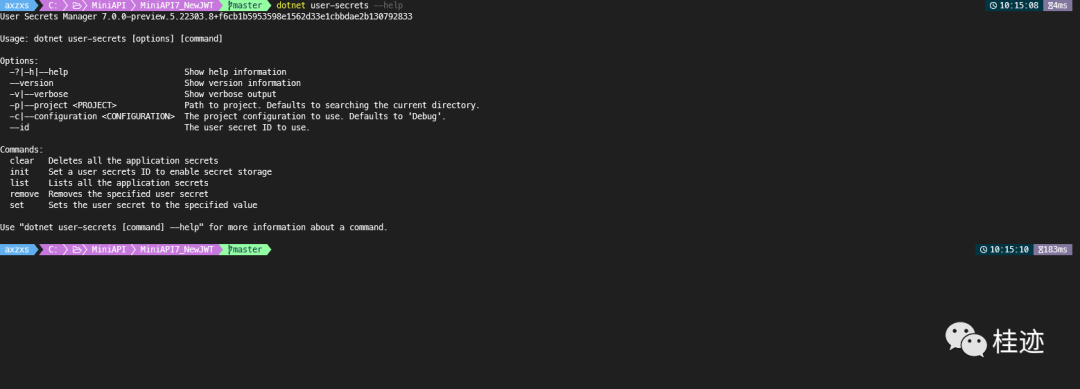
1、如果在項目中第一次使用user-secrets工具,首先要初始化,可以在右擊項目,用“在終端打開”,來運行命令行。
dotnet?user-secrets?init
命令的返回結果是:Set UserSecretsId to 'c2450184-8525-4ed7-9a82-d54c349dd4b8' for MSBuild project 'C:\myfile\Source\Repos\Asp.NetCoreExperiment\Asp.NetCoreExperiment\MiniAPI\MiniAPI7_NewJWT\MiniAPI7_NewJWT.csproj'.
同時,這個命令會在項目文件中生成UserSecretsID節點,值正是上面返回的UUID
<PropertyGroup><TargetFramework>net7.0</TargetFramework><Nullable>enable</Nullable><ImplicitUsings>enable</ImplicitUsings><LangVersion>preview</LangVersion><UserSecretsId>c2450184-8525-4ed7-9a82-d54c349dd4b8</UserSecretsId>
</PropertyGroup>
2、這時看一下secrets,結果是沒有配置
dotnet?user-secrets?list
No secrets configured for this application.
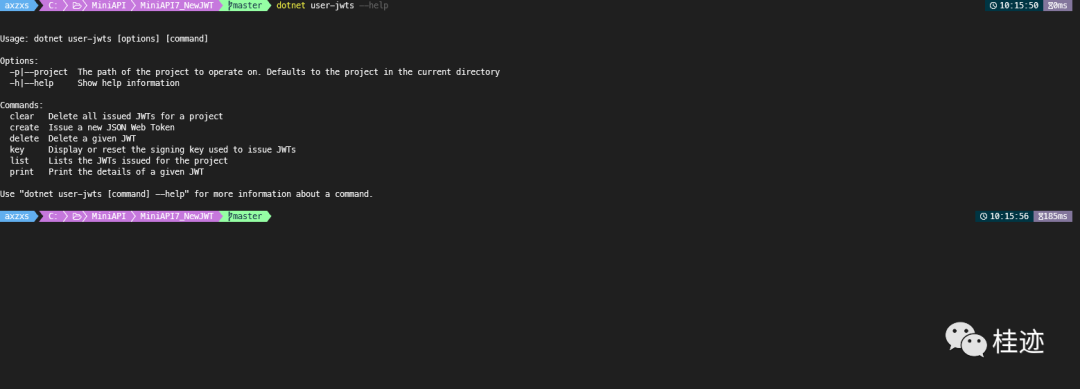
3、如果看一下jwts,返回值如下,有Secrets,但沒有jwts
dotnet?user-jwts?list
Project: C:\myfile\Source\Repos\Asp.NetCoreExperiment\Asp.NetCoreExperiment\MiniAPI\MiniAPI7_NewJWT\MiniAPI7_NewJWT.csproj
User Secrets ID: c2450184-8525-4ed7-9a82-d54c349dd4b8
No JWTs created yet!
4、這個時候創建一個jwt
dotnet?user-jwts?create
New JWT saved with ID 'd7dabed0'.
"Authentication": {"Schemes": {"Bearer": {"Audiences": ["http://localhost:5274"],"ClaimsIssuer": "dotnet-user-jwts"}}}同時,會在C:\Users\axzxs\AppData\Roaming\Microsoft\UserSecrets生成一個secrets文件夾,里面有兩個文件secrets.json和user-jwts.json,里面分別放著生成的secret信息和jwt信息。
5、這時secrets再顯示一下,就會有值了
dotnet?user-secrets?list
返回結果:
dotnet-user-jwts:KeyMaterial = l4ynAWIVR5JKSKo5Yyr0XvOXgZ+dlBUwe3jI1st3DsY=
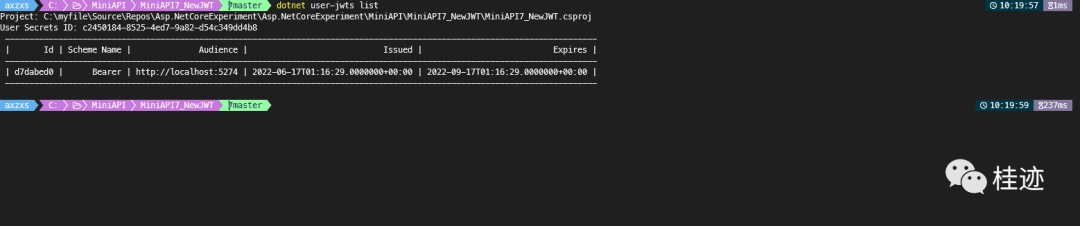
6、jwts list,就會有列表了
dotnet?user-jwts?list
7、可以用jwts的print命令,顯示一下token,以方便我們在測試中使用
dotnet?user-jwts?print?d7dabed0?--show-full
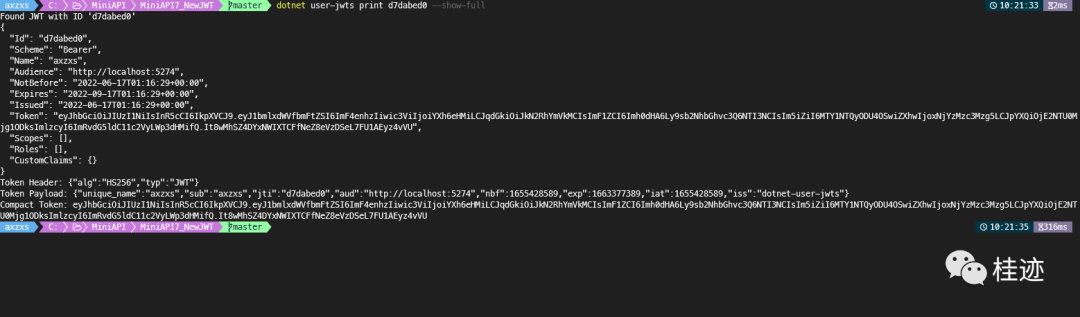
運行結果
運行項目,用postman測試,這個沒有什么問題,返回無驗證
復制生成的Token,放在header中,請求myhome,這時會返回驗證通過的信息,并且帶有name,這個name就是當前windows用戶
上面只是驗證,那如果增加角色呢?先在項目中添加代碼:
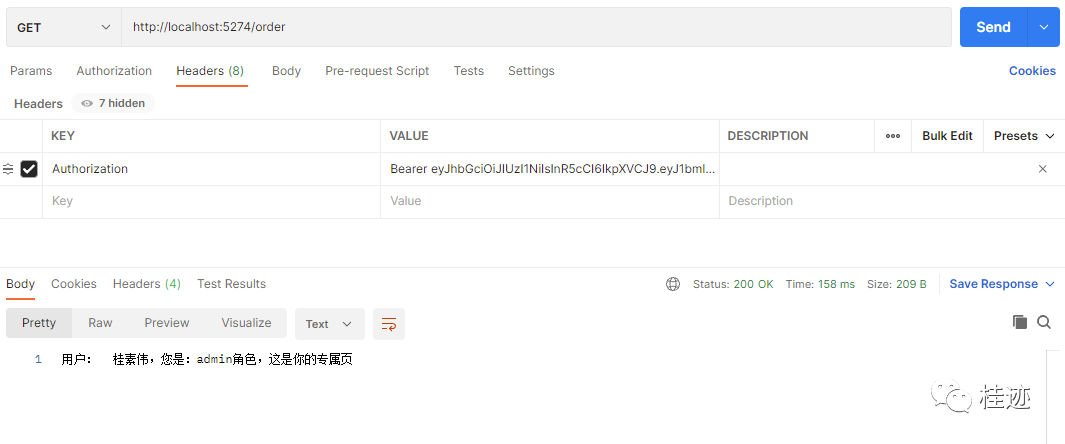
app.MapGet("/order", (ClaimsPrincipal user) => $"用戶:{user.Identity?.Name},您是:{user.Claims?.Where(s => s.Type == ClaimTypes.Role).First().Value}角色,這是你的專屬頁").RequireAuthorization(builder =>
{builder.RequireRole("admin");
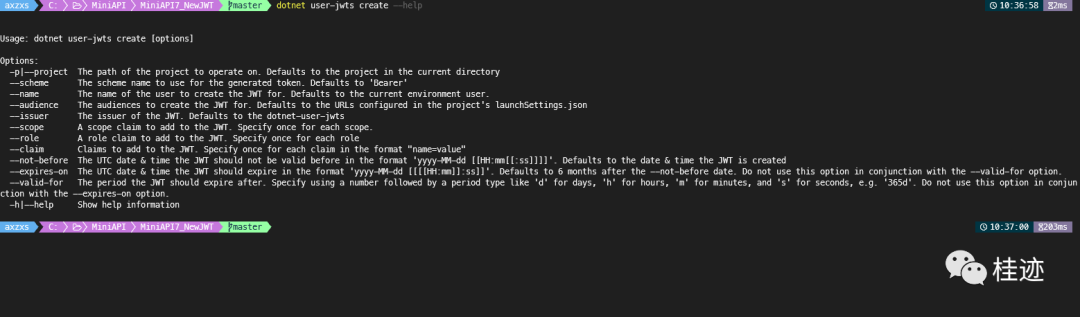
});那帶角色的token怎么生成呢?先看一下user-jwts create命令的幫助,是可以在create時加name和role的。
dotnet?user-jwts?create?--help
dotnet?user-jwts?create?--name=桂素偉?--role=admin
創建一個名字叫桂素偉,角色是admin的token。
這時,再次測試結果如下,這次name和role都是自己設置的了。
通過上面的兩個例子,可以看到,通過這兩組工具,可以幫我們生成token,可以直接用來測試,而不需要提前把獲取tokne和權限相關的東西搞定,雖然只是一小步,也說明了.net7在進步中。

)
 Add an Arbiter to Replica Set 集群中加入仲裁節點)
![[轉]new Thread的弊端及Java四種線程池的使用](http://pic.xiahunao.cn/[轉]new Thread的弊端及Java四種線程池的使用)
)


![[轉].NET 開源項目 Polly 介紹](http://pic.xiahunao.cn/[轉].NET 開源項目 Polly 介紹)


)
![[轉]數據庫事務ACID特性](http://pic.xiahunao.cn/[轉]數據庫事務ACID特性)


