
寫在前面
我在前文:
《微軟Azure配置中心 App Configuration (一):輕松集成到Asp.Net Core》已經介紹了Asp.net Core怎么輕易的接入azure 配置中心App Configuration(下稱azure 配置中心);
《微軟Azure配置中心 App Configuration (二):Feature Flag 功能開關特性》 講Asp.net Core功能開關的兩種方式的簡單使用;
本文重點來講講Azure配置中心是怎么配置的動態更新的。
概念定義
一般對配置中心來說都有動態更新的概念,我這里給個定義:
配置中心的動態更新是指,當用戶在配置中心管理后臺更新配置后,集成的客戶端能以某種形式到配置的更新;
一般有兩種模式
1、客戶端輪詢;
2、服務端主動推送更新;包括但不限于Grpc(Nacos),Websocket等方式;
客戶端輪詢模式
本文在前文基礎上開始的,有些略過的地方請看前文;
1、修改集成方式
var?builder?=?WebApplication.CreateBuilder(args);
var?connectionString?=?builder.Configuration.GetConnectionString("AppConfig");builder.Host.ConfigureAppConfiguration((hostingContext,?config)?=>
{//配置不同功能config.AddAzureAppConfiguration(options?=>{啟用Label(多環境)支持//options.Connect(connectionString)//????.Select(KeyFilter.Any,?LabelFilter.Null)//配置過濾器,讀取空Lable的配置//????.Select(KeyFilter.Any,?hostingContext.HostingEnvironment.EnvironmentName);?//配置過濾器,只讀取某個環境的配置//啟用Poll模式的主動更新options.Connect(connectionString).Select(KeyFilter.Any,?LabelFilter.Null)//配置過濾器,讀取空Lable的配置.Select(KeyFilter.Any,?hostingContext.HostingEnvironment.EnvironmentName)?//配置過濾器,只讀取某個環境的配置.ConfigureRefresh(refresh?=>{refresh.Register("TestApp:Settings:Sentinel",?refreshAll:?true).SetCacheExpiration(new?TimeSpan(0,?0,?30));});});
});這里方法ConfigureRefresh參數:
TestApp:Settings:Sentinel:這就是程序輪詢的配置Key;
refreshAll=true: 表示當輪詢的配置Key更新時,更新所有配置;
SetCacheExpiration:設置多久時間輪詢一次,這里設置了30秒,這也是默認值;
2、注入服務
builder.Services.AddAzureAppConfiguration();3、驗證
我們現在Azure配置管理后臺設置好key:TestApp:Settings:Sentinel
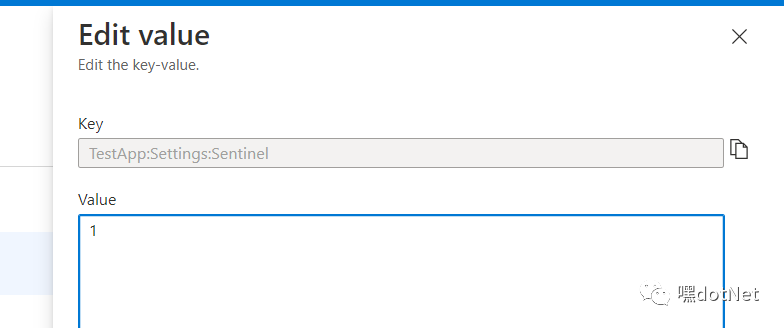
可以看到初始值==1;
我們新增一個測試的TestKey4==TestKey4-azure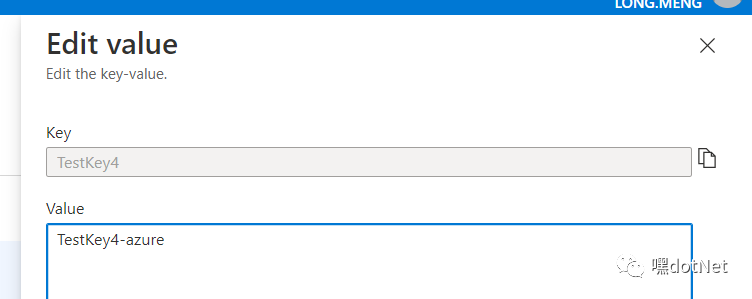
啟動程序后,我們無論怎么修改配置后臺,都不會程序拿到值始終:TestKey4 ==TestKey4-azure
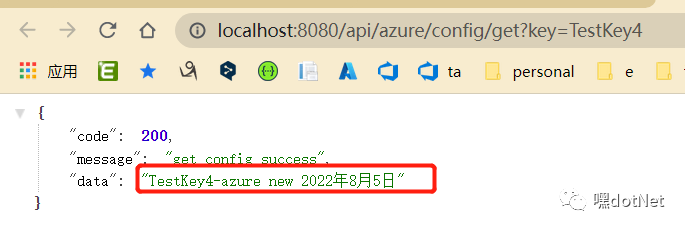
我們把監控Key:TestApp:Settings:Sentinel設置為2
再次獲取可以看到,TestKey4 的值更新了:
OK,輪詢模式就是這么樸實無華,卻又足以滿足大部分需求;
服務端主動推送更新
流程簡介
除了輪詢的方式動態更新配置外,Azure配置中心也提供了push的方式主動推送配置更新到客戶端,不過它的實現流程不太像我們經常遇到的Grpc或者Websocket等那樣直連的方式,而是借助Azure消息隊列Service Bus實現的。
大體流程:
先創建一個Service Bus的Topic訂閱(類似于RabbitMQ的Topic);
Azure配置中心注冊一個事件訂閱到Service Bus的Topic訂閱,當配置修改時觸發事件發送一個配置更新消息到Service Bus;
客戶端程序訂閱了Service Bus的Topic,實時接收配置更新消息并更新本地程序的IConfiguration;
下面我們看看流程怎么實現;
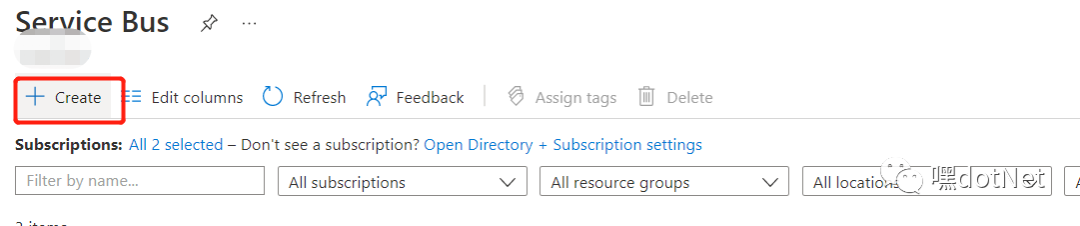
1、先創建Service Bus的Topic訂閱
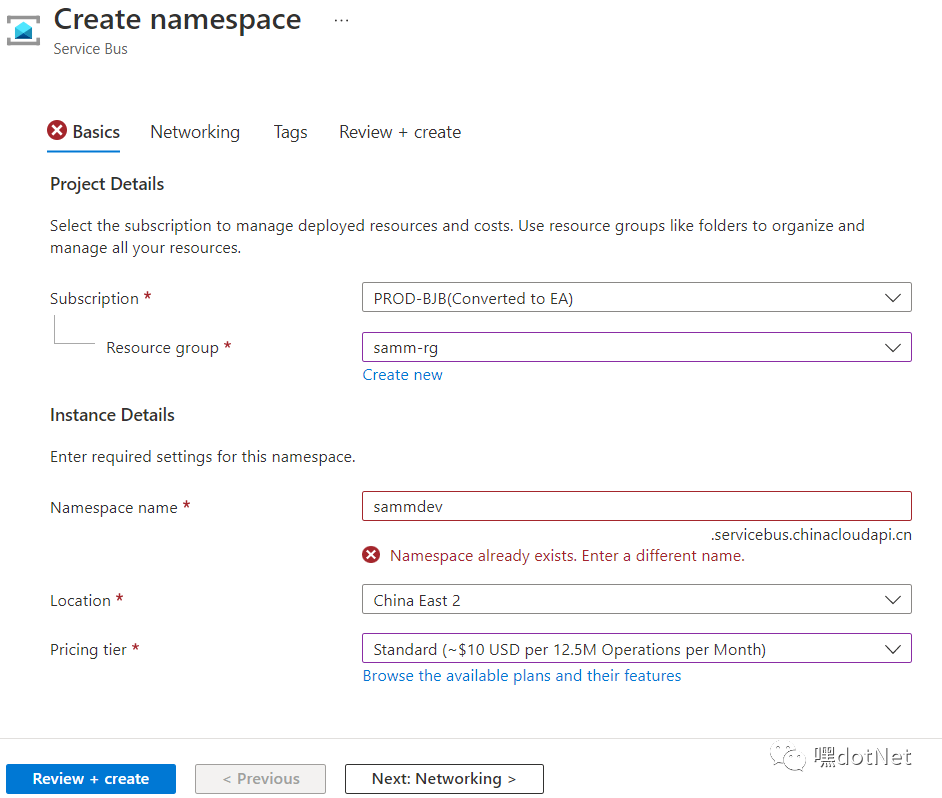
創建Service Bus命名空間
信息自己填
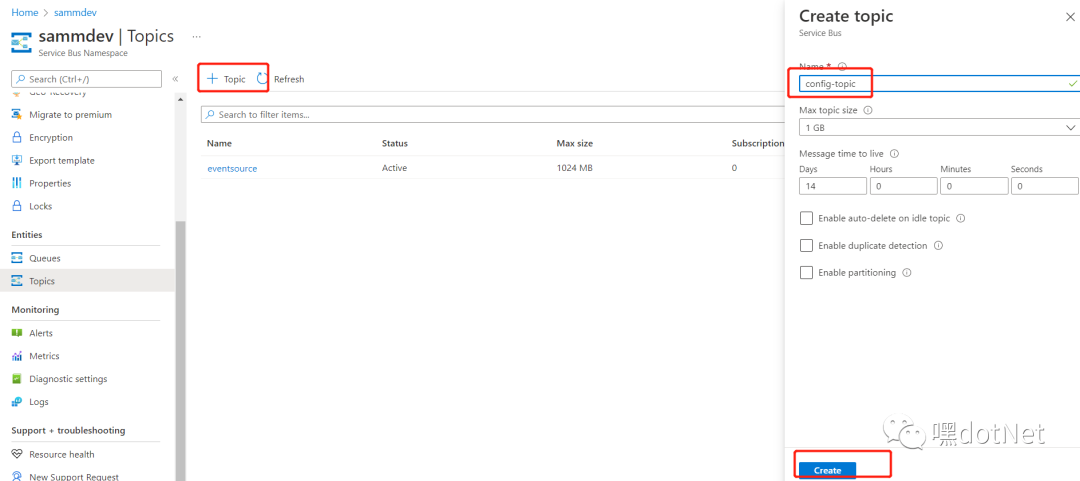
創建Topic
我創建的topic名:config-topic
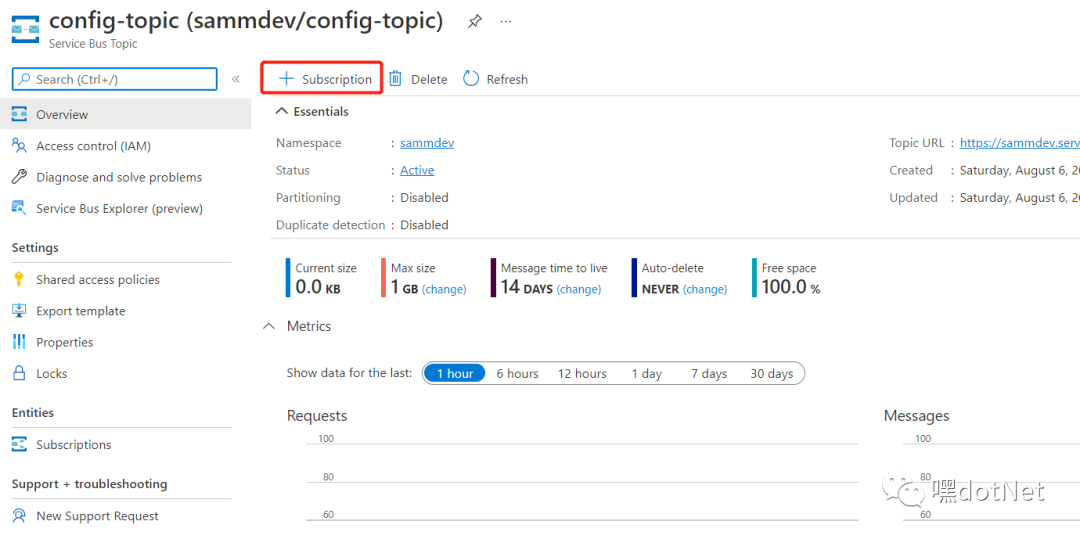
創建topic訂閱
訂閱名:config-s1
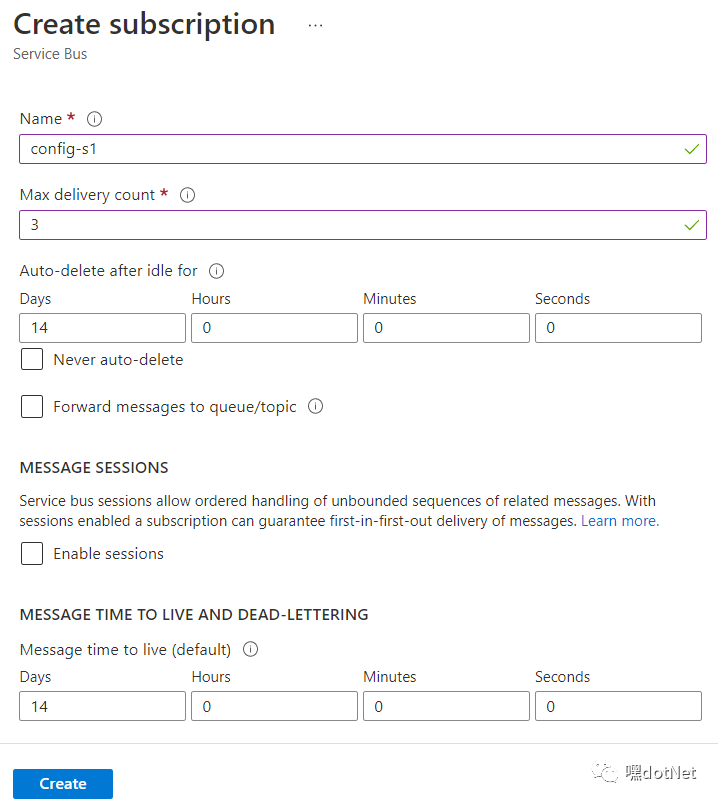
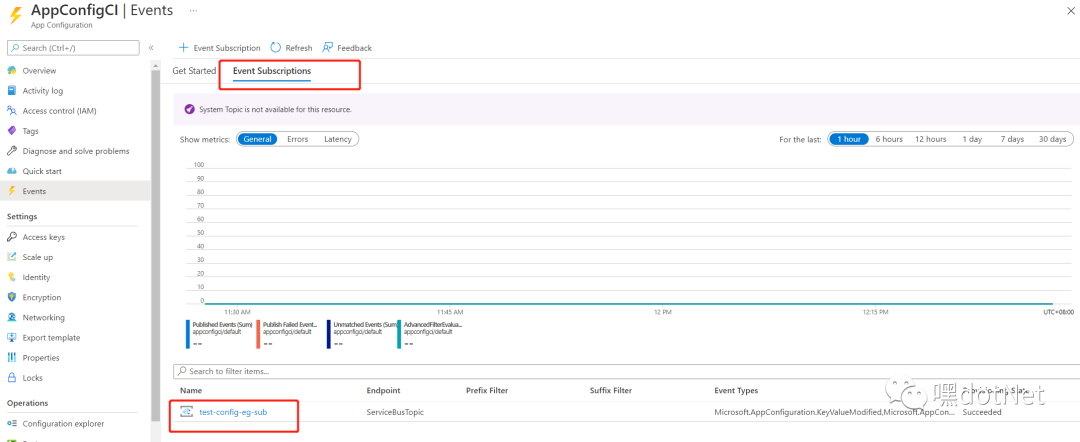
ok,到這步位置,Service Bus這邊基本配置完;
2、創建配置中心的事件訂閱到topic訂閱
App Configuration下創建事件訂閱
填寫Topic訂閱信息
注意右側紅框,要選擇你上步創建的Service Bus 的Topic訂閱 config-topic
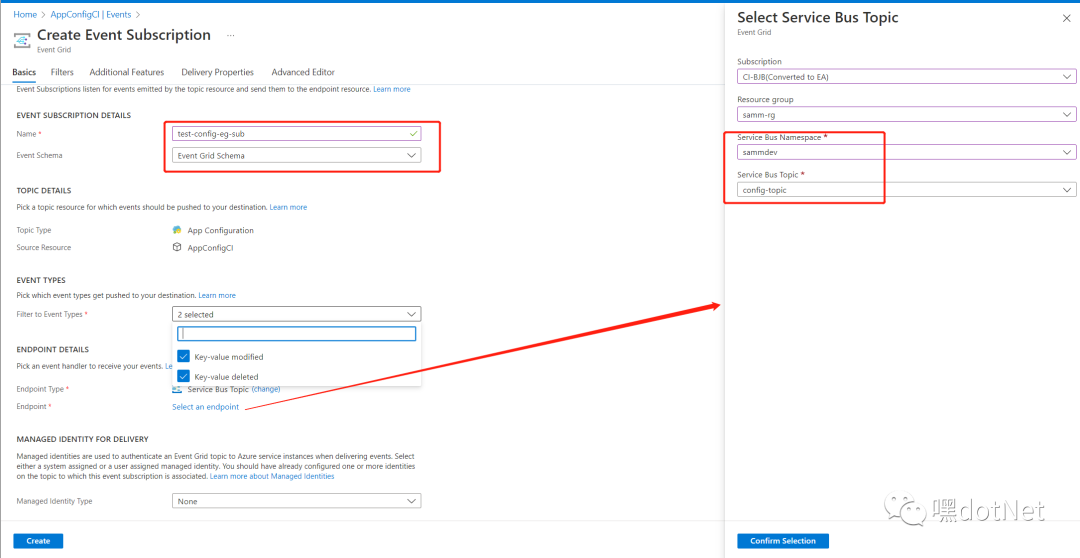
創建成功
3、Asp.Net Core中集成
安裝包
install-package?Microsoft.Azure.ServiceBus新增配置信息
//ServiceBus?的配置"AzureServiceBusConfig":?{"ConnectionString":?"<?ConnectionString?>","TopicName":?"<?Your?TopicName?>",?//我的是config-topic"SubscriptionName":?"<?Your?SubscriptionName?>"?//?我的是?config-s1}修改ConfigureService做集成
var?builder?=?WebApplication.CreateBuilder(args);
var?connectionString?=?builder.Configuration.GetConnectionString("AppConfig");
IConfigurationRefresher?_refresher?=?null;builder.Host.ConfigureAppConfiguration((hostingContext,?config)?=>
{簡單使用只配置connection?string//config.AddAzureAppConfiguration(connectionString);//配置不同功能config.AddAzureAppConfiguration(options?=>{//啟用Push模式的主動推送更新配置options.Connect(connectionString).Select(KeyFilter.Any,?LabelFilter.Null)//配置過濾器,讀取空Lable的配置.Select(KeyFilter.Any,?hostingContext.HostingEnvironment.EnvironmentName)?//配置過濾器,只讀取某個環境的配置.ConfigureRefresh(refresh?=>{refresh.Register("TestApp:Settings:Sentinel",?refreshAll:?true).SetCacheExpiration(TimeSpan.FromDays(10));?//這個刷新頻率要設置特別低了});_refresher?=?options.GetRefresher();});
});
TestApp:Settings:Sentinel:只訂閱這個key的刷新事件;
SetCacheExpiration:這里的刷新頻率設置很低就行;
修改IApplicationBuilder集成
先寫個拓展方法
///?<summary>
///?啟用一個Service?bus事件處理程序在配置更新時刷新?IConfiguration
///?</summary>
///?<param?name="app">The?application.</param>
///?<param?name="refresher">The?refresher.</param>
///?<returns></returns>
///?<exception?cref="System.ArgumentNullException">serviceBusConfig</exception>
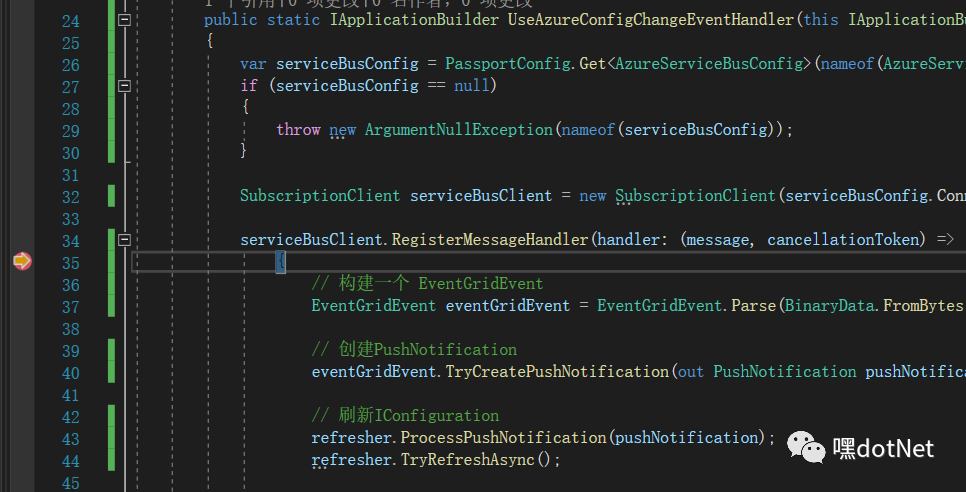
public?static?IApplicationBuilder?UseAzureConfigChangeEventHandler(this?IApplicationBuilder?app,?IConfigurationRefresher?refresher)
{var?serviceBusConfig?=?PassportConfig.Get<AzureServiceBusConfig>(nameof(AzureServiceBusConfig));if?(serviceBusConfig?==?null){throw?new?ArgumentNullException(nameof(serviceBusConfig));}SubscriptionClient?serviceBusClient?=?new?SubscriptionClient(serviceBusConfig.ConnectionString,?serviceBusConfig.TopicName,?serviceBusConfig.SubscriptionName);serviceBusClient.RegisterMessageHandler(handler:?(message,?cancellationToken)?=>{//?構建一個?EventGridEventEventGridEvent?eventGridEvent?=?EventGridEvent.Parse(BinaryData.FromBytes(message.Body));//?創建PushNotificationeventGridEvent.TryCreatePushNotification(out?PushNotification?pushNotification);//?刷新IConfigurationrefresher.ProcessPushNotification(pushNotification);refresher.TryRefreshAsync();return?Task.CompletedTask;},exceptionReceivedHandler:?(exceptionargs)?=>{Console.WriteLine($"{exceptionargs.Exception}");return?Task.CompletedTask;});return?app;
}然后直接在管道中啟用
app.UseAzureConfigChangeEventHandler(_refresher);這個函數的功能是,訂閱Service Bus的Topic ,當服務端配置修改時,接收配置更新信息,刷新本地配置;
驗證
還是用TestKey4來測試,先運行程序,
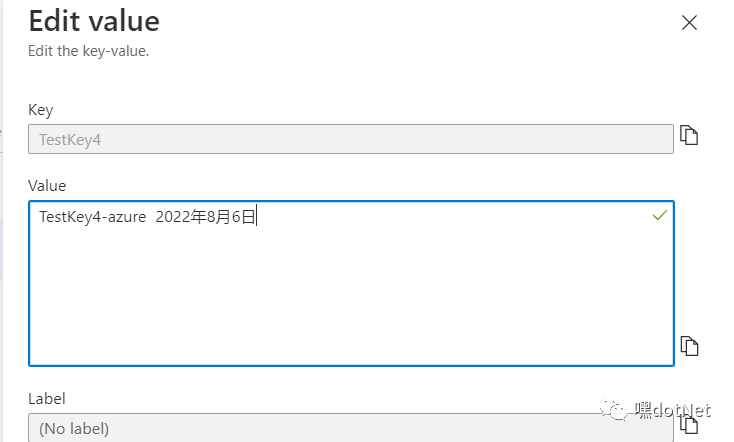
本來:TestKey4==TestKey4-azure,我們改成:TestKey4==TestKey4-azure 2022年8月6日
但怎么刷新程序獲取的值都不會更新。
我們打個斷點到函數:UseAzureConfigChangeEventHandler(),再更新Key ?TestApp:Settings:Sentinel
看到,收到配置更新消息命中斷點了:
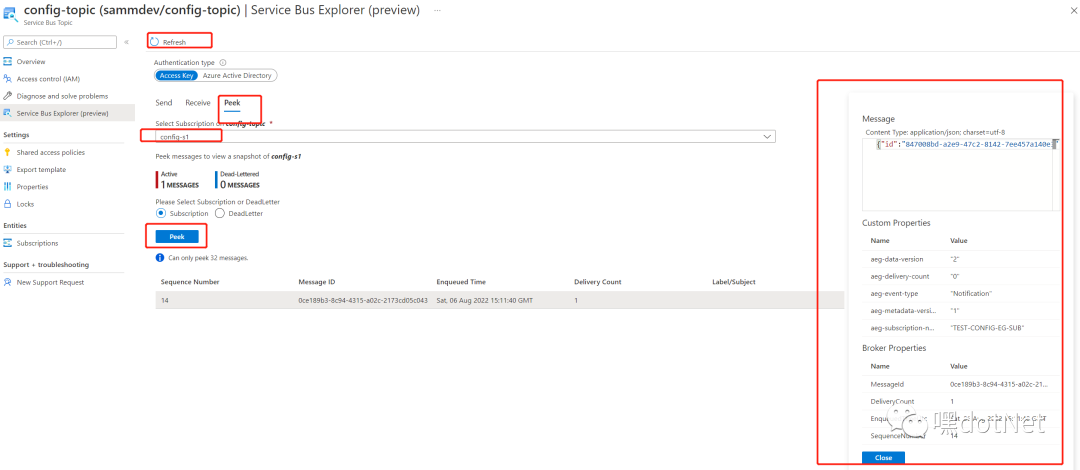
同時,通過Service Bus的后臺,我們也已看到配置更新事件消息正確發送:
我們再次獲取配置看到確已更新:

OK,服務端基于訂閱消息隊列獲取配置的主動更新方式驗證成功;
總結
1、我覺得動態更新配置用主動輪詢的方式基本能滿足大部分需求(但是每次輪詢消耗次數,請設置好輪詢間隔時間),基于消息隊列的主動推送方式稍微有點麻煩,看需求選用;
2、當配置中心的Key和本地配置文件的Key沖突時,以配置中心為準;
3、總體來說Azure配置中心還是挺香的,除了貴(畢竟Azure 土豪云),價格:https://azure.microsoft.com/en-us/pricing/details/app-configuration/。
Azure配置中心的基本學習到這里告一段落,后面挖掘到更實用的功能/技巧將再次水文補充;
源碼
https://github.com/gebiWangshushu/Hei.Azure.Test
[參考]
https://docs.microsoft.com/en-us/azure/azure-app-configuration/overview

)


介紹與實現)


 D. Mike and distribution 思維+數學)
:如何尋找 C# 中的 VirtualAlloc 內存泄漏)
![[APP]- 找回Xcode7的代碼折疊功能](http://pic.xiahunao.cn/[APP]- 找回Xcode7的代碼折疊功能)

