
odoo 自定義視圖
If you’re particular about how Windows displays the contents of your folders, you can cut your customization time down considerably by taking advantage of File Explorer’s five built-in folder templates.
如果您特別想知道Windows如何顯示文件夾的內容,則可以利用File Explorer的五個內置文件夾模板大大減少自定義時間。
You may have noticed that when you open folders with certain types of files–like pictures or music–Windows displays the contents of those folder a little differently from other folders. In Windows, every folder on your system is “optimized” for one of the five following templates:
您可能已經注意到,當打開包含某些類型的文件(例如圖片或音樂)的文件夾時,Windows顯示的文件夾內容與其他文件夾略有不同。 在Windows中,針對以下五個模板之一“優化”了系統上的每個文件夾:
- General Items 一般項目
- Documents文件資料
- Pictures圖片
- Music音樂
- Videos影片
Windows does its best to automatically detect what kind of files are?in a folder and apply the proper template. In folders with mixed file types, Windows will typically use the General Items template, unless the overwhelming majority of files in that folder fit one of the other categories. You can also set the template for any folder manually.
Windows會盡最大努力自動檢測文件夾中的文件類型并應用適當的模板。 在具有混合文件類型的文件夾中,Windows通常將使用“常規項目”模板,除非該文件夾中的絕大多數文件符合其他類別之一。 您也可以手動設置任何文件夾的模板。
Even better, you can customize the display of any folder that uses a particular template and then apply those customizations system-wide to all folders that use the same template. Such customizations include the view (list, details, and so on), which columns are displayed and how, the sort order, and any file groupings. Here’s how to make it all happen.
更好的是,您可以自定義使用特定模板的任何文件夾的顯示,然后在系統范圍內將這些自定義應用于使用同一模板的所有文件夾。 此類自定義包括視圖(列表,詳細信息等),顯示哪些列以及如何顯示,排序順序以及任何文件分組。 這是實現所有目標的方法。
NOTE:?Folder templates have been around since the Windows XP days and using them hasn’t changed much over the years. The techniques in this article apply to Windows XP through?Windows 10.
注意:自Windows XP以來,文件夾模板就已經存在,并且多年來使用它們并沒有太大變化。 本文中的技術適用于通過Windows 10的Windows XP。
第一步:自定義使用要更改模板的文件夾 (Step One: Customize a Folder that Uses the Template You Want to Change)
Your first step is to customize a single folder that uses the template you want to change.?In this article, we’ll be customizing a pictures folder and then applying those changes to all folders that use the picture template. The process is identical for customizing folders using each of the other four templates.
第一步是定制一個使用您要更改的模板的文件夾。 在本文中,我們將自定義圖片文件夾,然后將這些更改應用于使用圖片模板的所有文件夾。 使用其他四個模板中的每個模板定制文件夾的過程相同。
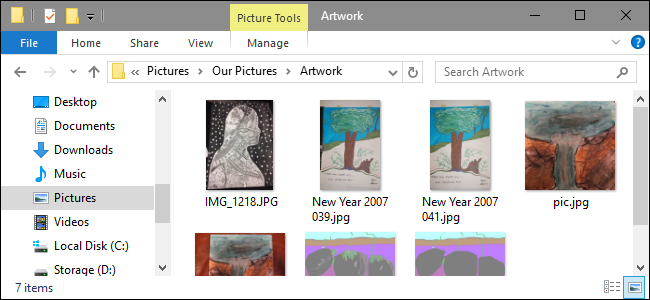
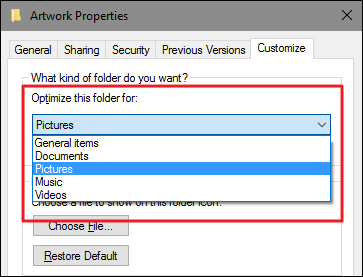
Open up File Explorer and find?a folder you want to work with. To ensure that it’s a suitable candidate, right-click the folder, choose “Properties,” and then switch to the “Customize” tab.? Ensure that the “Optimize this folder for” drop-down menu shows the right template. In our case, the Pictures?template is selected, so we’re good to go.
打開文件資源管理器,然后找到要使用的文件夾。 為了確保它是合適的候選者,請右鍵單擊該文件夾,選擇“屬性”,然后切換到“自定義”選項卡。 確保“為該文件夾優化”下拉菜單顯示正確的模板。 在我們的例子中,選擇了圖片模板,所以我們很好。
If the right template is not shown, you can either choose a different folder or select the proper template from the menu to apply it to that folder. When you’re done, click “OK.”
如果未顯示正確的模板,則可以選擇其他文件夾,也可以從菜單中選擇適當的模板以將其應用于該文件夾。 完成后,單擊“確定”。

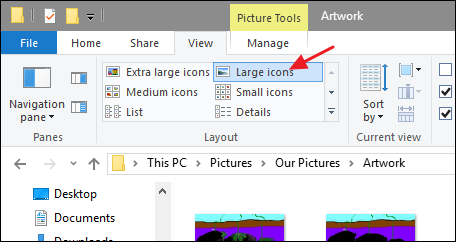
Now, you’re ready to customize the folder. How you do this is entirely up to you. In our example, we’re going to switch the view to display large thumbnails by clicking “Large icons” on the “View” menu of File Explorer. In older versions of Windows without the ribbon interface, you’ll find a drop-down menu on the toolbar for making this change.
現在,您可以自定義文件夾了。 如何做到這一點完全取決于您。 在我們的示例中,我們將通過單擊文件資源管理器“視圖”菜單上的“大圖標”來切換視圖以顯示大縮略圖。 在沒有功能區界面的Windows的較早版本中,您會在工具欄上找到一個下拉菜單以進行此更改。
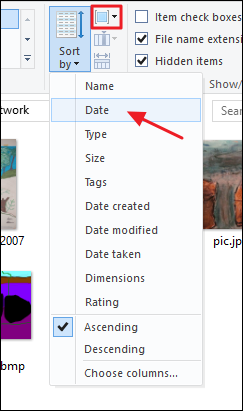
We’re also going to have the pictures grouped by date?by selecting “Date” from the “Group by” drop-down menu on the “View” tab.
通過在“查看”選項卡上的“分組依據”下拉菜單中選擇“日期”,我們還將按日期對圖片進行分組。
That’s all we’re going to for our picture folders, but there is obviously a lot more folder customization you could do. If you’re using the Details or List view, you can customize what columns appear in the view and drag your columns to different positions.
這就是我們圖片文件夾的全部內容,但是顯然您可以做更多的文件夾自定義操作。 如果使用的是“詳細信息”或“列表”視圖,則可以自定義視圖中顯示的列,并將列拖動到其他位置。
第二步:使用模板將該自定義應用于所有文件夾 (Step Two: Apply that Customization to All Folders Using the Template)
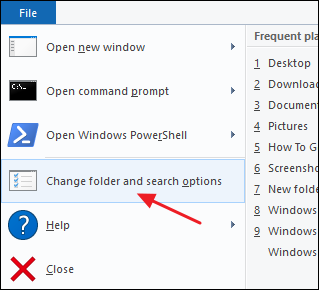
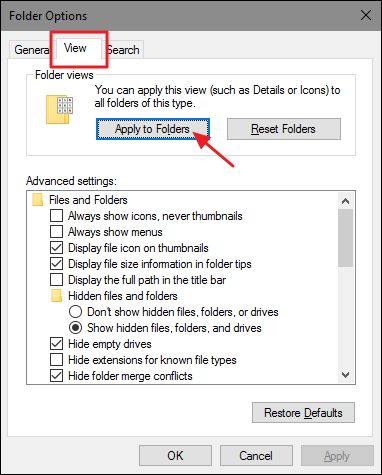
When?you have the folder customized the way you want it, you can now apply your customizations to all other folders using the same template. While you still have that folder open in File Explorer, click the “File” menu and then click the “Change folder and search options” command. In older versions of Windows, this command was named “File and folder options.”
當您以所需方式自定義文件夾后,現在可以使用同一模板將自定義內容應用于所有其他文件夾。 當您仍在文件資源管理器中打開該文件夾時,單擊“文件”菜單,然后單擊“更改文件夾和搜索選項”命令。 在Windows的舊版本中,此命令名為“文件和文件夾選項”。
In the Folder Options window, switch to the “View” tab, click the “Apply to Folders” button, and then click “OK.”
在“文件夾選項”窗口中,切換到“查看”選項卡,單擊“應用于文件夾”按鈕,然后單擊“確定”。
You can now browse around to some other folders that you’d expect to use this template and verify that your customizations have been applied.
現在,您可以瀏覽到一些其他希望使用此模板的文件夾,并驗證是否已應用自定義設置。
As we mentioned earlier, when you open a folder, File?Explorer examines the contents to see if it can automatically determine which folder template to use. If it can’t, it will use the General Items template. You can force a folder to use any template by selecting it on the “Customize” tab of the folder’s properties window.
如前所述,當您打開文件夾時,文件資源管理器會檢查內容,以查看它是否可以自動確定要使用的文件夾模板。 如果不能,它將使用“常規項目”模板。 您可以通過在文件夾屬性窗口的“自定義”選項卡上選擇文件夾來強制它使用任何模板。
It’s a shame that Microsoft never went any further with the idea after its initial implementation. It would be really great, for example, if we were able to create our own templates. Nonetheless, it’s still?handy being?able to set up the templates we do have for different types of?folders and apply those templates system wide.
令人遺憾的是,Microsoft在最初實施此想法后再也沒有進一步發展。 例如,如果我們能夠創建自己的模板,那就太好了。 盡管如此,為不同類型的文件夾設置我們擁有的模板并在系統范圍內應用這些模板仍然很方便。
翻譯自: https://www.howtogeek.com/howto/16694/customize-the-five-windows-folder-templates/
odoo 自定義視圖


)


