介紹
celery 定時器是一個調度器(scheduler);它會定時地開啟(kicks off)任務,然后由集群中可用的工人(worker)來執行。
定時任務記錄(entries)默認 從 beat_schedule 設置中獲取,但自定義存儲也可以使用,如把記錄存儲到SQL數據庫中。
要確保同一時間一份時間表上只有一個調度器在運行,否則會因為重復發送任務而結束。使用集中途徑意味著定時任務不用必須同步,并且服務無需用鎖操控。
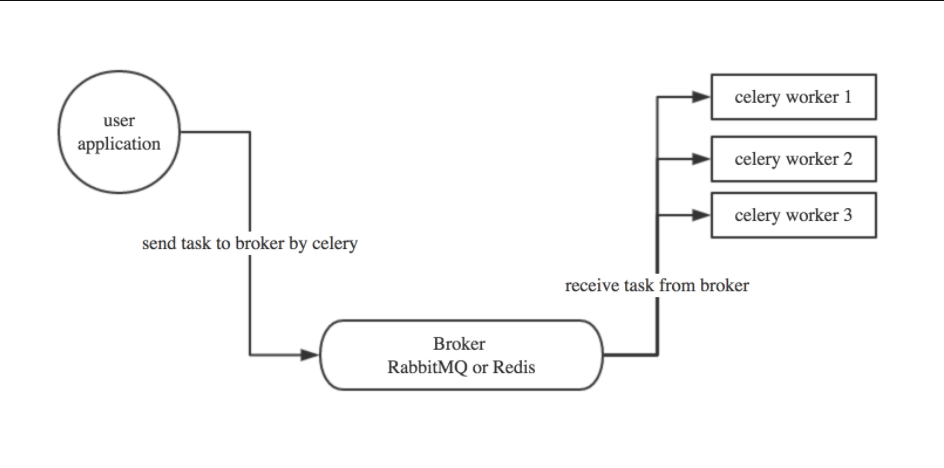
- user:用戶程序,用于告知celery去執行一個任務。
- broker: 存放任務(依賴RabbitMQ或Redis,進行存儲)
- worker:執行任務
celery需要rabbitMQ、Redis、Amazon SQS、Zookeeper(測試中) 充當broker來進行消息的接收,并且也支持多個broker和worker來實現高可用和分布式。http://docs.celeryproject.org/en/latest/getting-started/brokers/index.html


Celery version 4.0 runs onPython ?2.7, 3.4, 3.5?PyPy ?5.4, 5.5?This is the last version to support Python 2.7, and from the next version (Celery 5.x) Python 3.5 or newer is required.If you’re running an older version of Python, you need to be running an older version of Celery:Python 2.6: Celery series 3.1 or earlier.Python 2.5: Celery series 3.0 or earlier.Python 2.4 was Celery series 2.2 or earlier.Celery is a project with minimal funding, so we don’t support Microsoft Windows. Please don’t open any issues related to that platform.
環境準備:
- 安裝rabbitMQ或Redis
https://www.cnblogs.com/L5251/articles/9146825.html
? ?https://www.cnblogs.com/L5251/articles/9325586.html
- 安裝celery
? ? ?pip3 install celery
快速上手
import time
from celery import Celeryapp = Celery('tasks', broker='redis://192.168.10.48:6379', backend='redis://192.168.10.48:6379')@app.task
def xxxxxx(x, y):time.sleep(10)return x + y
s2.pyfrom celery.result import AsyncResult from s1 import appasync = AsyncResult(id="f0b41e83-99cf-469f-9eff-74c8dd600002", app=app)if async.successful():result = async.get()print(result)# result.forget() # 將結果刪除 elif async.failed():print('執行失敗') elif async.status == 'PENDING':print('任務等待中被執行') elif async.status == 'RETRY':print('任務異常后正在重試') elif async.status == 'STARTED':print('任務已經開始被執行')
# 執行 s1.py 創建worker(終端執行命令):
celery worker -A s1 -l info
# PS:Windows系統上執行命令時出錯解決方法
    pip3 install eventlet
# 后期運行修改為:celery worker -A s1 -l info -P eventlet
# 執行 s2.py ,創建一個任務并獲取任務ID:
    python3 s2.py# 執行 s3.py ,檢查任務狀態并獲取結果:python3 s3.py
多任務結構
pro_cel├── celery_tasks# celery相關文件夾│ ├── celery.py # celery連接和配置相關文件│ └── tasks.py # 所有任務函數├── check_result.py # 檢查結果└── send_task.py # 觸發任務
#!/usr/bin/env python
# -*- coding:utf-8 -*-
from celery import Celerycelery = Celery('xxxxxx',broker='redis://192.168.0.111:6379',backend='redis://192.168.0.111:6379',include=['celery_tasks.tasks'])# 時區
celery.conf.timezone = 'Asia/Shanghai'
# 是否使用UTC
celery.conf.enable_utc = False
#!/usr/bin/env python
# -*- coding:utf-8 -*-import time
from .celery import celery@celery.task
def xxxxx(*args, **kwargs):time.sleep(5)return "任務結果"@celery.task
def hhhhhh(*args, **kwargs):time.sleep(5)return "任務結果"
#!/usr/bin/env python
# -*- coding:utf-8 -*-from celery.result import AsyncResult
from celery_tasks.celery import celeryasync = AsyncResult(id="ed88fa52-11ea-4873-b883-b6e0f00f3ef3", app=celery)if async.successful():result = async.get()print(result)# result.forget() # 將結果刪除
elif async.failed():print('執行失敗')
elif async.status == 'PENDING':print('任務等待中被執行')
elif async.status == 'RETRY':print('任務異常后正在重試')
elif async.status == 'STARTED':print('任務已經開始被執行')
#!/usr/bin/env python
# -*- coding:utf-8 -*-
import celery_tasks.tasks# 立即告知celery去執行xxxxxx任務,并傳入兩個參數
result = celery_tasks.tasks.xxxxx.delay(4, 4)print(result.id)
更多配置:http://docs.celeryproject.org/en/latest/userguide/configuration.html
定時任務
1. 設定時間讓celery執行一個任務
import datetime
from celery_tasks.tasks import xxxxx
"""
from datetime import datetimev1 = datetime(2017, 4, 11, 3, 0, 0)
print(v1)v2 = datetime.utcfromtimestamp(v1.timestamp())
print(v2)"""
ctime = datetime.datetime.now()
utc_ctime = datetime.datetime.utcfromtimestamp(ctime.timestamp())s10 = datetime.timedelta(seconds=10)
ctime_x = utc_ctime + s10# 使用apply_async并設定時間
result = xxxxx.apply_async(args=[1, 3], eta=ctime_x)
print(result.id)
2. 類似于contab的定時任務
"""
celery beat -A proj
celery worker -A proj -l info"""
from celery import Celery
from celery.schedules import crontabapp = Celery('tasks', broker='amqp://47.98.134.86:5672', backend='amqp://47.98.134.86:5672', include=['proj.s1', ])
app.conf.timezone = 'Asia/Shanghai'
app.conf.enable_utc = Falseapp.conf.beat_schedule = {# 'add-every-10-seconds': {#     'task': 'proj.s1.add1',#     'schedule': 10.0,#     'args': (16, 16)# },'add-every-12-seconds': {'task': 'proj.s1.add1','schedule': crontab(minute=42, hour=8, day_of_month=11, month_of_year=4),'args': (16, 16)},
}
注:如果想要定時執行類似于crontab的任務,需要定制 Scheduler來完成。
Flask中應用Celery
pro_flask_celery/
├── app.py
├── celery_tasks├── celery.py└── tasks.py #!/usr/bin/env python # -*- coding:utf-8 -*-from flask import Flask from celery.result import AsyncResultfrom celery_tasks import tasks from celery_tasks.celery import celeryapp = Flask(__name__)TASK_ID = None@app.route('/') def index():global TASK_IDresult = tasks.xxxxx.delay()# result = tasks.task.apply_async(args=[1, 3], eta=datetime(2018, 5, 19, 1, 24, 0))TASK_ID = result.idreturn "任務已經提交"@app.route('/result') def result():global TASK_IDresult = AsyncResult(id=TASK_ID, app=celery)if result.ready():return result.get()return "xxxx"if __name__ == '__main__':app.run()
#!/usr/bin/env python
# -*- coding:utf-8 -*-
from celery import Celery
from celery.schedules import crontabcelery = Celery('xxxxxx',broker='redis://192.168.10.48:6379',backend='redis://192.168.10.48:6379',include=['celery_tasks.tasks'])# 時區
celery.conf.timezone = 'Asia/Shanghai'
# 是否使用UTC
celery.conf.enable_utc = False
#!/usr/bin/env python
# -*- coding:utf-8 -*-import time
from .celery import celery@celery.task
def hello(*args, **kwargs):print('執行hello')return "hello"@celery.task
def xxxxx(*args, **kwargs):print('執行xxxxx')return "xxxxx"@celery.task
def hhhhhh(*args, **kwargs):time.sleep(5)return "任務結果"
記錄
為了定時調用任務,你必須添加記錄到打點列表中:
from celery import Celery
from celery.schedules import crontabapp = Celery()@app.on_after_configure.connect
def setup_periodic_tasks(sender, **kwargs):# 每10秒調用 test('hello') .sender.add_periodic_task(10.0, test.s('hello'), name='add every 10')# 每30秒調用 test('world') sender.add_periodic_task(30.0, test.s('world'), expires=10)# 每周一上午7:30執行
    sender.add_periodic_task(crontab(hour=7, minute=30, day_of_week=1),test.s('Happy Mondays!'),)@app.task
def test(arg):print(arg)
用on_after_configure處理器進行這些設置意味著當使用test.s()時我們不會在模塊層面運行app 。
add_periodic_task() 函數在幕后會添加記錄到beat_schedule設定,同樣的設定可以用來手動設置定時任務:
例子: 每30秒運行 tasks.add .
app.conf.beat_schedule = {'add-every-30-seconds': {'task': 'tasks.add','schedule': 30.0,'args': (16, 16)},
}
app.conf.timezone = 'UTC'
一般會使用配置文件進行配置,如下?
celeryconfig.py:
broker_url = 'pyamqp://'
result_backend = 'rpc://'task_serializer = 'json'
result_serializer = 'json'
accept_content = ['json']
timezone = 'Europe/Oslo'
enable_utc = True
beat_schedule = {'add-every-30-seconds': {'task': 'tasks.add','schedule': 30.0,'args': (16, 16)},
}
程序里使用:
app.config_from_object('celeryconfig')注意
如果你的參數元組里只有一個項目,只用一個逗號就可以了,不要圓括號。
時間表使用時間差意味著每30秒間隔會發送任務(第一個任務在celery定時器開啟后30秒發送,然后上每次距一次運行后30秒發送一次)
可使用的屬性
-
task
要執行的任務名字
-
schedule
執行的頻率
可以是整數秒數,時間差,或者一個周期( crontab)。你也可以自 定義你的時間表類型,通過擴展schedule接口。
-
args
位置參數 (list 或 tuple).
-
kwargs
鍵值參數 (dict).
-
options
執行選項 (dict).
這可以是任何被apply_async()支持的參數與—-exchange, routing_key, expires,等。
-
relative
如果 relative 是 true ,時間表“由時鐘時間”安排,意味著 頻率近似到最近的秒,分鐘,小時或天,這取決于時間差中的時間間隔。?
默認relative是false,頻率不會近似,會相對于celery的啟動時間。Crontab 表達式語法非常靈活。
-
| 例子 | 含義 |
|---|---|
| crontab() | 每分鐘執行 |
| crontab(minute=0, hour=0) | 每天午夜執行 |
| crontab(minute=0, hour=’*/3’) | 每三個小時執行: 午夜, 3am, 6am, 9am, 正午, 3pm, 6pm, 9pm. |
| crontab(minute=0,hour=’0,3,6,9,12,15,18,21’) | 同上 |
| crontab(minute=’*/15’) | 每15分鐘執行 |
| crontab(day_of_week=’sunday’) | 星期日每分鐘 |
| crontab(minute=’‘,hour=’‘, day_of_week=’sun’) | 同上 |
| crontab(minute=’*/10’,hour=’3,17,22’, day_of_week=’thu,fri’) | 每10分鐘執行,僅限于周六日3-4 am, 5-6 pm, and 10-11 pm |
| crontab(minute=0, hour=’/2,/3’) | 偶數小時或者能被3整除的小時數執行 |
| crontab(minute=0, hour=’*/5’) | 被5整除的小時數,如3pm |
| crontab(minute=0, hour=’*/3,8-17’) | 8am-5pm能被3整除的 |
| crontab(0, 0, day_of_month=’2’) | 每月第2天 |
| crontab(0, 0,day_of_month=’2-30/3’) | 每偶數天 |
| crontab(0, 0,day_of_month=’1-7,15-21’) | 每月1和3周 |
| crontab(0, 0, day_of_month=’11’,month_of_year=’5’) | 每年5月11日 |
| crontab(0, 0,month_of_year=’*/3’) | 每個季度第1月 |
開啟調度
開啟celery定時服務:
$ celery -A proj beat
可以把定時器嵌入到工人(worker)中,通過啟用workers -B選項,如果你永遠不會運行超過一個工人節點這就會很方便。但這不太常見,不推薦在生產環境這樣使用:
$ celery -A proj worker -B
定時器需要在本地數據庫文件(默認名為 celerybeat-schedule )存儲任務上次運行時間,所以它需要在當前目錄中寫權限。或者你也可以給這個文件指定一個位置:
$ celery -A proj beat -s /home/celery/var/run/celerybeat-schedule
?
)
)
Chrome的下載設置)


)


使用方法)


