
dvd刻錄軟件

Software like DVD Flick?is great for burning video to DVDs, but Windows 7 actually includes built-in DVD burning software. Strangely, it’s the last time the company did so—while Windows 8 and Windows 10 can play back DVD movies, they can’t create them with a DVD burner without tools from third parties.
像DVD Flick這樣的軟件非常適合將視頻刻錄到DVD,但是Windows 7實際上包括內置的DVD刻錄軟件。 奇怪的是,這是該公司最后一次這樣做-Windows 8和Windows 10可以播放DVD電影,但是如果沒有第三方工具,他們就無法使用DVD刻錄機來創建它們。
Perhaps Microsoft didn’t want to pay the software licensing fees necessary to keep the tool in later versions, or perhaps the rise of all-digital media simply removed the necessity. Either way,?if you’re a?Windows 7?holdout, you can?burn?your?own movies or photo collections without downloading any extra software. Here’s how.
也許微軟不想支付將其保持在更高版本中所需的軟件許可費,或者也許全數字媒體的興起完全消除了這種必要。 無論哪種方式,如果您是Windows 7支持者,都可以刻錄自己的電影或照片集,而無需下載任何其他軟件。 這是如何做。
Note:?this guide is for burning video and other media meant for a DVD player, not simply a data DVD.?Check out this guide?if that’s what you’re looking for.
注意:本指南用于刻錄視頻和其他用于DVD播放器的媒體,而不僅僅是數據DVD。 如果需要的話,請查看本指南。
第一步:加載媒體 (Step One: Load Your Media)
Open your DVD drive and insert a blank disc. Any type of burnable DVD (DVD-R, DVD+R, DVD-RW, etc.) should work, as long as your DVD burner supports it.
打開DVD驅動器,然后插入空白光盤。 只要您的DVD刻錄機支持,任何類型的可刻錄DVD(DVD-R,DVD + R,DVD-RW等)都可以使用。
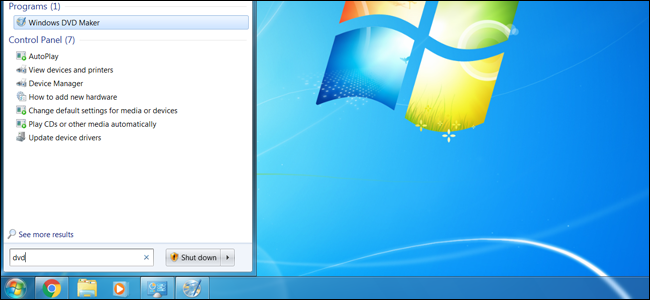
Click the Start button, then type “dvd.” “Windows DVD Maker” should be the first result—click it to launch the program.
點擊開始按鈕,然后輸入“ dvd”。 “ Windows DVD Maker”應該是第一個結果-單擊它以啟動程序。
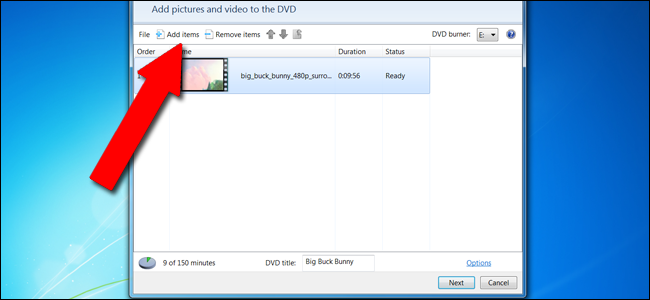
From the introductory screen, you can add photo and video files to the DVD storage and menu system. Click the “Add items” button to open a Windows Explorer menu, wherein you can search for and add video, audio, and photo files. You can add as many as you like, up to the limit of the blank disc in your DVD drive (typically four to eight gigabytes).
在介紹性屏幕上,您可以將照片和視頻文件添加到DVD存儲和菜單系統。 單擊“添加項目”按鈕以打開Windows資源管理器菜單,您可以在其中搜索并添加視頻,音頻和照片文件。 您可以根據需要添加任意數量,但不超過DVD驅動器中空白光盤的限制(通常為4至8 GB)。
Windows DVD Maker is not an especially robust tool, and?is limited to the following file types:
Windows DVD Maker不是一個特別健壯的工具,并且限于以下文件類型:
Video files: ASF, AVI, DVR-MS, M1V, MP2, MP2V, MPE, MPEG, MPG, MPV2, WM, WMV
視頻文件:ASF,AVI,DVR-MS,M1V,MP2,MP2V,MPE,MPEG,MPG,MPV2,WM,WMV
Photo files:?BMP, DIB, EMF, GIF, JFIF, JPE, JPEG, JPG, PNG, TIF, TIFF, WMF
照片文件: BMP,DIB,EMF,GIF,JFIF,JPE,JPEG,JPG,PNG,TIF,TIFF,WMF
Sound files: AIF, AIFC, AIFF, ASF, AU, MP2, MP3, MPA, SND, WAV, WMA
聲音文件:AIF,AIFC,AIFF,ASF,AU,MP2,MP3,MPA,SND,WAV,WMA
If your media is in a different format, you’ll either need to convert it or?use more powerful software like DVD Flick.
如果您的媒體格式不同,則需要對其進行轉換,或者使用功能更強大的軟件如DVD Flick 。
Add everything you’d like to the list, or everything you can fit into the “150 minutes” of somewhat arbitrary storage that is the software’s limit. You can give the items a rough order by clicking on an item, then clicking the up or down arrows in the menu bar.
將您想要的所有內容添加到列表中,或將您可以放入“ 150分鐘”的某種程度任意存儲的所有內容添加到列表中,這是軟件的限制。 您可以通過單擊項目,然后單擊菜單欄中的向上或向下箭頭來給這些項目一個粗略的順序。
第二步:設置技術選項 (Step Two: Set Your Technical Options)
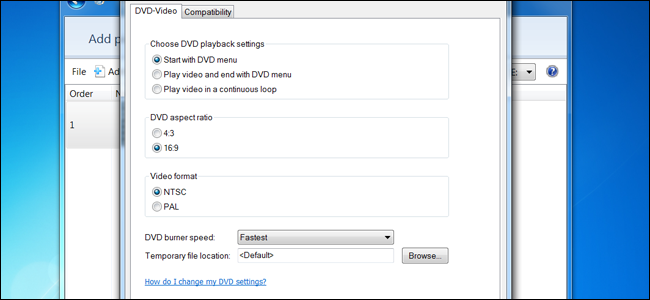
Click “Options” in the lower-right hand corner. This offers a few selections for authored DVDs—that is, DVDs intended to be played back as a movie rather than simply read as data.
單擊右下角的“選項”。 這為創作的DVD提供了一些選擇-即,打算以電影形式播放而不是簡單地以數據形式讀取的DVD。
Here are the main options you can tweak:
您可以調整以下主要選項:
Choose DVD playback settings: select menu in front, menu behind the videos, or looped videos only. Most users will want “Start with DVD menu.”
選擇DVD播放設置:選擇前面的菜單,視頻后面的菜單或僅循環播放的視頻。 大多數用戶將需要“從DVD菜單開始”。
DVD aspect ratio: this is standard, 4:3, or widescreen, 16:9. Choose whichever format best fits the videos you’re loading from your local storage.
DVD寬高比:這是標準的4:3或寬屏的16:9。 選擇最適合您要從本地存儲中加載的視頻的格式。
Video format: NTSC is the standard format for video players sold in North America and most of South America (excluding Brazil and Argentina), plus Japan, South Korea, Taiwan, and the Philippines, PAL is?typically the standard for all other regions. Choose based on where you want your DVD to be played.
視頻格式:NTSC是北美和南美大部分地區(巴西和阿根廷除外)以及日本,韓國,臺灣和菲律賓銷售的視頻播放器的標準格式,PAL通常是所有其他地區的標準。 根據您想要播放DVD的位置進行選擇。
DVD burner speed: faster speeds are, well, faster, but can result in data errors in very rare cases.
DVD刻錄機速度:更快的速度固然更快,但在極少數情況下會導致數據錯誤。
Ignore the “Compatibility” tab and click “OK” when your selections are through. You can add a title in the “DVD Title” field near the bottom of the window—for our video, we’d label it “Big Buck Bunny.” Click “Next” in the main window.
選擇完成后,忽略“兼容性”選項卡,然后單擊“確定”。 您可以在窗口底部附近的“ DVD標題”字段中添加標題-對于我們的視頻,我們將其標記為“ Big Buck Bunny”。 在主窗口中單擊“下一步”。
第三步:選擇菜單 (Step Three: Select a Menu)
In this screen, you can select the menu that will appear before your video plays, assuming that’s how you set it up in the previous section. None of this is particularly important, it just lends a little extra flair to the presentation. Standard styles can be selected from the scrolling box on the left.
在此屏幕中,您可以選擇在視頻播放之前顯示的菜單,前提是您在上一節中進行了設置。 這些都不是特別重要的事情,它只是為演示文稿增添了一點天賦。 可以從左側的滾動框中選擇標準樣式。
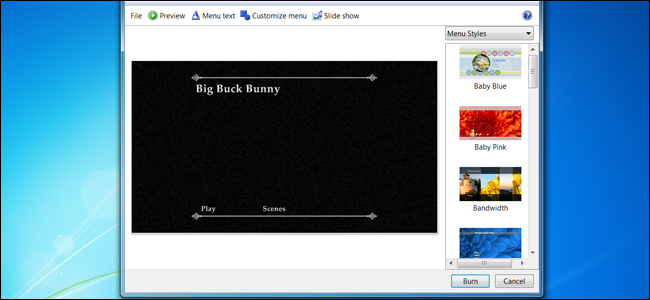
Click “Menu text” to customize the action text with the menu itself, including the names of specific actions like “Play” and “Scenes,” different fonts, and modifiers like bold text. The “Slide show” button allows you to add a music track behind the built-in slideshow for any single or grouped images on the DVD (once again, the music needs to fit in the available storage).
單擊“菜單文本”以使用菜單本身自定義動作文本,包括特定動作的名稱(如“播放”和“場景”),不同的字體以及修飾符(如粗體文本)。 使用“幻燈片放映”按鈕,您可以在內置幻燈片放映后面為DVD上的任何單個或分組圖像添加音樂曲目(再次,音樂需要容納在可用的存儲空間中)。
“Customize Menu” allows you to modify the video that automatically plays behind the menu options. If you have any available, you can insert short video clips and background audio that will play while the user is making selections in the main menu or scene menu. The font can be changed here as well, along with the buttons for scenes (if they’ve been added). Again, remember that any video or audio you add in this screen needs to fit on the remaining?space in the disc. Styles can be saved for use in later projects.
“自定義菜單”使您可以修改在菜單選項后面自動播放的視頻。 如果有可用的空間,則可以插入在用戶在主菜單或場景菜單中進行選擇時將播放的短片和背景音頻。 字體以及場景按鈕(如果已添加)也可以在此處更改。 同樣,請記住,您在此屏幕上添加的任何視頻或音頻都需要適合光盤上的剩余空間。 可以保存樣式以供以后的項目使用。

On both the customize menus and the larger menu screen, you can click “Preview” to see your menu, titles, and background video and audio in action before burning the disc itself.
在自定義菜單和較大的菜單屏幕上,可以在刻錄光盤本身之前單擊“預覽”以查看菜單,標題以及正在運行的背景視頻和音頻。
第四步:燒傷,嬰兒,燒傷 (Step Four: Burn, Baby, Burn)
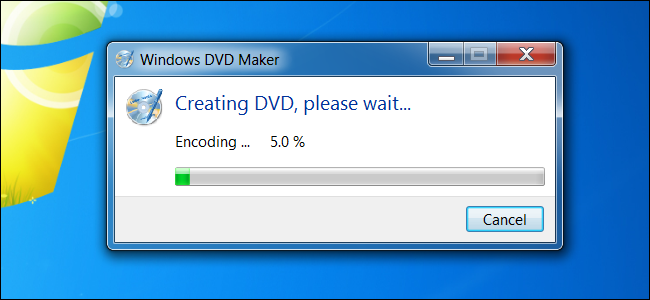
When you’re ready, click “Burn.” Now just wait—depending on how much data you’ve added to the disc it could take a few minutes or more than an hour to finish. When it’s done, pop it into any DVD player (or any other computer with a DVD drive and playback software) to enjoy your movie.
準備好后,點擊“刻錄”。 現在,只需等待-根據您向光盤添加的數據量,可能需要幾分鐘或一個多小時才能完成。 完成后,將其彈出到任何DVD播放器(或任何其他具有DVD驅動器和播放軟件的計算機)中欣賞電影。
Image credit:?Geoffrey Fairchild/Flickr
圖片來源: Geoffrey Fairchild / Flickr
翻譯自: https://www.howtogeek.com/howto/5499/create-and-author-dvds-in-windows-7/
dvd刻錄軟件

](http://pic.xiahunao.cn/Mysql-高可用集群[MyCat中間件使用](三))


iOS11應用編輯界面添加視圖)
)
![bzoj 1024 [ SCOI 2009 ] 生日快樂 —— 遞歸](http://pic.xiahunao.cn/bzoj 1024 [ SCOI 2009 ] 生日快樂 —— 遞歸)


)

)

