計算機啟動程序bios
So you’ve carefully picked out some parts and built a computer, but it doesn’t really do anything…yet. Before we hop into installing your operating system, we need to take a quick look at the BIOS and prepare it for our operating system.
因此,您已經精心挑選了一些零件并建造了一臺計算機,但實際上并沒有做任何事情……。 在開始安裝您的操作系統之前,我們需要快速瀏覽一下BIOS并為我們的操作系統做準備。
BIOS stands for “Basic Input-Output System.” It’s a tiny program that’s stored on a small memory chip in your motherboard, and it runs on your computer before the operating system does, setting everything up and allowing you to change basic settings. It’s what allows you to install a new operating system, overwrite an old one, or do more technical stuff like overclock your processor.
BIOS代表“基本輸入輸出系統” 。 這是一個微型程序,存儲在主板上的小內存芯片上,并且在操作系統運行之前先在計算機上運行,??可以進行所有設置并允許您更改基本設置。 它使您可以安裝新的操作系統,覆蓋舊的操作系統或做更多的技術工作,例如對處理器進行超頻。
(Technically, most new motherboards including ours are loaded with a more advanced kind of pre-boot environment called a Unified Extensible Firmware Interface, or UEFI. It has a ton of new and useful features to better support modern hardware. But everyone still calls it “the BIOS,” because it covers all of the same bases.)
(從技術上講,包括我們在內的大多數新主板都裝有更高級的預引導環境,稱為統一可擴展固件接口,即UEFI。它具有大量新功能和有用功能,可以更好地支持現代硬件。但是每個人仍然稱呼它“ BIOS”,因為它涵蓋了所有相同的基礎。)
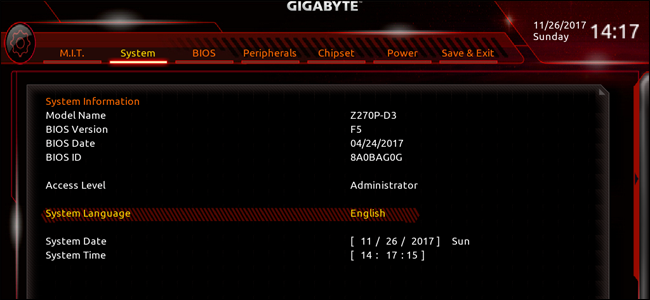
進入BIOS (Getting Into the BIOS)
If you don’t have an operating system installed on your storage drive, the UEFI/BIOS program should start immediately when you turn your computer on. If it doesn’t, take a look at the splash screen (the one with your motherboard’s logo or text): it will have directions on how to start it.
如果您的存儲驅動器上未安裝操作系統,則在打開計算機電源時應立即啟動UEFI / BIOS程序。 如果沒有,請看一看啟動屏幕(帶有主板徽標或文字的啟動屏幕):它將說明如何啟動。
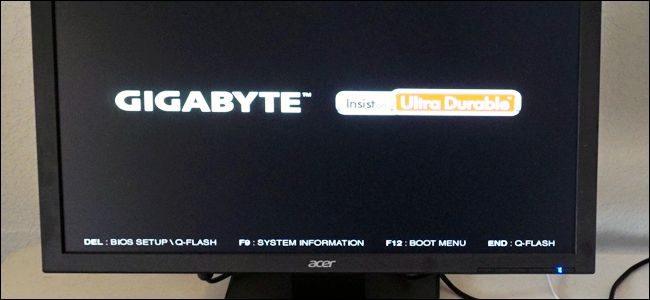
Usually you do this by quickly pressing F1, F2, F11, F12, Delete, or some other secondary key on your keyboard as it boots. (On our Gigabyte keyboard, the command is “Delete,” in the lower-left portion of the screen above.) If you don’t get it on the first try, just turn the computer off and give it another go.
通常,您可以通過在啟動時快速按鍵盤上的F1,F2,F11,F12,Delete或其他輔助鍵來執行此操作。 (在技嘉鍵盤上,命令位于上方屏幕的左下角,為“刪除”。)如果第一次嘗試時未獲得此命令,請關閉計算機電源,然后再重新嘗試。
Once you’re in, there are a few things you may want to do.
進入之后,您可能需要做一些事情。
更新您的BIOS或UEFI(可選) (Update Your BIOS or UEFI (Optional))
Chances are, your motherboard is not running the latest version of its UEFI. Updating it helps to support new features, patch bugs and security vulnerabilities, and generally give the place a bit of spit-and-polish. Because the UEFI runs before the full operating system, it doesn’t have a way to update itself over the Internet, and you’ll need to do it manually.
可能是,您的主板未運行其UEFI的最新版本。 更新它有助于支持新功能,補丁錯誤和安全漏洞,并且通常會給它帶來一些麻煩。 由于UEFI在完整的操作系統之前運行,因此它無法通過Internet進行更新,因此您需要手動進行。
Note that you don’t generally need the latest version of the motherboard firmware, unless you run into specific compatibility problems with newer hardware and features. For example, if you have a last-generation motherboard and a current-generation CPU that happens to use the same socket, you may need to update it for the CPU to work properly. Updating is also sometimes recommended for specific, critical security updates or bugs.
請注意,除非您遇到較新的硬件和功能的特定兼容性問題,否則通常不需要最新版本的主板固件。 例如,如果您擁有上一代主板和恰好使用同一插槽的當前CPU,則可能需要對其進行更新以使CPU正常工作。 有時也建議針對特定的關鍵安全更新或錯誤進行更新。
You can check for the latest version of your UEFI/BIOS by putting the model number into Google and adding “BIOS update.” (Check the box or one of the UEFI menus if you don’t know your motherboard model.) On your manufacturer’s product page you’ll find a list of updates, usually under “Support.” Download the latest one if your UEFI isn’t already running it.
您可以通過將型號輸入Google并添加“ BIOS更新”來檢查UEFI / BIOS的最新版本。 (如果您不知道主板型號,請選中??此框或UEFI菜單之一。)在制造商的產品頁面上,您通常會在“支持”下找到更新列表。 如果您的UEFI尚未運行,請下載最新版本。
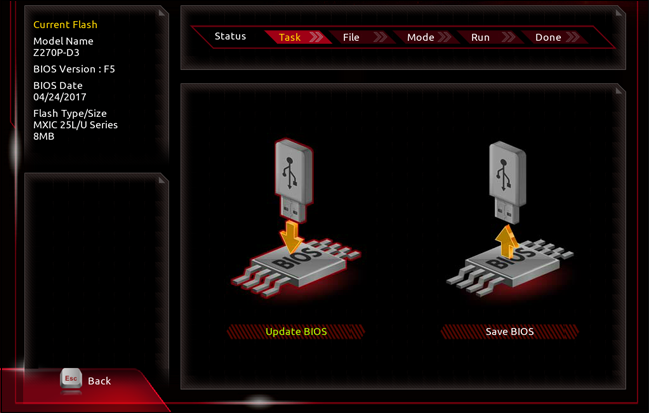
Again, for each manufacturer this process is a little different, but more or less all of them should have some means of updating the UEFI program without an operating system installed. In the case of our Gigabyte motherboard, the process went something like this:
同樣,對于每個制造商來說,此過程都略有不同,但是他們或多或少都應具有一些無需安裝操作系統即可更新UEFI程序的方式。 對于我們的技嘉主板,該過程如下所示:
- Download the updated UEFI file from the Gigabyte website (on another, working computer, of course). 從技嘉網站下載更新的UEFI文件(當然是在另一臺工作的計算機上)。
- Transfer the file to a USB drive. 將文件傳輸到USB驅動器。
- Plug the drive into the new computer, start up UEFI, and press F8. 將驅動器插入新計算機,啟動UEFI,然后按F8。
- Follow the on-screen instructions to install the latest version of UEFI. 按照屏幕上的說明安裝最新版本的UEFI。
- Reboot. 重啟。
Your motherboard and BIOS/UEFI will follow the same general steps, but not necessarily exactly. You can usually find the process with a quick Google search. If for some reason you can’t get it working, don’t worry: motherboard manufacturers also frequently offer programs that can update the BIOS/UEFI once you get Windows up and running, too.
您的主板和BIOS / UEFI將遵循相同的常規步驟,但不一定完全相同。 通常,您可以通過Google的快速搜索找到該過程。 如果由于某種原因無法正常運行,請不要擔心:主板制造商還經常提供在Windows啟動并運行后即可更新BIOS / UEFI的程序。
檢查您的存儲驅動器 (Check Your Storage Drives)
Next, check to make sure that your motherboard can recognize your storage drive. If it can’t, the Windows setup utility you use in the next article won’t have anything to install to.
接下來,檢查以確保您的主板可以識別您的存儲驅動器。 如果不能,那么您在下一篇文章中使用的Windows安裝實用程序將沒有任何安裝。
The instructions here are unfortunately going to be a bit vague, because every company’s UEFI program is laid out differently. All we’re really trying to do is find the page that manages the storage drives. On our Gigabyte motherboard, this is found under the “BIOS” tab (because the new UEFI includes all of the old “BIOS” settings, you see).
不幸的是,這里的說明會有些含糊,因為每個公司的UEFI程序的布局都不同。 我們真正要做的就是找到管理存儲驅動器的頁面。 在我們的技嘉主板上,該文件位于“ BIOS”選項卡下(因為您看到的是新的UEFI包含所有舊的“ BIOS”設置)。

I’ve selected “Boot Option #1,” the first thing that the BIOS will attempt to boot. If this fails, it will continue to the second option. Under the available list, you can see the Corsair solid state drive we installed in the last article. If you’re installing your operating system with a DVD drive, make sure you can see it here too. (Sometimes both are labelled “SATA” for their motherboard connections.)
我選擇了“引導選項#1”,這是BIOS嘗試引導的第一件事。 如果失敗,它將繼續執行第二個選項。 在可用列表下,您可以看到我們在上一篇文章中安裝的Corsair固態驅動器。 如果要使用DVD驅動器安裝操作系統,請確保在此處也可以看到它。 (有時它們的主板連接都標記為“ SATA”。)
If you don’t see your drive or drives, double-check the power and SATA data cables in your case. If you’ve verified that they’re connected and you still can’t see the drives in BIOS, you may have to replace them.
如果看不到驅動器,請仔細檢查電源和SATA數據電纜。 如果您已驗證它們已連接,但仍無法在BIOS中看到驅動器,則可能必須更換它們。
進一步調整 (Going Further with Other Tweaks)
There’s a lot of other interesting stuff you can do with your computer’s UEFI or BIOS, but none of it is really necessary to get an operating system up and running. Feel free to poke around at some of the options; most of it is self-explanatory, like powering up the computer when the mouse or keyboard is touched. If you don’t understand what something controls, don’t touch it without doing a Google search first.
您還可以使用計算機的UEFI或BIOS進行許多其他有趣的操作,但實際上并不需要安裝和運行操作系統。 隨意瀏覽一些選項; 其中大多數是不言自明的,例如在觸摸鼠標或鍵盤時打開計算機電源。 如果您不了解控制什么,請先進行Google搜索,然后再進行操作。
Here are some of the more interesting options in the BIOS and UEFI we recommend checking out, as long as you feel comfortable doing so:
只要您愿意,以下是我們建議您檢出BIOS和UEFI中一些更有趣的選項:
Enable Intel XMP to Make Your RAM Run at Its Advertised Speeds
啟用Intel XMP使您的RAM以其廣告速度運行
Auto-Control Your PC’s Fans for Cool, Quiet Operation
自動控制PC的風扇,以實現安靜,安靜的操作
Enable Intel VT-x in Your Computer’s BIOS or UEFI Firmware for Virtual Machines
在計算機的BIOS或UEFI固件中為虛擬機啟用Intel VT-x
Secure Your Computer With a BIOS or?UEFI?Password
使用BIOS或UEFI密碼保護計算機安全
The Pros and Cons of Windows 10’s “Fast Startup” Mode in the BIOS
Windows 10 BIOS中“快速啟動”模式的優缺點
Once you’re done with everything in the BIOS and UEFI, head to the next article to install Windows. Note that you’ll need another working computer with access to the Internet if you don’t already have an installation disc or USB drive ready.
完成BIOS和UEFI中的所有操作后,請轉到下一篇文章以安裝Windows。 請注意,如果尚未準備好安裝光盤或USB驅動器,則需要另一臺可以訪問Internet的工作計算機。
Or, if you want to jump to another part in the guide, here’s the whole thing:
或者,如果您想跳到指南的另一部分,請參閱以下內容:
Building a New Computer, Part One: Choosing Hardware
構建新計算機,第一部分:選擇硬件
Building a New Computer, Part Two: Putting It Together
構建新計算機,第二部分:組裝在一起
Building a New Computer, Part Three: Getting the BIOS Ready
構建新計算機,第三部分:準備BIOS
Building a New Computer, Part Four: Installing Windows and Loading Drivers
構建新計算機,第四部分:安裝Windows和加載驅動程序
Building a New Computer, Part Five: Tweaking Your New Computer
構建新計算機,第五部分:調整新計算機
翻譯自: https://www.howtogeek.com/howto/the-geek-blog/building-a-new-computer-part-3-setting-it-up/
計算機啟動程序bios


并統計)


