
圖像大小調整
Most image viewing programs have a built-in feature to help you change the size of images. Here are our favorite image resizing tools for Windows. We’ve picked out a built-in option, a couple of third party apps, and even a browser-based tool.
大多數圖像查看程序都具有內置功能,可幫助您更改圖像大小。 這是我們最喜歡的Windows圖像大小調整工具。 我們選擇了一個內置選項,幾個第三方應用程序,甚至一個基于瀏覽器的工具。
Maybe you need to upload a smaller version of a photograph to Facebook (they do it automatically and badly when you upload anyway) or another social site. Maybe you want to include an image that isn’t so ridiculously oversized in an email. Or maybe you want just the right size image to include in a blog post or Word document. Whatever your reason, it’s not hard at all to resize an image. We’ve rounded up our favorite tools for doing it in Windows, whether you need to resize just one image or a whole batch at once.
也許您需要將較小版本的照片上傳到Facebook(無論如何上傳,它們都會自動進行,而且效果很差)或其他社交網站。 也許您想在電子郵件中包含一張沒有那么大的圖像。 或者,也許您只希望大小合適的圖像包含在博客文章或Word文檔中。 無論您是什么原因,調整圖像大小都不是一件容易的事。 無論您需要一次調整一個圖像還是整個批次的大小,我們都已經收集了最喜歡的工具來在Windows中執行此操作。
快速調整圖像大小 (A Quick Note on Resizing Images)
The quality of a resized image really depends on the original image you’re resizing. Photographs tend to do best, at least when you’re reducing the size of an image, because they have lots of detail to begin with. High resolution photos are more open to blowing up to larger sizes, but even they have their limits—blow up a photograph too much and things start to get grainy.
調整大小后的圖像的質量實際上取決于您要調整大小的原始圖像。 至少在縮小圖像尺寸時,照片往往表現最好,因為它們一開始就有很多細節。 高分辨率照片更容易爆炸成更大的尺寸,但即使它們也有其局限性,將照片炸得太多,事情開始變得粒狀。
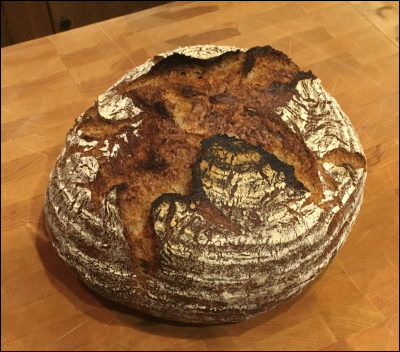
Here’s an example of a resized photograph. The original image was 2200×1938 pixels, and we cropped it down to a mere 400×352. The image is crisp, and the details still present.
這是調整大小的照片的示例。 原始圖像為2200×1938像素,我們將其裁剪為僅400×352。 圖像清晰,細節仍然存在。
If you’re working with a screenshot that you took on your PC or mobile device—or any image that contains text—resizing tends not to work terribly well. Here’s an example of a screenshot taken at 1920×1040 pixels, and then resized down to 600×317 to fit on our site.
如果使用的是在PC或移動設備上拍攝的屏幕截圖(或任何包含文本的圖像),則調整大小可能無法很好地工作。 這是一個以1920×1040像素拍攝的屏幕截圖的示例,然后將其縮小為600×317以適合我們的網站。
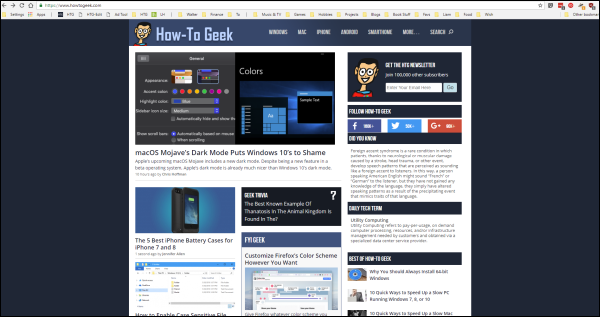
It’s okay if you just want to show the broad look of things, but not so much for detail. That’s why we prefer cropping screenshots to resizing them for our articles, like with the image below.
如果您只想展示事物的整體外觀,而沒有太多細節,那可以。 這就是為什么我們更喜歡裁剪屏幕截圖而不是調整文章大小,就像下面的圖片一樣。

So, with that out of the way, let’s move onto the Windows tools you can use to resize your images.
因此,在此之后,讓我們繼續使用Windows工具來調整圖像大小。
內置:使用繪畫調整照片大小 (Built-In: Use Paint To Resize Your Photos)
Paint has been a staple of Windows since version 1.0 in 1985. Chances are you’ve used it before. Paint opens most common file types (BMP, PNG, JPG, TIFF, and GIF) and offers a very straightforward approach to resizing images.
自1985年發布1.0版以來,Paint一直是Windows的主要內容。您以前曾經使用過它。 畫圖打開最常見的文件類型(BMP,PNG,JPG,TIFF和GIF),并提供了一種非常簡單的方法來調整圖像大小。
In Paint, open your image by opening up the File menu, and then clicking the “Open” command.
在“畫圖”中,通過打開“文件”菜單,然后單擊“打開”命令來打開圖像。
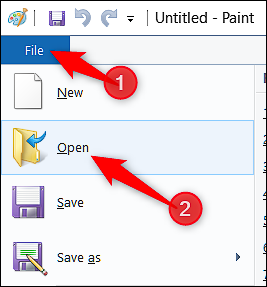
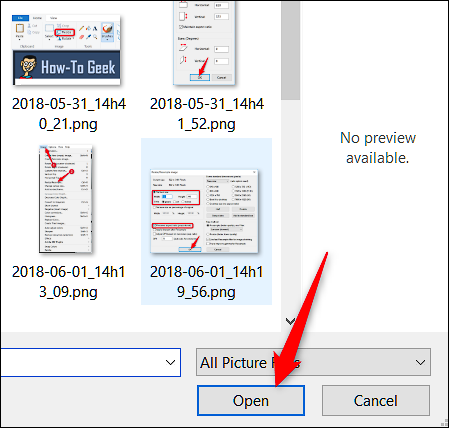
Find and select the image you want to resize, and then click the “Open” button.
查找并選擇要調整大小的圖像,然后單擊“打開”按鈕。
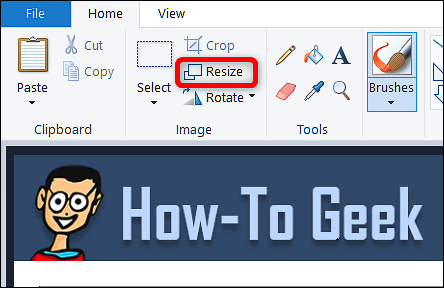
On the Home tab of the Paint toolbar, click the “Resize” button.
在“畫圖”工具欄的“主頁”選項卡上,單擊“調整大小”按鈕。
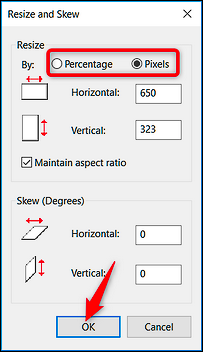
Paint gives you the option of resizing by percentage or by pixels. It uses percentage by default, and that’s fine for rough resizing. If you need something specific, you’ll need to switch over to using pixels. When you type a horizontal or vertical value, Paint automatically creates the other value for you to maintain the original image’s dimensions.
“畫圖”使您可以選擇按百分比或按像素調整大小。 默認情況下,它使用百分比,這對于粗略調整大小是很好的。 如果您需要特定的內容,則需要切換到使用像素。 當您輸入水平或垂直值時,Paint會自動為您創建另一個值,以保持原始圖像的尺寸。
Select the percentage you want, or the desired dimensions, and then click the “OK” button.
選擇所需的百分比或所需的尺寸,然后單擊“確定”按鈕。
If you only need to resize one image at a time and don’t want to install any third-party apps, Paint is a pretty decent resizing solution.
如果您一次只需要調整一個圖像的大小,并且不想安裝任何第三方應用程序,那么Paint是一個不錯的調整大小解決方案。
Note: As of 2017, Paint has been added to the deprecated list of apps no longer being developed by Microsoft. Instead, they are replacing Paint with Paint 3D. Paint is likely not going away for a while, though, and you’ll still be able to download it from the Windows Store.
注意:自2017年起,Paint已添加到Microsoft不再開發的應用程序中已棄用的列表中。 相反,他們用Paint 3D替換Paint。 不過,Paint可能暫時不會消失,您仍然可以從Windows Store下載它。
第三方應用程序:使用PicPick調整照片大小以及更多其他功能 (Third Party App: Use PicPick To Resize Photos and a Whole Lot More)
PicPick?has a similar-looking interface to Paint, though it packs a lot more features under the hood, including better editing and annotation tools, and solid screen capture utility. It’s free for personal use, and the commercial use license is about $25 .
PicPick具有與Paint相似的界面,盡管它在幕后提供了許多功能,包括更好的編輯和注釋工具以及可靠的屏幕捕獲實用程序。 它是免費供個人使用,商業使用許可約為25美元。
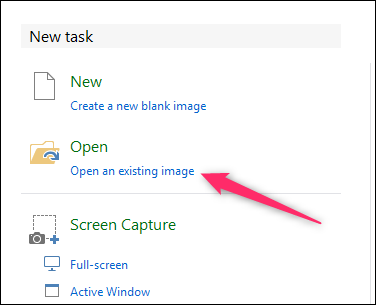
On the PicPick splash screen, click the “Open an existing image” link, and then find the image you want to resize. You can also drag an image from File Explorer onto an open PicPick window.
在PicPick初始屏幕上,單擊“打開現有圖像”鏈接,然后找到要調整大小的圖像。 您還可以將圖像從文件資源管理器拖到打開的PicPick窗口中。
On the toolbar, click the “Resize” button, and then click “Image Resize” on the dropdown menu.
在工具欄上,單擊“調整大小”按鈕,然后在下拉菜單上單擊“圖像調整大小”。

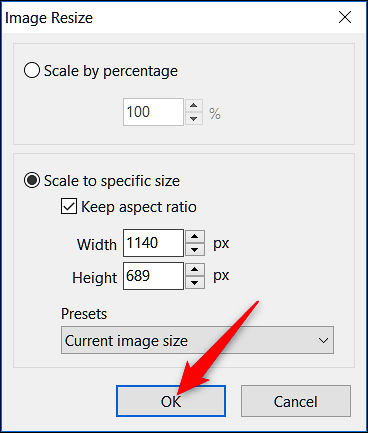
PicPick lets you resize by percentage or by pixels. It uses percentage by default, which is good for rough resizing. If you need to resize to specific dimensions, switch over to using pixels. When you type a width or height value, PicPick automatically sets the other value for you to maintain the original image’s dimensions. You can disable this by deselecting the “Keep aspect ratio” check box, though we’re not sure why you’d want to.
PicPick使您可以按百分比或按像素調整大小。 默認情況下,它使用百分比,這對于粗略調整大小很有用。 如果需要將尺寸調整為特定尺寸,請切換為使用像素。 鍵入寬度或高度值時,PicPick會自動為您設置另一個值,以保持原始圖像的尺寸。 您可以通過取消選中“保持寬高比”復選框來禁用此功能,盡管我們不確定您為什么要這么做。
Select the percentage you want, or the desired dimensions, and then click the “OK” button.
選擇所需的百分比或所需的尺寸,然后單擊“確定”按鈕。
While PicPick (and Paint, for that matter) does a fine job of resizing one image at a time, sometimes you’ve got a bunch of image you need to resize to the same dimensions. For that, we turn to our next couple of tools.
雖然PicPick(以及Paint)可以很好地一次調整一個圖像的大小,但有時您需要將一堆圖像調整為相同的尺寸。 為此,我們轉向下幾個工具。
第三方應用程序:使用IrfanView一次批量調整許多圖像的大小 (Third Party App: Use IrfanView to Batch Resize Lots of Images at Once)
IrfanView is first and foremost an image viewer, and it’s a great one. It’s fast, lightweight, and can open just about every image format in existence (even a lot of audio and video formats). And best of all, it’s free.
IrfanView首先是圖像查看器,它是一個很棒的視圖。 它快速,輕巧,并且可以打開現有的幾乎所有圖像格式(甚至包括許多音頻和視頻格式)。 最重要的是,它是免費的。
It doesn’t include a lot of the editing and annotation tools of an image editor like PicPick, but it is great for quickly resizing, cropping, and rotating images. And there are lots of plugins available that extend its functionality.
它不包含PicPick這樣的圖像編輯器的許多編輯和注釋工具,但是對于快速調整大小,裁剪和旋轉圖像非常有用。 并且有許多擴展其功能的插件。
在IrfanView中調整單個圖像的大小 (Resize a Single Image in IrfanView)
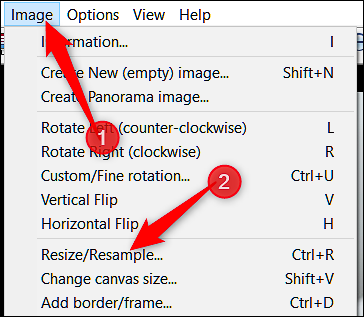
To resize a single image in IrfanView, open the Image menu, and then click the “Resize/Resample” command.
要在IrfanView中調整單個圖像的大小,請打開“圖像”菜單,然后單擊“調整大小/重新采樣”命令。
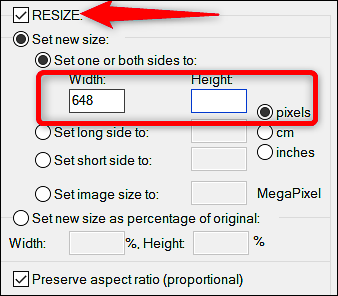
You can resize by specific dimensions (pixels, centimeters, or inches) or by percentage. IrfanView uses dimensions by default, which is great for when you need images to be a specific size, though you can switch to percentages for rough resizing.When you type a width or height value, IrfanView automatically sets the other value for you to maintain the original image’s dimensions. You can disable this by deselecting the “Preserve aspect ratio (proportional)” check box.
您可以按特定尺寸(像素,厘米或英寸)或百分比調整大小。 IrfanView默認使用尺寸,當您需要將圖像設置為特定尺寸時,IrfanView非常有用,盡管您可以切換到百分比以粗略調整大小。鍵入寬度或高度值時,IrfanView會自動設置另一個值來保持原始圖像的尺寸。 您可以通過取消選中“保留縱橫比(比例)”復選框來禁用此功能。
Type in the new dimensions (or percentage) for the image, and then click the “OK” button.
輸入圖像的新尺寸(或百分比),然后單擊“確定”按鈕。

That’s it. Your new image has been resized and is ready to use!
而已。 您的新圖片已調整大小,可以使用了!
在IrfanView中一次調整一批圖像的大小 (Resize a Batch of Images at Once in IrfanView)
IrfanView has a built-in batch tool if you have multiple images that you need to convert all at once. The batch tool can be a little bit confusing to work with, since you can use it to apply just about any of the functions IrfanView includes. But once you get a hang of it and what options to use, it’s a great addition to an already excellent product.
如果您有多個圖像需要一次轉換,則IrfanView具有內置的批處理工具。 批處理工具的使用可能會有些混亂,因為您可以使用它來應用IrfanView包含的幾乎所有功能。 但是一旦您掌握了它以及可以使用哪些選項,它就會對已經非常出色的產品有很大的幫助。
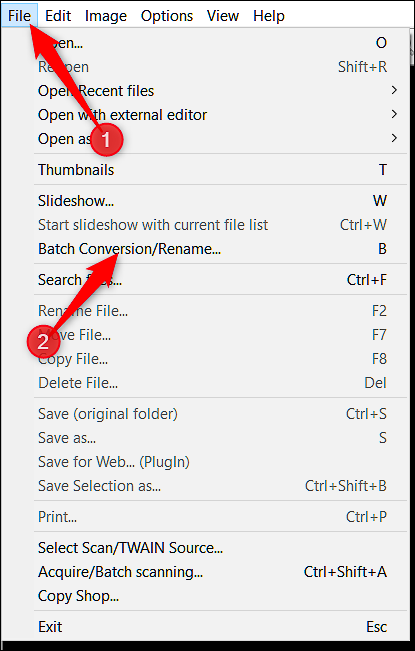
Open the File menu, and then click the “Batch Conversion/Rename” command.
打開“文件”菜單,然后單擊“批量轉換/重命名”命令。
Next, in the right pane, navigate to the images you want to resize, select them, and then click the “Add” button. When you’ve got your images added, click the “Advanced” button over to the left.
接下來,在右窗格中,導航到要調整大小的圖像,選擇它們,然后單擊“添加”按鈕。 添加圖像后,單擊左側的“高級”按鈕。
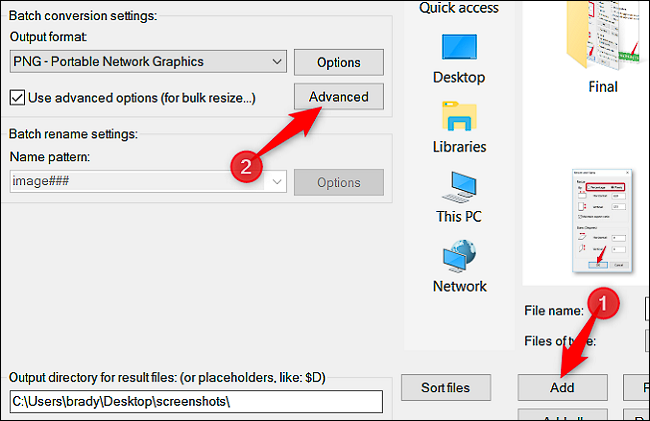
The next window has a lot of features and is a little bit of an eye sore. The options we’ll need for resizing images are all over on the left, so we’ll just focus our attention there.
下一個窗口具有很多功能,并且有點眼痛。 調整圖像大小所需的選項都在左側,因此我們將注意力集中在此處。
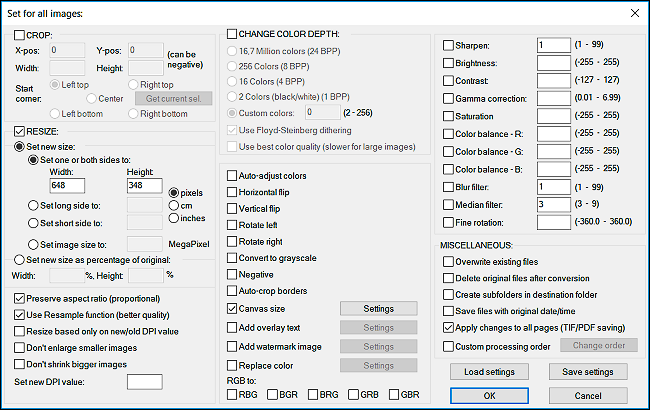
Select the “Resize” check box, and then enter the new size you want for all your images. The options here are the same as you’d find when resizing a single image. When you’ve got it set up then click the “OK” button to close the Advanced window.
選擇“調整大小”復選框,然后為所有圖像輸入所需的新大小。 這里的選項與調整單個圖像大小時的選項相同。 完成設置后,請單擊“確定”按鈕以關閉“高級”窗口。
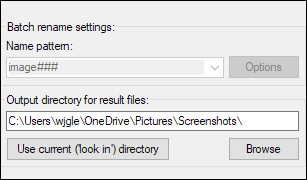
Back in the main Batch Conversion window, make note of the output directory. That’s where your new, resized images are stored. If you want, you can select a different folder or just click the “Use Current (‘Look In’) Directory” button to have the new images save to the same folder as the originals. And don’t worry, your originals are retained by default.
返回主“批量轉換”窗口,記下輸出目錄。 在此存儲新的,調整大小的圖像。 如果需要,您可以選擇其他文件夾,也可以單擊“使用當前(查找)目錄”按鈕將新圖像保存到與原始圖像相同的文件夾中。 不用擔心,默認情況下會保留您的原件。
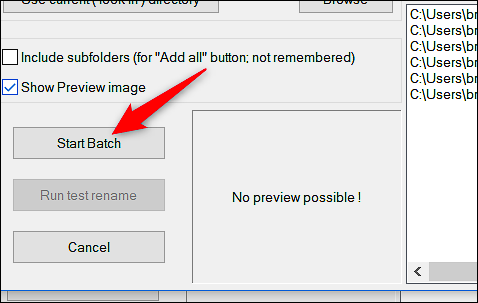
Finally, click “Start Batch” to convert all your images.
最后,單擊“開始批處理”以轉換所有圖像。
在網上:使用BulkResizePhotos快速調整批量大小 (On the Web: Use BulkResizePhotos for Quick Batch Resizing)
If downloading and installing yet another program onto your computer isn’t something you want (or if you’re not using your own PC), there are lots of online resizing tools that you can access with just your web browser. One of our favorites is BulkResizePhotos, a free service that lets you resize, edit, crop, and compress images. It’s also very fast, because it doesn’t upload the images to their servers. Your images never leave your computer.
如果您不想在計算機上下載并安裝另一個程序(或者如果您未使用自己的PC),則可以通過Web瀏覽器訪問許多在線調整大小工具。 我們的最愛之一是BulkResizePhotos ,這是一項免費服務,可讓您調整圖像大小,編輯,裁剪和壓縮。 它也非常快,因為它不會將圖像上傳到其服務器。 您的圖像永遠不會離開計算機。
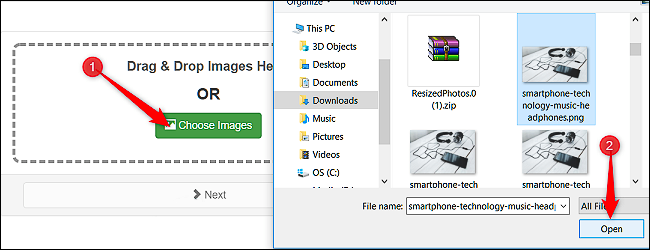
On the site, click the “Choose Images” button, and then find and select the images you want to resize. You can choose a single images or hundreds at once. Click the “Open” button when you’re ready.
在網站上,單擊“選擇圖像”按鈕,然后查找并選擇要調整大小的圖像。 您可以一次選擇一個圖像,也可以一次選擇數百個。 準備好后,點擊“打開”按鈕。
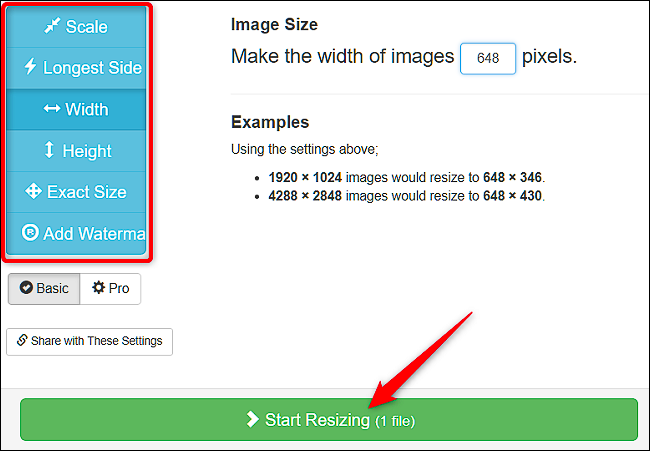
On the next screen, you can choose how to resize the image—Scale, Longest Side, Width, Height, or Exact Size. Select an option, type in the size you want, and then click the?“Start Resizing” button.
在下一個屏幕上,您可以選擇如何調整圖像大小-縮放,最長邊,寬度,高度或精確大小。 選擇一個選項,鍵入所需的大小,然后單擊“開始調整大小”按鈕。
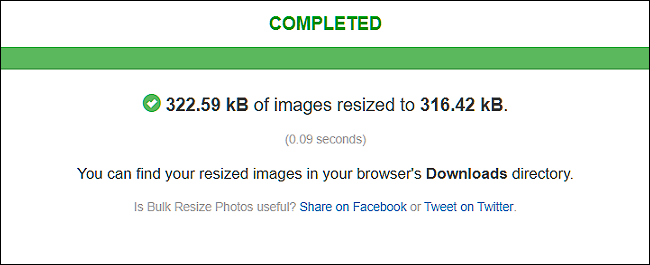
As the images are resized, they are saved to your Downloads folder (or whatever folder you’ve got set up to save downloads from your browser).
調整圖像大小后,圖像將保存到“下載”文件夾(或設置為保存從瀏覽器下載的任何文件夾)。
Have a favorite tool we didn’t mention? Let us know about it in the comments!
有沒有提到的最喜歡的工具? 讓我們在評論中知道它!
翻譯自: https://www.howtogeek.com/354015/how-to-resize-images-and-photos-in-windows/
圖像大小調整
![Spring Data JPA例子[基于Spring Boot、Mysql]](http://pic.xiahunao.cn/Spring Data JPA例子[基于Spring Boot、Mysql])
 -- Packaging CSS(打包css))


![[Hadoop in China 2011] 中興:NoSQL應用現狀及電信業務實踐](http://pic.xiahunao.cn/[Hadoop in China 2011] 中興:NoSQL應用現狀及電信業務實踐)


——使用Java通用配置模板方法模式)
)


——GUI編程)

)
上禁用Aero)
