Discord has an excellent API for writing custom bots, and a very active bot community. Today we’ll take a look at how to get started making your own.
Discord具有出色的用于編寫自定義機器人的API,以及非常活躍的機器人社區。 今天,我們將探討如何開始制作自己的作品。
You will need a bit of programming knowledge to code a bot, so it isn’t for everyone, but luckily there are some modules for popular languages that make it very easy to do. We’ll be using the most popular one, discord.js.
您將需要一點編程知識來編寫機器人程序,因此并非所有人都可以,但是幸運的是,有一些流行語言模塊可以很容易地實現。 我們將使用最受歡迎的discord.js 。
入門 (Getting Started)
Head over to Discord’s bot portal, and create a new application.
轉到Discord的機器人門戶,并創建一個新應用程序。
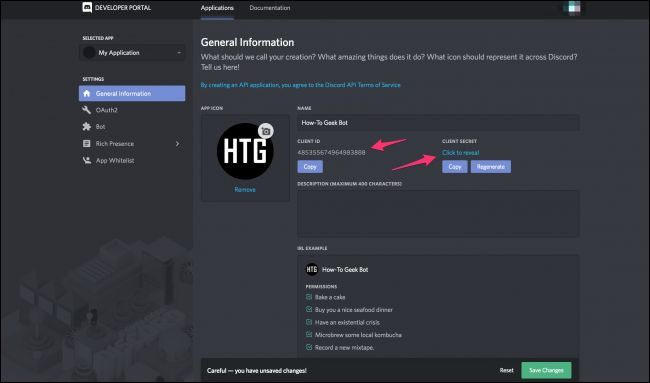
You’ll want to make a note of the Client ID and secret (which you should keep a secret, of course). However, this isn’t the bot, just the “Application.” You’ll have to add the bot under the “Bot” tab.
您需要記下Client ID和機密(當然,您應該保守機密)。 但是,這不是機器人,而是“應用程序”。 您必須在“啟動”標簽下添加機器人。
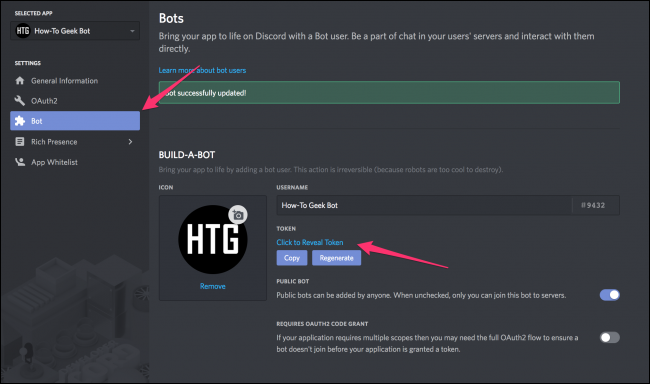
Make a note of this token as well, and keep it a secret. Do not, under any circumstances, commit this key to Github. Your bot will be hacked almost immediately.
還要記下此令牌,并將其保密。 在任何情況下,請勿將此密鑰提交給Github。 您的漫游器幾乎會立即被黑客入侵。
安裝Node.js并獲取編碼 (Install Node.js and Get Coding)
To run Javascript code outside of a webpage, you need Node. Download it, install it, and make sure it works in a terminal (or Command Prompt, as all of this should work on Windows systems). The default command is “node.”
要在網頁外部運行Javascript代碼,您需要Node 。 下載它,安裝它,并確保它可以在終端上運行(或命令提示符,因為所有這些都應在Windows系統上運行)。 默認命令是“節點”。
We also recommend installing the?nodemon tool. It’s a command line app that monitors your bot’s code and restarts automatically on changes. You can install it by running the following command:
我們還建議安裝nodemon工具。 這是一個命令行應用程序,可監視您的機器人代碼并在更改后自動重新啟動。 您可以通過運行以下命令來安裝它:
npm i -g nodemon
You’ll need a text editor. You could just use notepad, but we recommend either Atom or VSC.
您需要一個文本編輯器。 您可以只使用記事本,但是我們建議使用Atom或VSC 。
Here’s our “Hello World”:
這是我們的“ Hello World”:
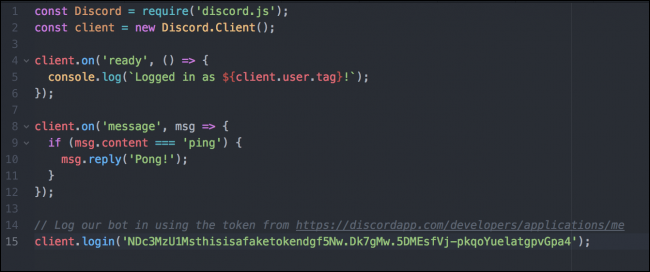
const Discord = require('discord.js');
const client = new Discord.Client();
client.on('ready', () => {
console.log(`Logged in as ${client.user.tag}!`);
});
client.on('message', msg => {
if (msg.content === 'ping') {
msg.reply('pong');
}
});
client.login('token');
This code is taken from the discord.js example. Let’s break it down.
此代碼取自discord.js示例。 讓我們分解一下。
- The first two lines are to configure the client. Line one imports the module into an object called “Discord,” and line two initializes the client object. 前兩行用于配置客戶端。 第一行將模塊導入名為“ Discord”的對象,第二行初始化客戶端對象。
The
client.on('ready')block will fire when the bot starts up. Here, it’s just configured to log its name to the terminal.機器人啟動時,
client.on('ready')塊將觸發。 在這里,它只是配置為將其名稱記錄到終端。The
client.on('message')block will fire everytime a new message is posted to any channel.?Of course, you’ll need to check the message content, and that’s what theifblock does. If the message just says “ping,” then it will reply with “Pong!”每當有新消息發布到任何頻道時,
client.on('message')塊都會觸發。 當然,您需要檢查消息的內容,這就是if塊的作用。 如果該消息僅顯示“ ping”,則將回復“ Pong!”。- The last line logs in with the token from the bot portal. Obviously, the token in the screenshot here is fake. Don’t ever post your token on the internet. 最后一行使用Bot門戶中的令牌登錄。 顯然,此屏幕截圖中的令牌是偽造的。 永遠不要將令牌發布到互聯網上。
Copy this code, paste in your token at the bottom, and save it as index.js?in a dedicated folder.
復制此代碼,將其粘貼在底部的令牌中,并將其另存為index.js在專用文件夾中。
如何運行機器人 (How to Run the Bot)
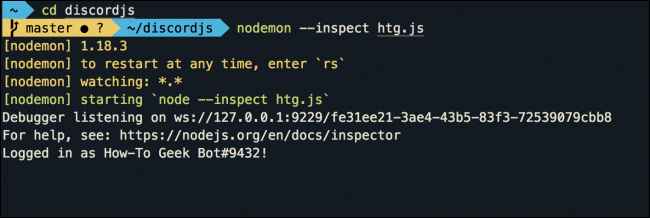
Head over to your terminal, and run the following command:
轉到您的終端,然后運行以下命令:
nodemon --inspect index.js
This starts up the script, and also fires up the Chrome debugger, which you can access by typing chrome://inspect/ ?into Chrome’s Omnibar and then opening “dedicated devtools for Node.”
這將啟動腳本,并啟動Chrome調試器,您可以通過在Chrome的Omnibar中鍵入chrome://inspect/ ,然后打開“ Node專用devtools”來訪問該調試器。
Now, it should just say “Logged in as <bot-name>,” but here I’ve added a line that will log all message objects received to the console:
現在,它應該只說“以<bot-name>登錄”,但是在這里我添加了一行,它將記錄接收到控制臺的所有消息對象:
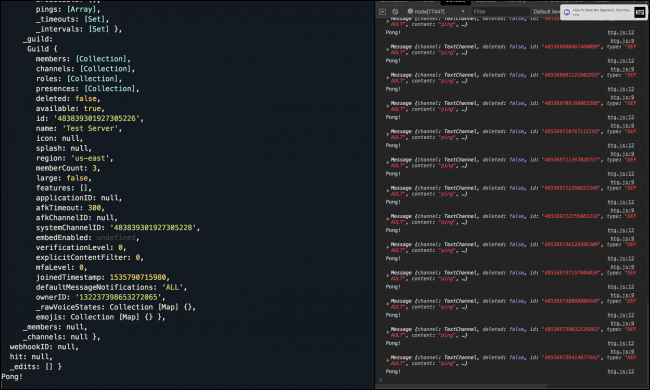
So what makes up this message object? A lot of stuff, actually:
那么,什么構成了這個消息對象呢? 實際上有很多東西:
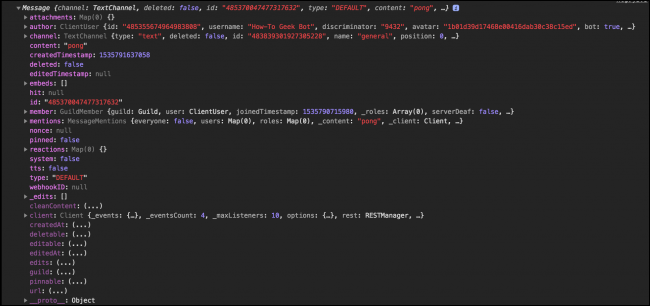
Most notably, you have the author info and the channel info, which you can access with msg.author and msg.channel. I recommend this method of logging objects to the Chrome Node devtools, and just looking around to see what makes it work. You may find something interesting. Here, for example, the bot logs its replies to the console, so the bot’s replies trigger client.on('message'). So, I made a spambot:
最值得注意的是,您具有作者信息和頻道信息,可以使用msg.author和msg.channel訪問這些信息。 我建議您使用這種方法將對象記錄到Chrome Node devtools,然后四處看看是否能使它起作用。 您可能會發現一些有趣的東西。 例如,在這里,僵尸程序將其答復記錄到控制臺,因此,僵尸程序的答復會觸發client.on('message') 。 所以,我做了一個垃圾郵件機器人:
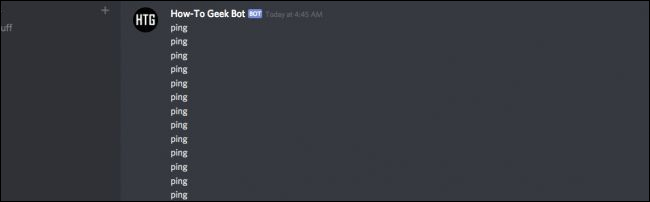
Note: Be careful with this, as you don’t really want to deal with recursion.
注意:請謹慎操作,因為您確實不想處理遞歸。
如何將Bot添加到服務器 (How to Add the Bot to Your Server)
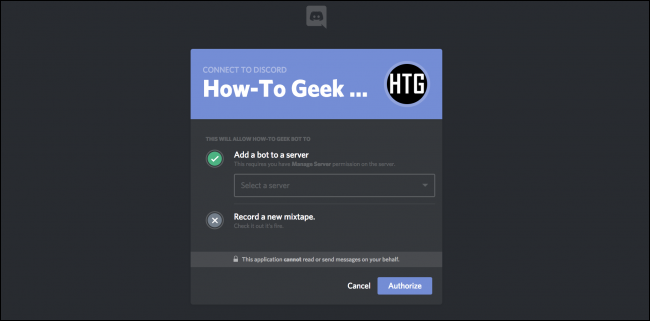
This part is harder than it should be. You have to take this URL:
這部分比應做的要難。 您必須使用以下網址:
https://discordapp.com/oauth2/authorize?client_id=CLIENTID&scope=bot
And replace CLIENTID with your bot’s client ID, found on the general information tab of the application page. Once this is done though, you can give the link to your friends to have them add the bot to their servers as well.
并將CLIENTID替換為bot的客戶端ID,該ID可在應用程序頁面的常規信息標簽上找到。 一旦完成,您就可以將鏈接提供給您的朋友,讓他們也將機器人添加到他們的服務器中。
好吧,那我還能做什么? (Alright, So What Else Can I Do?)
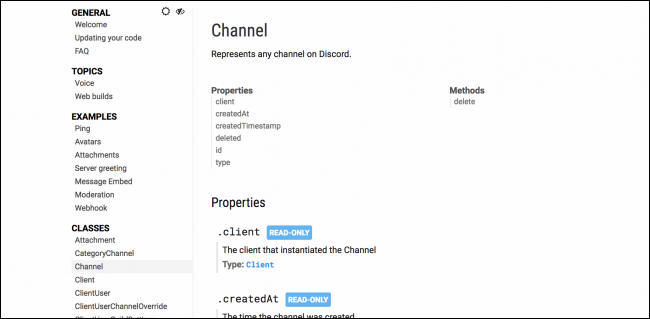
Beyond basic setup, anything else is entirely up to you. But, this wouldn’t be much of a tutorial if we stopped at hello world, so let’s go over some of the documentation, so you have a better idea of what’s possible. I suggest you read through as much as you can, as it’s very well documented.
除了基本設置外,其他任何事情都完全由您決定。 但是,如果我們停滯不前,那么本教程就不會多了,所以讓我們看一下一些文檔,這樣您就更好地了解了可能。 我建議您盡可能多地通讀,因為它有充分的記錄。
I would recommend adding console.log(client) to the start of your code, and taking a look at the client object in the console:
我建議將console.log(client)添加到代碼的開頭,并在控制臺中查看client對象:
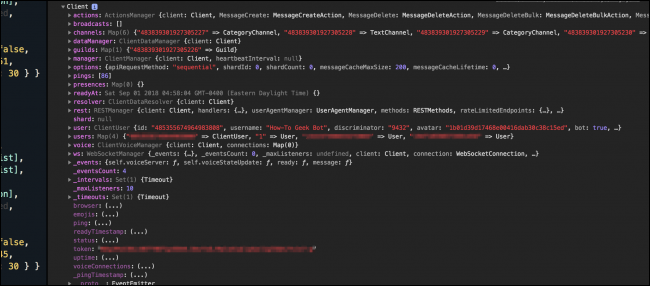
From here, you can learn a lot. Since you can add a bot to multiple servers at once, servers are part of the Guilds?map object. In that object are the individual Guilds?(which is the API’s name for “server”) and those guild objects have channel lists that contain all the info and lists of messages. The API is very deep, and may take a while to learn, but at least it’s easy to set up and get started learning.
從這里,您可以學到很多東西。 由于您可以一次將漫游器添加到多個服務器,因此服務器是Guilds映射對象的一部分。 在該對象中是各個公會(這是“服務器”的API名稱),并且那些公會對象具有包含所有信息和消息列表的通道列表。 該API非常深入,可能需要花費一些時間來學習,但至少它很容易設置并開始學習。
翻譯自: https://www.howtogeek.com/364225/how-to-make-your-own-discord-bot/


)


觸發器)
)

