
無法創建系統映像
You can back up your USB drive by creating a saved image. You can then take that saved image and clone multiple USB sticks.?This guide shows you how to create an image of your USB drive using Windows 10.
您可以通過創建保存的圖像來備份USB驅動器。 然后,您可以拍攝保存的圖像并克隆多個USB記憶棒。 本指南說明如何使用Windows 10創建USB驅動器的映像。
復制與克隆 (Copy Versus Clone)
Don’t follow this guide if you’re simply copying files from a USB stick. Take the usual drag-and-drop method in File Explorer to transfer files to and from the USB stick.
如果您只是從USB記憶棒復制文件,請不要遵循本指南。 在“文件資源管理器”中采用通常的拖放方法將文件與USB記憶棒進行傳輸。
This guide targets users who need to fully back up or clone a USB stick, such as a USB boot drive. The difference here is that you simply can’t drag-and-drop its contents to another USB drive. You need the drive’s master boot record and partition tables too. Even if the source USB drive isn’t bootable, you still need to make a clone if it has more than one partition.
本指南針對需要完全備份或克隆USB記憶棒(例如USB引導驅動器)的用戶。 此處的區別在于,您根本無法將其內容拖放到另一個USB驅動器。 您還需要驅動器的主引導記錄和分區表。 即使源USB驅動器不可引導,如果它具有多個分區,您仍然需要進行克隆。
The resulting image, then, consists of all visible and hidden files and the drive’s unused space. The image also includes slack space: Unused remnants of drive space Windows 10 allocates to a single file.
然后,生成的映像由所有可見和隱藏文件以及驅動器的未使用空間組成。 該映像還包括松弛空間:Windows 10分配給單個文件的驅動器空間的未使用剩余空間。
Finally, if you need to copy files from a single non-bootable USB drive to multiple units with an identical capacity, cloning may be your quickest solution. Scenarios could include USB-based press kits for tradeshows, or a manufacturer’s product catalog mailed to clients.
最后,如果您需要將文件從單個不可引導的USB驅動器復制到具有相同容量的多個單元,則克隆可能是最快的解決方案。 方案可能包括用于貿易展覽的基于USB的新聞資料袋,或郵寄給客戶的制造商產品目錄。
克隆您的USB驅動器 (Clone Your USB Drive)
Download and extract Passmark Software’s free ImageUSB tool. The most recent version (as of this writing) is v1.5.1000 released on October 25, 2019. This program doesn’t install into Windows 10, so be sure to unpack the ZIP file into a location you can remember.
下載并解壓縮Passmark軟件的免費ImageUSB工具。 最新版本(截至撰寫本文時)是2019年10月25日發行的v1.5.1000。此程序未安裝到Windows 10中,因此請確保將ZIP文件解壓縮到您可以記住的位置。
Next, insert your source USB stick and launch the program by double-clicking on the ImageUSB.exe file. Click “Yes” if a User Account Control pop-up appears on the screen.
接下來,插入您的源USB記憶棒,然后雙擊ImageUSB.exe文件啟動程序。 如果屏幕上出現“用戶帳戶控制”彈出窗口,請單擊“是”。
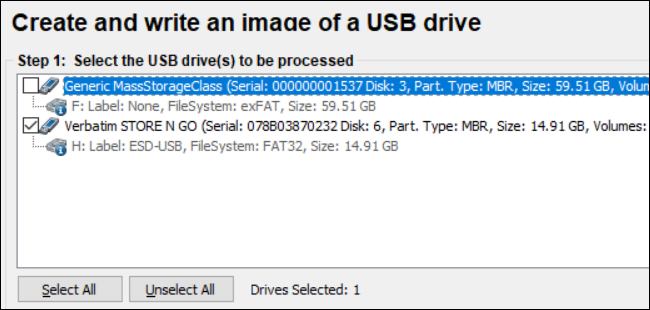
When the program opens on your screen, check the box next to your listed USB device.
當程序在屏幕上打開時,選中列出的USB設備旁邊的框。
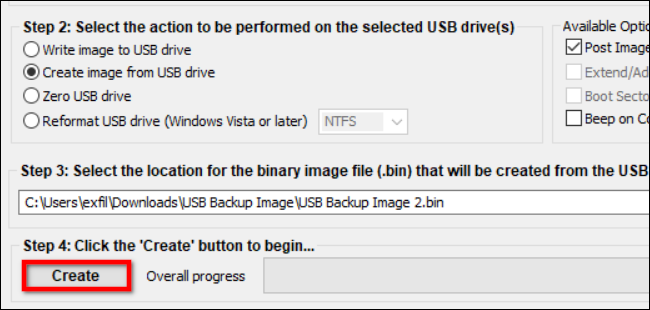
Next, select “Create Image From USB Drive” in Step 2.
接下來,在步驟2中選擇“從USB驅動器創建圖像”。
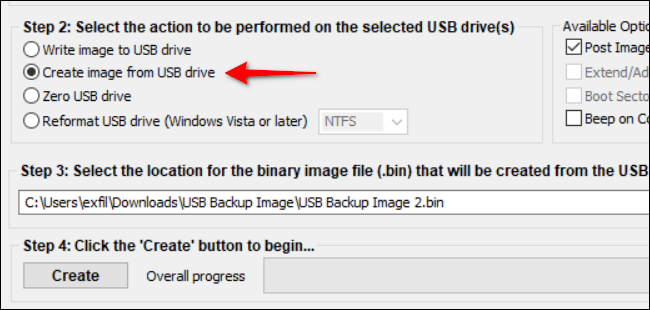
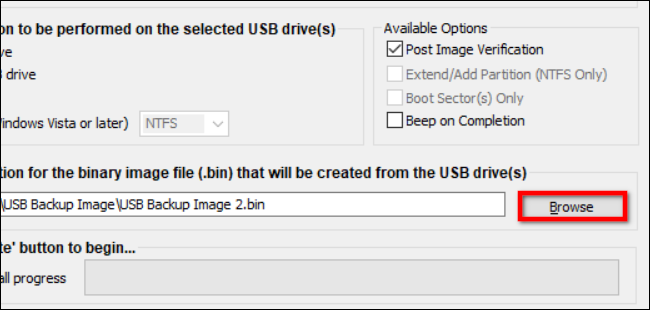
Click the “Browse” button to select or create a destination for the saved image. You’ll also need to create a file name, though you can’t change the “.BIN” file extension.
單擊“瀏覽”按鈕選擇或創建保存圖像的目的地。 盡管您無法更改“ .BIN”文件擴展名,但您還需要創建一個文件名。
Click the “Create” button once you choose a file name and location to start the image-saving process.
選擇文件名和位置后,單擊“創建”按鈕以開始圖像保存過程。
Finally, click “Yes” in the pop-up window to verify and confirm the task’s details.
最后,在彈出窗口中單擊“是”以確認并確認任務的詳細信息。
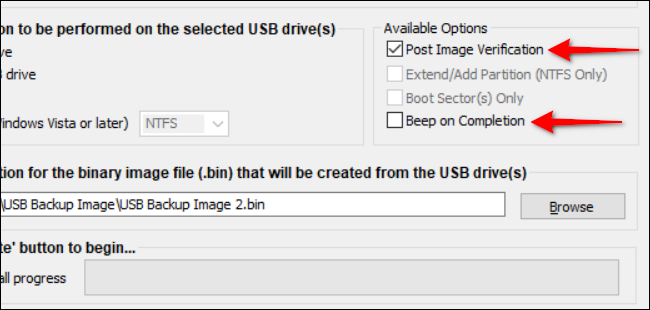
Under the “Available Options” section to the right, the “Post Image Verification” option is checked by default. With this feature enabled, the program scans through the file upon completion to verify its integrity. If the file fails inspection, you’ll need to create the image again. You’ll also see a “Beep On Completion” setting that provides an audible alert.
在右側的“可用選項”部分下,默認情況下選中“后圖像驗證”選項。 啟用此功能后,程序將在完成后掃描文件以驗證其完整性。 如果文件未通過檢查,則需要再次創建圖像。 您還將看到“完成時響起”設置,該設置會發出聲音警報。
將圖像文件傳輸回USB記憶棒 (Transfer Your Image File Back to a USB Stick)
For this guide, you will need a USB drive with a capacity matching the original storage device. For example, if you created a USB image from a 128GB drive, then the second drive needs the matching 128GB capacity. You cannot install the image to a drive with a 64GB capacity, for example. Why? Because the image includes unused space.
對于本指南,您將需要一個容量與原始存儲設備匹配的USB驅動器。 例如,如果您是從128GB驅動器創建USB映像,則第二個驅動器需要匹配的128GB容量。 例如,您不能將映像安裝到容量為64GB的驅動器上。 為什么? 因為圖像包含未使用的空間。
As before, double-click the ImageUSB.exe file to launch the program. Click “Yes” if a User Account Control pop-up appears on the screen.
和以前一樣,雙擊ImageUSB.exe文件以啟動程序。 如果屏幕上出現“用戶帳戶控制”彈出窗口,請單擊“是”。
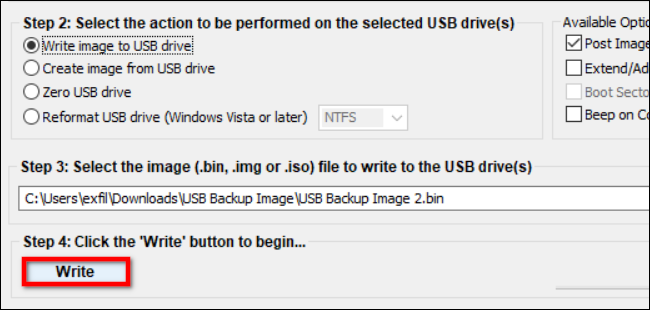
When the program opens on your screen, click the “Write Image To USB Drive” setting listed under Step 2.
當程序在屏幕上打開時,單擊步驟2下列出的“將圖像寫入USB驅動器”設置。

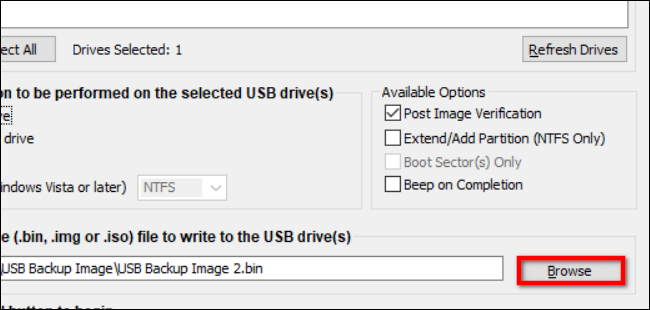
Click the “Browse” button to locate and select the image file stored on your PC.
單擊“瀏覽”按鈕,找到并選擇存儲在PC上的圖像文件。
Once you locate the stored image, click the “Write” button to begin. Keep in mind that ImageUSB will erase everything stored on the destination USB stick and replace its contents with the image’s data.
找到存儲的圖像后,單擊“寫入”按鈕開始。 請記住,ImageUSB將擦除目標USB記憶棒上存儲的所有內容,并將其內容替換為圖像數據。
When complete, delete the file from your PC if you have no plans to write it to another USB stick. If you’re making multiple clones, insert a new USB drive and repeat these four steps.
完成后,如果您沒有計劃將其寫入另一個USB記憶棒,請從您的PC中刪除該文件。 如果要進行多個克隆,請插入新的USB驅動器并重復上述四個步驟。
翻譯自: https://www.howtogeek.com/446176/how-to-create-an-image-of-your-usb-drive/
無法創建系統映像


)
![[轉]QDir類及其用法總結](http://pic.xiahunao.cn/[轉]QDir類及其用法總結)


默認特性)


