The Raspberry Pi is everywhere now, which is why it’s caught the eye of threat actors and cybercriminals. We’ll show you how to secure your Pi with two-factor authentication.
Raspberry Pi現在無處不在,這就是為什么它引起了威脅參與者和網絡犯罪分子的關注。 我們將向您展示如何通過兩步驗證來保護您的Pi。
驚人的樹莓派 (The Amazing Raspberry Pi)
The Raspberry Pi?is a single-board computer. It launched in the U.K. in 2012 with the intent of getting children to tinker with, create, and learn code. The original form factor was a credit-card-sized board, powered by a phone charger.
Raspberry Pi是單板計算機。 它于2012年在英國推出,旨在讓孩子們修補,創建和學習代碼。 最初的尺寸是信用卡大小的板,由電話充電器供電。
It provides HDMI output, USB ports, network connectivity, and runs Linux. Later additions to the line included even smaller versions designed to be incorporated in products or run as headless systems. Prices range from $5 for the minimalist Pi Zero, to $75 for the Pi 4 B/8 GB.
它提供HDMI輸出,USB端口,網絡連接并運行Linux。 該產品線后來的增加包括甚至更小版本的產品,這些產品設計用于產品或作為無頭系統運行。 價格從極簡的Pi Zero的5美元到Pi 4 B / 8 GB的75美元不等。
Its success has been incredible; over 30 million of these tiny computers have sold worldwide. Hobbyists have done amazing and inspiring things with them, including floating one to the edge of space?and back on a balloon.
它的成功令人難以置信。 這些微型計算機在全球已售出超過3000萬臺。 業余愛好者已經與他們一起完成了令人驚奇和啟發性的事情,包括將一個漂浮在太空邊緣然后放回氣球上。
Alas, once a computing platform becomes sufficiently widespread it inevitably attracts the attention of cybercriminals. It’s dreadful to think of how many Pi’s are using the default user account and password. If your Pi is public-facing and accessible from the internet by Secure Shell (SSH), it must be secure.
las,一旦計算平臺變得足夠普及,它不可避免地會引起網絡犯罪分子的關注。 考慮到有多少Pi正在使用默認用戶帳戶和密碼,這真是令人恐懼。 如果您的Pi是面向公眾的,并且可以通過Secure Shell (SSH)從Internet訪問,則它必須是安全的。
Even if you don’t have any valuable data or software on your Pi, you need to protect it because your Pi isn’t the actual target—it’s just a way to get into your network. Once a threat actor has a foothold in a network, he’ll pivot to the other devices in which he’s actually interested.
即使您的Pi上沒有任何有價值的數據或軟件,您也需要對其進行保護,因為您的Pi并不是真正的目標-這只是進入網絡的一種方式。 一旦威脅參與者在網絡中立足,他將轉向他真正感興趣的其他設備。
兩要素認證 (Two-Factor Authentication)
Authentication—or gaining access to a system—requires one or more factors. Factors are categorized as the following:
身份驗證(或獲得對系統的訪問權限)需要一個或多個因素。 因素分為以下幾種:
Something you know:?Such as a password or -phrase.
您知道的一些信息:例如密碼或短語。
Something you have:?Like a cell phone, physical token, or dongle.
您擁有的東西:例如手機,物理令牌或加密狗。
Something you are:?A biometric reading, like a fingerprint or retinal scan.
您是:生物識別讀數,例如指紋或視網膜掃描。
Multifactor authentication (MFA) requires a password, and one or more items from the other categories.?For our example, we’re going to use a password and cell phone. The cell phone will run a Google authenticator app, and the Pi will run a Google authentication module.
多因素身份驗證(MFA)要求輸入密碼以及其他類別中的一項或多項。 對于我們的示例,我們將使用密碼和手機。 手機將運行Google身份驗證器應用程序,Pi將運行Google身份驗證模塊。
A cell phone app is linked to your Pi by scanning a QR code. This passes some seed information to your cell phone from the Pi, ensuring their number-generation algorithms produce the same codes simultaneously.? The codes are referred to as?time-based, one-time passwords (TOTP).
手機應用通過掃描QR碼鏈接到您的Pi。 這會將一些種子信息從Pi傳遞到您的手機,以確保其數字生成算法同時生成相同的代碼。 這些代碼稱為基于時間的一次性密碼(TOTP)。
When it receives a connection request, your Pi generates a code. You use the authenticator app on your phone to see the current code, and then your Pi will ask you for your password and authentication code. Both your password and the TOTP must be correct before you’re allowed to connect.
當它收到連接請求時,您的Pi會生成一個代碼。 您使用手機上的身份驗證器應用程序查看當前代碼,然后您的Pi會要求您提供密碼和驗證碼。 允許您連接之前,您的密碼和TOTP都必須正確。
配置Pi (Configuring the Pi)
If you usually SSH onto your Pi, it’s likely it’s a headless system, so we’ll configure it over an SSH connection.
如果您通常將SSH連接到Pi,則可能是無頭系統,因此我們將通過SSH連接對其進行配置。
It’s safest to make two SSH connections: one to do the configuring and testing, and another to act as a safety net. This way, if you lock yourself out of your Pi, you’ll still have the second active SSH connection active. Changing SSH settings won’t affect an in-progress connection, so you can use the second one to reverse any changes and remedy the situation.
建立兩個SSH連接是最安全的:一個進行配置和測試,另一個充當安全網。 這樣,如果您將自己鎖定在Pi之外,您仍將保持第二個活動的SSH連接活動。 更改SSH設置不會影響正在進行的連接,因此您可以使用第二個SSH撤消任何更改并糾正這種情況。
If the worst happens and you’re completely locked out via SSH, you’ll still be able to connect your Pi to a monitor, keyboard, and mouse, and then log in to a regular session. That is, you can still sign in, as long as your Pi can drive a monitor. If it can’t, however, you really need to keep the safety net SSH connection open until you’ve verified that two-factor authentication is working.
如果最壞的情況發生了,并且您已完全通過SSH鎖定,您仍然可以將Pi連接到顯示器,鍵盤和鼠標,然后登錄到常規會話。 也就是說,只要您的Pi可以驅動顯示器,您仍然可以登錄。 但是,如果不能,那么您真的需要保持安全網SSH連接的打開狀態,直到您確認兩因素身份驗證有效。
The ultimate sanction, of course, is to reflash the operating system onto the Pi’s micro SD card, but let’s try to avoid that.
當然,最終的制裁是將操作系統重新刷新到Pi的micro SD卡上,但是讓我們嘗試避免這種情況。
First, we need to make our two connections to the Pi. Both commands take the following form:
首先,我們需要與樹莓派建立兩個連接。 這兩個命令都采用以下形式:
ssh pi@watchdog.local

The name of this Pi is “watchdog,” but you’ll type the name yours instead. If you’ve changed the default username, use that, too; ours is “pi.”
該Pi的名稱是“看門狗”,但是您將鍵入您的名字。 如果您更改了默認用戶名,也請使用該用戶名。 我們的是“ pi”。
Remember, for safety, type this command twice in different terminal windows so you have two connections to your Pi. Then, minimize one of them, so it’s out of the way and won’t be closed accidentally.
請記住,為安全起見,請在不同的終端窗口中鍵入此命令兩次,以使您與Pi有兩個連接。 然后,最小化其中之一,以免干擾,不會意外關閉。
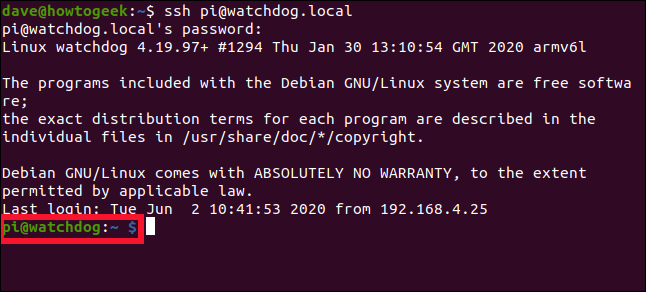
After you connect, you’ll see the greeting message. The prompt will show the username (in this case, “pi”), and the name of the Pi (in this case, “watchdog”).
連接后,您將看到問候消息。 提示符將顯示用戶名(在本例中為“ pi”)和Pi的名稱(在本例中為“看門狗”)。
You need to edit the “sshd_config” file. We’ll do so in the nano text editor:
您需要編輯“ sshd_config”文件。 我們將在nano文本編輯器中執行此操作:
sudo nano /etc/ssh/sshd_config

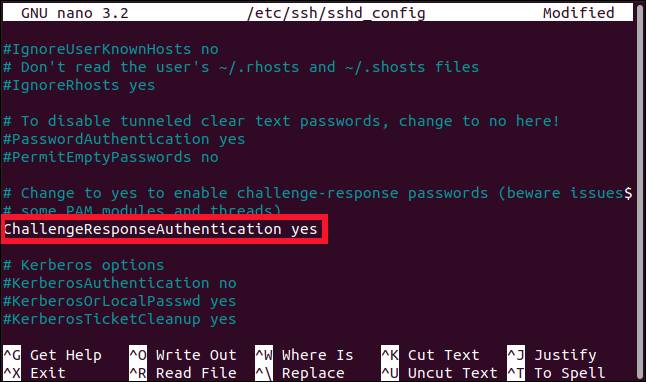
Scroll through the file until you see the following line:
滾動瀏覽文件,直到看到以下行:
ChallengeResponseAuthentication no
Replace the “no” with “yes.”
將“否”替換為“是”。
Press Ctrl+O to save your changes in nano, and then press Ctrl+X to close the file. Use the following command to restart the SSH daemon:
按Ctrl + O將更改保存在nano中,然后按Ctrl + X關閉文件。 使用以下命令重新啟動SSH守護程序:
sudo systemctl restart ssh

You need to install the Google authenticator, which is a Pluggable Authentication Module (PAM) library. The application (SSH) will call the Linux PAM interface, and the interface finds the appropriate PAM module to service the type of authentication being requested.
您需要安裝Google身份驗證器,它是一個可插入身份驗證模塊(PAM)庫。 應用程序(SSH)將調用Linux PAM接口,并且該接口找到適當的PAM模塊以服務于請求的身份驗證類型。
Type the following:
輸入以下內容:
sudo apt-get install libpam-google-authenticator

安裝應用 (Installing the App)
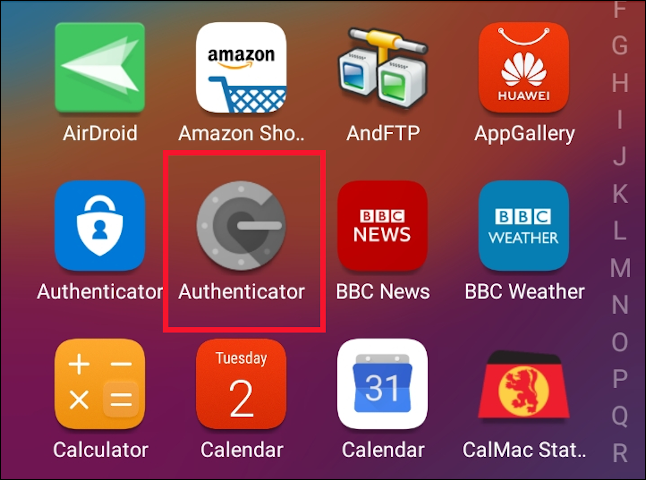
The Google Authenticator app is available for iPhone?and?Android, so just install the appropriate version for your cell phone. You can also use Authy and other apps that support this type of authentication code.
Google Authenticator應用適用于iPhone和Android ,因此只需為您的手機安裝適當的版本即可。 您還可以使用Authy和其他支持此類身份驗證代碼的應用。
配置兩因素身份驗證 (Configuring Two-Factor Authentication)
In the account you’ll be using when you connect to the Pi via SSH, run the following command (do not include the?sudo?prefix):
在通過SSH連接到Pi時要使用的帳戶中,運行以下命令(不包括sudo前綴):
google-authenticator
You’ll be asked if you want the authentication tokens to be time-based; press Y, and then hit Enter.
系統將詢問您是否希望身份驗證令牌基于時間; 按Y,然后按Enter。
A Quick Response (QR) code is generated, but it’s scrambled because it’s wider than the 80-column terminal window. Drag the window wider to see the code.
生成了快速響應(QR)代碼,但由于它比80列的終端窗口寬,因此已被加擾。 將窗口更寬地拖動以查看代碼。
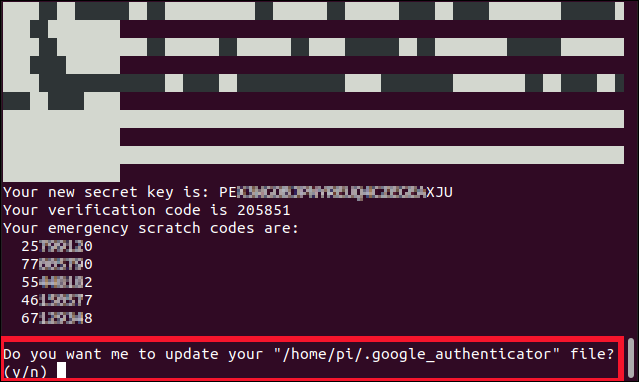
You’ll also see some security codes beneath the QR code. These are written to a file called “.google_authenticator,” but you might want to make a copy of them now. If you ever lose the ability to obtain a TOTP (if you lose your cell phone, for example), you can use these codes to authenticate.
您還將在QR碼下方看到一些安全碼。 它們被寫入名為“ .google_authenticator”的文件中,但是您現在可能想要復制它們。 如果您失去了獲得TOTP的能力(例如,如果您丟失了手機),則可以使用這些代碼進行身份驗證。
You must answer four questions, the first of which is:
您必須回答四個問題,第一個是:
Do you want me to update your "/home/pi/.google_authenticator" file? (y/n)
Press Y, and then hit Enter.
按Y,然后按Enter。
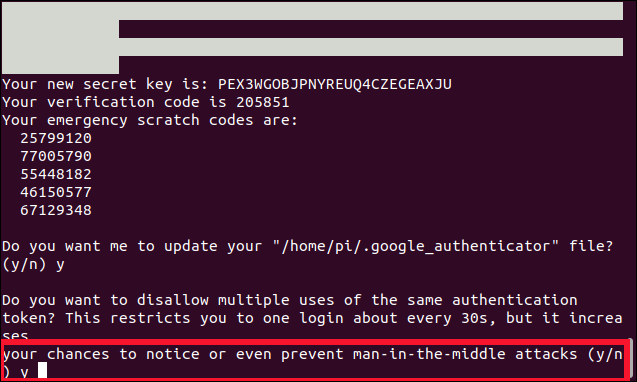
The next question asks whether you want to prevent multiple uses of the same code within a 30-second window.
下一個問題詢問您是否要防止在30秒的窗口內多次使用同一代碼。
Press Y, and then hit Enter.
按Y,然后按Enter。
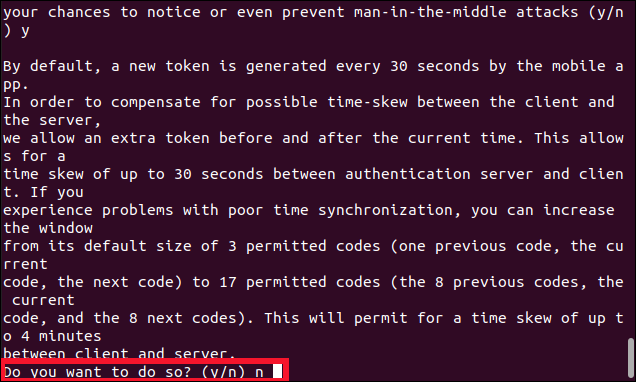
The third question asks whether you want to widen the window of acceptance for the TOTP tokens.
第三個問題詢問您是否要擴大TOTP令牌的接受范圍。
Press N in answer to this, and then press Enter.
在回答中按N,然后按Enter。
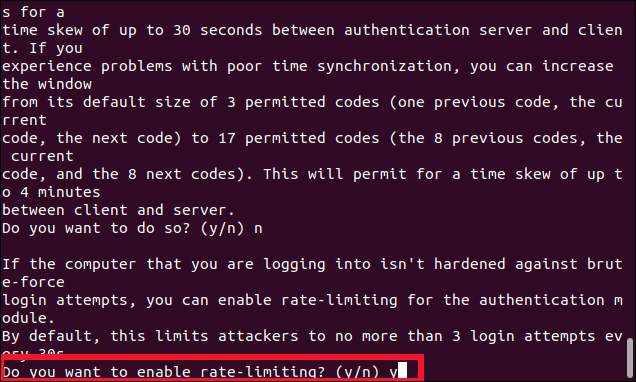
The last question is: “Do you want to enable rate-limiting?”
最后一個問題是:“您要啟用速率限制嗎?”
Type Y, and then hit Enter.
鍵入Y,然后按Enter。
You’re returned to the command prompt. If necessary, drag the terminal window wider and/or scroll up in the terminal window so you can see the entire QR code.
您將返回到命令提示符。 如有必要,將終端窗口更寬地拖動和/或在終端窗口中向上滾動,以查看整個QR碼。
On your cell phone open the authenticator app, and then press the plus sign (+) at the bottom-right of the screen. Select “Scan a QR Code,” and then scan the QR code in the terminal window.
在您的手機上,打開身份驗證器應用程序,然后按屏幕右下角的加號(+)。 選擇“掃描QR碼”,然后在終端窗口中掃描QR碼。
A new entry will appear in the authenticator app named after the hostname of the Pi, and a six-digit TOTP code will be listed beneath it. It’s displayed as two groups of three digits to make reading it easier, but you must type it as one, six-digit number.
一個新條目將出現在身份驗證器應用程序中,該應用程序以Pi的主機名命名,并在其下方列出一個六位數的TOTP代碼。 它被顯示為兩組,每組三個數字,以便于閱讀,但是您必須將其鍵入一個六位數的數字。
An animated circle beside the code indicates how much longer the code will be valid: a full circle means 30 seconds, a half-circle means 15 seconds, and so on.
代碼旁邊的動畫圓圈表示該代碼有效的時間:一個完整??的圓圈表示30秒,一個半圓圈表示15秒,依此類推。
鏈接在一起 (Linking It All Together)
We’ve got one more file to edit. We have to tell SSH which PAM authentication module to use:
我們還有一個文件要編輯。 我們必須告訴SSH使用哪個PAM身份驗證模塊:
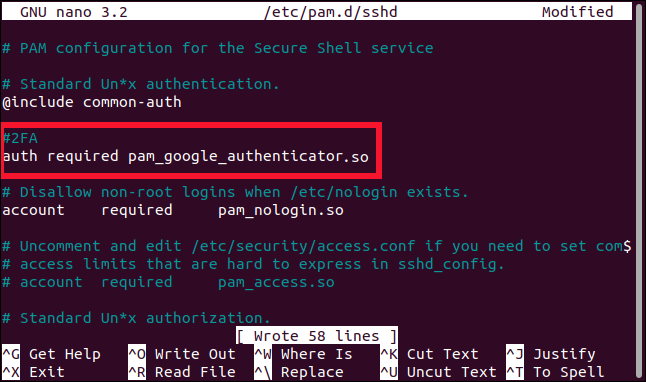
sudo nano /etc/pam.d/sshd

Type the following lines near the top of the file:
在文件頂部附近鍵入以下幾行:
#2FA
auth required pam_google_authenticator.so
You can also choose when you want to be asked for the TOTP:
您還可以選擇何時要求輸入TOTP:
After you’ve entered your password: Type the previous lines below “@include common-auth,” as shown in the image above.
輸入密碼后:如上圖所示,在“ @include common-auth”下面輸入前幾行。
Before you’re asked for your password: Type the previous lines?above “@include common-auth.”
在要求您輸入密碼之前:在“ @include common-auth”上方輸入前幾行。
Note the underscores (_) used in “pam_google_authenticator.so,” rather than the hyphens (-) we used earlier with the apt-get command to install the module.
請注意“ pam_google_authenticator.so”中使用的下劃線(_),而不是我們之前使用apt-get命令安裝模塊時使用的連字符(-)。
Press Ctrl+O to write the changes to the file, and then press Ctrl+X to close the editor. We need to restart SSH one final time, and then we’re done:
按Ctrl + O將更改寫入文件,然后按Ctrl + X關閉編輯器。 我們需要在最后一次重新啟動SSH,然后完成:
sudo systemctl restart ssh

Close this SSH connection, but leave the other safety net SSH connection running until we’ve verified this next step.
關閉此SSH連接,但使其他安全網SSH連接保持運行狀態,直到我們驗證了此下一步。
Make sure the authenticator app is open and ready on your cell phone, and then open a new SSH connection to the Pi:
確保身份驗證器應用已打開并在手機上準備就緒,然后打開與Pi的新SSH連接:
ssh pi@watchdog.local
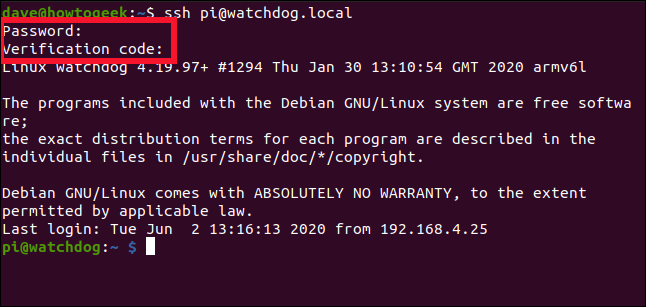
You should be asked for your password, and then for the code. Type the code from your cell phone without any spaces between the numbers.?Like your password, it’s not echoed on the screen.
應該要求您輸入密碼,然后輸入代碼。 鍵入手機中的密碼,數字之間不要有空格。 就像您的密碼一樣,它不會在屏幕上回顯。
If everything goes according to plan, you should be allowed to connect to the Pi; if not, use your safety net SSH connection to review the previous steps.
如果一切都按計劃進行,則應允許您連接到Pi。 如果不是,請使用您的安全網SSH連接查看前面的步驟。
比抱歉更好安全 (Better Safer Than Sorry)
Did you notice the “r” in “safer” above?
您是否注意到上面“更安全”中的“ r”?
Indeed, you’re now safer than you were previously when connecting to a Raspberry Pi, but nothing is ever 100 percent safe. There are ways to circumvent two-factor authentication. These rely on social engineering, man-in-the-middle?and man-at-the-endpoint attacks, SIM swapping, and other advanced techniques that, obviously, we’re not going to describe here.
確實,與連接Raspberry Pi的連接相比,您現在比以前更安全,但是沒有100%安全。 有一些方法可以規避兩因素身份驗證。 這些依賴于社會工程,中間人攻擊和端點人攻擊, SIM卡交換以及其他高級技術,顯然,我們將不在這里描述。
So, why bother with all this if it’s not perfect? Well, for the same reason you lock your front door when you leave, even though there are people who can pick locks—most can’t.
那么,如果這還不夠完美,為什么還要煩惱呢? 好吧,出于同樣的原因,即使有人可以選鎖,但離開時還是要鎖上前門,而大多數人卻不能。
翻譯自: https://www.howtogeek.com/676077/how-to-set-up-two-factor-authentication-on-a-raspberry-pi/


![一張圖看懂阿里云網絡產品[十二]云企業網](http://pic.xiahunao.cn/一張圖看懂阿里云網絡產品[十二]云企業網)


