小屏幕 ui設計
重點 (Top highlight)
第4部分 (Part 4)
Welcome to the fourth part of the UI Design basics. This time we’ll cover the screens you’ll likely design for. This is also a part of the free chapters from Designing User Interfaces.
歡迎使用UI設計基礎知識的第四部分。 這次,我們將介紹您可能要設計的屏幕。 這也是《 設計用戶界面 》中免費章節的一部分。
用戶界面的99%=屏幕上的像素* (99% of UI = pixels on a screen*)
- The 1% is for voice interfaces, and possibly neural-link connections in the near future. 1%用于語音接口,并可能在不久的將來用于神經鏈接連接。
UI design is all about displays. Based on the fact that the UI is everything we see, it’s essential to understand what do we watch it on.
UI設計完全與顯示有關。 基于這樣的事實,該UI是我們看到的一切,這是必須要了解我們怎么看它 。
In the early days of the web, it was quite simple — you designed somewhere between 640 x 480 and 800 x 600 pixels. We can, of course, go back even farther — to the first Macintosh or Xerox’s very first Desktop-UI but those UIs, but let’s assume old school color CRT’s as our base here. That is also the time when I started designing for the web (1998)
在網絡的早期,它非常簡單-您設計的像素介于640 x 480和800 x 600之間。 當然,我們可以追溯到更遠的地方–返回第一個Macintosh或Xerox的第一個Desktop-UI,但那些UI,但讓我們假設老式的CRT作為這里的基礎。 那也是我開始為網絡設計的時候(1998年)
But that was the late 90’s, and things started rapidly changing after that. Most of the displays of that era had similar resolution ranges, were super heavy, and couldn’t display too many colors. The also had low refresh rates that resulted in subpar scrolling experience. The displays of that era often limited what websites could achieve visually.
但這是90年代后期,此后事情開始Swift發生變化。 那個時代的大多數顯示器具有相似的分辨率范圍,超重,并且不能顯示太多顏色。 它還具有較低的刷新率,導致滾動效果不佳。 那個時代的展示常常限制了網站在視覺上可以實現的目標。
Since we are now living in a tech-world of millions of pixels and millions of colors, we need to understand the screens we design for today. The technology leaped forward since the early internet days. Nowadays, the phone you are holding in your hand has a resolution that didn’t exist twenty years ago.
由于我們現在生活在數百萬個像素和數百萬種顏色的技術世界中,因此我們需要了解我們今天設計的屏幕。 自早期互聯網時代以來,這項技術就飛速發展。 如今,您手里拿著的電話具有20年前不存在的分辨率。
PPI或每英寸像素 (PPI or Pixels per inch)
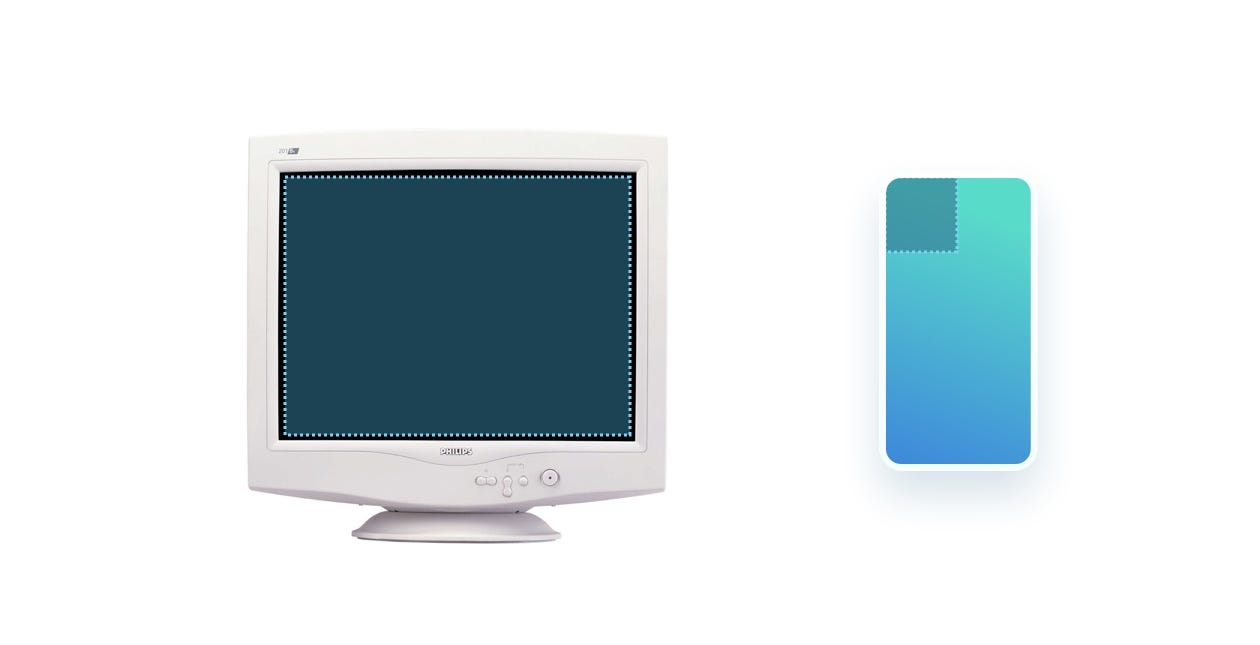
At some point, 72 pixels per inch became the display standard for those CRT displays and it was the case for a long, long time. Right now both our laptops and our mobile devices have much higher resolutions and pixel densities.
在某些時候,每英寸72像素已成為那些CRT顯示器的顯示標準,并且這種情況已經持續了很長時間。 現在,我們的筆記本電腦和移動設備都具有更高的分辨率和像素密度。
但是有什么區別呢? (But what is the difference?)
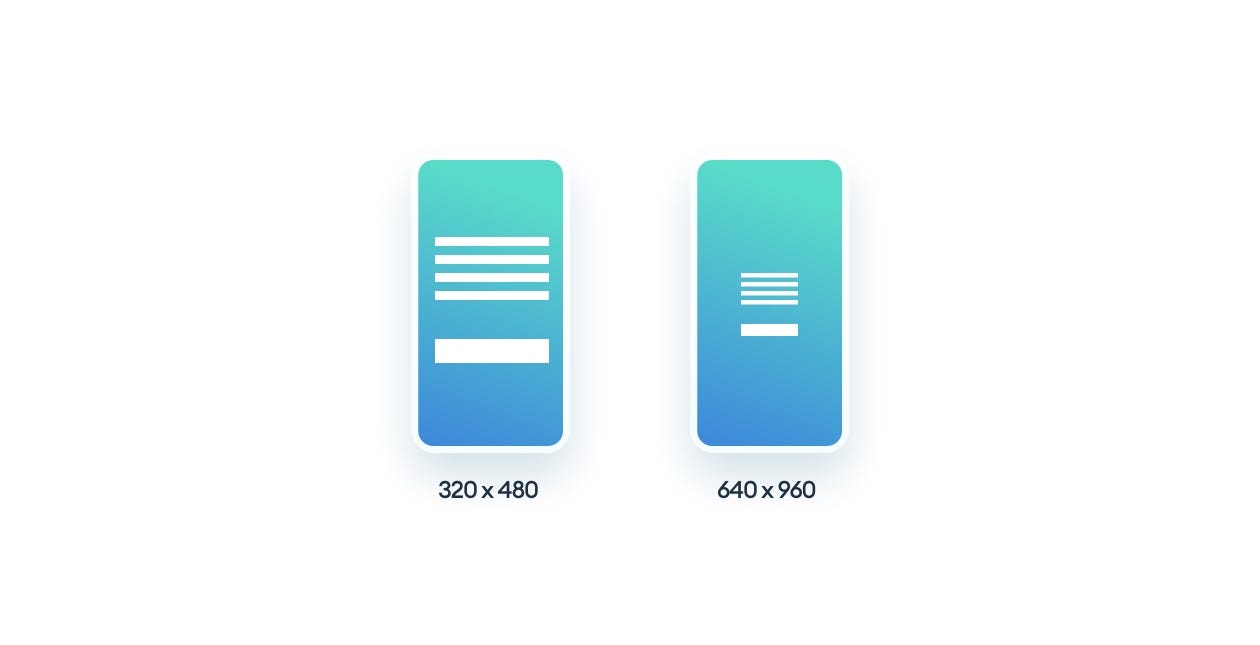
The resolution is the number of individual pixels the display has. For example the first iPhone had a 320 x 480 base resolution. Apple decided, that this resolution should be enough for a comfortable interface, so it set a baseline of a 1x density for the platform.
分辨率是顯示器具有的單個像素數。 例如,第一部iPhone的基本分辨率為320 x 480。 蘋果公司決定,該分辨率足以提供舒適的界面,因此為該平臺設置了1倍密度的基線。
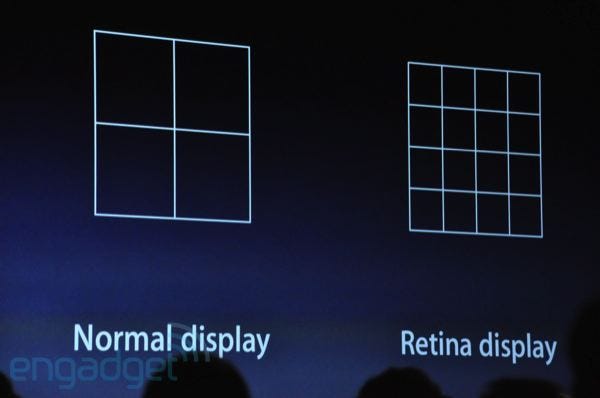
That all changed with the introduction of the iPhone 4 with its retina display. The premise was the pixels were so dense you couldn’t easily see the individual ones anymore. A base (or 1x) resolution was the same as the previous iPhone, but the pixel density was a multiplier of that resolution resulting in sharper text and images. The iPhone 4 doubled the number of pixels to 640 x 960, but the actual design of elements was kept at 320 x 480 and upscaled on the device.
這一切都隨著帶有視網膜顯示屏的iPhone 4的推出而改變。 前提是像素是如此密集,以至于無法再輕易看到單個像素了。 基本(或1倍)分辨率與以前的iPhone相同,但是像素密度是該分辨率的倍數,從而使文字和圖像更加清晰。 iPhone 4將像素數量增加了一倍,達到640 x 960,但實際的元素設計保持在320 x 480,并在設備上進行了放大。
Ok, but why was it still behaving like 320 x 480? Why didn’t they simply use 640 x 960 as the “viewable resolution” ?
好的,但是為什么它仍然表現為320 x 480? 他們為什么不簡單地使用640 x 960作為“可視分辨率”?
After the iPhone 4’s 2x pixel count, we started seeing 3x, 4x, and larger pixel densities in both phones, tablets, and laptops.
在iPhone 4的像素數增加到2倍之后,我們開始看到手機,平板電腦和筆記本電腦的像素密度分別是3倍,4倍和更大。
For example, the modern day iPhone X used a 375 by 812 base resolution, but its actual pixel count is three times larger (3x) at 1125 by 2436.
例如,現代的iPhone X使用375 x 812基本分辨率,但其實際像素數是1125 x 2436的三倍大(3倍)。
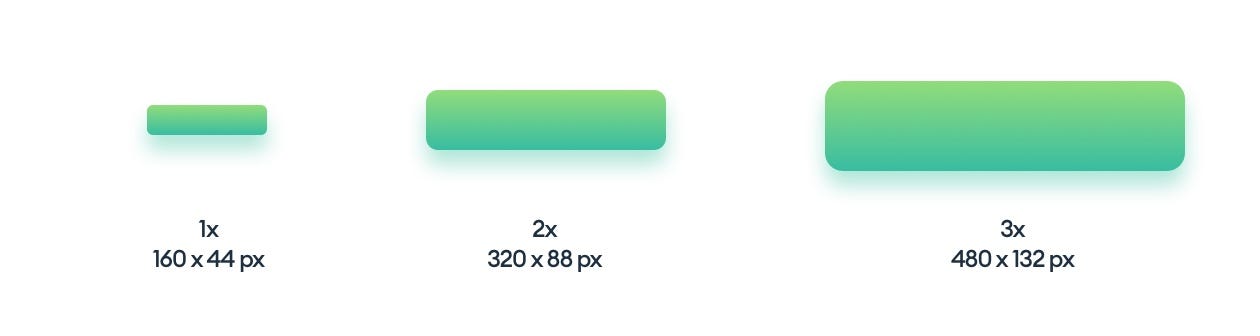
To give an example — if you’re designing a button, you need to make it at least 44p high. That means that designing at 1x it will be 44 pixels (at 1x a pixel is the same as a point) while at 2x it will be 88 pixels, but still 44 points in your design.
舉例來說-如果您要設計一個按鈕,則需要使其至少高44p。 這意味著以1x進行設計將為44像素(以1x進行像素處理將等于一個點),而以2x進行設計將進行處理則為88像素,但在您的設計中仍為44點。
Since the UI’s we design are all inside vector-based tools, we don’t need to worry about actual resolutions anymore. The base resolution of 1x serves as a template that works on low-density screens and is sharper and more precise in high-density ones.
由于我們設計的UI都在基于矢量的工具中,因此我們不再需要擔心實際的分辨率。 1x的基本分辨率用作在低密度屏幕上工作的模板,在高密度屏幕上則更清晰,更精確。
但是你不需要記住這個 (But you don’t need to remember this)
Most design tools provide you with a 1x template for all the popular screen sizes. You just design at 1x, and the coded interface scales up automatically. What a relief! 🥳
大多數設計工具會為您提供所有流行屏幕尺寸的1x模板。 您只需以1倍的速度進行設計,編碼的接口就會自動放大。 終于解脫了! 🥳
But keep in mind that there is fragmentation.
但是請記住,存在碎片。
什么是碎片? (What is fragmentation?)
Sadly a growing number of screen resolutions end up with a very fragmented display landscape. We design for TVs, laptops, tablets, phones, watches, and IoT devices, which requires a lot of planning and device-specific modifications for the design to work.
令人遺憾的是,越來越多的屏幕分辨率最終導致非常分散的顯示格局。 我們為電視,筆記本電腦,平板電腦,電話,手表和IoT設備進行設計,這需要大量規劃和特定于設備的修改才能起作用。
The first questions to ask when starting a design is what kind of screen it is going to work on and what’s the typical viewing distance.
開始設計時首先要問的問題是它將在哪種屏幕上工作以及典型的觀看距離是多少。
A TV app should have higher contrast and more significant UI elements than a mobile phone app, mostly because it’s often used from across the room, while a phone app is just inches away from the face.
電視應用程序應比手機應用程序具有更高的對比度和更重要的UI元素,主要是因為它經常在整個房間中使用,而手機應用程序距離面部只有幾英寸。

But the place where fragmentation hurts the most is from within one device category. The most ubiquitous one — the mobile phone — has so many potential resolutions and aspect ratios that there is no way to make one design fit all. There are dozens of screen resolutions outlined in the Google Play store for Android-based mobile devices. Apple used to have a more consistent set a few years ago, but has since then abandoned the path and went towards individual resolutions for nearly all the devices.
但是,碎片傷害最大的地方卻來自一個設備類別。 最普及的手機-手機-具有如此眾多的潛在分辨率和長寬比,以至于無法使一種設計適合所有人。 Google Play商店針對基于Android的移動設備概述了多種屏幕分辨率。 蘋果幾年前曾設置過更一致的設置,但此后便放棄了發展之路,幾乎針對所有設備采用了單獨的分辨率。
如何打零碎? (How to fight fragmentation?)
The only way to fight (and win) with this trend is to design at the smallest possible resolution, at least until it becomes legally obsolete. Then switch to the next smallest one.
與這種趨勢抗爭(并取勝)的唯一方法是以最小的分辨率進行設計,至少要在其合法淘汰之前。 然后切換到下一個最小的。
In simpler terms: Don’t design for the iPhone Pro Max specifically. Design for an iPhone Pro.
用更簡單的話來說:不要專門為iPhone Pro Max設計。 iPhone Pro設計。
范圍和范圍 (Range and reach)
In mobile devices, it is also essential to think about the average reach. A randomly pieced together interface can be complicated to use with one hand and lead to frustration.
在移動設備中,考慮平均覆蓋率也很重要。 用一只手隨意拼湊的界面可能很復雜,并且會導致挫敗感。
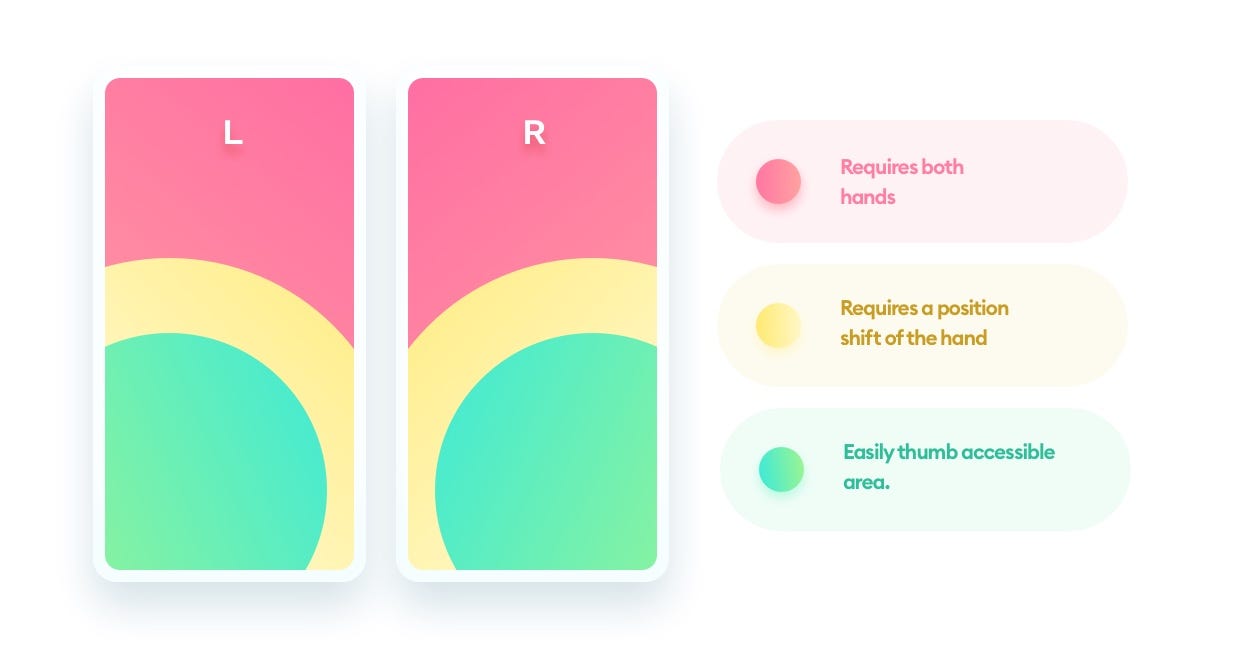
We assume that the typical phone usage pattern is a single hand holding the phone with the thumb of the same hand doing most of the on-screen work.
我們假設典型的電話使用方式是一只手握住電話,而另一只手的拇指則完成屏幕上的大部分工作。
Reach can also help determine how easy it will be to navigate the product. The popular hamburger menu design pattern is in the least favorable spot imaginable for right-handed users.
覆蓋面還可以幫助確定導航產品的難易程度。 對于慣用右手的用戶而言,流行的漢堡菜單設計模式處于最不利的位置。
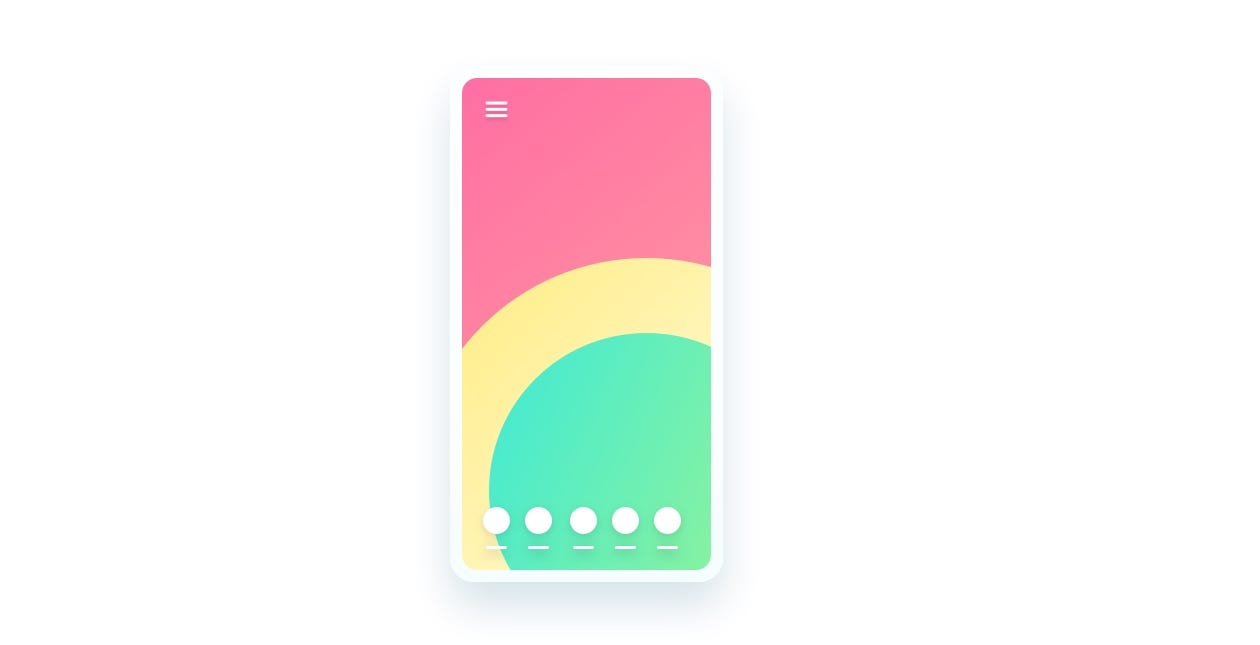
Bottom aligned tabs are, in most cases, the easiest way to design menus and should be considered for nearly every product as the first choice.
在大多數情況下,底部對齊的選項卡是設計菜單的最簡單方法,幾乎??所有產品都應將其視為首選。
主要外賣 (Main takeaways)
Here’s all you need to remember about designing for all types of screens:
這是您為所有類型的屏幕進行設計時需要記住的所有內容:
- Always design for the 1x pixel density 始終設計為1倍像素密度
- All design tools have the right screen sizes built right in (no need to remember them) 所有設計工具都內置有正確的屏幕尺寸(無需記住它們)
- Make your main navigation easy to reach on mobile devices 使您的主導航易于在移動設備上訪問
In the next article from this series we’ll cover artboards and frames — the space in which you’ll be doing the actual designing.
在本系列的下一篇文章中,我們將介紹畫板和框架-您將在其中進行實際設計的空間。
This has been a part of the free chapters of 📘 Designing User Interfaces Ebook, and you can download these chapters free 🍒 Learn the basics of design in this YouTube playlist:📺 Design Basics!
這已經是📘Designing User Interfaces電子書的免費章節的一部分,您可以免費下載這些章節。 🍒在此YouTube播放列表中學習設計基礎 :s 設計基礎 !
翻譯自: https://uxdesign.cc/ui-design-basics-screens-734bfbeffca9
小屏幕 ui設計
本文來自互聯網用戶投稿,該文觀點僅代表作者本人,不代表本站立場。本站僅提供信息存儲空間服務,不擁有所有權,不承擔相關法律責任。 如若轉載,請注明出處:http://www.pswp.cn/news/275218.shtml 繁體地址,請注明出處:http://hk.pswp.cn/news/275218.shtml 英文地址,請注明出處:http://en.pswp.cn/news/275218.shtml
如若內容造成侵權/違法違規/事實不符,請聯系多彩編程網進行投訴反饋email:809451989@qq.com,一經查實,立即刪除!相關文章
和直連交換機(Direct Exchange))
RabbitMQ指南之四:路由(Routing)和直連交換機(Direct Exchange)

不用任何插件實現 WordPress 的彩色標簽云

隨時隨地能寫代碼, vscode.dev 出手了

七種主流設計風格_您是哪種設計風格?

算法精講:分享一道值得分享的算法題

正幾邊形可以實現無縫拼接?

React 18 Beta 來了

osg著色語言著色_探索數字著色

upc組隊賽15 Supreme Number【打表】
:CSS3之我觀)
CSS3實踐之路(一):CSS3之我觀

18個項目必備的JavaScript代碼片段——數組篇

美學評價_卡美學的真正美

好程序員web前端分享CSS Bug、CSS Hack和Filter學習筆記

as3 淺復制 深復制

碎片化學前端,促進技術提升,我推薦這些

ux和ui_設計更好的結帳體驗-UX / UI案例研究

Django中ajax發送post請求,報403錯誤CSRF驗證失敗解決辦法

如何在EXCEL中添加下拉框

每次新增頁面復制粘貼?100多行源碼的 element-ui 的新增組件功能教你解愁
