axure rp 創建彈框
Axure is a well-known prototyping tool with a lot of history, it has been around for years. You can create almost any kind of prototypes from simple ones to more complex ones with variables and logic without writing a single line of code (well, when dealing with the complexity you will need to write some expressions).
Axure是著名的原型制作工具,已有很長的歷史了,已經存在了很多年。 您可以創建幾乎所有類型的原型,從簡單的原型到具有變量和邏輯的更復雜的原型,而無需編寫任何代碼(嗯,當處理復雜性時,您將需要編寫一些表達式)。
先決條件 (Prerequisites)
First, you need to have Axure installed, if you don’t have it then simply head over axure.com and download the latest (trial) version.
首先,您需要安裝Axure ,如果沒有,請直接訪問axure.com并下載最新(試用)版本。
Axure is available for Windows and Mac, so choose the appropriate version to download.
Axure可用于Windows和Mac,因此請選擇適當的版本進行下載。
If you are a little bit familiar with Axure (even with older versions) you know about widgets, interactions and cases then you are on the right track, if not, you should still be able to follow the steps in this tutorial.
如果您對Axure(甚至是較舊的版本)有點了解,那么您會了解小部件,交互和用例,那么您就走對了 ,否則,您仍然可以按照本教程中的步驟進行操作。
我們將創造什么 (What we will create)

In this tutorial, we will see how we can put together a simple switch (a very well known input control pattern) used in mobile or desktop UI. The important part to this component is the interaction (the on/off toggle interaction).
在本教程中,我們將看到如何將用于移動或桌面UI的簡單開關 (眾所周知的輸入控制模式)組合在一起。 該組件的重要部分是交互(打開/關閉切換交互)。
If you want to learn more about this control type you can take a look at the Apple HIG here: https://developer.apple.com/design/human-interface-guidelines/ios/controls/switches/
如果您想了解有關此控件類型的更多信息,可以在這里查看Apple HIG: https : //developer.apple.com/design/human-interface-guidelines/ios/controls/switches/
To make everything work(on the interaction part), we will use a little bit of logic to respond to the click(or tap) event in order to toggle the switch (but we will not gonna use variables for this).
為了使一切正常(在交互部分上),我們將使用一些邏輯來響應click(或tap)事件,以切換開關(但我們不會為此使用變量)。
The reason for not using a variable to handle the toggle state is because we want this component to be self contained (without dependencies) to be easily reused across projects.
不使用變量來處理切換狀態的原因是因為我們希望該組件是自包含的(沒有依賴項),以便可以在項目中輕松重用。
分步說明 (Step by step instructions)
This tutorial is quite simple and it has only 2 steps.
本教程非常簡單,只有兩個步驟。
步驟1 —建立必要的形狀 (Step 1 — Building the necessary shapes)
First things first. Let’s create the basic shapes by dragging 1 rectangle and 1 ellipse on the canvas area. The rectangle will be the background (so we can also rename it to background) and the ellipse will be the knob (also rename it to knob).
首先是第一件事。 讓我們通過在畫布區域上拖動1個矩形和1個橢圓來創建基本形狀。 矩形將是背景 (因此我們也可以將其重命名為背景),而橢圓將是旋鈕 (也將其重命名為旋鈕)。
For these to shape I’ve used the following settings (see below) and at the end I’ve grouped them (and renamed the group to switch).
為了使它們成形,我使用了以下設置(請參見下文),最后將它們分組(并重命名了要切換的組)。

If you don’t have too much experience with Axure shape widgets then you can read more about them here: https://docs.axure.com/axure-rp/reference/shapes/.
如果您對Axure形狀小部件沒有太多經驗,則可以在這里閱讀有關它們的更多信息: https : //docs.axure.com/axure-rp/reference/shapes/ 。
Shape properties:
形狀屬性:
Knob:
旋鈕 :
- Width/Height: 27 寬/高:27
- Fill: #FFFFFF 填寫:#FFFFFF
- Shadow: fill: #000000, opacity: 6%, x: 0, y: 3 陰影:填充:#000000,不透明度:6%,x:0,y:3
Background:
背景 :
- Width: 51 寬:51
- Height: 31 高度:31
- Fill: #D7D7D7 填寫:#D7D7D7
For the background shape I’ve also set up 2 style effects (selected and disabled) using the Interactions tab.
對于背景形狀,我還使用“ 交互”選項卡設置了2種樣式效果( 選中和禁用 )。

第2步-添加互動 (Step 2 — Adding interactivity)
Now, that we have done the basic setup and have all the shapes we can move to the interactivity.
現在,我們已經完成了基本設置,并擁有了可以移至交互性的所有形狀。
We will add the interactivity on the group object (this way we can respond to the group events) on the click(tap) event.
我們將在click(tap)事件上將交互性添加到組對象上(通過這種方式,我們可以響應組事件)。
See the image below (with the Interaction Editor) where I’ve added the interactivity (don’t worry if it looks complex, I’ll explain what is happening).
參見下圖(使用“交互編輯器”),其中添加了交互性(不要擔心它看起來是否復雜,我將解釋發生了什么)。

So let’s break this down.
因此,讓我們分解一下。
I’ve added an interaction on the Click(tap) trigger (so this is the click/tap event). To add an interaction make sure that you have the switch group selected and on the Interaction panel click on the New Interaction button and select the Click or Tap trigger.
我在Click(tap)觸發器上添加了一個交互(因此這是click / tap事件)。 要添加交互,請確保已選擇開關組,然后在“ 交互”面板上單擊“ 新建交互”按鈕,然后選擇“ 單擊”或“點擊”觸發器。
If you are not really familiar with events, actions, cases you can read more about them on the Axure website https://docs.axure.com/axure-rp/reference/events-cases-actions/.
如果您不太熟悉事件,操作和案例,則可以在Axure網站https://docs.axure.com/axure-rp/reference/events-cases-actions/上閱讀有關它們的更多信息。
Now, as you can see on the image, we have 2 cases named SwitchOn and SwitchOff and each of these steps have some actions.
現在,你可以在圖像上看到的,我們有2箱子命名合閘合閘和關機和每個步驟都有一些動作。
1.打開機箱。 (1. SwitchOn case.)
To add a case just click on the Enable Cases button for the Click(Tap) trigger in the Interaction panel. Clicking on the Enable Cases will open the Condition Builder dialog, this is where we can build our condition and run a set of actions if this condition is evaluated as true.
要添加案例,只需在“交互”面板中單擊Click(Tap)觸發器的“ 啟用案例”按鈕。 單擊“ 啟用案例”將打開“ 條件構建器”對話框,在此條件下,如果此條件被評估為true ,我們可以在其中構建條件并運行一組操作。
See the image below with the set up for the condition.
請參閱下面的圖片,其中包含針對該條件的設置。
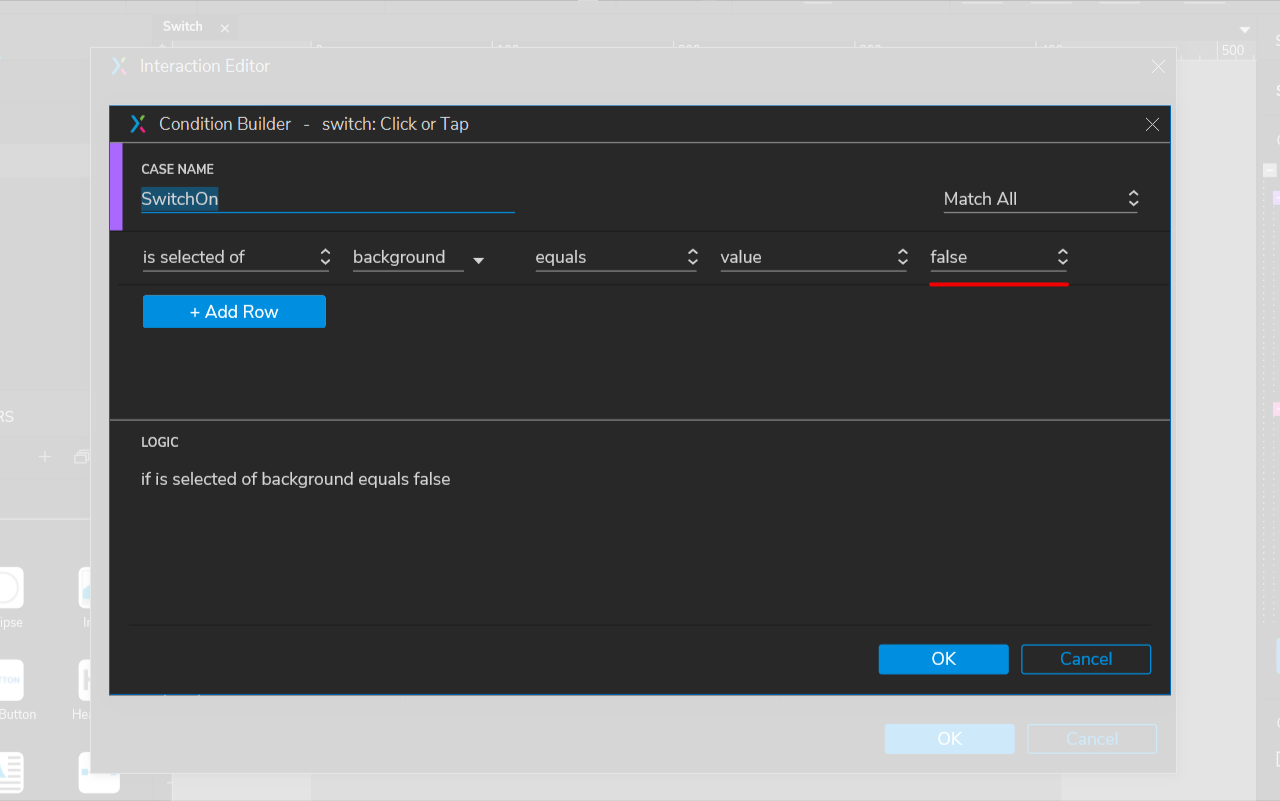
As you can see we will check if the background selected value is false. If this happens it will run a series of actions (see my previous image).
如您所見,我們將檢查背景選定值是否為false 。 如果發生這種情況,它將執行一系列操作(請參閱我的上一張圖像)。
Here are the actions:
操作如下:
Action Move (basically we will move the knob on the horizontal axis from left to right by 20):
動作移動 (基本上,我們將水平軸上的旋鈕從左向右移動20):
- Target: knob 目標:旋鈕
- Move: by x: 20, y:0 移動:x:20,y:0
- Animate: ease in cubic: 200ms 動畫:立體感緩解:200ms
2. Action Set Selected/Checked (we set the background selected value to true):
2. Action Set Selected / Checked ( 將選中/選中的動作設置為背景 (我們將背景選擇值設置為true ):
- Target: background 目標:背景
- Set: value 設定值
- To: true 至:正確
This is it, let’s now move to the SwitchOff case.
就是這樣,讓我們??現在轉到“關閉”案例。
2. 關機情況 (2. SwitchOff case)
The SwitchOff case will be quite similar with the SwitchOn case with 2 small changes.
在關機的情況下將與合閘合閘情況下用2個小的變化非常相似。
One change will be on the condition, see the image below.
條件將發生變化,請參見下圖。

As you can see the condition is the same, except we check if it is true.
如您所見,條件相同,只是我們檢查它是否為true 。
So if the condition is met then we will execute the same steps as on our previous condition with small changes.
因此,如果滿足條件,則我們將執行與先前條件相同的步驟,并進行少量更改。
Here are the actions:
操作如下:
Action Move (this is where we move the knob from left to right with a negative value by -20):
動作移動(這是我們將旋鈕從左向右移動負值-20的位置):
- Target: knob 目標:旋鈕
Move: by x: -20, y:0
移動:x: -20 ,y:0
- Animate: ease in cubic: 200ms 動畫:立體感緩解:200ms
2. Action Set Selected/Checked (we set the background selected value to false):
2. Action Set Selected / Checked(設置選定/選中操作)(我們將選定的背景值設置為false ):
- Target: background 目標:背景
- Set: value 設定值
To: false
收件人: 假
This is it.
就是這個。
Creating a switch UI component in Axure is relatively easy with just one simple interaction in a group. Now, we can enjoy our new switch component in future projects. You can also download the Axure file from here: https://hi.switchy.io/1O4f
在一個組中只有一個簡單的交互,在Axure中創建一個Switch UI組件相對容易。 現在,我們可以在將來的項目中使用我們的新開關組件。 您也可以從此處下載Axure文件: https ://hi.switchy.io/1O4f
翻譯自: https://uxdesign.cc/how-to-create-a-switch-in-axure-rp-9-f42060d99b1a
axure rp 創建彈框
本文來自互聯網用戶投稿,該文觀點僅代表作者本人,不代表本站立場。本站僅提供信息存儲空間服務,不擁有所有權,不承擔相關法律責任。 如若轉載,請注明出處:http://www.pswp.cn/news/274462.shtml 繁體地址,請注明出處:http://hk.pswp.cn/news/274462.shtml 英文地址,請注明出處:http://en.pswp.cn/news/274462.shtml
如若內容造成侵權/違法違規/事實不符,請聯系多彩編程網進行投訴反饋email:809451989@qq.com,一經查實,立即刪除!相關文章

linux下使用cmake構建C/C++項目

用 Vue3 手撕了個企業級項目,真香!

界面設計語言_使用任何語言設計界面的提示

托管代碼和非托管代碼

如何實現前端新手引導功能?

hp-ux鎖定用戶密碼_UX設計101:提出正確的問題-規劃和促進用戶訪談

我與掘金合作出了源碼共讀第一期,首發超400人報名,快來參與~

ASP.NET repeater添加序號列的方法

mac基本操作技巧_6個基本設計技巧
)
如何突破技術瓶頸(適合P6以下)

stack smash_扶手椅VGUX:Super Smash Bros.Ultimate
- Private Definitions — the where-clause)
《Two Dozen Short Lessons in Haskell》學習(十)- Private Definitions — the where-clause

我和掘金合作的源碼共讀小冊報名快1000人了~
)
【短語學習】盈余量分析(earned value analysis)

配音劇本_網絡的各個階段:劇本如何傳達更好的UX

極致編譯速度,一文搞定webpack5升級
——輸入輸出)
Java學習筆記(7)——輸入輸出

全庫模式 用戶模式 表模式_暗模式,亮模式和用戶的故事

Rollup 與 Webpack 的 Tree-shaking
