接著上一節《 faster rcnn學習之rpn訓練全過程》,假定我們已經訓好了rpn網絡,下面我們看看如何利用訓練好的rpn網絡生成proposal.
其網絡為rpn_test.pt
# Enter your network definition here.
# Use Shift+Enter to update the visualization.
name: "VGG_CNN_M_1024"
input: "data"
input_shape {dim: 1dim: 3dim: 224dim: 224
}
input: "im_info"
input_shape {dim: 1dim: 3
}
layer {name: "conv1"type: "Convolution"bottom: "data"top: "conv1"convolution_param {num_output: 96kernel_size: 7stride: 2}
}
layer {name: "relu1"type: "ReLU"bottom: "conv1"top: "conv1"
}
layer {name: "norm1"type: "LRN"bottom: "conv1"top: "norm1"lrn_param {local_size: 5alpha: 0.0005beta: 0.75k: 2}
}
layer {name: "pool1"type: "Pooling"bottom: "norm1"top: "pool1"pooling_param {pool: MAXkernel_size: 3stride: 2}
}
layer {name: "conv2"type: "Convolution"bottom: "pool1"top: "conv2"convolution_param {num_output: 256pad: 1kernel_size: 5stride: 2}
}
layer {name: "relu2"type: "ReLU"bottom: "conv2"top: "conv2"
}
layer {name: "norm2"type: "LRN"bottom: "conv2"top: "norm2"lrn_param {local_size: 5alpha: 0.0005beta: 0.75k: 2}
}
layer {name: "pool2"type: "Pooling"bottom: "norm2"top: "pool2"pooling_param {pool: MAXkernel_size: 3stride: 2}
}
layer {name: "conv3"type: "Convolution"bottom: "pool2"top: "conv3"convolution_param {num_output: 512pad: 1kernel_size: 3}
}
layer {name: "relu3"type: "ReLU"bottom: "conv3"top: "conv3"
}
layer {name: "conv4"type: "Convolution"bottom: "conv3"top: "conv4"convolution_param {num_output: 512pad: 1kernel_size: 3}
}
layer {name: "relu4"type: "ReLU"bottom: "conv4"top: "conv4"
}
layer {name: "conv5"type: "Convolution"bottom: "conv4"top: "conv5"convolution_param {num_output: 512pad: 1kernel_size: 3}
}
layer {name: "relu5"type: "ReLU"bottom: "conv5"top: "conv5"
}#========= RPN ============layer {name: "rpn_conv/3x3"type: "Convolution"bottom: "conv5"top: "rpn/output"convolution_param {num_output: 256kernel_size: 3 pad: 1 stride: 1}
}
layer {name: "rpn_relu/3x3"type: "ReLU"bottom: "rpn/output"top: "rpn/output"
}
layer {name: "rpn_cls_score"type: "Convolution"bottom: "rpn/output"top: "rpn_cls_score"convolution_param {num_output: 18   # 2(bg/fg) * 9(anchors)kernel_size: 1 pad: 0 stride: 1}
}
layer {name: "rpn_bbox_pred"type: "Convolution"bottom: "rpn/output"top: "rpn_bbox_pred"convolution_param {num_output: 36   # 4 * 9(anchors)kernel_size: 1 pad: 0 stride: 1}
}
layer {bottom: "rpn_cls_score"top: "rpn_cls_score_reshape"name: "rpn_cls_score_reshape"type: "Reshape"reshape_param { shape { dim: 0 dim: 2 dim: -1 dim: 0 } }
}#========= RoI Proposal ============layer {name: "rpn_cls_prob"type: "Softmax"bottom: "rpn_cls_score_reshape"top: "rpn_cls_prob"
}
layer {name: 'rpn_cls_prob_reshape'type: 'Reshape'bottom: 'rpn_cls_prob'top: 'rpn_cls_prob_reshape'reshape_param { shape { dim: 0 dim: 18 dim: -1 dim: 0 } }
}
layer {name: 'proposal'type: 'Python'bottom: 'rpn_cls_prob_reshape'bottom: 'rpn_bbox_pred'bottom: 'im_info'top: 'rois'top: 'scores'python_param {module: 'rpn.proposal_layer'layer: 'ProposalLayer'param_str: "'feat_stride': 16"}
}
同樣借用文獻[1]的圖 ,網絡繪制出來如下:我們發現與rpn基本相同。
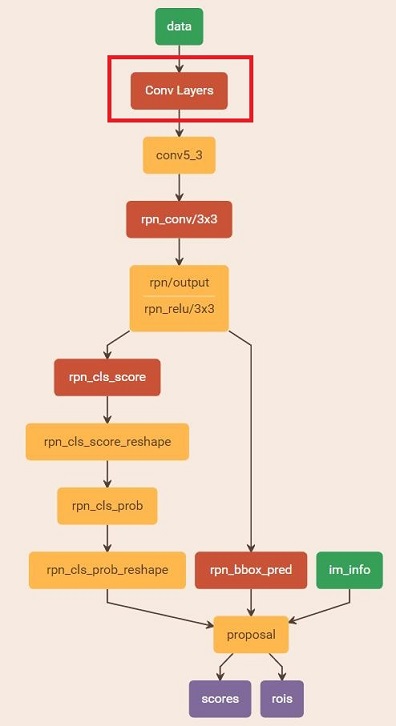
如上,一張大小為224*224的圖片經過前面的5個卷積層,輸出256張大小為13*13的 特征圖(你也可以理解為一張13*13*256大小的特征圖,256表示通道數),然后使用1*1的卷積輸出13*13*18的rpn_cls_score,和13*13*36的rpn_bbox_pred。rpn_cls_score經過了reshape,準備進行softmax輸出。
接著rpn_cls_score_reshape使用softmax輸出了rpn_cls_prob,再reshape回去,輸出rpn_cls_prob_reshape。
最后rpn_cls_prob_reshape(1*18*13*13),rpn_bbox_pred(1*36*13*13),im_info (1*3)輸入到proposal層中輸出了rois與scores。
layer {name: 'proposal'type: 'Python'bottom: 'rpn_cls_prob_reshape'bottom: 'rpn_bbox_pred'bottom: 'im_info'top: 'rois'top: 'scores'python_param {module: 'rpn.proposal_layer'layer: 'ProposalLayer'param_str: "'feat_stride': 16"}
} def setup(self, bottom, top):# parse the layer parameter string, which must be valid YAMLlayer_params = yaml.load(self.param_str_)self._feat_stride = layer_params['feat_stride']anchor_scales = layer_params.get('scales', (8, 16, 32))self._anchors = generate_anchors(scales=np.array(anchor_scales))self._num_anchors = self._anchors.shape[0]if DEBUG:print 'feat_stride: {}'.format(self._feat_stride)print 'anchors:'print self._anchors# rois blob: holds R regions of interest, each is a 5-tuple# (n, x1, y1, x2, y2) specifying an image batch index n and a# rectangle (x1, y1, x2, y2)top[0].reshape(1, 5)# scores blob: holds scores for R regions of interestif len(top) > 1:top[1].reshape(1, 1, 1, 1)
def forward(self, bottom, top):# Algorithm:## for each (H, W) location i# generate A anchor boxes centered on cell i# apply predicted bbox deltas at cell i to each of the A anchors# clip predicted boxes to image# remove predicted boxes with either height or width < threshold# sort all (proposal, score) pairs by score from highest to lowest# take top pre_nms_topN proposals before NMS# apply NMS with threshold 0.7 to remaining proposals# take after_nms_topN proposals after NMS# return the top proposals (-> RoIs top, scores top)assert bottom[0].data.shape[0] == 1, \'Only single item batches are supported'cfg_key = str(self.phase) # either 'TRAIN' or 'TEST'pre_nms_topN = cfg[cfg_key].RPN_PRE_NMS_TOP_Npost_nms_topN = cfg[cfg_key].RPN_POST_NMS_TOP_Nnms_thresh = cfg[cfg_key].RPN_NMS_THRESHmin_size = cfg[cfg_key].RPN_MIN_SIZE# the first set of _num_anchors channels are bg probs (前9個是背景,后面的是前景預測)# the second set are the fg probs, which we wantscores = bottom[0].data[:, self._num_anchors:, :, :]bbox_deltas = bottom[1].dataim_info = bottom[2].data[0, :]if DEBUG:print 'im_size: ({}, {})'.format(im_info[0], im_info[1])print 'scale: {}'.format(im_info[2])# 1. Generate proposals from bbox deltas and shifted anchorsheight, width = scores.shape[-2:]if DEBUG:print 'score map size: {}'.format(scores.shape)# Enumerate all shiftsshift_x = np.arange(0, width) * self._feat_strideshift_y = np.arange(0, height) * self._feat_strideshift_x, shift_y = np.meshgrid(shift_x, shift_y)shifts = np.vstack((shift_x.ravel(), shift_y.ravel(),shift_x.ravel(), shift_y.ravel())).transpose()# Enumerate all shifted anchors:## add A anchors (1, A, 4) to# cell K shifts (K, 1, 4) to get# shift anchors (K, A, 4)# reshape to (K*A, 4) shifted anchorsA = self._num_anchorsK = shifts.shape[0]anchors = self._anchors.reshape((1, A, 4)) + \shifts.reshape((1, K, 4)).transpose((1, 0, 2))anchors = anchors.reshape((K * A, 4))# Transpose and reshape predicted bbox transformations to get them# into the same order as the anchors:## bbox deltas will be (1, 4 * A, H, W) format# transpose to (1, H, W, 4 * A)# reshape to (1 * H * W * A, 4) where rows are ordered by (h, w, a)# in slowest to fastest order# 為了與anchors的shape對應,故做了此變換bbox_deltas = bbox_deltas.transpose((0, 2, 3, 1)).reshape((-1, 4))# Same story for the scores:## scores are (1, A, H, W) format# transpose to (1, H, W, A)# reshape to (1 * H * W * A, 1) where rows are ordered by (h, w, a)# 為了與anchors的shape對應,故做了此變換scores = scores.transpose((0, 2, 3, 1)).reshape((-1, 1))# Convert anchors into proposals via bbox transformations,生成預測(x1,y1,x2,y2)proposals = bbox_transform_inv(anchors, bbox_deltas)# 2. clip predicted boxes to imageproposals = clip_boxes(proposals, im_info[:2])# 3. remove predicted boxes with either height or width < threshold# (NOTE: convert min_size to input image scale stored in im_info[2])keep = _filter_boxes(proposals, min_size * im_info[2])proposals = proposals[keep, :]scores = scores[keep]# 4. sort all (proposal, score) pairs by score from highest to lowest# 5. take top pre_nms_topN (e.g. 6000)order = scores.ravel().argsort()[::-1]if pre_nms_topN > 0:order = order[:pre_nms_topN]proposals = proposals[order, :]scores = scores[order]# 6. apply nms (e.g. threshold = 0.7)# 7. take after_nms_topN (e.g. 300)# 8. return the top proposals (-> RoIs top)keep = nms(np.hstack((proposals, scores)), nms_thresh)if post_nms_topN > 0:keep = keep[:post_nms_topN]proposals = proposals[keep, :]scores = scores[keep]# Output rois blob# Our RPN implementation only supports a single input image, so all# batch inds are 0# rois 的shape為1*5,(n,x1,y1,x2,y2) ,這里生成的box的尺度是縮放后的。batch_inds = np.zeros((proposals.shape[0], 1), dtype=np.float32)blob = np.hstack((batch_inds, proposals.astype(np.float32, copy=False)))top[0].reshape(*(blob.shape))top[0].data[...] = blob# [Optional] output scores blobif len(top) > 1:top[1].reshape(*(scores.shape))top[1].data[...] = scores再接著進行了一些刪減操作以及nms去重。返回前景分數最高的一些proposals及對應的scores.注意生成的proposal是相對于
輸入尺度的,也就是縮放后的尺度。
我們再回到train_faster_rcnn_alt_opt中。看Stage 1 RPN, generate proposals'
mp_kwargs = dict(queue=mp_queue,imdb_name=args.imdb_name,rpn_model_path=str(rpn_stage1_out['model_path']),cfg=cfg,rpn_test_prototxt=rpn_test_prototxt)p = mp.Process(target=rpn_generate, kwargs=mp_kwargs)p.start()rpn_stage1_out['proposal_path'] = mp_queue.get()['proposal_path']p.join()
在rpn_generate中,載入了網絡,且使用了生成的rpn網絡,接下來imdb_proposals根據網絡與imdb生成了rpn_proposals。
imdb_proposals在generate.py中。?
def im_proposals(net, im):"""Generate RPN proposals on a single image."""blobs = {}blobs['data'], blobs['im_info'] = _get_image_blob(im)net.blobs['data'].reshape(*(blobs['data'].shape))net.blobs['im_info'].reshape(*(blobs['im_info'].shape))blobs_out = net.forward(data=blobs['data'].astype(np.float32, copy=False),im_info=blobs['im_info'].astype(np.float32, copy=False))scale = blobs['im_info'][0, 2]boxes = blobs_out['rois'][:, 1:].copy() / scalescores = blobs_out['scores'].copy()return boxes, scoresdef imdb_proposals(net, imdb):"""Generate RPN proposals on all images in an imdb."""_t = Timer()imdb_boxes = [[] for _ in xrange(imdb.num_images)]for i in xrange(imdb.num_images):im = cv2.imread(imdb.image_path_at(i))_t.tic()imdb_boxes[i], scores = im_proposals(net, im)_t.toc()print 'im_proposals: {:d}/{:d} {:.3f}s' \.format(i + 1, imdb.num_images, _t.average_time)if 0:dets = np.hstack((imdb_boxes[i], scores))# from IPython import embed; embed()_vis_proposals(im, dets[:3, :], thresh=0.9)plt.show()return imdb_boxes boxes = blobs_out['rois'][:, 1:].copy() / scaleimdb_boxes的shape是N*5.N為盒子的序號。
參考:
1.?http://blog.csdn.net/zy1034092330/article/details/62044941
2. https://www.zhihu.com/question/35887527/answer/140239982


)

)


![[學習總結]7、Android AsyncTask完全解析,帶你從源碼的角度徹底理解](http://pic.xiahunao.cn/[學習總結]7、Android AsyncTask完全解析,帶你從源碼的角度徹底理解)

)
