一、前言
在spring時代配置文件的加載都是通過web.xml配置加載的(Servlet3.0之前),可能配置方式有所不同,但是大多數都是通過指定路徑的文件名的形式去告訴spring該加載哪個文件;
<context-param><param-name>contextConfigLocation</param-name><param-value>/WEB-INF/application*.xml</param-value></context-param>
而到了springboot時代,我們發現原來熟悉的web.xml已不復存在,但是springboot卻依然可以找到默認的配置文件(application.yml),那它是如何實現的呢?今天我們就一起來探究一下springboot自動加載配置文件的機制!
看完本篇文章你將了解到:
springboot什么時候加載配置文件
springboot通過哪個類加載配置文件
springboot自動加載配置文件流程
激活文件優先級
文件加載路徑優先級
文件后綴優先級
二、提出猜想
我們知道在使用springboot中我們只要在resources下面新建一個application.yml文件他就會自動加載,那是不是springboot默認在哪里配置了這個路徑和文件名?
三、驗證猜想
為了證實我們的猜想,我們可以通過查看springboot項目源碼,跟著debug一步一步走;
這里我使用的是springboot2.0版本,2.0與1.5版本比較啟動的大體流程是一樣的,只不過在一些實現中有所差異;
1.啟動流程
要知道springboot如何加載配置文件,就需要了解它的啟動流程:
我們從main方法進入,大概的調用流程如下:
DemoApplication.main->SpringApplication.run->new SpringApplication().run
在這里插入圖片描述
其實啟動的主要過程都在new SpringApplication().run();
new SpringApplication():創建SpringApplication實例,負責加載配置一些基本的環境變量、資源、構造器、監聽器
run():負責springboot整個啟動過程,包括加載創建環境、打印banner、配置文件、配置應用上下文,加載bean等等sb整個生命周期幾乎都在run方法中;
今天我們的主題是sb如何加載配置文件,所以著重講解加載配置文件和之前的操作原理和源碼,其他的功能以后有機會再和大家一起研究,下面我們來看看new SpringApplication()做了什么操作;
2.創建SpringApplication實例
/*** 創建一個SpringApplication實體,應用程序上下文將從指定的主源文檔加載bean以獲取詳細信息,* 這個實例可以在調用之前自定義* @param resourceLoader* @param primarySources*/
@SuppressWarnings({ "unchecked", "rawtypes" })
public SpringApplication(ResourceLoader resourceLoader, Class<?>... primarySources) {//使用的資源加載器this.resourceLoader = resourceLoader;//主要的bean資源 primarySources【在這里是啟動類所在的.class】,不能為null,如果為null,拋異常Assert.notNull(primarySources, "PrimarySources must not be null");//啟動類的實例數組轉化成list,放在LinkedHashSet集合中this.primarySources = new LinkedHashSet<>(Arrays.asList(primarySources));/*** 創建應用類型,不同應用程序類型,創建不同的環境* springboot1.5 只有兩種類型:web環境和非web環境* springboot2.0 有三種應用類型:WebApplicationType* NONE:不需要再web容器的環境下運行,也就是普通的工程* SERVLET:基于servlet的Web項目* REACTIVE:響應式web應用reactive web Spring5版本的新特性*/this.webApplicationType = WebApplicationType.deduceFromClasspath();/*** 每一個initailizer都是一個實現了ApplicationContextInitializer接口的實例。* ApplicationContextInitializer是Spring IOC容器中提供的一個接口: void initialize(C applicationContext);* 這個方法它會在ConfigurableApplicationContext的refresh()方法調用之前被調用(prepareContext方法中調用),* 做一些容器的初始化工作。*/setInitializers((Collection) getSpringFactoriesInstances(ApplicationContextInitializer.class));/*** Springboot整個生命周期在完成一個階段的時候都會通過事件推送器(EventPublishingRunListener)產生一個事件(ApplicationEvent),* 然后再遍歷每個監聽器(ApplicationListener)以匹配事件對象,這是一種典型的觀察者設計模式的實現* 具體事件推送原理請看:sb事件推送機制圖*/setListeners((Collection) getSpringFactoriesInstances(ApplicationListener.class));// 指定main函數啟動所在的類,即啟動類BootApplication.classthis.mainApplicationClass = deduceMainApplicationClass();
}
我們來大概的看下ApplicationListener的一些實現類以及他們具體的功能簡介
在這里插入圖片描述
這些監聽器的實現類都是在spring.factories文件中配置好的,代碼中通過getSpringFactoriesInstances方法獲取,這種機制叫做SPI機制:通過本地的注冊發現獲取到具體的實現類,輕松可插拔。
在這里插入圖片描述
SpringBoot默認情況下提供了兩個spring.factories文件,分別是:
spring-boot-2.0.2.RELEASE.jar
spring-boot-autoconfigure-2.0.2.RELEASE.jar
在這里插入圖片描述
概括來說在創建SpringApplication實例的時候,sb會加載一些初始化和啟動的參數與類,如同跑步比賽時的等待發令槍的階段;
3.run方法
(1)、事件推送原理
SB啟動過程中分多個階段或者說是多個步驟,每完成一步就會產生一個事件,并調用對應事件的監聽器,這是一種標準的觀察者模式,這在啟動的過程中有很好的擴展性,下面我們來看看sb的事件推送原理:
SpringBoot事件推送原理圖:
在這里插入圖片描述
(2)、run方法整體流程簡述
/*** 運行應用程序,創建并刷新一個新的應用程序上下文** @param args* @return*/
public ConfigurableApplicationContext run(String... args) {/***  StopWatch: 簡單的秒表,允許定時的一些任務,公開每個指定任務的總運行時間和運行時間。*  這個對象的設計不是線程安全的,沒有使用同步。SpringApplication是在單線程環境下,使用安全。*/StopWatch stopWatch = new StopWatch();// 設置當前啟動的時間為系統時間startTimeMillis = System.currentTimeMillis();stopWatch.start();// 創建一個應用上下文引用ConfigurableApplicationContext context = null;// 異常收集,報告啟動異常Collection<SpringBootExceptionReporter> exceptionReporters = new ArrayList<>();/*** 系統設置headless模式(一種缺乏顯示設備、鍵盤或鼠標的環境下,比如服務器),* 通過屬性:java.awt.headless=true控制*/configureHeadlessProperty();/** 獲取事件推送監器,負責產生事件,并調用支某類持事件的監聽器* 事件推送原理看上面的事件推送原理圖*/SpringApplicationRunListeners listeners = getRunListeners(args);/*** 發布一個啟動事件(ApplicationStartingEvent),通過上述方法調用支持此事件的監聽器*/listeners.starting();try {// 提供對用于運行SpringApplication的參數的訪問。取默認實現ApplicationArguments applicationArguments = new DefaultApplicationArguments(args);/*** 構建容器環境,這里加載配置文件*/ConfigurableEnvironment environment = prepareEnvironment(listeners, applicationArguments);// 對環境中一些bean忽略配置configureIgnoreBeanInfo(environment);// 日志控制臺打印設置Banner printedBanner = printBanner(environment);// 創建容器context = createApplicationContext();exceptionReporters = getSpringFactoriesInstances(SpringBootExceptionReporter.class, new Class[] { ConfigurableApplicationContext.class }, context);/*** 準備應用程序上下文* 追蹤源碼prepareContext()進去我們可以發現容器準備階段做了下面的事情:* 容器設置配置環境,并且監聽容器,初始化容器,記錄啟動日志,* 將給定的singleton對象添加到此工廠的singleton緩存中。* 將bean加載到應用程序上下文中。*/prepareContext(context, environment, listeners, applicationArguments, printedBanner);/*** 刷新上下文* 1、同步刷新,對上下文的bean工廠包括子類的刷新準備使用,初始化此上下文的消息源,注冊攔截bean的處理器,檢查偵聽器bean并注冊它們,實例化所有剩余的(非延遲-init)單例。* 2、異步開啟一個同步線程去時時監控容器是否被關閉,當關閉此應用程序上下文,銷毀其bean工廠中的所有bean。* 。。。底層調refresh方法代碼量較多*/refreshContext(context);afterRefresh(context, applicationArguments);// stopwatch 的作用就是記錄啟動消耗的時間,和開始啟動的時間等信息記錄下來stopWatch.stop();if (this.logStartupInfo) {new StartupInfoLogger(this.mainApplicationClass).logStarted(getApplicationLog(), stopWatch);}// 發布一個已啟動的事件listeners.started(context);callRunners(context, applicationArguments);
}
catch (Throwable ex) {handleRunFailure(context, ex, exceptionReporters, listeners);throw new IllegalStateException(ex);
}
try {// 發布一個運行中的事件listeners.running(context);
}
catch (Throwable ex) {// 啟動異常,里面會發布一個失敗的事件handleRunFailure(context, ex, exceptionReporters, null);throw new IllegalStateException(ex);
}
return context;
}
(3)、構建容器環境
在:run方法中的ConfigurableEnvironment environment = prepareEnvironment(listeners, applicationArguments);是準備環境,里面會加載配置文件;
private ConfigurableEnvironment prepareEnvironment(SpringApplicationRunListeners listeners, ApplicationArguments applicationArguments) {// 創建一個配置環境,根據前面定義的應用類型定義不同的環境ConfigurableEnvironment environment = getOrCreateEnvironment();// 將配置參數設置到配置環境中configureEnvironment(environment, applicationArguments.getSourceArgs());/*** 發布一個環境裝載成功的事件,并調用支持此事件的監聽器* 這其中就有我們今天的主角:配置文件加載監聽器(ConfigFileApplicationListener)*/listeners.environmentPrepared(environment);// 將配置環境綁定到應用程序bindToSpringApplication(environment);if (!this.isCustomEnvironment) {environment = new EnvironmentConverter(getClassLoader()).convertEnvironmentIfNecessary(environment, deduceEnvironmentClass());}ConfigurationPropertySources.attach(environment);return environment;
}
(4)、ConfigFileApplicationListener類介紹
sb就是通過ConfigFileApplicationListener 這個類來加載配置文件的,這個類同樣是一個監聽器,我們來看看他的繼承類圖:
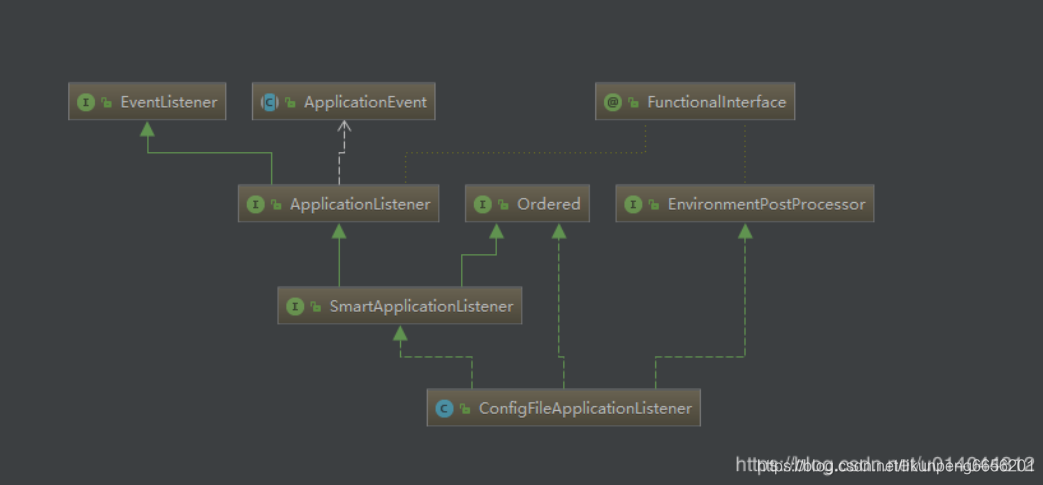
再讓我們來看看這個類具體都有哪些方法:
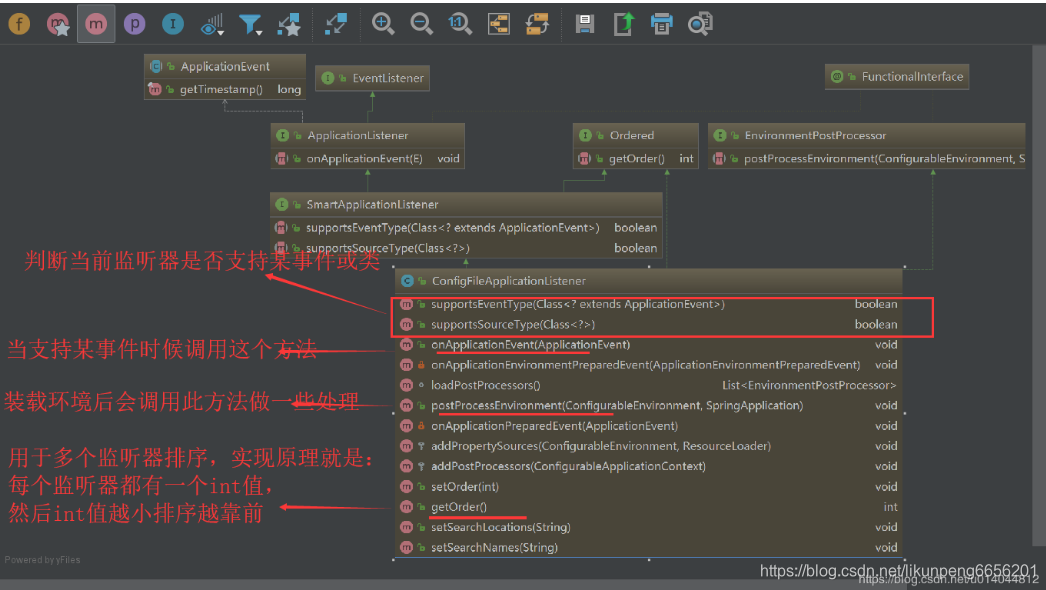
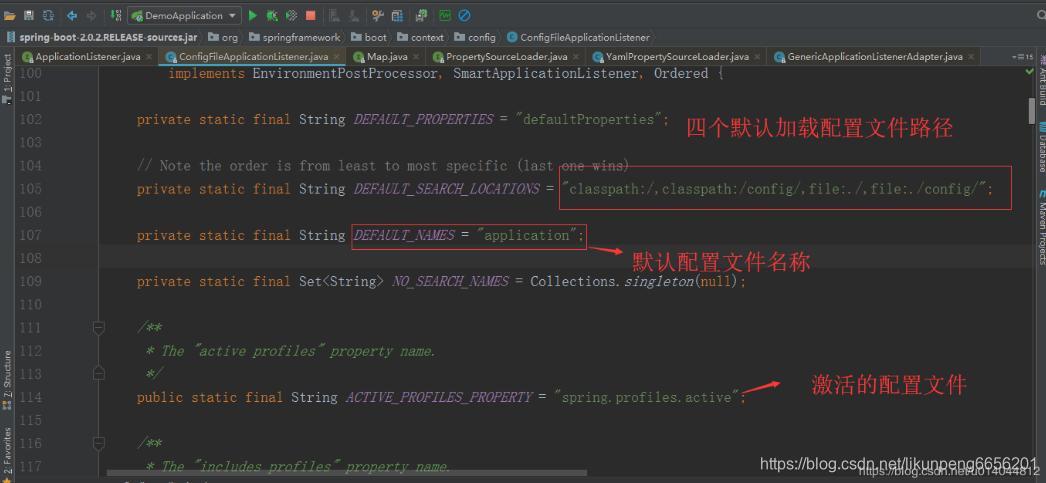
最后我們來看看這個類有哪些需要注意的字段:
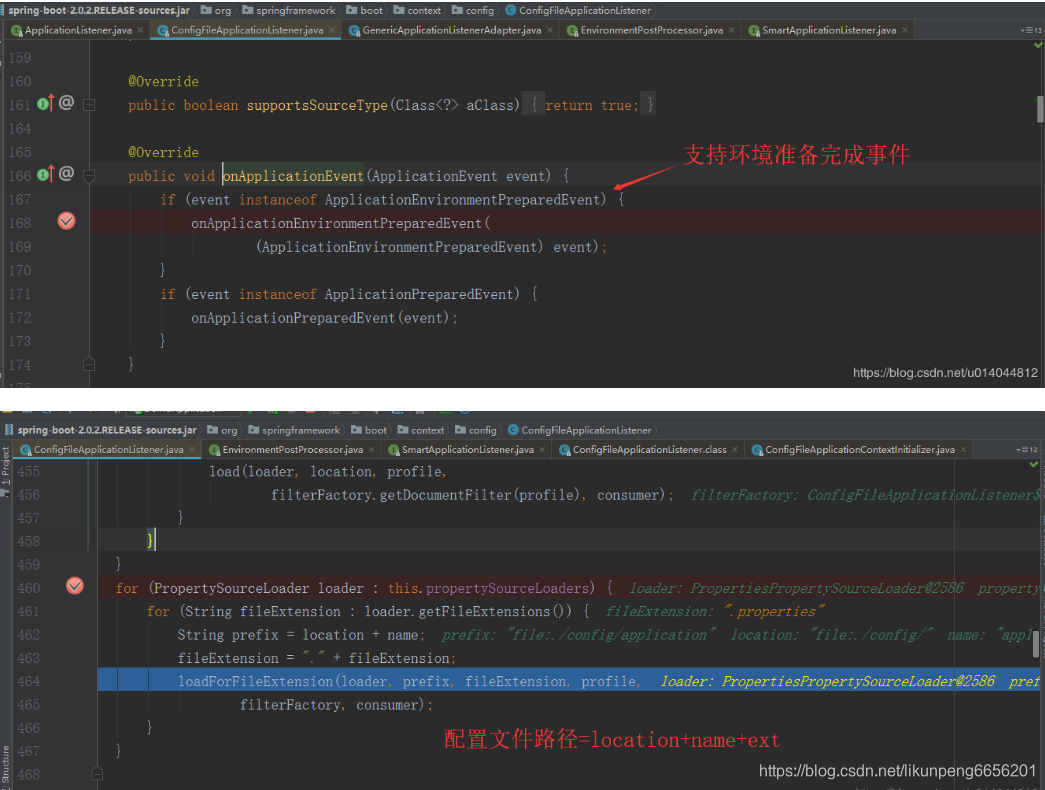
(5)、ConfigFileApplicationListener類加載配置文件
我們從ConfigFileApplicationListener.onApplicationEvent開始,一直往下看方法鏈,發現最后是load方法去具體怎么加載配置文件的
激活配置文件與默認配置文件的優先級:
我們在使用中經常會根據不同的環境根據spring.profiles.active屬性來定義不同的配置文件:
application-dev.properties
application-test.properties
application-prod.properties
但同時我們會創建一個默認的配置文件:application.properties,那自定義環境的配置文件與默認的配置文件的優先級是哪個高呢?
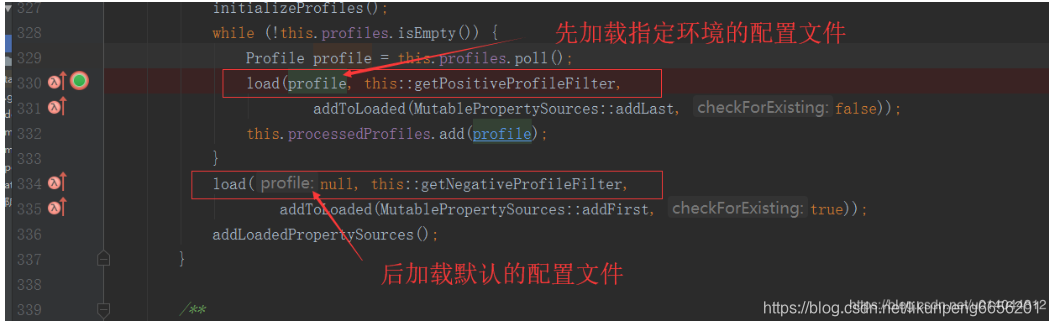
看圖片我們可知他們加載的先后順序(注意:后加載會覆蓋前加載的文件):
application-xxx.properties
application.properties
配置文件路徑的優先級:
我們從屬性:DEFAULT_SEARCH_LOCATIONS = "classpath:/,classpath:/config/,file:./,file:./config/可以看出文件路徑的先后順序(注意:后加載的會覆蓋先加載的):
classpath:/
classpath:/config/
file:./
file:./config/
配置文件的優先級:
我們從這個類中的字段:propertySourceLoaders可以看出有兩個Loader,請各位看官看圖:
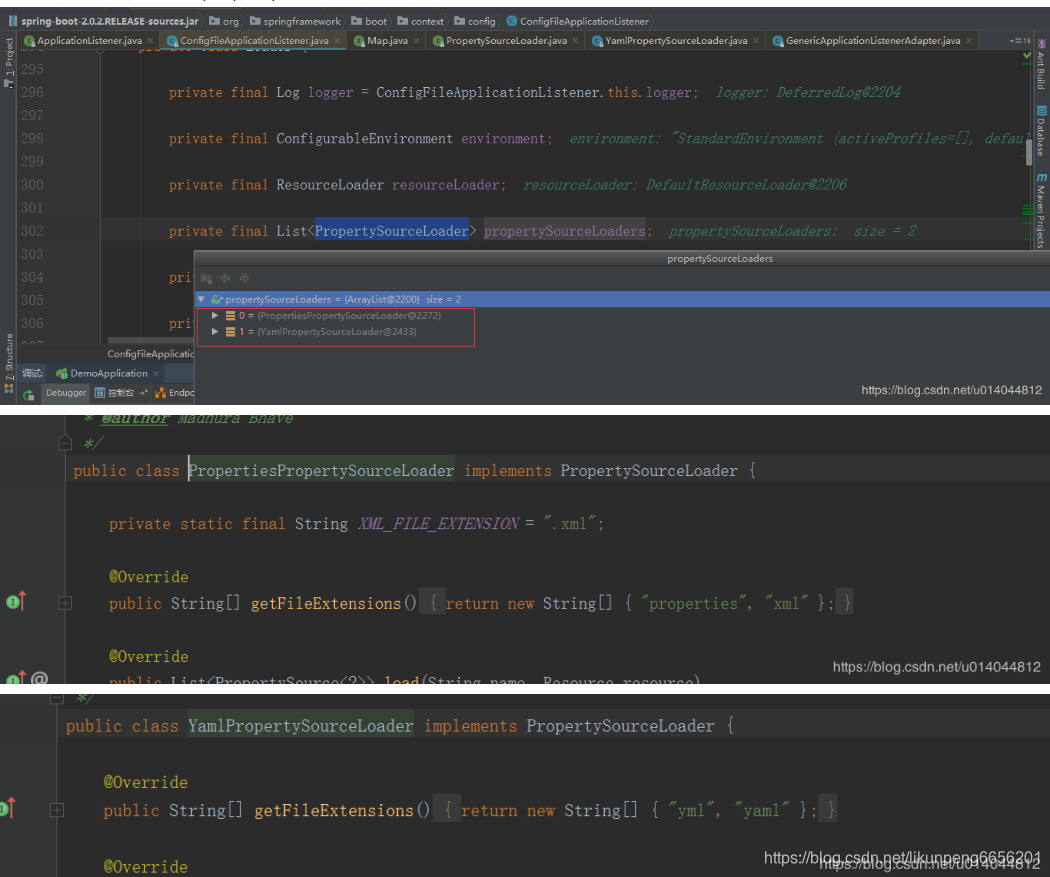
我們從上面兩張圖中可以看出,每個Loader會加載兩種后綴名的文件,加起來就是4種,又因為是數組類型,所以也會有先后順序,所以加載配置文件的先后順序就是(后加載覆蓋先加載的):
properties
xml
yml
yaml
最后查找的具體路徑:location + name + “-” + profile + “.” + ext
這里我們介紹了三種優先級:
active與默認優先級
文件路徑優先級
文件后綴優先級
未完待續。。。
四、提問
springboot學習遺留問題,
1.active和默認的誰覆蓋誰
2.flter區別
3.多個配置文件如何覆蓋
![[github] - git使用小結(分支拉取、版本回退)](http://pic.xiahunao.cn/[github] - git使用小結(分支拉取、版本回退))


![[C++] 轉義序列](http://pic.xiahunao.cn/[C++] 轉義序列)
)


![[Head First Java] - 簡單的建議程序](http://pic.xiahunao.cn/[Head First Java] - 簡單的建議程序)


![[Head First Java] - Swing做一個簡單的客戶端](http://pic.xiahunao.cn/[Head First Java] - Swing做一個簡單的客戶端)


![[Head First Java] - 給線程命名](http://pic.xiahunao.cn/[Head First Java] - 給線程命名)