一、Flask的路由系統
1.@app.route()裝飾器中的參數
methods:當前URL地址,允許訪問的請求方式
@app.route("/info", methods=["GET", "POST"])
def student_info():stu_id = int(request.args["id"])return f"Hello Old boy {stu_id}"  #格式化輸出
endpoint:反向RUL地址,默認位視圖函數名(url_for)
from flask import url_for@app.route("/info", methods=["GET", "POST"], endpoint="r_info")
def student_info():print(url_for("r_info"))  # /infostu_id = int(request.args["id"])return f"Hello Old boy {stu_id}"  # 格式化輸出
defaults:視圖函數的參數默認值
from flask import url_for@app.route("/info", methods=["GET", "POST"], endpoint="r_info", defaults={"nid": 100})
def student_info(nid):print(url_for("r_info"))  # /info# stu_id = int(request.args["id"])print(nid)  # 100return f"Hello Old boy {nid}"  # Python3.6的新特性 f"{變量名}格式化輸出"
strict_slashes:url地址結尾符"/" 的控制False:無論結尾“/”是否存在均可以訪問,True:結尾必須不是“/”
# 訪問地址 : /info
@app.route("/info", strict_slashes=True)
def student_info():return "Hello Old boy info"# 訪問地址 : /infos  or  /infos/
@app.route("/infos", strict_slashes=False)
def student_infos():return "Hello Old boy infos"
?
redirect_to:url地址重定向
# 訪問地址 : /info 瀏覽器跳轉至 /infos
@app.route("/info", strict_slashes=True, redirect_to="/infos")
def student_info():return "Hello Old boy info"@app.route("/infos", strict_slashes=False)
def student_infos():return "Hello Old boy infos"
subdomain:子域名前綴subdomian=“wurenxiansheng”這樣寫可以得到wurenxiansheng.bokeyuan.com前提是app.config["SERVER_NAME"]="bokeyuan.com"
app.config["SERVER_NAME"] = "bokeyuan.com"@app.route("/info",subdomain="wurenxiansheng")
def student_info():return "Hello wurenxiansheng info"# 訪問地址為: wurenxiansheng.bokeyuan.com/info
?
2.動態參數路由:
from flask import url_for# 訪問地址 : http://127.0.0.1:5000/info/1
@app.route("/info/<int:nid>", methods=["GET", "POST"], endpoint="r_info")
def student_info(nid):print(url_for("r_info",nid=2))  # /info/2return f"Hello Old boy {nid}"  # Python3.6的新特性 f"{變量名}"
<int:nid>就是在url后定義一個參數接收
這種動態參數路由,在url_for的時候,一定要將動態參數名+參數值添加進去,否則會拋出參數錯誤的異常
3.Flask初始化配置
app = Flask(__name__)
app.template_folder = "templates"    #指定模板存放路徑
app.static_folder = "文件夾名字"    #指定靜態文件的存放路徑
app.static_url_path = "/static"    # 指定靜態文件訪問路徑
static_host = None    #靜態文件的存放服務器
?
4.Flask對象配置
查看默認配置及配置項
app.config == app.default_config
我們可以把關于Flask的一些配置,單拎出來創建一個獨立的類或者文件用來存放用的時候直接導入,但是要記住用app.config.from_object(Obj)引入配置文件
class FlaskSetting(object):DEBUG = True    #打開Flask的debug模式

app.config.from_object(FlaskSetting)
?
二、Flask中的藍圖
1.初始Flask藍圖(blueprint)
把Blueprint理解為不能被run的Flask對象
創建一個項目然后將目錄結構做成如下(這是一個簡單的對于數據的增刪改查):
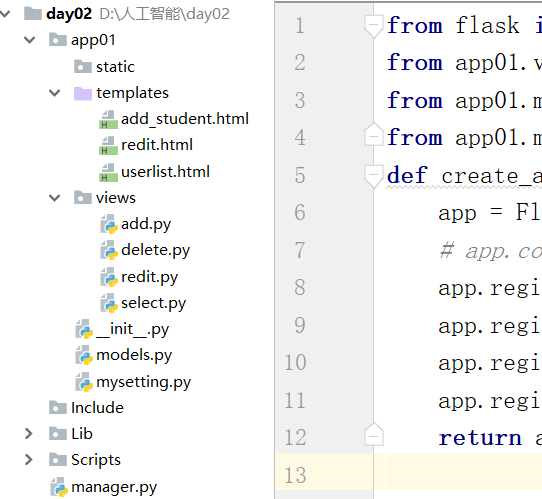
static:存放靜態文件
templates:存放html文件
views:存放視圖文件也就是咱們的藍圖(blueprint)
mysetting.py:關于Flask的一些配置
?
我們只看一個查看的功能走一下流程
views中的select.py文件中的內容:
from flask import Blueprint,render_templatestudent = [{"name":"小霞","age":"18","gender":"女"},{"name":"小紅","age":"17","gender":"女"},{"name":"小明","age":"20","gender":"男"},{"name":"小亮","age":"19","gender":"男"},{"name":"小蘭","age":"21","gender":"女"},
]list_student = Blueprint("list_student",__name__)
@list_student.route("/user_list",methods=["GET","POST"])
def user_list():return render_template("userlist.html",student_list=student)
?
userlist.html文件中的內容:
<!DOCTYPE html>
<html lang="zh-CN">
<head><meta charset="utf-8"><meta http-equiv="X-UA-Compatible" content="IE=edge"><meta name="viewport" content="width=device-width, initial-scale=1"><!-- 上述3個meta標簽*必須*放在最前面,任何其他內容都*必須*跟隨其后! --><title></title><!-- Bootstrap -->
</head>
<body>
<a href="">添加學生信息</a>
<table border="1px"><thead><tr><th>名字</th><th>性別</th><th>年齡</th><th>操作</th></tr></thead><tbody>{% for student in student_list %}<tr><td>{{ student.name }}</td><td>{{ student.gender }}</td><td>{{ student.age }}</td><td><a href="">刪除</a><a href="">編輯</a></td></tr>{% endfor %}</tbody>
</table>
</body>
</html>
?
manager.py文件中的內容:
from app01 import create_app
app = create_app()
if __name__ == '__main__':app.run(debug=True)
?
app01中的__init__.py中的內容:
from flask import Flask
from app01.views import selectdef create_app():app = Flask(__name__)app.register_blueprint(select.list_student)return app
?
藍圖內部的視圖函數及route不要出現重復


)


語言基礎)


基礎)
)

)
