前端路由
問題導入
在前面完成的資產管理案例中, 我們是把列表區域和添加表單區域實現在了一個區域。當頁面功能比較復雜時,我們需要它們拆分開來:一個頁面中只顯示一個區域。
一個比較直觀的解決方案是把它們分別做成兩個獨立的網頁文件,例如:
文件一: xxxx/index.html 顯示表格區區域
文件二:xxxx/add.html顯示表單區域
然后添加一個導航條來允許用戶進行跳轉。
這種解決方案比較直接了當,但它存在一些問題:
- 從一個頁面跳入另一個頁面需要重新加載公共的資源文件,造成浪費。例如index.html中需要用到axios.js,在add.html中也需要用到。
- 頁面的跳入跳出給用戶的體驗也不好(特別地,是在移動端)。
那有沒有一種方案在不進行頁面跳轉的前提下,能根據地址欄中的地址不同,來顯示不同的內容?
有,這就是前端路由技術。
前端路由:
- 根據地址欄變化(不發請求),去局部更新不同的頁面內容。
- 前端業務場景切換。
模擬實現原理
<!DOCTYPE html>
<html lang="en">
<head><meta charset="UTF-8"><meta name="viewport" content="width=device-width, initial-scale=1.0"><title>Document</title>
</head>
<body><div><nav><!-- #:在地址欄有兩個含義- 錨點鏈接:在頁面內部進行導航,不會有頁面跳轉。- hash。在前端路由技術中,我們叫它哈希值。它不會有頁面跳轉,地址欄變化的瀏覽器中后退,前進也是可用的http://127.0.0.1:5500/index.html#/add --><a href="#/">主頁</a><a href="#/add">添加</a></nav><div id="content"><!-- // 模擬不同的地址欄中的hash值,顯示不同的內容 --></div></div><script>// 實現前端路由效果//    -  地址欄變化,頁面內容變化,不刷新// 1. 如何監聽地址欄中hash值的變化?//    答:在window上,添加hashchange監聽// 2. 如何獲取當前地址欄中的hash值?//    答:location.hashwindow.addEventListener('hashchange', onHashChange)// 當頁面中的dom加載完成,就去執行window.addEventListener('DOMContentLoaded',function() {onHashChange()})function onHashChange (e) {console.log('hash值的變了')console.log(e)// 根據不同的hash值,顯示不同的內容到content區域switch (location.hash) {case "#/": // 主頁document.getElementById('content').innerHTML = "這里主頁的內容"break;case "#/add": // adddocument.getElementById('content').innerHTML = "這里是add的內容"break;default:document.getElementById('content').innerHTML = "404沒有這個頁面"break;}// if elseif ,elseif ......}</script>
</body>
</html>
技術要點:
- 地址url 中看到 #,這個 # 有兩種情況,一個是我們所謂的錨點,比如典型的回到頂部按鈕原理、Github 上各個標題之間的跳轉等,路由里的 # 不叫錨點,我們稱之為 hash。地址欄中hash的變化是不會發生頁面跳轉的
- hashchange 事件用來監聽hash值的變化。
- hash的改變也會記錄到瀏覽歷史中,通過回退和前進可以切換業務場景
SPA
單頁面應用程序,簡稱SPA(single page application)一個系統上的所有功能在一個頁面上實現。
(在移動端比較多)
SPA是通過前端路由實現業務場景的切換的。
在vue框架中額外引入vue-router插件來配合組件系統就可以輕易地實現。
在單頁面應用程序中,如何切換頁面的業務場景。
- http://zhoushugang.gitee.io/hm-toutiao-pc-93/
- https://music.163.com/
優點:
- 整體不刷新頁面,用戶體驗更好。
缺點:
- 首次加載會比較慢一點。
vue-router-使用步驟
vue-router是vue的一個插件,當我們的項目需要前端路由時,我們要先把它下載引入到頁面中。
下載: https://cdn.bootcss.com/vue-router/3.1.3/vue-router.min.js
導入插件
# 先下載到本地,再引用
<script src="./vue-router.min.js"></script>
# 直接引用
<script src="https://cdn.bootcss.com/vue-router/3.1.3/vue-router.min.js"></script>
初始化vue-router插件
用VueRouter構造器創建路由實例,并配置路由規則。
基本格式
const router = new VueRouter({routes: [{path:"路徑1",component:要展示的組件1},{path:"路徑2",component:要展示的組件2},.....]
})
示例
- vue-router中有一套約定的規則用來確定在哪個url下顯示哪個組件。
// 初始化vue-router且使用剛定義的路由規則
const router = new VueRouter({// 初始化路由的配置對象// 有以一個配置項 routes 定義路由規則routes:[{path: '/', component: {template:`<div>我是主頁</div>`}},{path: '/news', component: {template:`<div>新聞-生活早知道</div>`}},{path: '/sport', component: {template:`<div>體育-體育改變人生</div>`} }]
})
使用路由實例
在vue構造器中,有一項是router,它專門用來設置路由對象
new Vue({el: '#app',// vue提供了一個配置選項,router選項,是用來掛載路由實例的// 只有掛載了 router 實例 才可使用路由的功能router:路由對象
})
設置路由出口
在vue的模板,添加一個router-view組件,用它來指定當前路由對應組件渲染的位置。
<!-- 渲染路由對應的組件 router-view承載路由對應的組件的-->
<router-view></router-view>
測試使用
請直接在地址欄中補充對應的路由地址來查看路由效果。
路由鏈接導航
通過router-link來進行路由跳轉。
<!-- 寫路由鏈接 不會使用a標簽  使用router-link組件 -->
<nav><!-- 組件默認解析的是a標簽  to屬性跳轉的地址,不需要帶上# --><router-link to="/">主頁</router-link><router-link to="/news">新聞</router-link><router-link to="/sports">運動</router-link>
</nav>
- router-link組件會被vue解析成a標簽,但不能直接通過a標簽來跳轉。
- 如果當前路由被激活會添加特殊的類名:
router-link-exact-active router-link-active
動態路由
目標:實現新聞詳情的功能:即不同的新聞使用同一個組件,但要傳入不同的參數。
概念:不同的路由地址,指向同一個組件,此時需要使用動態路由。
示圖:

代碼:
<!DOCTYPE html>
<html lang="en">
<head><meta charset="UTF-8"><meta name="viewport" content="width=device-width, initial-scale=1.0"><title>Document</title><style>.router-link-exact-active{color:red;padding:0 5px;}</style>
</head>
<body><div id="app"><h3>動態路由</h3><router-link to="/detail/100">編號為100的新聞</router-link><router-link to="/detail/101">編號為101的新聞</router-link><router-link to="/detail/102">編號為102的新聞</router-link><router-link to="/detail/103">編號為103的新聞</router-link><router-view></router-view></div><script src="https://unpkg.com/vue/dist/vue.js"></script><script src="https://unpkg.com/vue-router/dist/vue-router.js"></script><script>// 動態路由//  -- 同一個組件,根據傳入參數不同,顯示不同的內容。// 例如:大事件項目前中的新聞詳情頁。//  localhost:3000/index.html#/detail/100   ---->  顯示編號為100的新聞//  localhost:3000/index.html#/detail/101   ---->  顯示編號為101的新聞// 1. 定義路由規則//    path:'/detail/:形參名'// 2. 跳轉 `to:/detail/實參`// 3. 在組件中獲取當前的參數值?//   this.$route.params.形參//   - $route 引入了vueRouter插件之后, vue組件內部通過 $route 就可以直接來訪問當前的組件對象//   - $route這個對象有很多屬性,params用來保存當前傳入動態路由的參數值const myrouter = new VueRouter({routes: [// path是hash值,component是組件,就是顯示的內容{path: '/',component:{template: `<div>我是主頁!!!!!</div>`}},// /detail/:id  可以匹配類似于: /detail/XXXXX 的路徑{path:'/detail/:id123',component:{template: `<div><h1>新聞詳情頁-{{$route.params.id123}}</h1><button @click="h1">點擊</button></div>`,methods: {h1 () {console.log( this.$route.params.id123)}}}},{path: '*',component:{template: `<div>你要訪問的頁面不存在,404!!!!</div>`}},]})new Vue({el: '#app',data:{},methods:{},router: myrouter// 用來設置路由對象 })</script>
</body>
</html>
總結:
- 在路由規則中,匹配到不同的地址,指向同一個組件
- 代碼:
{path:'/detail/:id', component: detail} - 數據:模板
{{$route.params.id}}組件this.$route.params.id
頁面跳轉及傳參
從頁面pageA跳轉到pageB ,并攜帶參數
跳轉有兩種方式:
- 通過router-link的to屬性跳轉
- 通過$router.push()方法來跳轉
傳參有兩種方式:
- 查詢傳參
/aricle?id=1001 - 路徑傳參
/article/1001
獲取傳參數的方式: (根據傳參不同,獲取參數也不同)
-  查詢傳參: this.$route.query.id
-  路徑傳參:this.$route.params.id
聲明式導航
通過<router-link>組件的屬性to來聲明它的跳轉后的路由地址。
不帶參數的跳轉
- 普通字符串,不帶參數。
<router-link to="/list"></router-link>
- 對象,普通跳轉,不帶參數
<router-link :to="{path:'/list'}"></router-link>
帶參數的跳轉
- 普通字符串,進行帶參數的跳轉。
<!-- 路徑傳參  路由規則{path:'/article/:id'}-->
<router-link to="/article/10001"></router-link><!-- 查詢傳參 路由規則{path:'/article'}-->
<router-link to="/article?id=10001"></router-link>
- 對象,路徑傳參
<!--路徑傳參 路由規則{path:'/article/:id',name:'article',component:Article}] ---><router-link :to="{name:'article',params:{id: 10001}}"></router-link>
<!-- /article/10001 -->
- 對象,查詢傳參
<!--路徑傳參 路由規則 {path:'/article',component:ArticleItem} -->
<router-link :to="{path:'/article',query:{id: 10001}}"></router-link>
<!-- /article?id=10001 -->
代碼:
<div id="app"><!-- 各種router-link寫法 --><!-- 字符串 --><router-link to="/list">文章列表</router-link><router-link to="/article/10001">文章詳情</router-link><router-link to="/item?id=10001">文章詳情</router-link><hr><!-- 對象 --><router-link :to="{path:'/list'}">文章列表</router-link><router-link :to="{name:'article',params:{id:10001}}">文章列表</router-link><router-link :to="{path:'/item',query:{id:10001}}">文章列表</router-link><!-- 顯示路由對應組件容器 --><router-view></router-view></div><script src="./vue.js"></script><script src="./vue-router.min.js"></script><script>// routes 指定路由規則數組const router = new VueRouter({ routes:[{path: '/list', component: {template: `<div>列表組件</div>`}},{path: '/article/:id', name: 'article',component: {template: `<div>article文章詳情組件 {{$route.params.id}}</div>`}},{path: '/item', component: {template: `<div>item文章詳情組件 {{$route.query.id}}</div>`}}] })new Vue({el: '#app',router})</script>
總結:對象方式的兩種傳參,怎么取值。
:to="{name:'article',params:{id:10001}}"$route.params.id- 解析后:/article/10001
:to="{path:'/item',query:{id:10001}}"$route.query.id- 解析后:/item?id=10001
編程式導航
通過 js代碼調用一個導航函數(this.$router.push)進行跳轉。
場景:
- 在界面上,有確切的跳轉鏈接,使用聲明式導航。
- 當你在執行一個js邏輯的時候,你想進行跳轉,此時使用編程式導航。
- 在做登錄的時候,登錄成功后,才應該跳轉到首頁。
格式:
// 字符串
this.$router.push('/home')// 對象
this.$router.push({ path: 'home' })// 命名的路由
// 路徑傳參
this.$router.push({ name: 'user', params: { userId: '123' }})// 查詢參數,變成 /register?plan=private
this.$router.push({ path: 'register', query: { plan: 'private' }})
代碼:
<div id="app"><!-- 聲明式導航 --><router-link to="/login">登錄頁面</router-link><!-- 顯示路由對應組件容器 --><router-view></router-view></div><script src="./vue.js"></script><script src="./vue-router.min.js"></script><script>const router = new VueRouter({ // routes 指定路由規則數組routes:[{path: '/login',component: {template: `<div><input type="text" placeholder="用戶名"><input type="password" placeholder="密碼"><button @click="login">登錄</button></div>`,methods: {login () {// 進行登錄// 假設登錄成功了// 跳轉到首頁// 只能通過js的方式進行跳轉(編程式導航)// vue實例提供了一個對象 $router // $router就是路由實例,提供一個函數 push,可以進行跳轉this.$router.push('/home')}}}},{path: '/home',component: {template: `<div>首頁</div>`}}] })new Vue({el: '#app',router})</script>
總結:
- js代碼執行的導航跳轉就是編程式導航
this.$router.push('/home') - to屬性解析過執行的跳轉,依賴的代碼其實就是編程式導航代碼。
- router-link的to屬性能使用的傳參方式,在編程式導航中都可以使用。
// 路徑傳參
this.$router.push({name:'article',params:{id:10001}})
// 鍵值對傳參
this.$router.push({path:'/item',query:{id:10001}})
路由重定向
重定向:
- 當你訪問某個地址的時候,經過程序的處理(用戶看不見),跳轉到了另外一個地址。
前端的路由,使用使用重定向功能,假設一個業務場景:
- 當你訪問頁面的時候,默認hash地址是
#/,默認的路由地址/ - 此時我們項目的首頁
/home,所以:當我們訪問/重定向到/home,才能默認訪問首頁。
代碼:
<!-- 根容器 --><div id="app"><router-view></router-view></div><script src="./vue.js"></script><script src="./vue-router.min.js"></script><script>const router = new VueRouter({ // routes 指定路由規則數組routes:[// 匹配 / 路徑,重定向 到 '/home' 即可{path: '/', redirect: '/home'},// 首頁路由規則{path: '/home',component: {template: '<div>首頁頁面內容</div>'}}] })new Vue({el: '#app',router})</script>
總結:
- 路由規則對象中 提供了一個選項:redirect 配置重定向的地址即可。
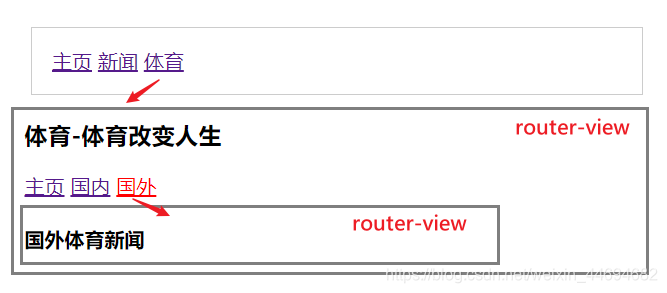
路由嵌套
原理:router-view中再次包含router-view。
背景:一個組件內部包含的業務還是很復雜,需要再次進行拆分。
格式:
routes:[{path: '/sport', component: {template:`<div><router-view></router-view></div>`},children: [path:'/xx1',]}
]
示例
總結:
- 在已有的路由容器中,再實現一套路由,再套一個路由容器,叫:嵌套路由。
代碼:
<!DOCTYPE html>
<html lang="zh"><head><meta charset="UTF-8" /><meta name="viewport" content="width=device-width, initial-scale=1.0" /><title>Document</title><style>body {background-color: #eee;}nav {border:1px solid #ccc;padding:1em;margin:5px;}#app {background-color: #fff;width: 500px;margin: 50px auto;box-shadow: 3px 3px 3px rgba(0, 0, 0, 0.5);padding: 2em;}.box {padding: 1em;border: 1px solid #ccc;margin: 1em;}.router-link-active{}.router-link-exact-active {color:red;}</style>
</head><body><div id="app"><nav><!-- 通過router-link來跳轉頁面如果是當前頁,則會添加 .router-link-exact-active ,.router-link-active 類 --><router-link to="/">主頁</router-link><router-link to="/news">新聞</router-link><router-link to="/sport">體育</router-link></nav><!-- 一級路由容器 --><router-view></router-view></div><script src="https://cdn.bootcdn.net/ajax/libs/vue/2.6.11/vue.js"></script><script src="https://cdn.bootcdn.net/ajax/libs/vue-router/3.1.3/vue-router.js"></script><script>const sports = {template:`<div><h3>體育-體育改變人生</h3><router-link to="/sport">主頁</router-link><router-link to="/sport/guonei">國內</router-link><router-link to="/sport/guowai">國外</router-link><router-view></router-view></div>`}// 初始化vue-router且使用剛定義的路由規則const router = new VueRouter({// 初始化路由的配置對象// 有以一個配置項 routes 定義路由規則routes:[{path: '/', component: {template:`<div>我是主頁</div>`}},{path: '/news', component: {template:`<div>新聞-生活早知道</div>`}},{path: '/sport', component: sports,children: [ {path: '', // 二級路由的默認顯示內容component: {template:'<div><h4>體育欄目的主頁</h4></div>'}},{path: 'guonei',component: {template:'<div><h4>國內體育新聞</h4></div>'}},{path: 'guowai',component: {template:'<div><h4>國外體育新聞</h4></div>'}}]},{path: '/detail/:id', component: {template:`<div>我是新聞詳情頁{{$route.params.id}}</div>`}}]})new Vue({el: '#app',router})</script>
</body></html>
總結:
-
嵌套路由除了 router-view 之間需要嵌套,路由規則也需要通過children來實現嵌套。
children: [ {path: '', // 二級路由的默認顯示內容component: {template:'<div><h4>體育欄目的主頁</h4></div>'}},{path: 'guonei',component: {template:'<div><h4>國內體育新聞</h4></div>'}},{path: 'guowai',component: {template:'<div><h4>國外體育新聞</h4></div>'}}]},{path: '/detail/:id', component: {template:`<div>我是新聞詳情頁{{$route.params.id}}</div>`}}]})
new Vue({
el: ‘#app’,
router
})
總結:
- 嵌套路由除了 router-view 之間需要嵌套,路由規則也需要通過children來實現嵌套。


)

)
)


)

)
)
)


