自動發現
- 一、Prometheus服務發現 理論部分
- 1.1 Prometheus數據采集配置
- 1.2 基于文件的服務發現
- 1.3 基于consul的服務發現
- 1.4 基于 Kubernetes API 的服務發現
- 1.4.1 概念
- 1.4.2 部分配置參數
- 1.4.3 配置模板
- 二、實例一:部署基于文件的服務發現
- 2.1 創建用于服務發現的文件
- 2.2 修改Prometheus的配置文件
- 2.3 瀏覽器訪問測試
- 三、實例二:部署基于consul的服務發現
- 3.1 部署Consul服務
- 3.2 在Consul 上注冊 Services
- 3.3 修改 prometheus 配置文件
- 四、Prometheus對接Kurbernetes集群的方法
- 4.1 方式一:外部部署
- 4.2 方式二:內部部署(以Pod的形式)
- 五、小結
一、Prometheus服務發現 理論部分
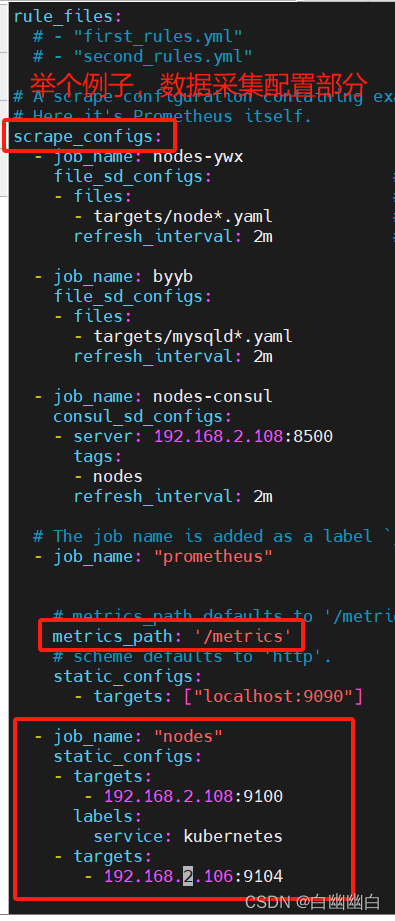
1.1 Prometheus數據采集配置
scrape_configs:
- job_name: XXX              #自定義監控任務的名稱metrics_path: "/metrics"   #指定獲取監控指標數據的URL路徑,一般都是 /metricsscheme: "https"             #指定拉取監控指標數據的協議,http(默認值)|https#定義靜態配置的監控目標static_configs:           - targets:                   #指定監控目標的IP和exporter的端口- <IP1>:<exporter的端口>- <IP2>:<exporter的端口>labels:                    #自定義監控目標的標簽<標簽key>: <標簽value>
1.2 基于文件的服務發現
簡介
Prometheus Server 會定期從文件中加載 Target 信息,文件可使用 YAML 和 JSON 格式,它含有定義的 Target 列表,以及可選的標簽信息。
基于文件的服務發現不依賴于任何平臺或第三方服務,是最為簡單和通用的實現方式。
配置模板
#基于文件的服務發現file_sd_configs:- files:- XXX.yaml #指定作服務發現的文件的路徑refresh_interval: 1m #指定服務發現的刷新間隔時間
1.3 基于consul的服務發現
下載地址:https://www.consul.io/downloads/
簡介
Consul 是一款基于 golang 開發的開源工具,主要面向分布式,服務化的系統提供服務注冊、服務發現和配置管理的功能。
提供服務注冊/發現、健康檢查、Key/Value存儲、多數據中心和分布式一致性保證等功能。
模板
#基于consul的服務發現consul_sd_configs:- server: <consul服務器IP>:8500 #指定consul服務器地址和端口tags: #指定在consul服務發現中用于作prometheus監控的tags標簽- 用于作prometheus監控的標簽refresh_interval: 1m
1.4 基于 Kubernetes API 的服務發現
1.4.1 概念
基于 Kubernetes API 的服務發現機制,支持將API Server 中 Node、Service、Endpoint、Pod 和 Ingress 等資源類型下相應的各資源對象視作 target, 并持續監視相關資源的變動
●Node、Service、Endpoint、Pod 和 Ingress 資源分別由各自的發現機制進行定義
●負責發現每種類型資源對象的組件,在 Prometheus 中稱為一個 role
●支持在集群上基于 DaemonSet 控制器部署 node-exporter 后發現各 Node 節點,也可以通過 kubelet 來作為 Prometheus 發現各 Node 節點的入口
1.4.2 部分配置參數
# The API server addresses. If left empty, Prometheus is assumed to run inside of the cluster and will discover API servers automatically
and use the pod's
# CA certificate and bearer token file at /var/run/secrets/kubernetes.io/serviceaccount/.
[ api_server: <host> ]# The Kubernetes role of entities that should be discovered. One of endpoints, service, pod, node, or ingress.
role: <string># Optional authentication information used to authenticate to the API server.
# Note that 'basic_auth', 'bearer_token'和'bearer_token_file' 等認證方式互斥;
[ bearer_token: <secret> ]
[ bearer_token_file: <filename> ]# TLS configuration.
tls_config:
# CA certificate to validate API server certificate with.
[ ca_file: <filename> ]# Certificate and key files for client cert authentication to the server.
[ cert_file: <filename> ]
[ key_file: <filename> ]# ServerName extension to indicate the name of the server.
[ server_name: <string> ]# Optional namespace discovery. If omitted, all namespaces are used.
namespaces:
names:
[ - <string> ]
1.4.3 配置模板
 #基于K8S的服務發現
- job_name: XXXscheme: "https"kubernetes_sd_configs:- role: endpoints|service|pod|node|ingress      #指定被監控的K8S資源對象類型
二、實例一:部署基于文件的服務發現
2.1 創建用于服務發現的文件
新建工作目錄
cd /usr/local/prometheusmkdir targets
在文件中配置所需的 target
vim targets/node-exporter.yaml
- targets:- 192.168.2.108:9100- 192.168.2.106:9100labels:app: node-exporterjob: nodevim targets/mysqld-exporter.yaml
- targets:- 192.168.2.108:9104- 192.168.2.106:9104labels:app: mysqld-exporterjob: mysqld
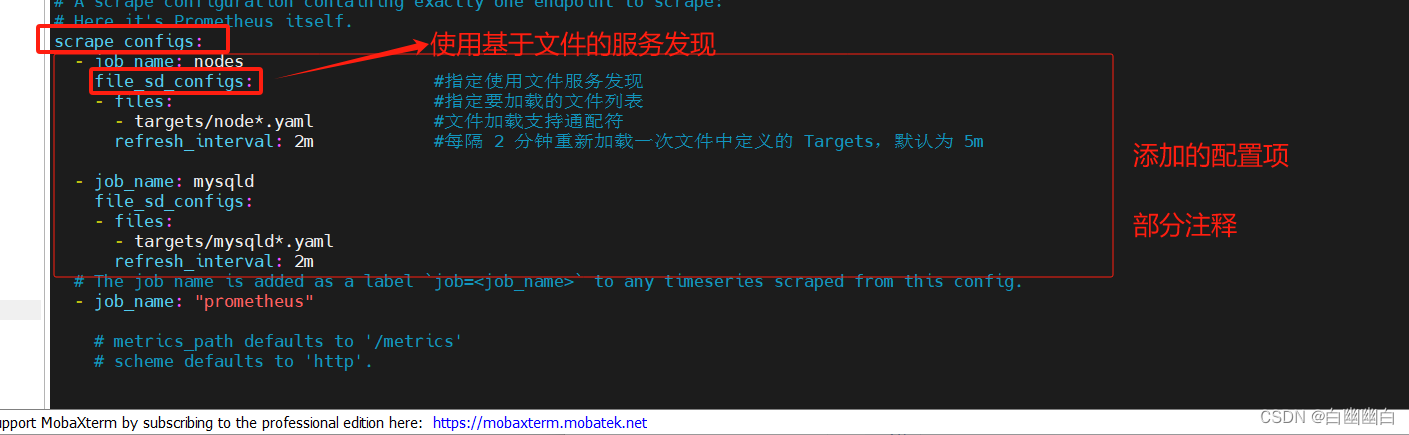
2.2 修改Prometheus的配置文件
修改 prometheus 配置文件,發現 target 的配置,定義在配置文件的 job 之中。
vim /usr/local/prometheus/prometheus.yml
......
scrape_configs:- job_name: nodesfile_sd_configs:                  #指定使用文件服務發現- files:                          #指定要加載的文件列表- targets/node*.yaml            #文件加載支持通配符refresh_interval: 2m            #每隔 2 分鐘重新加載一次文件中定義的 Targets,默認為 5m- job_name: mysqldfile_sd_configs:- files:- targets/mysqld*.yamlrefresh_interval: 2m
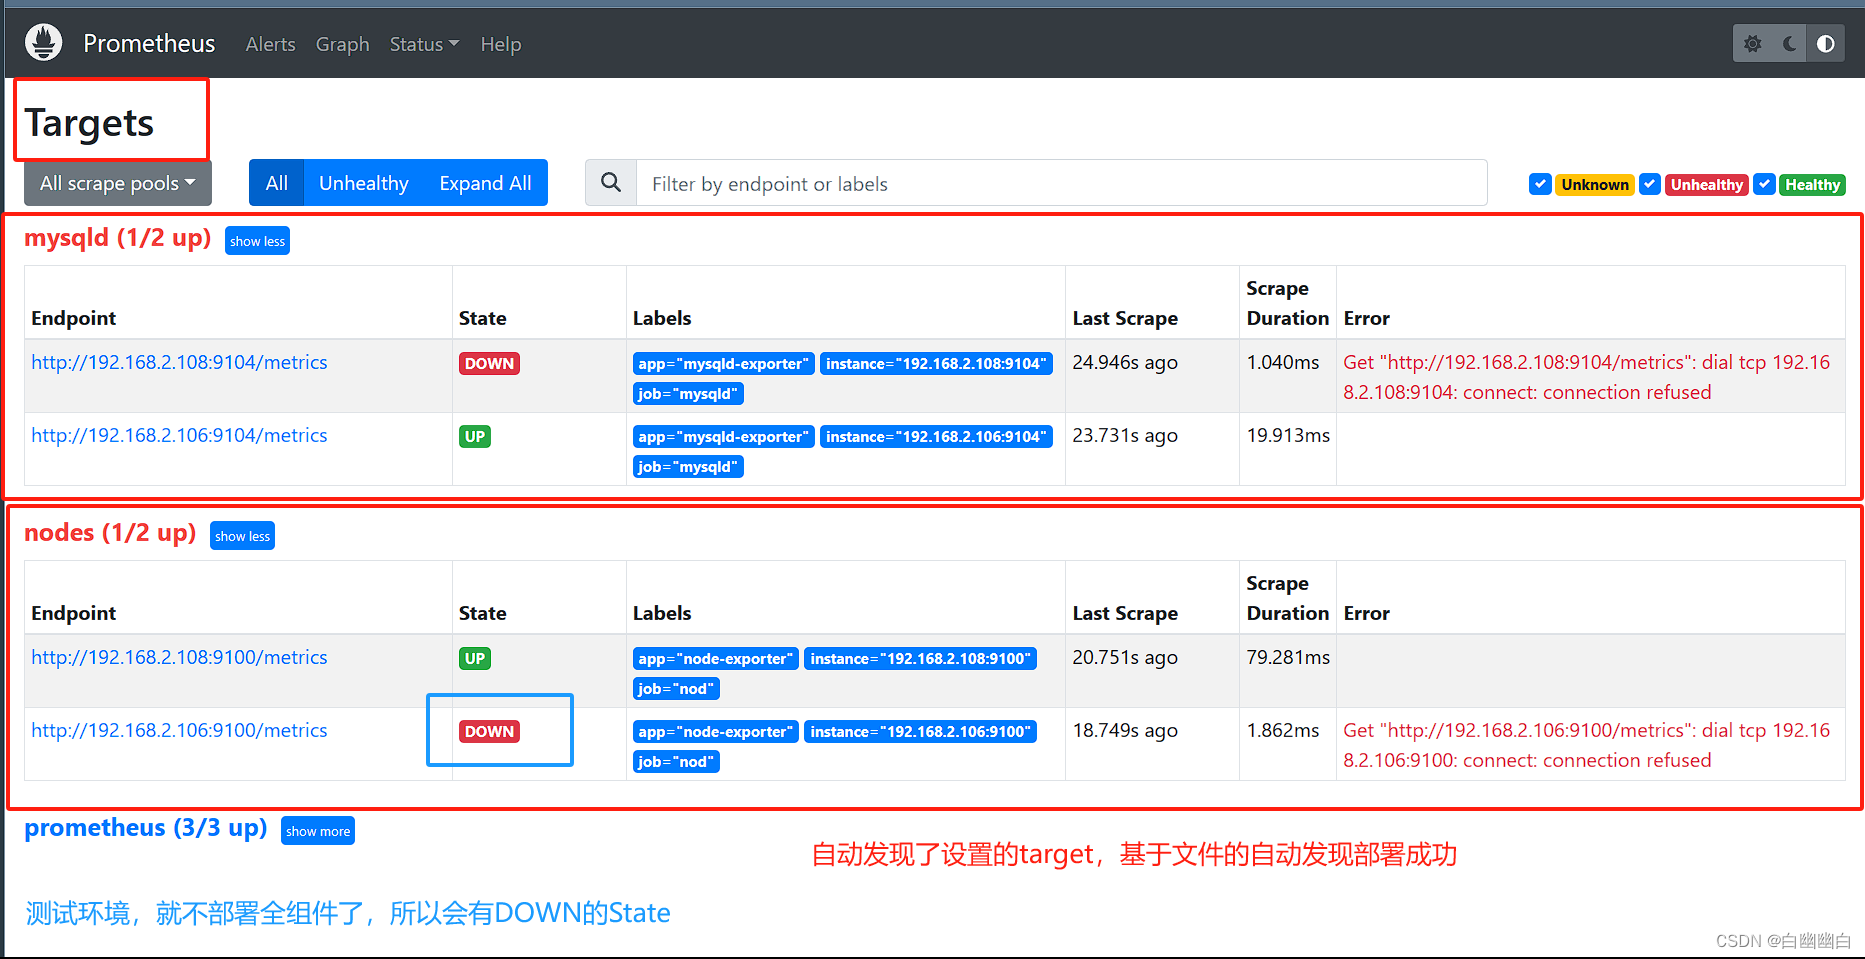
2.3 瀏覽器訪問測試
#先重啟服務
systemctl reload prometheus
#然后
瀏覽器查看 Prometheus 頁面的 Status -> Targets
三、實例二:部署基于consul的服務發現
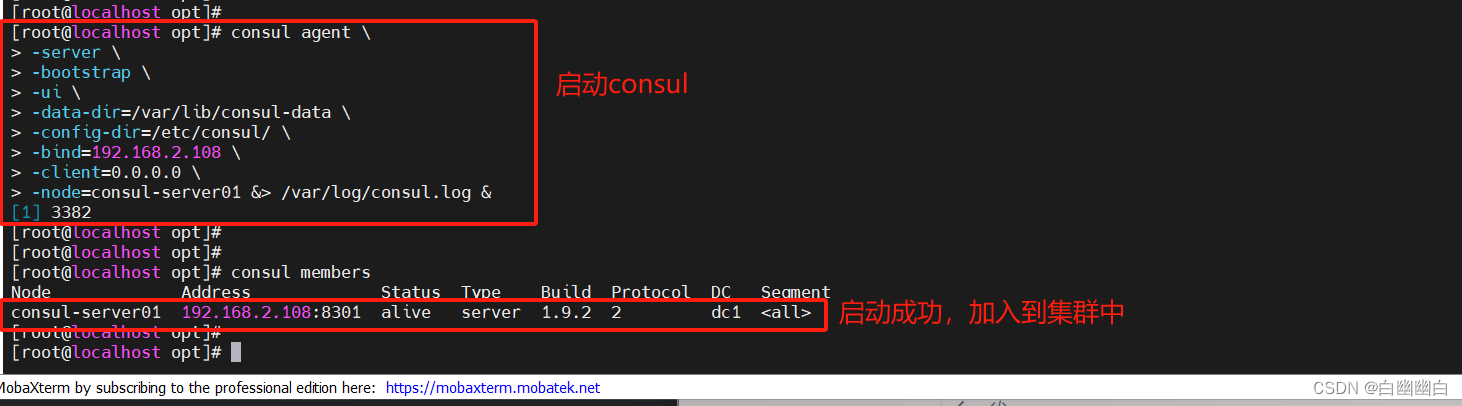
3.1 部署Consul服務
cd /opt/
unzip consul_1.9.2_linux_amd64.zip
mv consul /usr/local/bin/
#創建 Consul 服務的數據目錄和配置目錄
mkdir /var/lib/consul-data
mkdir /etc/consul/
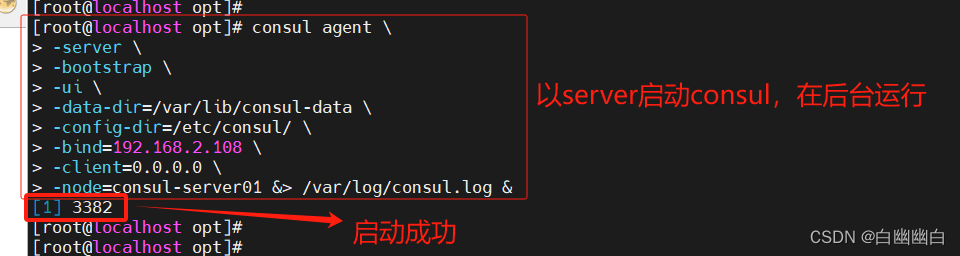
#使用 server 模式啟動 Consul 服務
consul agent \
-server \
-bootstrap \
-ui \
-data-dir=/var/lib/consul-data \
-config-dir=/etc/consul/ \
-bind=192.168.2.108 \
-client=0.0.0.0 \
-node=consul-server01 &> /var/log/consul.log &
#查看 consul 集群成員
consul members
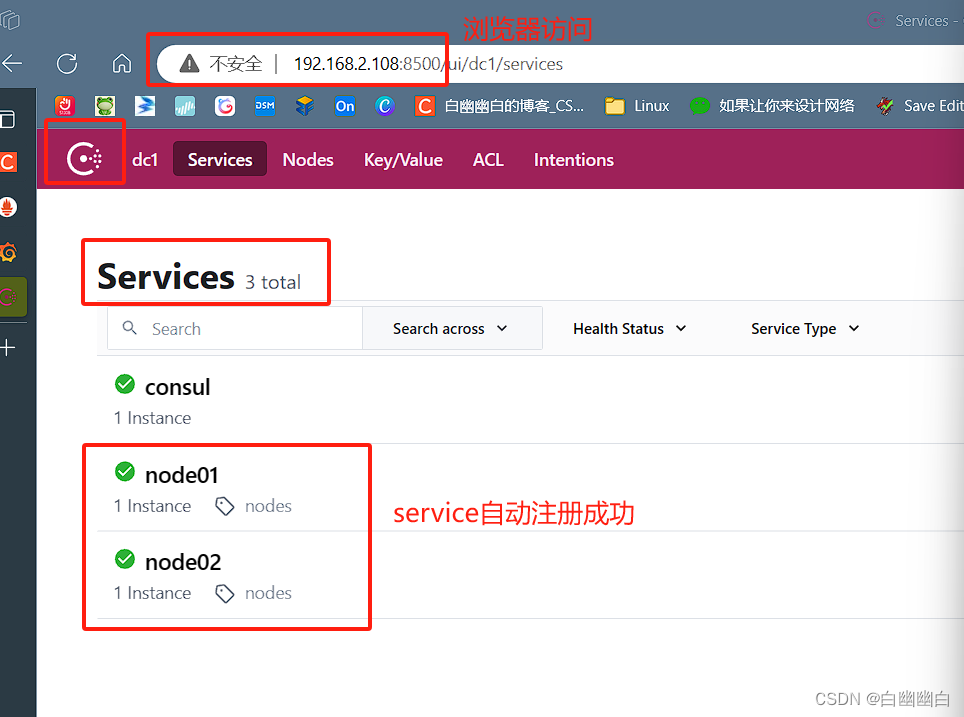
3.2 在Consul 上注冊 Services
#在配置目錄中添加文件
vim /etc/consul/nodes.json
{"services": [{"id": "node_exporter-node01","name": "node01","address": "192.168.2.108","port": 9100,"tags": ["nodes"],"checks": [{"http": "http://192.168.2.108:9100/metrics","interval": "5s"}]},{"id": "node_exporter-node02","name": "node02","address": "192.168.2.106","port": 9100,"tags": ["nodes"],"checks": [{"http": "http://192.168.2.106:9100/metrics","interval": "5s"}]}]
}
#讓 consul 重新加載配置信息
consul reload		瀏覽器訪問:http://192.168.2.108:8500
3.3 修改 prometheus 配置文件
vim /usr/local/prometheus/prometheus.yml
......- job_name: nodesconsul_sd_configs:                  #指定使用 consul 服務發現- server: 192.168.2.108:8500        #指定 consul 服務的端點列表tags:                             #指定 consul 服務發現的 services 中哪些 service 能夠加入到 prometheus 監控的標簽- nodesrefresh_interval: 2m

systemctl reload prometheus
瀏覽器查看 Prometheus 頁面的 Status -> Targets

#讓 consul 注銷 Service
consul services deregister -id="node_exporter-node02"#重新注冊
consul services register /etc/consul/nodes.json
四、Prometheus對接Kurbernetes集群的方法
4.1 方式一:外部部署
在K8S集群外部署的prometheus的認證配置。
#第一種老版本配置方法api_server: <apiserver的IP>:6443 #指定apiserver的地址和端口tls_config:ca_file: <filename> #指定ca證書的路徑cert_file: <filename> #指定客戶端證書的路徑key_file: <filename> #指定客戶端私鑰的路徑#第二種新版本配置方法kubeconfig_file: <filename> #指定kubeconfig集群引導配置文件路徑,kubeconfig文件會包含集群參數(ca證書、apiserver地址)和客戶端參數(客戶端證書和私鑰信息)
部署思路
-
生成認證密鑰: 首先,需要生成用于認證的密鑰。
可以使用
htpasswd命令行工具來生成一個包含用戶名和密碼的密鑰文件。例如,使用以下命令生成一個名為
auth的密鑰文件:htpasswd -c -B -C 12 auth username #上述命令將提示你輸入密碼 #然后在當前目錄下生成一個名為 `auth` 的密鑰文件, #并將用戶名和密碼添加到該文件中。 -
創建 Secret 對象: 在 Kubernetes 集群中,使用 Secret 對象來存儲認證密鑰。
kubectl create secret generic prometheus-auth --from-file=auth #創建一個名為 `prometheus-auth` 的 Secret 對象,并將 `auth` 文件的內容存儲在其中。 -
更新 Prometheus 配置: 編輯 Prometheus 的配置文件
prometheus.yml,添加認證相關的配置。 -
部署 Prometheus: 根據你的部署方式,可以使用 Docker 或其他工具將 Prometheus 部署在Kubernetes集群外部。
-
部署配置文件和 Secret 對象: 將更新后的
prometheus.yml文件和創建的 Secret 對象應用到 Prometheus 的部署中。比如使用容器編排工具(如 Docker Compose),將這些文件掛載到容器中。
完成上述步驟后, Prometheus 將使用認證配置來保護其 Web UI 和其他功能。
只有提供正確的用戶名和密碼才能訪問相關頁面。
4.2 方式二:內部部署(以Pod的形式)
在K8S集群內以Pod形式部署的prometheus的認證配置。
#在K8S集群內以Pod形式部署的prometheus的認證配置tls_config:ca_file: /var/run/secrets/kubernetes.io/serviceaccount/ca.crt#第一種老版本配置方法bearer_token_file: /var/run/secrets/kubernetes.io/serviceaccount/token#第二種新版本配置方法authorization:credentials_file: /var/run/secrets/kubernetes.io/serviceaccount/token
五、小結
Prometheus數據采集配置
scrape_configs:
- job_name: XXX              #自定義監控任務的名稱metrics_path: "/metrics"   #指定獲取監控指標數據的URL路徑,一般都是 /metricsscheme: "http"             #指定拉取監控指標數據的協議,http(默認值)|https#定義靜態配置的監控目標static_configs:           - targets:                   #指定監控目標的IP和exporter的端口- <IP1>:<exporter的端口>- <IP2>:<exporter的端口>labels:                    #自定義監控目標的標簽<標簽key>: <標簽value>#基于文件的服務發現file_sd_configs:- files:- XXX.yaml                 #指定作服務發現的文件的路徑refresh_interval: 1m       #指定服務發現的刷新間隔時間#基于consul的服務發現consul_sd_configs:- server: <consul服務器IP>:8500     #指定consul服務器地址和端口tags:                             #指定在consul服務發現中用于作prometheus監控的tags標簽- 用于作prometheus監控的標簽refresh_interval: 1m#基于K8S的服務發現
- job_name: XXXscheme: "https"kubernetes_sd_configs:- role: endpoints|service|pod|node|ingress #指定被監控的K8S資源對象類型#在K8S集群外部署的prometheus的認證配置#第一種老版本配置方法api_server: <apiserver的IP>:6443 #指定apiserver的地址和端口tls_config:ca_file: <filename> #指定ca證書的路徑cert_file: <filename> #指定客戶端證書的路徑key_file: <filename> #指定客戶端私鑰的路徑#第二種新版本配置方法kubeconfig_file: <filename> #指定kubeconfig集群引導配置文件路徑,kubeconfig文件會包含集群參數(ca證書、apiserver地址)和客戶端參數(客戶端證書和私鑰信息)#在K8S集群內以Pod形式部署的prometheus的認證配置tls_config:ca_file: /var/run/secrets/kubernetes.io/serviceaccount/ca.crt#第一種老版本配置方法bearer_token_file: /var/run/secrets/kubernetes.io/serviceaccount/token#第二種新版本配置方法authorization:credentials_file: /var/run/secrets/kubernetes.io/serviceaccount/token)


)


)


![CVE-2023-22515:Atlassian Confluence權限提升漏洞復現 [附POC]](http://pic.xiahunao.cn/CVE-2023-22515:Atlassian Confluence權限提升漏洞復現 [附POC])


起航)