pytest-bdd和behave是 Python 的兩個流行的 BDD 測試框架,兩者都可以用來編寫用戶故事和可執行的測試用例,
具體選擇哪一個則需要根據實際的項目狀況來看。
先簡單看一下兩者的功能:
pytest-bdd
- 基于
pytest測試框架,可以與pytest的其他功能(例如 fixtures)一起使用。 - 提供了一種緊湊的步驟定義方式,可以通過裝飾器定義并重復使用步驟。
- 支持參數化的測試,這樣可以用同一組步驟進行多組數據的測試。
behave
- 基于 Python 的
unittest測試框架。 behave的步驟文件更加接近純文本形式,對非編程人員更友好。- 支持使用
environment.py文件來定義在整個 test suite 運行前后需要進行的操作。
hehave
以下是behave的一些優點和特性:
-
適用于非技術團隊成員:使用 Gherkin 語言,可以撰寫更接近自然語言的測試場景描述,使得產品經理、商業分析師等非技術團隊成員也能夠理解、修改或編寫測試場景。
-
環境控制:
behave提供了在測試運行前后設置和清理環境的功能,例如數據庫初始化或數據清理等,只需要在environment.py文件里定義相應的函數即可。 -
可讀性強和可維護性高:
behave強調的是實現從用戶角度去描述系統行為的測試,這使得測試和實際用戶需求更加貼合,增加了測試的可讀性。而且將測試用例編寫為人類可讀的語言,可以提高代碼的可維護性。 -
創造可共享的步驟:可以為常用的操作創建可重用的步驟,這樣就能寫出更加簡潔、易于維護的測試代碼。
-
對標/兼容 Cucumber:
behave的 Gherkin 語言實現與寬廣使用的 Cucumber 測試框架非常接近,這一點在遷移到或從 Cucumber 環境中遷出時會很有用。 -
與其他 Python 測試框架相容:
behave可與unittest、doctest、nose、py.test等 Python 測試工具完美集成。
綜上所述,behave提供了一種高度可讀、可共享、適合大規模測試及非技術團隊成員的 BDD 測試工具。
pytest-bdd 與 behave的比較
behave和pytest-bdd都是 Python 下常用的為支持 BDD(行為驅動開發)流程而設計的測試框架,它們都采用.feature文件來描述行為,并使用相似的 Gherkin 語言語法進行描述。它們的.feature文件的格式大致上是相同的,但是在實際的使用和處理上可能會有一些細微差別。
以下是behave和pytest-bdd來處理.feature文件的一些細節差異:
-
Scenario 參數化:
behave使用Scenario Outline語法來實現參數化場景,而pytest-bdd使用Scenarios來實現參數化場景。在behave中,你必須定義 Examples 表格并在其中提供參數值, 而在pytest-bdd中,你可以簡單地用Scenarios讀取一個外部.feature文件。 -
裝飾器參數:在
pytest-bdd中,步驟裝飾器(例如@given、@when和@then)可以接受一個可選的解析器,用于從步驟文本中捕獲值。這樣,分析器可以為已經定義的步驟參數提供多個場景。
其他大部分方面,behave和pytest-bdd都是非常相似的,例如都支持Given、When和Then這樣的基本步驟,都允許在Background段落中定義在每個場景前都要運行的步驟,仍然允許你創建可重用的步驟定義。
綜上,behave和pytest-bdd處理.feature文件的方式非常相似,雖然在某些特性和實現上有些許差別。選哪個更多取決于個人或團隊需求。
pytest-bdd 與 behave的實例比較
接下來以一個具體的加法運算器為實例,初步演示兩者使用上的差異。
首先, 兩者的規格文件基本相同, 這里的文件名是 :calculator.feature,內容如下:
Feature: AdditionScenario: Add two numbersGiven I have a calculatorWhen I enter "1" and "2"Then the result should be "3"
規格很簡單, 就是驗證加法, 1+2 =3。
主要的差別是兩者在測試代碼上的差異。
使用pytest-bdd編寫的測試代碼的文件名是 test_calculator.py, 內容如下:
import sys
import os
import pytest
#sys.path.append('D:/devworkspace/python-ency/chp3/tests/bdd/util')
sys.path.append(os.path.join(os.path.dirname(os.path.dirname(os.path.dirname(__file__))), 'util'))
from calculator import Calculator
from pytest_bdd import scenario, given, when, then, parsers@scenario('../features/calculator.feature','Add two numbers')
def test_add():print(sys.path.append(os.path.dirname(os.path.dirname(__file__))+'util'))pass@pytest.fixture
@given("I have a calculator")
def calculator():return Calculator()@when(parsers.parse('I enter "{a}" and "{b}"'))
def enter_numbers(calculator, a, b):calculator.a = int(a)calculator.b = int(b)@then(parsers.parse('the result should be "{result}"'))
def verify_result(calculator, result):assert calculator.add(calculator.a, calculator.b) == int(result)
- pytest-bdd要求測試場景的函數和名稱需要以test_開頭, 步驟函數沒有特定的要求,關于 pytest-bdd的更多命名的規范可以參考: 基于pytest-bdd的項目目錄結構和命名規范
使用behave編寫的測試代碼的文件名同樣是 test_calculator.py, 內容如下:
import sys
import os
sys.path.append(os.path.join(os.path.dirname(os.path.dirname(os.path.dirname(os.path.dirname(__file__)))), 'util'))from behave import given, when, then
from calculator import Calculator@given('I have a calculator')
def step_impl(context):context.calc = Calculator()@when('I enter "{num1}" and "{num2}"')
def step_impl(context, num1, num2):context.result = context.calc.add(int(num1), int(num2))@then('the result should be "{expected_result}"')
def step_impl(context, expected_result):assert context.result == int(expected_result)
簡單對比一下兩者的測試代碼區別:
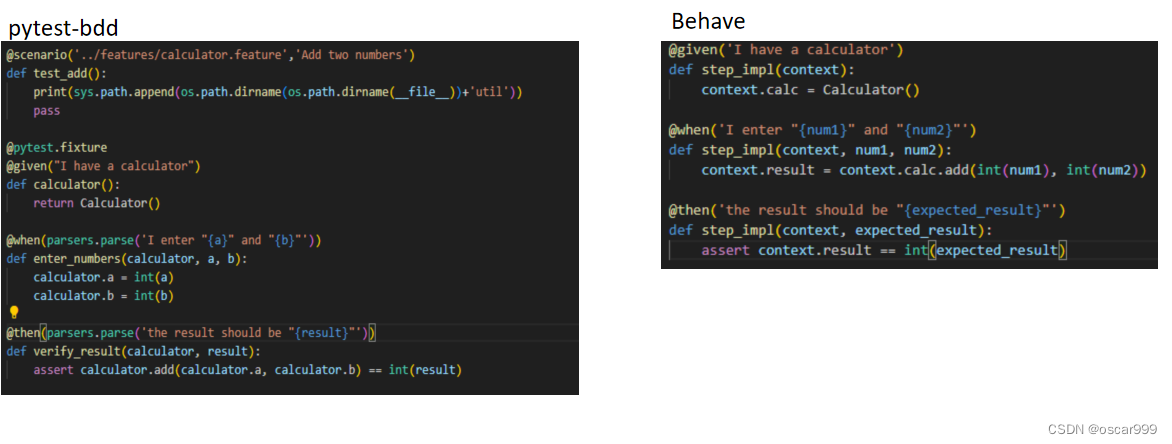
- Beave 的寫法相比更加簡潔
- pytest-bdd 可以手動關聯測試場景,看上去靈活度更高
總結
這兩個框架都有其優點和特性,選擇哪一個主要取決于特定需求。
- 如果你已經在使用
pytest,并且希望以最少的學習曲線使用 BDD,那么pytest-bdd可能是更好的選擇。 - 另一方面,如果你希望編寫的測試代碼更接近自然語言,并且適合非技術團隊成員閱讀和修改,那么
behave可能是更好的選擇。


)


)
)

