文章目錄
- 什么是過濾模塊
- Nginx相關數據結構介紹
- ngx_module_t的數據結構
- ngx_http_module_t數據結構
- ngx_command_s數據結構
- 相關宏定義
- filter(過濾器)實現
- Nginx模塊開發流程
- Nginx 模塊執行
- 具體實現流程
- create_loc_conf
- merge_loc_conf
- postconfiguration
- 修改header信息
- 修改body信息
- 示例代碼
- 編寫config文件
- 編譯模塊到Nginx源碼中
- 執行效果
- 總結
什么是過濾模塊
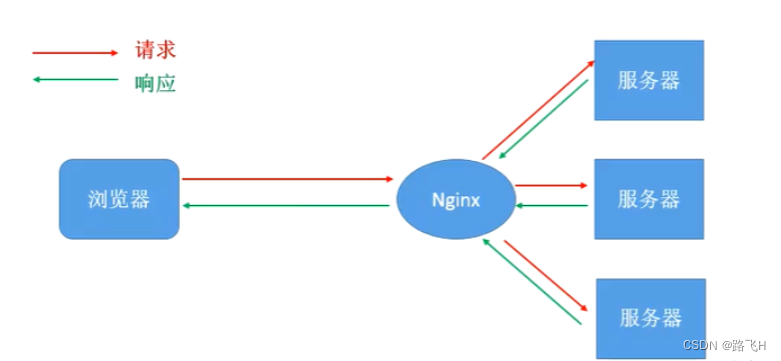
Nignx是一個代理服務器, 他前端被客戶端請求,后端連接服務器。這里涉及的數據處理大概有
- 客戶端請求數據,Nginx直接返回(handler 模塊)
- 客戶端請求數據,Nginx轉發給服務器(upstream 模塊)
- 服務器返回數據,Nginx轉發給客戶端(filter 模塊)
Nginx相關數據結構介紹
ngx_module_t的數據結構
struct ngx_module_s {ngx_uint_t            ctx_index; //是哪個進程ngx_uint_t            index;	//進程idchar                 *name;ngx_uint_t            spare0;ngx_uint_t            spare1;ngx_uint_t            version; //版本號const char           *signature; //簽名證書void                 *ctx;//上下文ngx_command_t        *commands;//命令ngx_uint_t            type;// nginx模塊類型ngx_int_t           (*init_master)(ngx_log_t *log);//ngx_int_t           (*init_module)(ngx_cycle_t *cycle); //模塊啟動時候ngx_int_t           (*init_process)(ngx_cycle_t *cycle); //進程啟動時候ngx_int_t           (*init_thread)(ngx_cycle_t *cycle);void                (*exit_thread)(ngx_cycle_t *cycle);void                (*exit_process)(ngx_cycle_t *cycle);void                (*exit_master)(ngx_cycle_t *cycle);uintptr_t             spare_hook0;uintptr_t             spare_hook1;uintptr_t             spare_hook2;uintptr_t             spare_hook3;uintptr_t             spare_hook4;uintptr_t             spare_hook5;uintptr_t             spare_hook6;uintptr_t             spare_hook7;
};
typedef struct ngx_module_s ngx_module_t;
ngx_http_module_t數據結構
typedef struct {void        **main_conf;void        **srv_conf;void        **loc_conf;
} ngx_http_conf_ctx_t;typedef struct {ngx_int_t   (*preconfiguration)(ngx_conf_t *cf);	// 解析配置文件之前ngx_int_t   (*postconfiguration)(ngx_conf_t *cf);	// 解析配置文件完成之后
// **_main_ **解析配置文件中http關鍵字的內部void       *(*create_main_conf)(ngx_conf_t *cf);	char       *(*init_main_conf)(ngx_conf_t *cf, void *conf);
// **_srv_ **解析配置文件中server關鍵字的內部void       *(*create_srv_conf)(ngx_conf_t *cf);	char       *(*merge_srv_conf)(ngx_conf_t *cf, void *prev, void *conf);
// **_loc_ **解析配置文件中location關鍵字的內部void       *(*create_loc_conf)(ngx_conf_t *cf);char       *(*merge_loc_conf)(ngx_conf_t *cf, void *prev, void *conf);
} ngx_http_module_t;
ngx_command_s數據結構
struct ngx_command_s {ngx_str_t             name;ngx_uint_t            type;char               *(*set)(ngx_conf_t *cf, ngx_command_t *cmd, void *conf);ngx_uint_t            conf;ngx_uint_t            offset;void                 *post;
};
相關宏定義
#define NGX_MODULE_V1                                                         \NGX_MODULE_UNSET_INDEX, NGX_MODULE_UNSET_INDEX,                           \NULL, 0, 0, nginx_version, NGX_MODULE_SIGNATURE#define NGX_MODULE_V1_PADDING  0, 0, 0, 0, 0, 0, 0, 0#define NGX_HTTP_MODULE           0x50545448   /* "HTTP" 模塊*//* 以下宏定義為了去確定該項配置屬于哪個類目下
比如service
比如location
*/
#define NGX_HTTP_MAIN_CONF        0x02000000
#define NGX_HTTP_SRV_CONF         0x04000000
#define NGX_HTTP_LOC_CONF         0x08000000
#define NGX_HTTP_UPS_CONF         0x10000000
#define NGX_HTTP_SIF_CONF         0x20000000
#define NGX_HTTP_LIF_CONF         0x40000000
#define NGX_HTTP_LMT_CONF         0x80000000
filter(過濾器)實現
Nginx模塊開發流程
(1)定義一個模塊名,ngx_module_t,選擇好http模塊NGX_HTTP_MODULE。
(2)定義cmd命令,有多少條cmd寫多少條cmd,ngx_command_t。
(3)定義用來解析http block,ngx_http_module_t。
(4)執行過程實現添加模塊。
Nginx 模塊執行
(1)初始化。當進程啟動的時候進行的模塊初始化。
(2)解析conf文件。解析conf文件中模塊的相關命令和設置。
(3)Nginx啟動之后,有命令或請求到來時,處理請求的流程。
開發模塊時,需要實現的主要是這三個流程的功能。
具體實現流程
create_loc_conf
內存池中分配一片kong空間,用以存儲配置文件中指令對應的值
// void       *(*create_loc_conf)(ngx_conf_t *cf);
// 解析conf文件location關鍵字之前的動作
void  *ngx_http_fly_filter_create_loc_conf(ngx_conf_t *cf)
{ngx_http_filter_conf_t *conf = ngx_palloc(cf->pool, sizeof(ngx_http_filter_conf_t));if (conf == NULL)return NULL;conf->enable = NGX_CONF_UNSET;return conf;
}
merge_loc_conf
char  *ngx_http_fly_filter_merge_loc_conf(ngx_conf_t *cf, void *parent, void *child)
{ngx_http_filter_conf_t *prev = (ngx_http_filter_conf_t*)parent;//如果prefix中是on,那么next->enable的值就為1,這個是在ngx_conf_set_flag_slot//函數中設置的,即可以理解為將配置//文件中的on或者off轉換為nginx內存中的1或者0ngx_http_filter_conf_t *next = (ngx_http_filter_conf_t*)child;ngx_conf_merge_value(next->enable, prev->enable, 0);return NGX_CONF_OK;
}
其中 ngx_conf_merge_value
#define ngx_conf_merge_value(conf, prev, default) \if (conf == NGX_CONF_UNSET) { \conf = (prev == NGX_CONF_UNSET) ? default : prev; \
postconfiguration
- 解析完畢conf文件后執行該指令,設置運行時候的回調函數
- 使用頭插法,將header_filter 與 body_filter插入filter隊列的頭部
// ngx_int_t   (*postconfiguration)(ngx_conf_t *cf);
// 解析完配置文件之后的動作,也就是解析完http關鍵字模塊之后
ngx_int_t ngx_http_fly_filter_init(ngx_conf_t *cf)
{// 模塊的初始化// http {  }// O->O->O->O// 多個模塊的頭插法,取出最前面的模塊//top指向第一個,next指向第二個ngx_http_next_header_filter = ngx_http_top_header_filter;ngx_http_top_header_filter = ngx_http_fly_header_filter;ngx_http_next_body_filter = ngx_http_top_body_filter;ngx_http_top_body_filter = ngx_http_fly_body_filter;return NGX_OK;
}
修改header信息
這里僅僅修改要回發的內容長度,由于修改了body內容,那么header中的length字段自然要做出相應的修改
static ngx_str_t prefix = ngx_string("<h2>FLY. </h2>");
ngx_int_t ngx_http_fly_header_filter(ngx_http_request_t *r) {if (r->headers_out.status != NGX_HTTP_OK) {// 不正常返回,則進行nextreturn ngx_http_next_header_filter(r);}//r->headers_out.content_type.len == sizeof("text/html")r->headers_out.content_length_n += prefix.len;return ngx_http_next_header_filter(r);
}
修改body信息
ngx_int_t ngx_http_fly_body_filter(ngx_http_request_t *r, ngx_chain_t *chain) {/** 關于ngx_chain_t:* 在nginx中,有一個數據鏈,存放要發送的數據。* O->O->O->O* 每次send的是ngx_chain_t中的一個ngx_buf_t*/// 添加一個chain bufferngx_buf_t *b = ngx_create_temp_buf(r->pool, prefix.len);b->start = b->pos = prefix.data;b->last = b->pos + prefix.len;ngx_chain_t *c1 = ngx_alloc_chain_link(r->pool);c1->buf = b;c1->next = chain;return ngx_http_next_body_filter(r, c1);}
示例代碼
這里主要實現了在返回的網頁中添加一個內容。里面在重點地方附上了詳細注釋。
ngx_http_filter_module.c
#include <ngx_config.h>
#include <ngx_http.h>
#include <ngx_core.h>typedef struct {ngx_flag_t enable;
}ngx_http_filter_conf_t;static ngx_str_t prefix = ngx_string("<h2>FLY. </h2>");static ngx_http_output_header_filter_pt  ngx_http_next_header_filter;
static ngx_http_output_body_filter_pt    ngx_http_next_body_filter;// ngx_int_t (*ngx_http_output_header_filter_pt)(ngx_http_request_t *r)
// 添加頭,header
ngx_int_t ngx_http_fly_header_filter(ngx_http_request_t *r) {if (r->headers_out.status != NGX_HTTP_OK) {// 不正常返回,則進行nextreturn ngx_http_next_header_filter(r);}//r->headers_out.content_type.len == sizeof("text/html")r->headers_out.content_length_n += prefix.len;return ngx_http_next_header_filter(r);
}// ngx_int_t (*ngx_http_output_body_filter_pt)(ngx_http_request_t *r, ngx_chain_t *chain)
// 添加內容,body
ngx_int_t ngx_http_fly_body_filter(ngx_http_request_t *r, ngx_chain_t *chain) {/** 關于ngx_chain_t:* 在nginx中,有一個數據鏈,存放要發送的數據。* O->O->O->O* 每次send的是ngx_chain_t中的一個ngx_buf_t*/// 添加一個chain bufferngx_buf_t *b = ngx_create_temp_buf(r->pool, prefix.len);b->start = b->pos = prefix.data;b->last = b->pos + prefix.len;ngx_chain_t *c1 = ngx_alloc_chain_link(r->pool);c1->buf = b;c1->next = chain;return ngx_http_next_body_filter(r, c1);}// ngx_int_t   (*postconfiguration)(ngx_conf_t *cf);
// 解析完配置文件之后的動作,也就是解析完http關鍵字模塊之后
ngx_int_t ngx_http_fly_filter_init(ngx_conf_t *cf)
{// 模塊的初始化// http {  }// O->O->O->O// 多個模塊的頭插法,取出最前面的模塊ngx_http_next_header_filter = ngx_http_top_header_filter;ngx_http_top_header_filter = ngx_http_fly_header_filter;ngx_http_next_body_filter = ngx_http_top_body_filter;ngx_http_top_body_filter = ngx_http_fly_body_filter;return NGX_OK;
}// void       *(*create_loc_conf)(ngx_conf_t *cf);
// 解析conf文件location關鍵字之前的動作
void  *ngx_http_fly_filter_create_loc_conf(ngx_conf_t *cf)
{ngx_http_filter_conf_t *conf = ngx_palloc(cf->pool, sizeof(ngx_http_filter_conf_t));if (conf == NULL)return NULL;conf->enable = NGX_CONF_UNSET;return conf;
}// char       *(*merge_loc_conf)(ngx_conf_t *cf, void *prev, void *conf);
// 解析完配置文件location關鍵字之后的動作
// 模塊可能在多個地方定義,這個函數合并所有的值一起使用
char  *ngx_http_fly_filter_merge_loc_conf(ngx_conf_t *cf, void *parent, void *child)
{ngx_http_filter_conf_t *prev = (ngx_http_filter_conf_t*)parent;ngx_http_filter_conf_t *next = (ngx_http_filter_conf_t*)child;// 合并enable的值ngx_conf_merge_value(next->enable, prev->enable, 0);return NGX_CONF_OK;
}/*
struct ngx_command_s {
ngx_str_t             name;
ngx_uint_t            type;
char               *(*set)(ngx_conf_t *cf, ngx_command_t *cmd, void *conf);
ngx_uint_t            conf;
ngx_uint_t            offset;
void                 *post;
};
*//*
// conf文件命令解析
char  *ngx_http_fly_filter_set_slot(ngx_conf_t *cf, ngx_command_t *cmd, void *conf)
{char *p = conf;// 對應 ngx_http_fly_filter_create_loc_conf函數的conf->enable = NGX_CONF_UNSET;ngx_flag_t *flag = (p + cmd->offset);return NGX_CONF_OK;
}
*/// conf文件中的每一行都是一個指令指令
ngx_command_t ngx_http_fly_filter_module_cmd[] = {{//命令名稱,比如listen,定義了就可以在conf文件中使用,注意不能和其他的起沖突ngx_string("predix"),// 指示name命令放的位置在哪里以及可以帶多少個參數,NGX_CONF_FLAGE表示開關標志// predix on/offNGX_HTTP_MAIN_CONF | NGX_HTTP_SRV_CONF | NGX_HTTP_LOC_CONF | NGX_CONF_FLAG,// 命令解析,可以使用nginx內部的也可以自己實現ngx_conf_set_flag_slot,//ngx_http_fly_filter_set_slot,NGX_HTTP_LOC_CONF_OFFSET,// offsetof獲取enable在結構體中的偏移位置offsetof(ngx_http_filter_conf_t,enable),NULL,},ngx_null_command
};// 用來解析對應的conf文件,其實表示的就是模塊定義中的上下文
static ngx_http_module_t ngx_http_fly_filter_module_ctx = {NULL,ngx_http_fly_filter_init,NULL,NULL,NULL,NULL,ngx_http_fly_filter_create_loc_conf,ngx_http_fly_filter_merge_loc_conf
};// 模塊定義
ngx_module_t ngx_http_fly_filter_module = {NGX_MODULE_V1,&ngx_http_fly_filter_module_ctx,ngx_http_fly_filter_module_cmd,// http的ascii值,指示是什么模塊NGX_HTTP_MODULE,NULL,NULL,NULL,NULL,NULL,NULL,NULL,NGX_MODULE_V1_PADDING	// 填充};
編寫config文件
創建:
touch config
內容:
ngx_addon_name=ngx_http_fly_filter_module
HTTP_FILTER_MODULES="$HTTP_FILTER_MODULES ngx_http_fly_filter_module"
NGX_ADDON_SRCS="$NGX_ADDON_SRCS $ngx_addon_dir/ngx_http_filter_module.c"
包含三部分信息,一個是模塊的名稱這里名稱需要與代碼中的定義的模塊名稱ngx_module_t一致;第二部分是指定模塊的類型和名稱,這里定義的是一個filter模塊;最后是指定模塊源文件路徑。
注意,config文件要和模塊的代碼在相同目錄。
編譯模塊到Nginx源碼中
(1)配置中添加模塊:
./configure --prefix=/usr/local/nginx --with-http_realip_module
--with-http_addition_module --with-http_gzip_static_module
--with-http_secure_link_module --with-http_stub_status_module
--with-stream --with-pcre=/home/fly/workspace/pcre-8.41
--with-zlib=/home/fly/workspace/zlib-1.2.11
--with-openssl=/home/fly/workspace/openssl-1.1.0g
--add-module=/mnt/hgfs/sourcecode_learning/ngx_http_filter_module
注意模塊路徑要正確。出現如下表示成功:
configuring additional modules
adding module in /mnt/hgfs/sourcecode_learning/ngx_http_filter_module+ ngx_http_fly_filter_module was configured
creating objs/Makefile
(2)查看是否添加模塊到動態代碼中:
vim objs/ngx_modules.c
(3)編譯:
make
sudo make install
執行效果
編譯安裝完成后,在conf文件中添加模塊的開關(predix on):
worker_processes 4;events {worker_connections 1024;
}http {upstream backend {server 192.168.7.146:8889;server 192.168.7.146:8890;}server {listen 8888;location / {proxy_pass http://backend;}}server {listen 8889;}server {listen 8890;predix on;}server {listen 8891;}
}
執行Nginx:
sudo /usr/local/nginx/sbin/nginx -c /usr/local/nginx/conf/fly.conf
在網頁輸入IP和端口,執行效果如下:
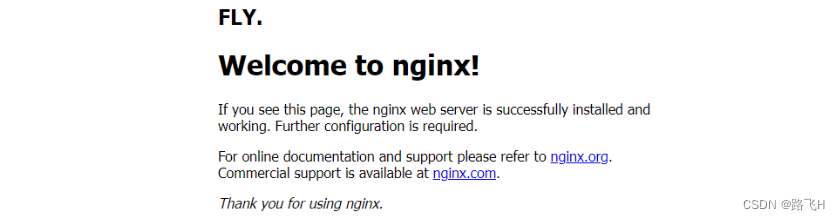
可以看到,返回的網頁中多出來添加的內容(FLY.)。
總結
- Nginx中http模塊非常多,每個模塊都會有ngx_http_module_t,為了防止解析過程出現沖突,Nginx編譯的時候會把所有的模塊都集中起來,組織到/obj/ngx_module.c(以數組的方式)。
- 在編譯模塊時,需要編寫config文件,這個文件最好不要使用筆記本編輯(notepad),容易造成編碼方式的錯誤。
- 網頁中常見的廣告(其實里面存儲了圖片、鏈接、名稱信息)等等其實就是通過nginx過濾器模塊去實現的。


輸入)


)


)


)
)

)
