????????一聽到三維的RTT(Render To Texture),似乎很神秘,但從底層實現一看,其實也就那樣,設計API的哪些頂級家伙已經幫你安排的明明白白了,咱們只需要學會怎么用就可以了。我認為得從WebGL入手,把整件事講明白就夠了。WebGL再下一層那是瀏覽器和硬件(顯卡)的事了,再再往下就到類似于“利用電器的物理特性”就到底了,這嚴重超出應用層該懂的范疇了。WebGL上層就是Cesium,我感覺Cesium就像是一只漂亮的大象,我就像是個盲人在摸。說的有些遠,接下來我主要闡述RTT的底層原理以及Cesium的實現,不想看原理的小伙伴可直接閱讀《三、實現》部分,等有時間了再回過頭來查看原理部分,我覺得我差不多講明白了。
一、效果
上面是渲染到Canvas,下面是渲染到紋理。
二、原理
要講原理,必須得提一嘴WebGL的常規渲染流程,Cesium是對WebGL的高級封裝,下圖是WebGL的渲染流程,同樣適用于Cesium。
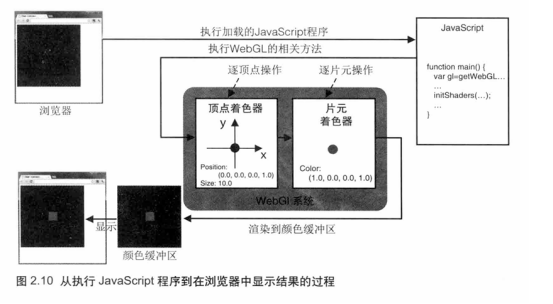
我們看到畫面的渲染順序是源碼程序->著色器處理->顏色緩存區->瀏覽器這么一個過程,著色器經過數據加載、圖元裝配、柵格化、深度隱藏等處理后,將數據扔進顏色緩存區,瀏覽器自動從顏色緩存區讀取數據并顯示到Canvas上,最后我們就看到畫面,這是常規的渲染流程。如果將著色器處理好的數據不扔進顏色緩存區,而是輸出到別的地方如作為Geometry紋理圖像或Canvas的ImageData呢?
針對這個需求,WebGL引入了FBO(frame buffer object)幀緩存區對象,FBO可以用來代替顏色緩存區或深度緩存區,如下圖所示:
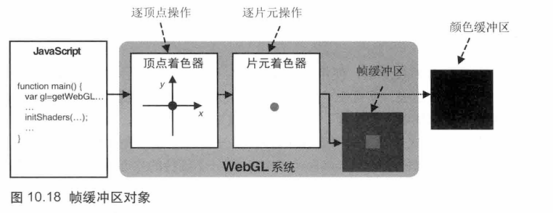
繪制到FBO中的數據不會直接被瀏覽器顯示出來,如何沒有后續的處理,它只是存在一塊內存中的數據而已,我們可以將這塊數據渲染到紋理(render to texture RTT),或者渲染到其他的Canvas上(離屏渲染)下一節講。如何將數據渲染到FBO里呢?我們先看看WebGL的實現:
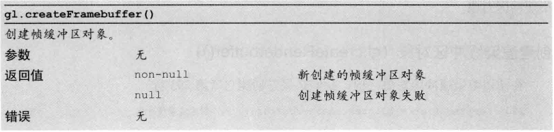
1.新建FBO。
2.切換到FBO。
上面提到了應為WebGL默認會把數據渲染到顏色緩存區,所以得需要切換到FBO。
3.繪制
該繪制什么就繪制什么,比如想繪制一個矩形,那就去do it,這時繪制的數據就存放到FBO里面了。
4.切回顏色緩存區
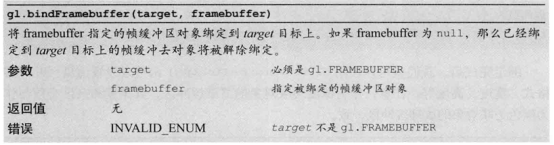
如果我想繪制到瀏覽器上顯示(顏色緩存區),那就需要調用gl.bindFramebuffer(gl.FRAMEBUFFER, null);,第二個參數傳空就好了。
有了以上的基礎,那么就有了渲染到紋理的實現思路:
- 創建FBO。
- 切換到FBO。
- 繪制一個物體A。
- 切回到顏色緩存區。
- 繪制另一個物體B(以物體A作為紋理)。
上面的第2、3、4、5都發生在一次DC當中,沒錯,這就是WebGL指南中所給出的例子:

一次繪制的過程
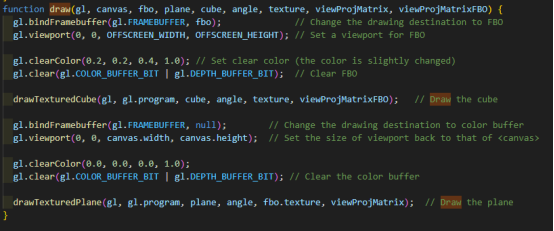
WebGL運行例子效果
這個例子是將一個帶紋理的正方體作為紋理繪制到一個平面上,具體代碼實現可查《WebGL編程指南》中第10章的FramebufferObject.html例子,如沒有《WebGL編程指南》的電子書和例子代碼的小伙伴可留言,我看到了就會發給你。
這里大概介紹一下WebGL創建FBO的過程:
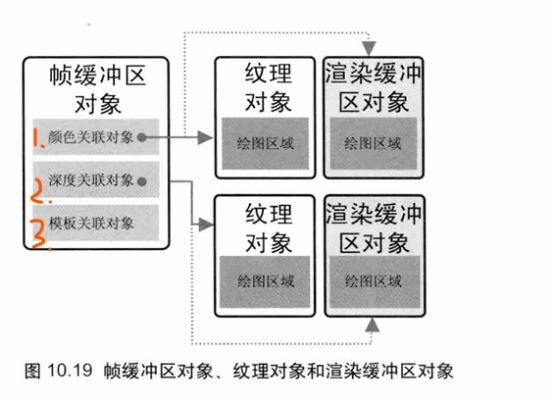
FBO包含了顏色關聯對象、深度關聯對象和模板關聯對象三個關聯對象,每個關聯對象又分為紋理對象和渲染緩存對象,如下圖所示他們的關系:
創建FBO的過程如下:
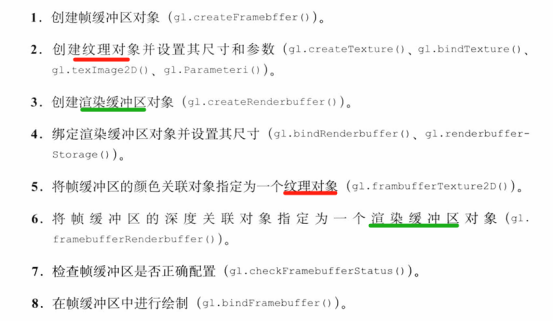
WebGL例子代碼
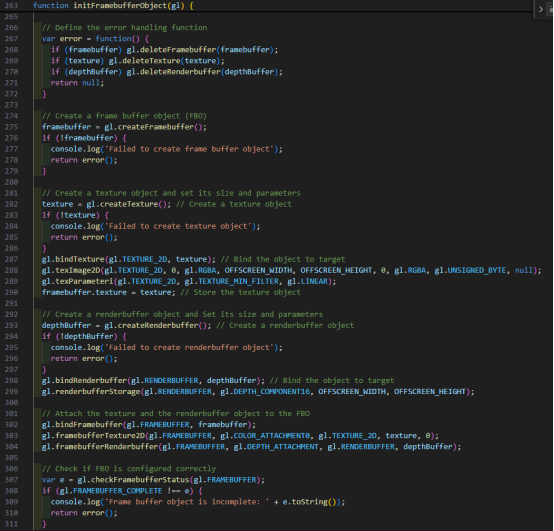
創建了一個紋理對象和一個渲染緩存區對象并指定給了FBO,此時一個FBO創建完畢并切換完成,渲染的數據就會流入的FBO中。
上面說了WebGL的實現,我們再看看Cesium的實現,大家知道Cesium是對WebGL的高級封裝,Cesium有單獨一個Framebuffer.js的文件封裝了FBO:
Framebuffer.js
import Check from "../Core/Check.js";
import defaultValue from "../Core/defaultValue.js";
import defined from "../Core/defined.js";
import destroyObject from "../Core/destroyObject.js";
import DeveloperError from "../Core/DeveloperError.js";
import PixelFormat from "../Core/PixelFormat.js";
import ContextLimits from "./ContextLimits.js";
import PixelDatatype from "./PixelDatatype.js";function attachTexture(framebuffer, attachment, texture) {const gl = framebuffer._gl;gl.framebufferTexture2D(gl.FRAMEBUFFER,attachment,texture._target,texture._texture,0);
}function attachRenderbuffer(framebuffer, attachment, renderbuffer) {const gl = framebuffer._gl;gl.framebufferRenderbuffer(gl.FRAMEBUFFER,attachment,gl.RENDERBUFFER,renderbuffer._getRenderbuffer());
}/*** Creates a framebuffer with optional initial color, depth, and stencil attachments.* Framebuffers are used for render-to-texture effects; they allow us to render to* textures in one pass, and read from it in a later pass.** @param {Object} options The initial framebuffer attachments as shown in the example below. <code>context</code> is required. The possible properties are <code>colorTextures</code>, <code>colorRenderbuffers</code>, <code>depthTexture</code>, <code>depthRenderbuffer</code>, <code>stencilRenderbuffer</code>, <code>depthStencilTexture</code>, <code>depthStencilRenderbuffer</code>, and <code>destroyAttachments</code>.** @exception {DeveloperError} Cannot have both color texture and color renderbuffer attachments.* @exception {DeveloperError} Cannot have both a depth texture and depth renderbuffer attachment.* @exception {DeveloperError} Cannot have both a depth-stencil texture and depth-stencil renderbuffer attachment.* @exception {DeveloperError} Cannot have both a depth and depth-stencil renderbuffer.* @exception {DeveloperError} Cannot have both a stencil and depth-stencil renderbuffer.* @exception {DeveloperError} Cannot have both a depth and stencil renderbuffer.* @exception {DeveloperError} The color-texture pixel-format must be a color format.* @exception {DeveloperError} The depth-texture pixel-format must be DEPTH_COMPONENT.* @exception {DeveloperError} The depth-stencil-texture pixel-format must be DEPTH_STENCIL.* @exception {DeveloperError} The number of color attachments exceeds the number supported.* @exception {DeveloperError} The color-texture pixel datatype is HALF_FLOAT and the WebGL implementation does not support the EXT_color_buffer_half_float extension.* @exception {DeveloperError} The color-texture pixel datatype is FLOAT and the WebGL implementation does not support the EXT_color_buffer_float or WEBGL_color_buffer_float extensions.** @example* // Create a framebuffer with color and depth texture attachments.* const width = context.canvas.clientWidth;* const height = context.canvas.clientHeight;* const framebuffer = new Framebuffer({*   context : context,*   colorTextures : [new Texture({*     context : context,*     width : width,*     height : height,*     pixelFormat : PixelFormat.RGBA*   })],*   depthTexture : new Texture({*     context : context,*     width : width,*     height : height,*     pixelFormat : PixelFormat.DEPTH_COMPONENT,*     pixelDatatype : PixelDatatype.UNSIGNED_SHORT*   })* });** @private* @constructor*/
function Framebuffer(options) {options = defaultValue(options, defaultValue.EMPTY_OBJECT);const context = options.context;//>>includeStart('debug', pragmas.debug);Check.defined("options.context", context);//>>includeEnd('debug');const gl = context._gl;const maximumColorAttachments = ContextLimits.maximumColorAttachments;this._gl = gl;this._framebuffer = gl.createFramebuffer();this._colorTextures = [];this._colorRenderbuffers = [];this._activeColorAttachments = [];this._depthTexture = undefined;this._depthRenderbuffer = undefined;this._stencilRenderbuffer = undefined;this._depthStencilTexture = undefined;this._depthStencilRenderbuffer = undefined;/*** When true, the framebuffer owns its attachments so they will be destroyed when* {@link Framebuffer#destroy} is called or when a new attachment is assigned* to an attachment point.** @type {Boolean}* @default true** @see Framebuffer#destroy*/this.destroyAttachments = defaultValue(options.destroyAttachments, true);// Throw if a texture and renderbuffer are attached to the same point.  This won't// cause a WebGL error (because only one will be attached), but is likely a developer error.//>>includeStart('debug', pragmas.debug);if (defined(options.colorTextures) && defined(options.colorRenderbuffers)) {throw new DeveloperError("Cannot have both color texture and color renderbuffer attachments.");}if (defined(options.depthTexture) && defined(options.depthRenderbuffer)) {throw new DeveloperError("Cannot have both a depth texture and depth renderbuffer attachment.");}if (defined(options.depthStencilTexture) &&defined(options.depthStencilRenderbuffer)) {throw new DeveloperError("Cannot have both a depth-stencil texture and depth-stencil renderbuffer attachment.");}//>>includeEnd('debug');// Avoid errors defined in Section 6.5 of the WebGL specconst depthAttachment =defined(options.depthTexture) || defined(options.depthRenderbuffer);const depthStencilAttachment =defined(options.depthStencilTexture) ||defined(options.depthStencilRenderbuffer);//>>includeStart('debug', pragmas.debug);if (depthAttachment && depthStencilAttachment) {throw new DeveloperError("Cannot have both a depth and depth-stencil attachment.");}if (defined(options.stencilRenderbuffer) && depthStencilAttachment) {throw new DeveloperError("Cannot have both a stencil and depth-stencil attachment.");}if (depthAttachment && defined(options.stencilRenderbuffer)) {throw new DeveloperError("Cannot have both a depth and stencil attachment.");}//>>includeEnd('debug');///////////////////////////////////////////////////////////////////this._bind();let texture;let renderbuffer;let i;let length;let attachmentEnum;if (defined(options.colorTextures)) {const textures = options.colorTextures;length = this._colorTextures.length = this._activeColorAttachments.length =textures.length;//>>includeStart('debug', pragmas.debug);if (length > maximumColorAttachments) {throw new DeveloperError("The number of color attachments exceeds the number supported.");}//>>includeEnd('debug');for (i = 0; i < length; ++i) {texture = textures[i];//>>includeStart('debug', pragmas.debug);if (!PixelFormat.isColorFormat(texture.pixelFormat)) {throw new DeveloperError("The color-texture pixel-format must be a color format.");}if (texture.pixelDatatype === PixelDatatype.FLOAT &&!context.colorBufferFloat) {throw new DeveloperError("The color texture pixel datatype is FLOAT and the WebGL implementation does not support the EXT_color_buffer_float or WEBGL_color_buffer_float extensions. See Context.colorBufferFloat.");}if (texture.pixelDatatype === PixelDatatype.HALF_FLOAT &&!context.colorBufferHalfFloat) {throw new DeveloperError("The color texture pixel datatype is HALF_FLOAT and the WebGL implementation does not support the EXT_color_buffer_half_float extension. See Context.colorBufferHalfFloat.");}//>>includeEnd('debug');attachmentEnum = this._gl.COLOR_ATTACHMENT0 + i;attachTexture(this, attachmentEnum, texture);this._activeColorAttachments[i] = attachmentEnum;this._colorTextures[i] = texture;}}if (defined(options.colorRenderbuffers)) {const renderbuffers = options.colorRenderbuffers;length = this._colorRenderbuffers.length = this._activeColorAttachments.length =renderbuffers.length;//>>includeStart('debug', pragmas.debug);if (length > maximumColorAttachments) {throw new DeveloperError("The number of color attachments exceeds the number supported.");}//>>includeEnd('debug');for (i = 0; i < length; ++i) {renderbuffer = renderbuffers[i];attachmentEnum = this._gl.COLOR_ATTACHMENT0 + i;attachRenderbuffer(this, attachmentEnum, renderbuffer);this._activeColorAttachments[i] = attachmentEnum;this._colorRenderbuffers[i] = renderbuffer;}}if (defined(options.depthTexture)) {texture = options.depthTexture;//>>includeStart('debug', pragmas.debug);if (texture.pixelFormat !== PixelFormat.DEPTH_COMPONENT) {throw new DeveloperError("The depth-texture pixel-format must be DEPTH_COMPONENT.");}//>>includeEnd('debug');attachTexture(this, this._gl.DEPTH_ATTACHMENT, texture);this._depthTexture = texture;}if (defined(options.depthRenderbuffer)) {renderbuffer = options.depthRenderbuffer;attachRenderbuffer(this, this._gl.DEPTH_ATTACHMENT, renderbuffer);this._depthRenderbuffer = renderbuffer;}if (defined(options.stencilRenderbuffer)) {renderbuffer = options.stencilRenderbuffer;attachRenderbuffer(this, this._gl.STENCIL_ATTACHMENT, renderbuffer);this._stencilRenderbuffer = renderbuffer;}if (defined(options.depthStencilTexture)) {texture = options.depthStencilTexture;//>>includeStart('debug', pragmas.debug);if (texture.pixelFormat !== PixelFormat.DEPTH_STENCIL) {throw new DeveloperError("The depth-stencil pixel-format must be DEPTH_STENCIL.");}//>>includeEnd('debug');attachTexture(this, this._gl.DEPTH_STENCIL_ATTACHMENT, texture);this._depthStencilTexture = texture;}if (defined(options.depthStencilRenderbuffer)) {renderbuffer = options.depthStencilRenderbuffer;attachRenderbuffer(this, this._gl.DEPTH_STENCIL_ATTACHMENT, renderbuffer);this._depthStencilRenderbuffer = renderbuffer;}this._unBind();
}Object.defineProperties(Framebuffer.prototype, {/*** The status of the framebuffer. If the status is not WebGLConstants.FRAMEBUFFER_COMPLETE,* a {@link DeveloperError} will be thrown when attempting to render to the framebuffer.* @memberof Framebuffer.prototype* @type {Number}*/status: {get: function () {this._bind();const status = this._gl.checkFramebufferStatus(this._gl.FRAMEBUFFER);this._unBind();return status;},},numberOfColorAttachments: {get: function () {return this._activeColorAttachments.length;},},depthTexture: {get: function () {return this._depthTexture;},},depthRenderbuffer: {get: function () {return this._depthRenderbuffer;},},stencilRenderbuffer: {get: function () {return this._stencilRenderbuffer;},},depthStencilTexture: {get: function () {return this._depthStencilTexture;},},depthStencilRenderbuffer: {get: function () {return this._depthStencilRenderbuffer;},},/*** True if the framebuffer has a depth attachment.  Depth attachments include* depth and depth-stencil textures, and depth and depth-stencil renderbuffers.  When* rendering to a framebuffer, a depth attachment is required for the depth test to have effect.* @memberof Framebuffer.prototype* @type {Boolean}*/hasDepthAttachment: {get: function () {return !!(this.depthTexture ||this.depthRenderbuffer ||this.depthStencilTexture ||this.depthStencilRenderbuffer);},},
});Framebuffer.prototype._bind = function () {const gl = this._gl;gl.bindFramebuffer(gl.FRAMEBUFFER, this._framebuffer);
};Framebuffer.prototype._unBind = function () {const gl = this._gl;gl.bindFramebuffer(gl.FRAMEBUFFER, null);
};Framebuffer.prototype.bindDraw = function () {const gl = this._gl;gl.bindFramebuffer(gl.DRAW_FRAMEBUFFER, this._framebuffer);
};Framebuffer.prototype.bindRead = function () {const gl = this._gl;gl.bindFramebuffer(gl.READ_FRAMEBUFFER, this._framebuffer);
};Framebuffer.prototype._getActiveColorAttachments = function () {return this._activeColorAttachments;
};Framebuffer.prototype.getColorTexture = function (index) {//>>includeStart('debug', pragmas.debug);if (!defined(index) || index < 0 || index >= this._colorTextures.length) {throw new DeveloperError("index is required, must be greater than or equal to zero and must be less than the number of color attachments.");}//>>includeEnd('debug');return this._colorTextures[index];
};Framebuffer.prototype.getColorRenderbuffer = function (index) {//>>includeStart('debug', pragmas.debug);if (!defined(index) ||index < 0 ||index >= this._colorRenderbuffers.length) {throw new DeveloperError("index is required, must be greater than or equal to zero and must be less than the number of color attachments.");}//>>includeEnd('debug');return this._colorRenderbuffers[index];
};Framebuffer.prototype.isDestroyed = function () {return false;
};Framebuffer.prototype.destroy = function () {if (this.destroyAttachments) {// If the color texture is a cube map face, it is owned by the cube map, and will not be destroyed.let i = 0;const textures = this._colorTextures;let length = textures.length;for (; i < length; ++i) {const texture = textures[i];if (defined(texture)) {texture.destroy();}}const renderbuffers = this._colorRenderbuffers;length = renderbuffers.length;for (i = 0; i < length; ++i) {const renderbuffer = renderbuffers[i];if (defined(renderbuffer)) {renderbuffer.destroy();}}this._depthTexture = this._depthTexture && this._depthTexture.destroy();this._depthRenderbuffer =this._depthRenderbuffer && this._depthRenderbuffer.destroy();this._stencilRenderbuffer =this._stencilRenderbuffer && this._stencilRenderbuffer.destroy();this._depthStencilTexture =this._depthStencilTexture && this._depthStencilTexture.destroy();this._depthStencilRenderbuffer =this._depthStencilRenderbuffer &&this._depthStencilRenderbuffer.destroy();}this._gl.deleteFramebuffer(this._framebuffer);return destroyObject(this);
};
export default Framebuffer;
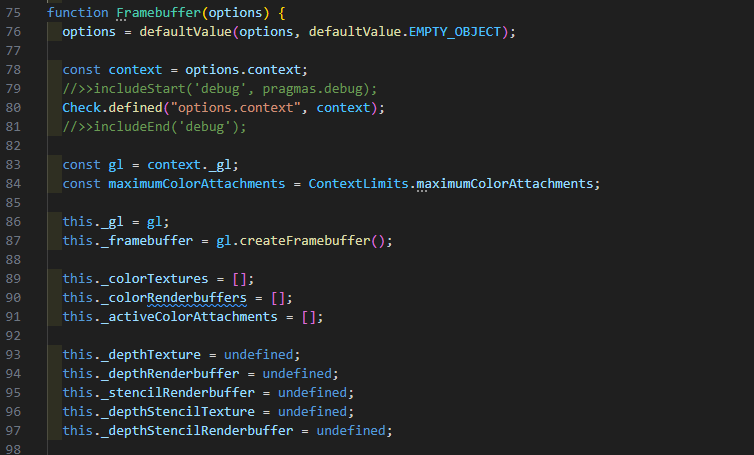
這源碼有點長,我們只看構造函數,一開始定義了
顏色的紋理對象和渲染緩存區對象
深度的紋理對象和渲染緩存區對象
模板的紋理對象和渲染緩存區對象
看的出來這和WebGL的FBO的簡創建過程相呼應,繼續往下看發現在一堆數據的校驗過后切換到FBO:
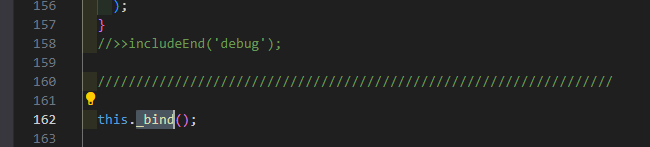

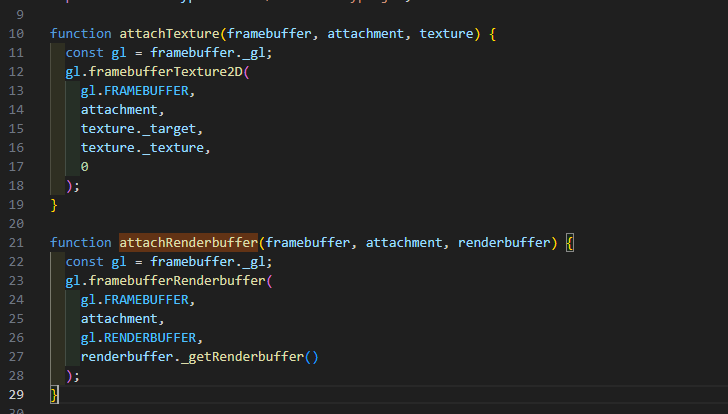
可見FBO切換的時機在Framebuffer的構造中就完成了,再往下看發現后面多次調用下面這個兩個函數為FBO的顏色關聯對象和深度關聯對象的紋理對象和渲染緩存區對象指定對象:
當我們簡單的?new Cesium.Framebuffer({...})的時候,就完成了上文提交的WebGL中的FBO創建的過程。
到這里關于底層的原理部分就寫完了,讓我喘口氣,又是截圖又是配解說詞的,快冒煙了(-:
三、實現
上面的原理解說,我們再來簡單看看Cesium是如何來完成上面這個過程的,Cesium渲染到紋理分為以下四個步驟:
1、創建幾何體
這里我創建一個矩形primitive,用于展示FBO渲染到紋理的效果
let geometryInstance = new Cesium.GeometryInstance({geometry: new Cesium.RectangleGeometry({rectangle: Cesium.Rectangle.fromDegrees(120.0,30.0,125.0,33.0),height: 1000,}),attributes: {color: Cesium.ColorGeometryInstanceAttribute.fromColor(Cesium.Color.BLUE),},});var appearance = new Cesium.MaterialAppearance({material: new Cesium.Material({fabric: {uniforms: {textureRTT: "/data/300.png",},source: `czm_material czm_getMaterial(czm_materialInput materialInput) {czm_material material = czm_getDefaultMaterial(materialInput);vec2 v_st = materialInput.st;vec4 textColor = texture2D(textureRTT, v_st);material.diffuse =textColor.rgb;material.alpha = 1.0;return material;}`,},translucent: true}),translucent: true,flat: true,faceForward: false});this.viewer.scene.primitives.add(new Cesium.Primitive({geometryInstances: geometryInstance,appearance: appearance,}));
2、創建FBO
createFrameBuffer(context) {let framebuffer = new Cesium.Framebuffer({context: context,colorTextures: [new Cesium.Texture({context: context,width: context.drawingBufferWidth,height: context.drawingBufferHeight,pixelFormat: Cesium.PixelFormat.RGBA,}),]});return framebuffer;}3、渲染到FBO
renderToFbo(fbo, scene) {const frameState = scene._frameState;const context = scene.context;const us = context.uniformState;const view = scene._defaultView;scene._view = view;scene.updateFrameState();frameState.passes.render = true;frameState.passes.postProcess = scene.postProcessStages.hasSelected;frameState.tilesetPassState = scene.renderTilesetPassState;let backgroundColor = Cesium.defaultValue(scene.backgroundColor, Cesium.Color.BLACK);if (scene._hdr) {backgroundColor = Cesium.Color.clone(backgroundColor, scene.scratchBackgroundColor);backgroundColor.red = Cesium.Math.pow(backgroundColor.red, scene.gamma);backgroundColor.green = Cesium.Math.pow(backgroundColor.green, scene.gamma);backgroundColor.blue = Cesium.Math.pow(backgroundColor.blue, scene.gamma);}frameState.backgroundColor = backgroundColor;frameState.atmosphere = scene.atmosphere;scene.fog.update(frameState);us.update(frameState);const shadowMap = scene.shadowMap;if (Cesium.defined(shadowMap) && shadowMap.enabled) {if (!Cesium.defined(scene.light) || scene.light instanceof Cesium.SunLight) {// Negate the sun direction so that it is from the Sun, not to the SunCesium.Cartesian3.negate(us.sunDirectionWC, scene._shadowMapCamera.direction);} else {Cesium.Cartesian3.clone(scene.light.direction, scene._shadowMapCamera.direction);}frameState.shadowMaps.push(shadowMap);}scene._computeCommandList.length = 0;scene._overlayCommandList.length = 0;const viewport = view.viewport;viewport.x = 0;viewport.y = 0;viewport.width = context.drawingBufferWidth;viewport.height = context.drawingBufferHeight;const passState = view.passState;passState.framebuffer = fbo;passState.blendingEnabled = undefined;passState.scissorTest = undefined;passState.viewport = Cesium.BoundingRectangle.clone(viewport, passState.viewport);if (Cesium.defined(scene.globe)) {scene.globe.beginFrame(frameState);}scene.updateEnvironment();scene.updateAndExecuteCommands(passState, backgroundColor);scene.resolveFramebuffers(passState);passState.framebuffer = undefined;//executeOverlayCommands(scene, passState);if (Cesium.defined(scene.globe)) {scene.globe.endFrame(frameState);if (!scene.globe.tilesLoaded) {scene._renderRequested = true;}}context.endFrame();scene.globe.show = true;}4、將FBO作為紋理賦值給幾何體
let colorTexture = Cesium.Texture.fromFramebuffer({context: this.viewer.scene.context,framebuffer: fbo})appearance.material.uniforms.textureRTT = colorTexture;通過上面四個步驟,最終在矩形幾何體上顯示出了當前場景,我們看到任何東西,不管它如何的復雜、如何的高深莫測,它都是離不開核心的東西,所謂萬變不離其宗,Cesium是基于WebGL封裝的,所以它再怎么封裝、再怎么抽象都離不開底層原理的。Cesium作為一款出色的大象,我們得慢慢的摸它。
如沒有《WebGL編程指南》的電子書和例子代碼同學請留言,我看到了會第一時間發給你。
碼字不易,請各位看官點個贊+關注,我會持續分享一些實用的東西。

方式導入 C++動態庫.dll方法總結)

入庫管理)


——判斷推理(重點回顧))


洛谷 P13551 ももいろの鍵 題解)
.)


