一、AJAX
1.AJAX概念
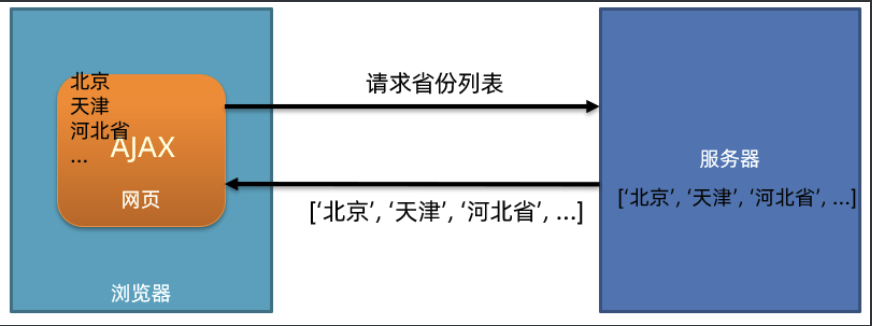
使瀏覽器的XMLHttpRequest對象與服務器通信
瀏覽器網頁中,使用 AJAX技術(XHR對象)發起獲取省份列表數據的請求,服務器代碼響應準備好的省份列表數據給前端,前端拿到數據數組以后,展示到網頁
<!DOCTYPE html>
<html lang="en"><head><meta charset="UTF-8"><meta http-equiv="X-UA-Compatible" content="IE=edge"><meta name="viewport" content="width=device-width, initial-scale=1.0"><title>AJAX概念和axios使用</title>
</head><body><!--axios庫地址:https://cdn.jsdelivr.net/npm/axios/dist/axios.min.js省份數據地址:http://hmajax.itheima.net/api/province目標: 使用axios庫, 獲取省份列表數據, 展示到頁面上1. 引入axios庫--><p class="my-p"></p><script src="https://cdn.jsdelivr.net/npm/axios/dist/axios.min.js"></script><script>// 2. 使用axios函數axios({url: 'http://hmajax.itheima.net/api/province'}).then(result => {console.log(result)// 好習慣:多打印,確認屬性名console.log(result.data.list)console.log(result.data.list.join('<br>'))// 把準備好省份列表,插入到頁面document.querySelector('.my-p').innerHTML = result.data.list.join('<br>') })</script>
</body></html>
2.URL
概念:URL即統一資源定位符,簡稱網址,用于定位網絡中的資源(資源指的是:網頁、圖片、數據、視頻、音頻等等)
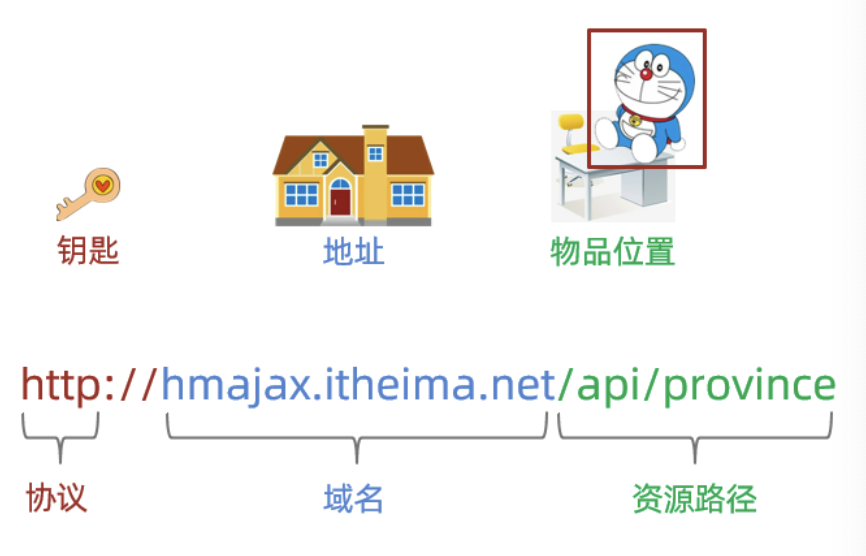
組成:協議、域名、資源路徑
http協議:超文本傳輸協議,規定了瀏覽器和服務器傳遞數據的格式
域名:標記服務器在互聯網當中的方位,網絡中有很多服務器,你想訪問哪一臺,就需要知道它的域名才可以
資源路徑:一個服務器內有多個資源,用于標識你要訪問的資源具體的位置
3.查詢參數
什么是查詢參數 ?
-
攜帶給服務器額外信息,獲得對應數據(讓服務器返回我想要的某一部分數據而不是全部數據)
-
舉例:查詢河北省下屬的城市列表,需要先把河北省傳遞給服務器
查詢參數語法:
-
在 url 網址后面用?拼接格式:XXXX?參數名1=值1&參數名2=值2
-
參數名一般是后端規定的,值前端看情況傳遞即可
axios如何攜帶查詢參數:
通過params選項
axios({url: '目標資源地址',params: {參數名: 值}
}).then(result => {// 對服務器返回的數據做后續處理
})
4.案例-查詢地區列表
鞏固查詢參數的使用,并查看多對查詢參數如何傳遞
<!DOCTYPE html>
<html lang="en"><head><meta charset="UTF-8" /><meta http-equiv="X-UA-Compatible" content="IE=edge" /><meta name="viewport" content="width=device-width, initial-scale=1.0" /><title>案例_地區查詢</title><linkrel="stylesheet"href="https://cdn.jsdelivr.net/npm/bootstrap@5.1.3/dist/css/bootstrap.min.css"/><style>:root {font-size: 15px;}body {padding-top: 15px;}</style></head><body><div class="container"><form id="editForm" class="row"><!-- 輸入省份名字 --><div class="mb-3 col"><label class="form-label">省份名字</label><inputtype="text"value="北京"name="province"class="form-control province"placeholder="請輸入省份名稱"/></div><!-- 輸入城市名字 --><div class="mb-3 col"><label class="form-label">城市名字</label><inputtype="text"value="北京市"name="city"class="form-control city"placeholder="請輸入城市名稱"/></div></form><button type="button" class="btn btn-primary sel-btn">查詢</button><br /><br /><p>地區列表:</p><ul class="list-group"><!-- 示例地區 --><li class="list-group-item">東城區</li></ul></div><script src="https://cdn.jsdelivr.net/npm/axios/dist/axios.min.js"></script><script>/*獲取地區列表: http://hmajax.itheima.net/api/area查詢參數:pname: 省份或直轄市名字cname: 城市名字*/// 目標: 根據省份和城市名字, 查詢地區列表// 1. 查詢按鈕-點擊事件document.querySelector(".sel-btn").addEventListener("click", () => {// 2. 獲取省份和城市名字let pname = document.querySelector(".province").value;let cname = document.querySelector(".city").value;// 3. 基于axios請求地區列表數據axios({url: "http://hmajax.itheima.net/api/area",params: {pname,cname,},}).then((result) => {// console.log(result)// 4. 把數據轉li標簽插入到頁面上let list = result.data.list;console.log(list);let theLi = list.map((areaName) => `<li class="list-group-item">${areaName}</li>`).join("");console.log(theLi);document.querySelector(".list-group").innerHTML = theLi;});});</script></body>
</html>
5.常用請求方法和數據提交
請求方法是一些固定單詞的英文,例如:GET,POST,PUT,DELETE,PATCH(這些都是http協議規定的),每個單詞對應一種對服務器資源要執行的操作
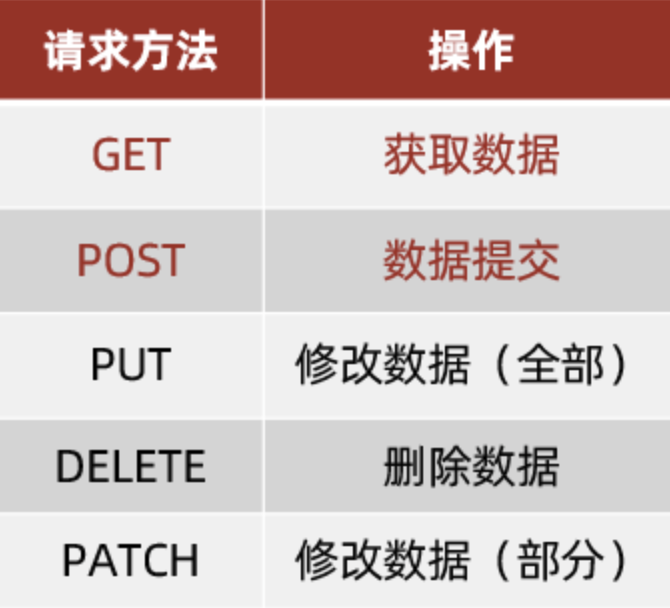
1. 請求方法表明對服務器資源的操作, 最為常用 的2個是?
? POST 提交數據, GET 查詢數據
2. axios 的核心配置?
? url:請求 URL 網址
? method :請求方法, GET 可以省略(不區分大小寫)
? params:查詢參數
? data :提交數據
axios({url: '目標資源地址',method: '請求方法',data: {參數名: 值}
}).then(result => {// 對服務器返回的數據做后續處理
})
6.axios錯誤處理
如果注冊相同的用戶名,則會遇到注冊失敗的請求,也就是 axios 請求響應失敗了,你會在控制臺看到如圖的錯誤:
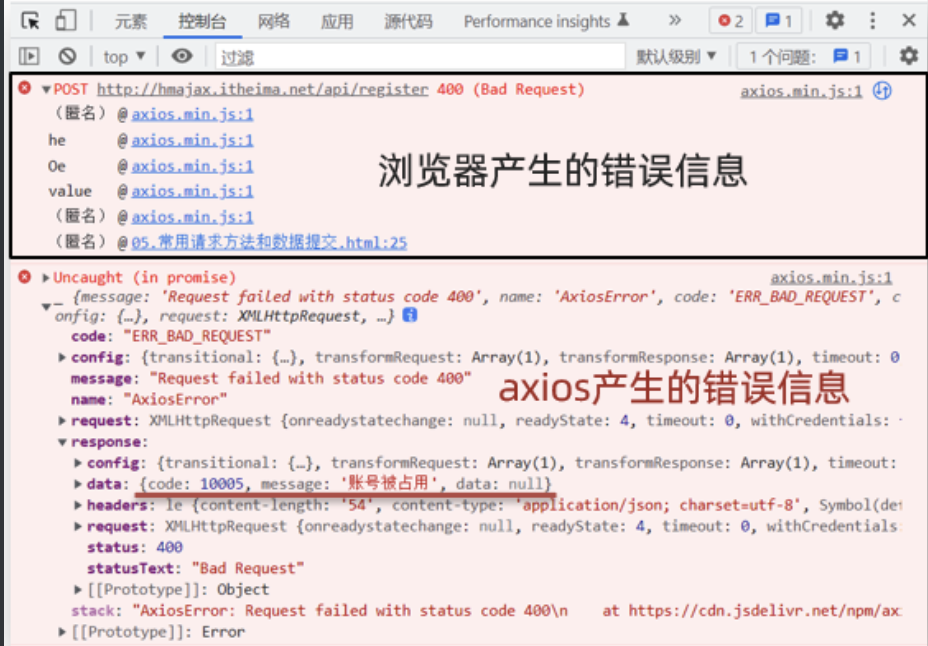
語法:在 then 方法的后面,通過點語法調用 catch 方法,傳入 回調函數 并定義 形參
使用 axios 的 catch 方法,捕獲這次請求響應的錯誤并做后續處理,語法如下:
axios({// ...請求選項
}).then(result => {// 處理成功數據
}).catch(error => {// 處理失敗錯誤
})
document.querySelector('.btn').addEventListener('click', () => {axios({url: 'http://hmajax.itheima.net/api/register',method: 'post',data: {username: 'itheima007',password: '7654321'}}).then(result => {// 成功console.log(result)}).catch(error => {// 失敗// 處理錯誤信息console.log(error)console.log(error.response.data.message)alert(error.response.data.message)})
})7.HTTP協議-報文
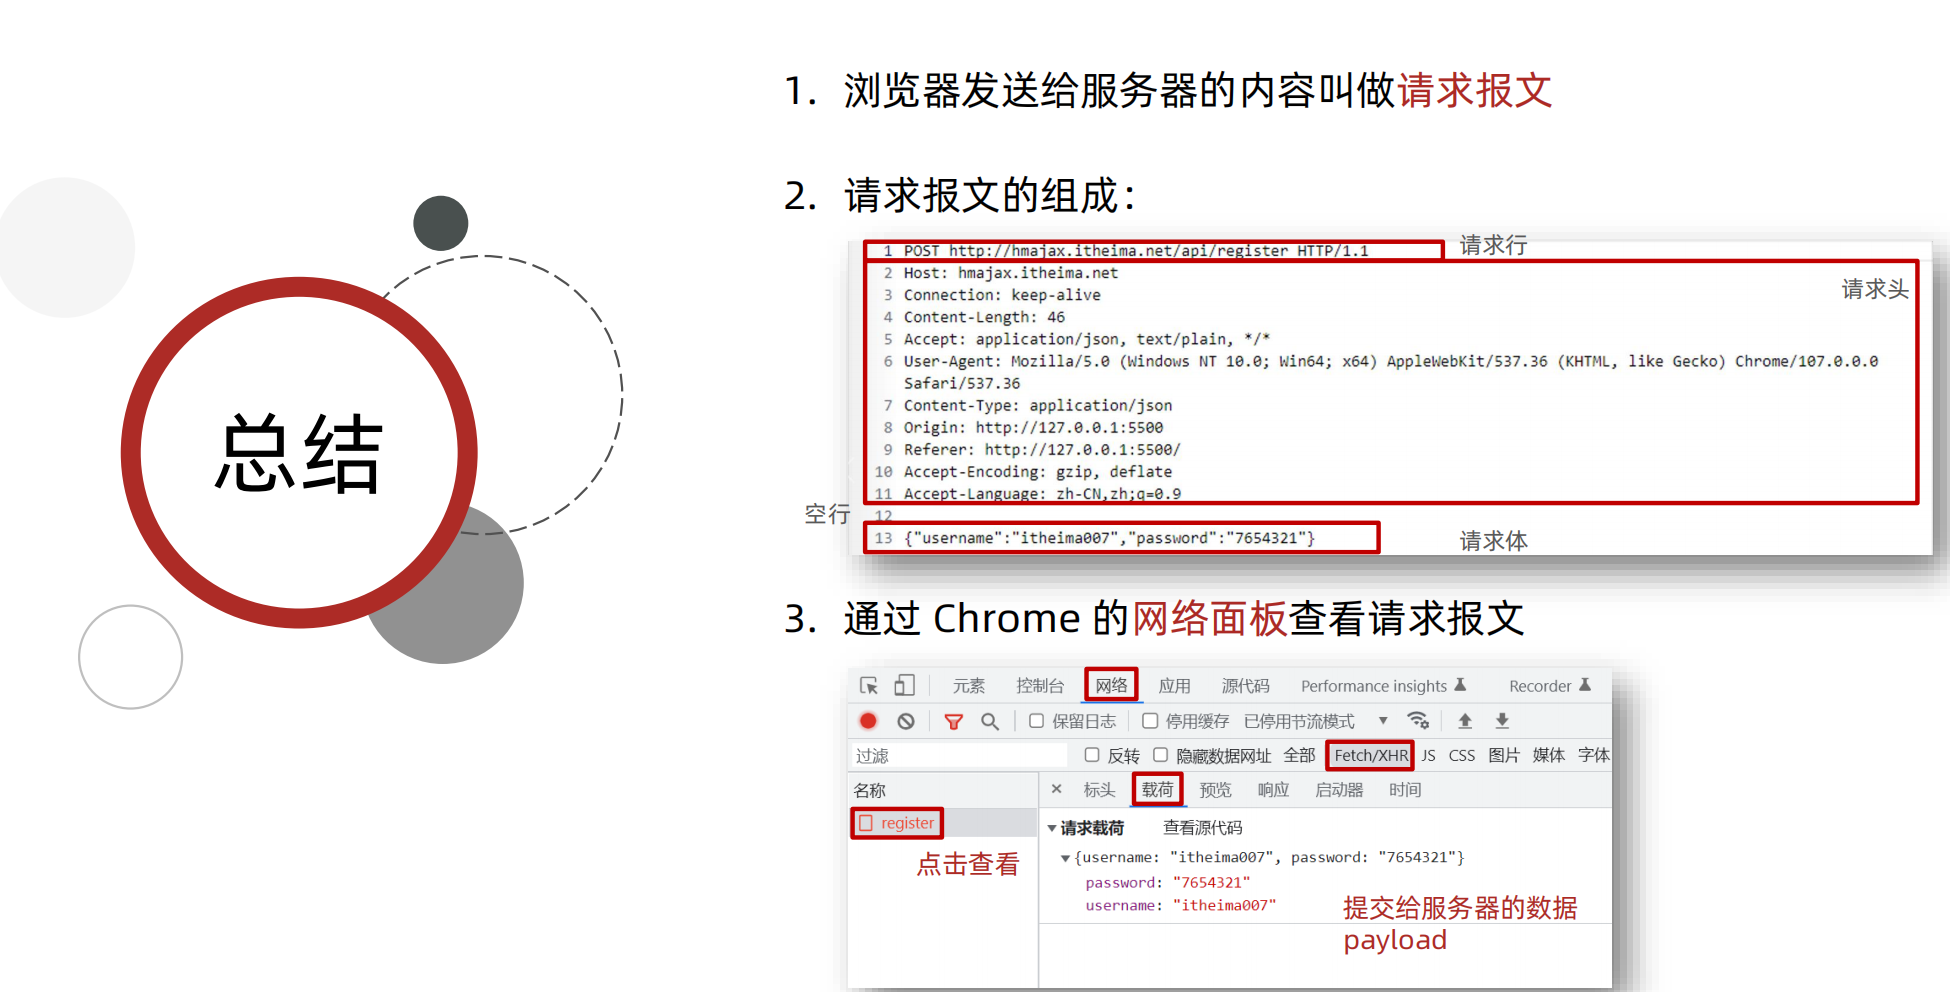
請求報文的組成部分有:
1. 請求行:請求方法,URL ,協議
2. 請求頭: 以鍵值對的格式攜帶的附加信息,比如: Content-Type
3. 空行:分隔請求頭,空行之后的是發送給服務器的資源
4. 請求體:發送的資源
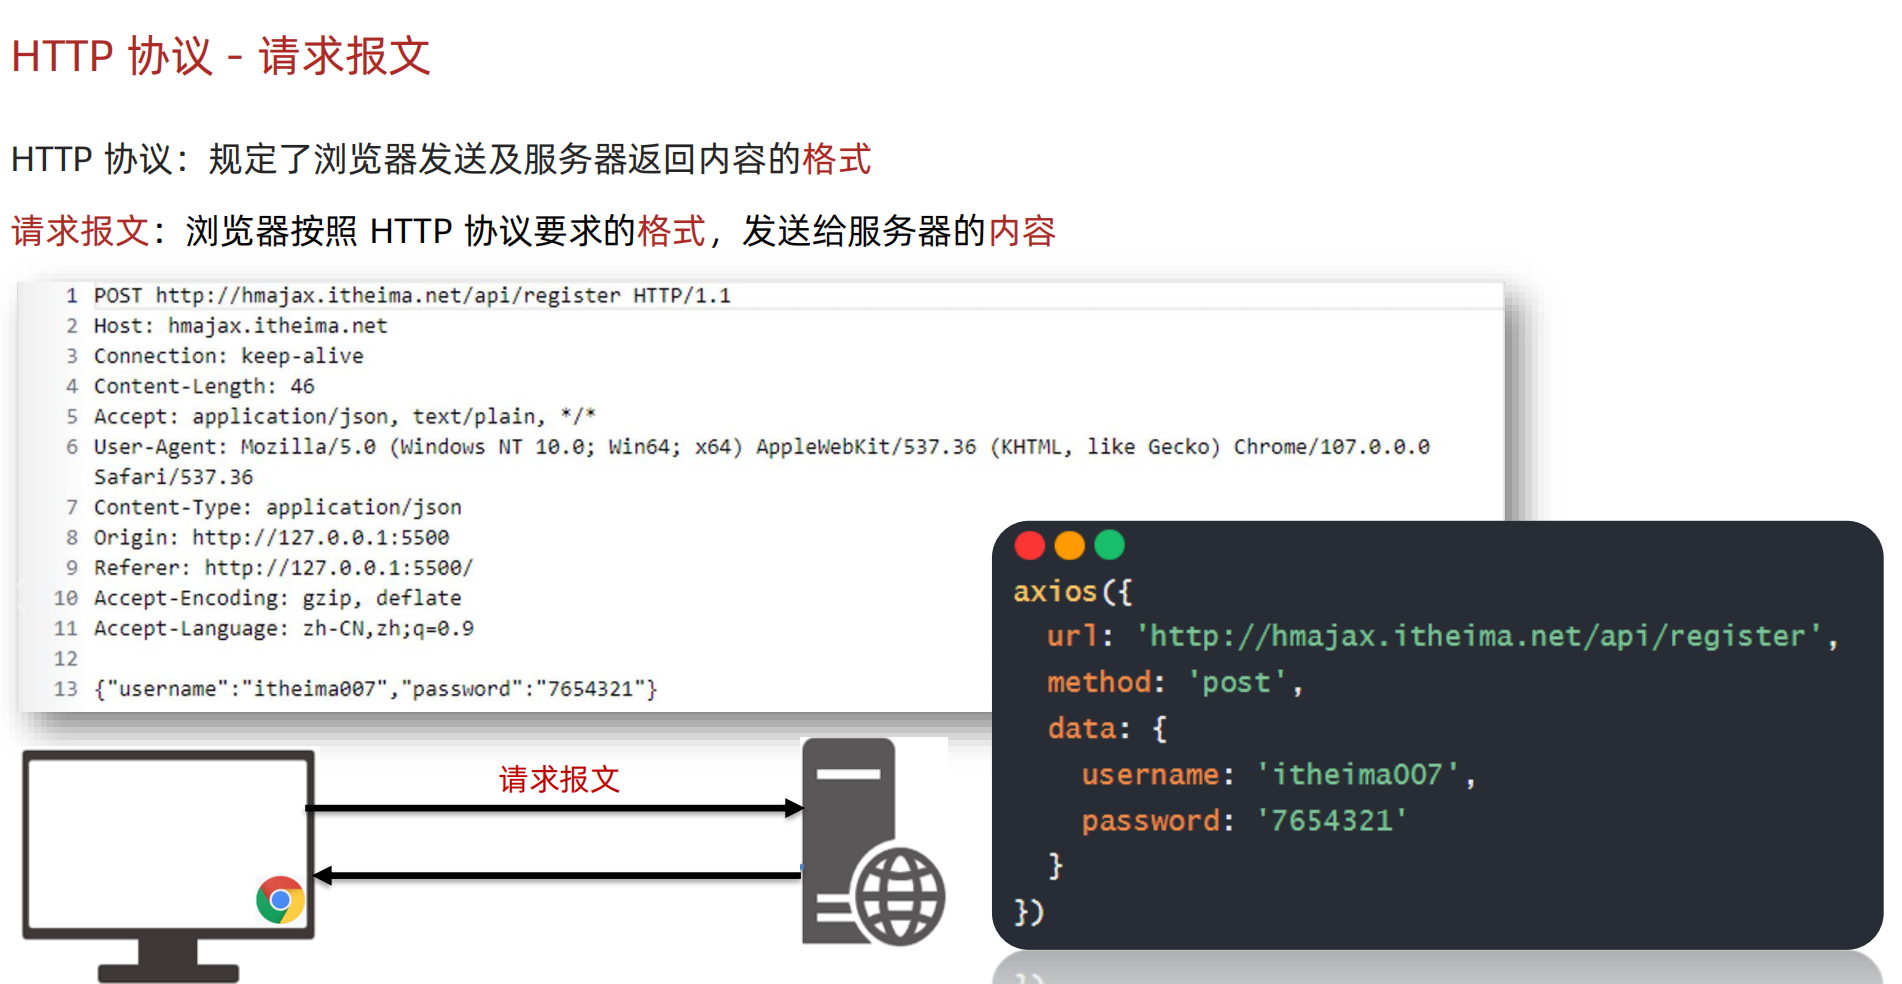
HTTP 協議:規定了瀏覽器發送及服務器返回內容的 格式
響應報文 :服務器按照 HTTP 協議要求的 格式 , 返回給瀏覽器的 內容
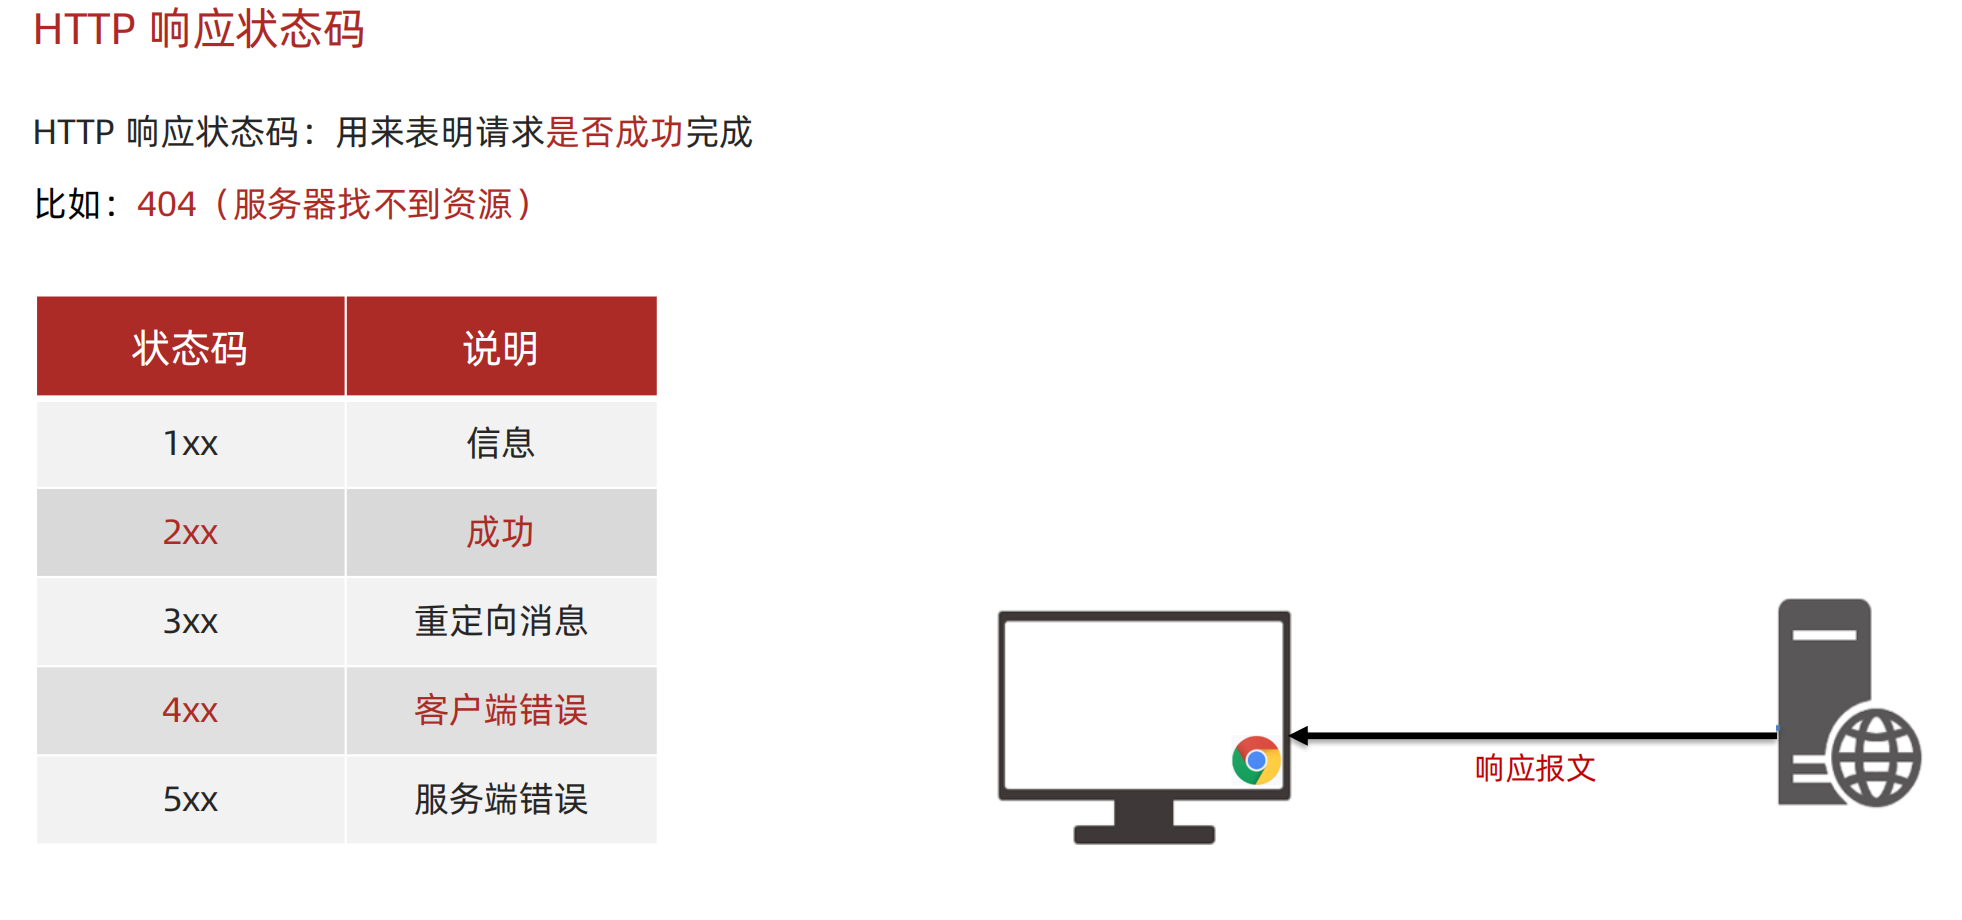
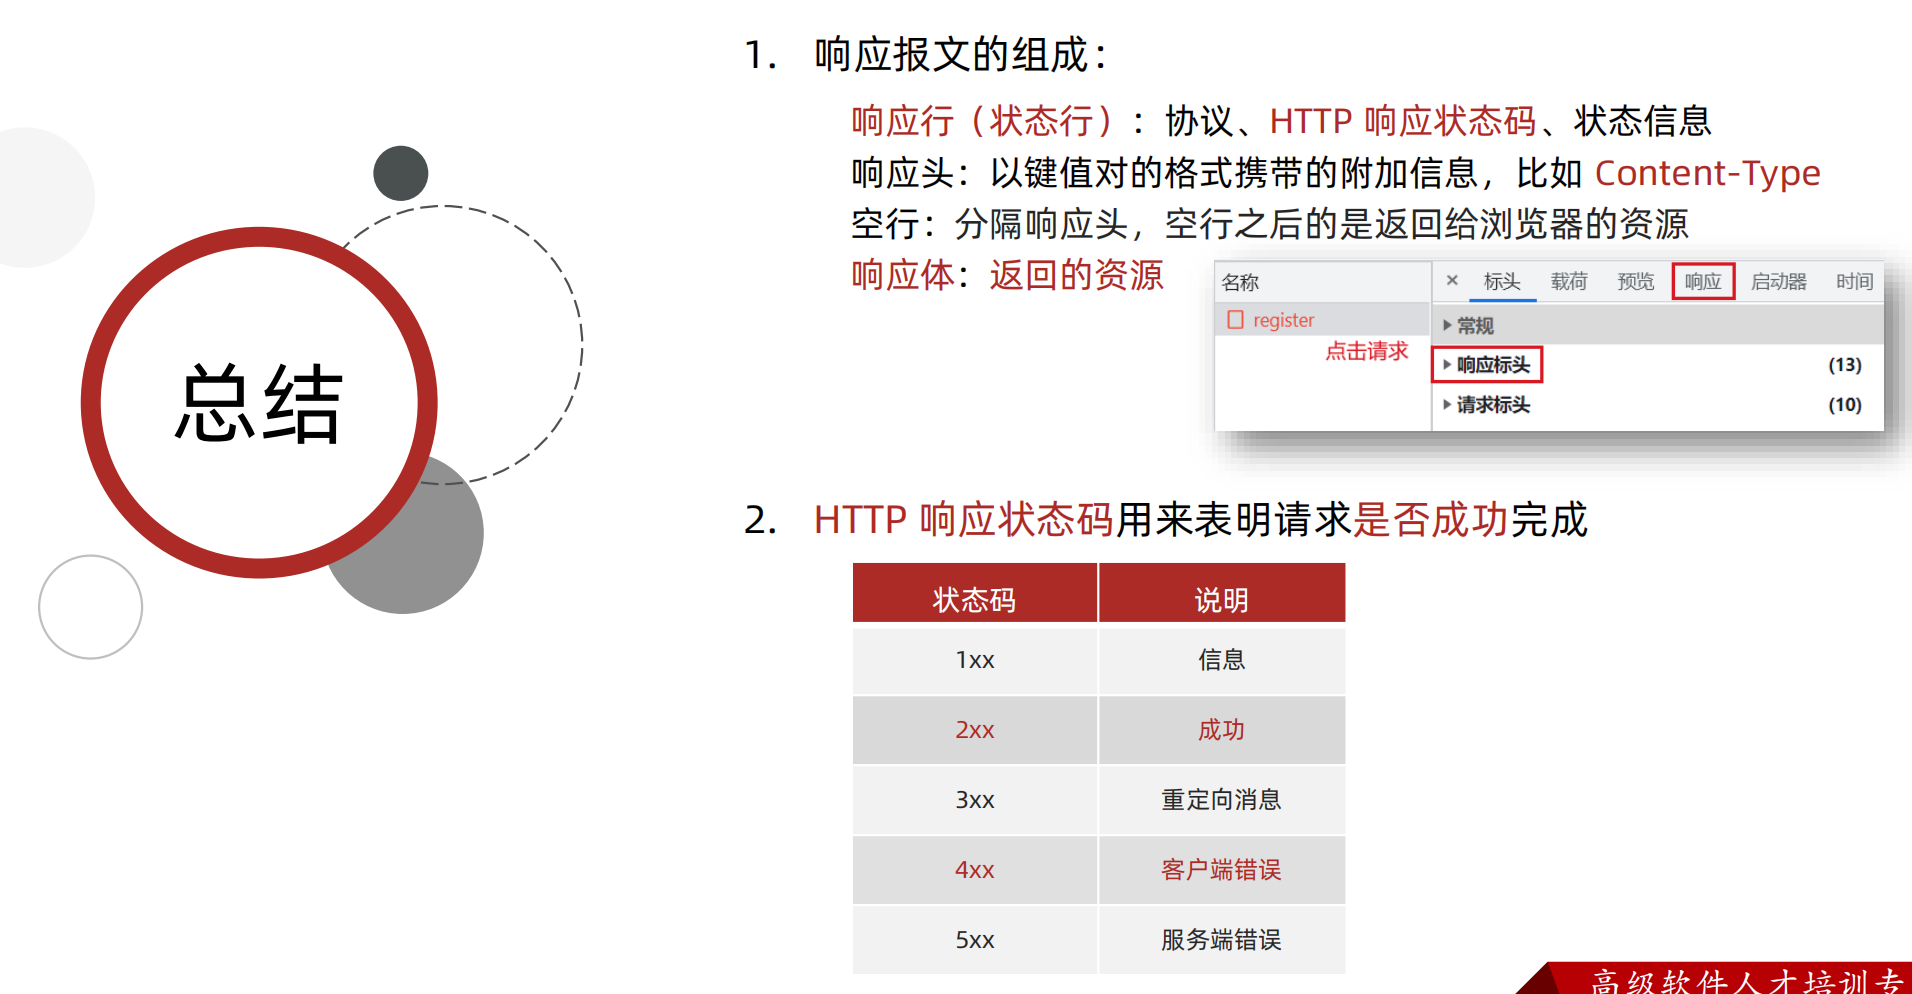
響應行(狀態行) :協議、 HTTP 響應狀態碼 、狀態信息
響應頭 :以鍵值對的格式攜帶的附加信息,比如: Content-Type
空行:分隔響應頭,空行之后的是服務器返回的資源
響應體 : 返回的資源
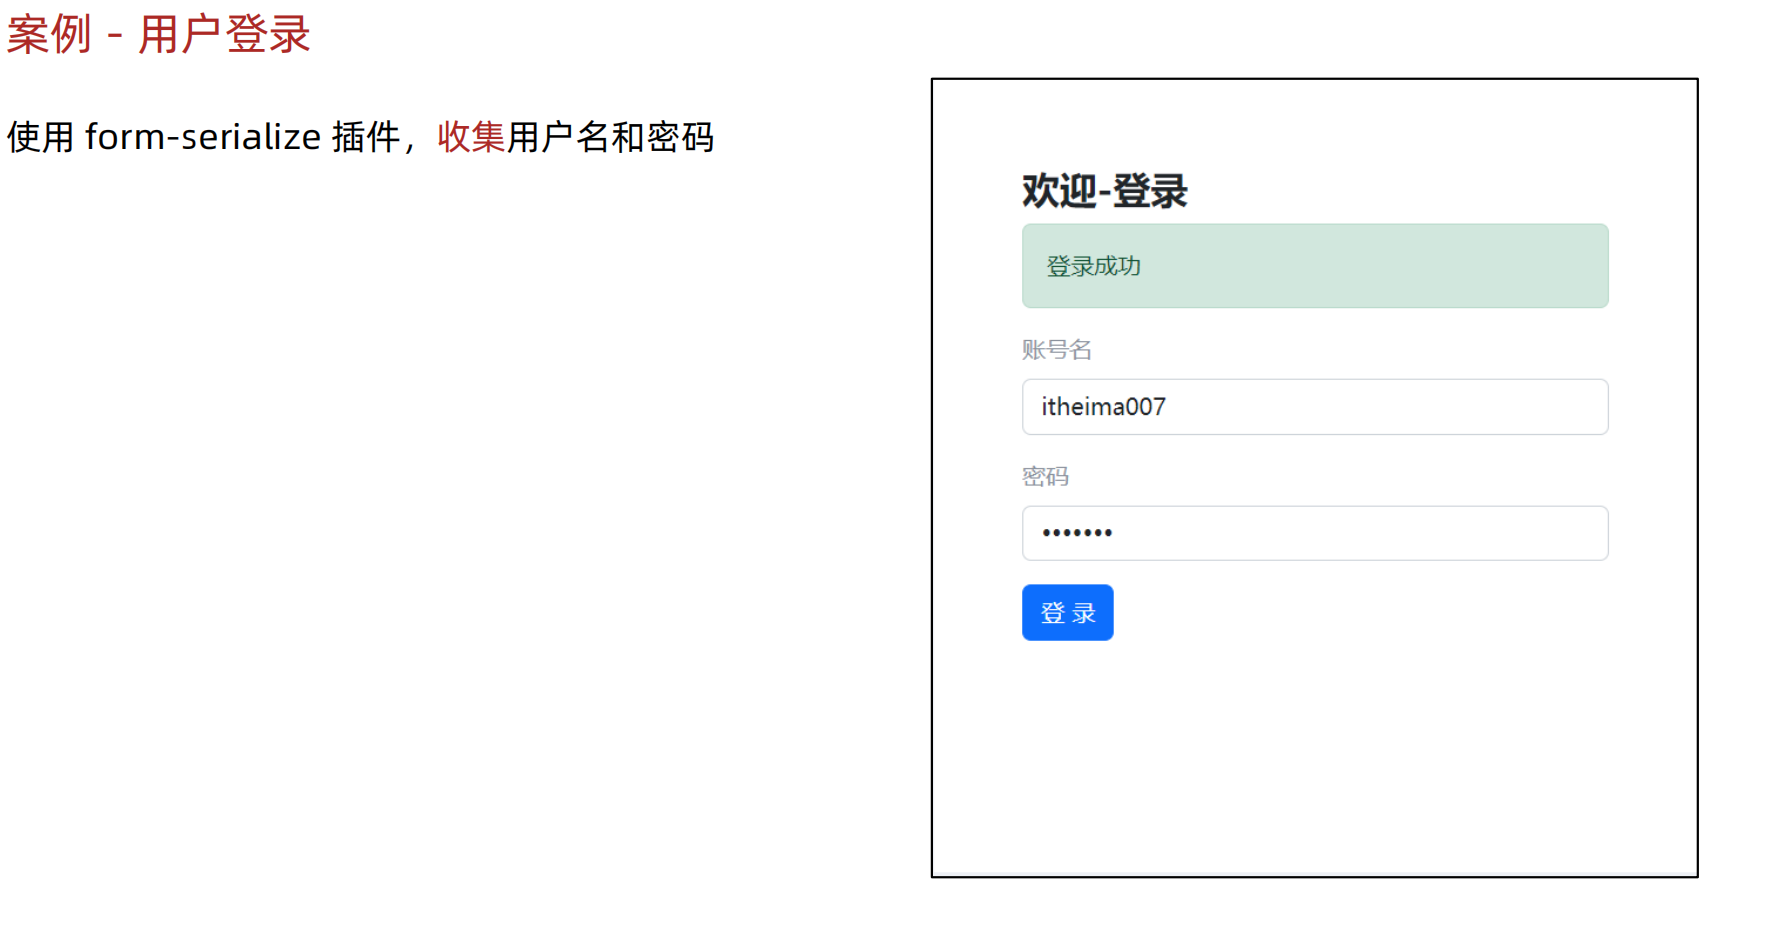
8.案例-登陸
<!DOCTYPE html>
<html lang="en"><head><meta charset="UTF-8"><meta http-equiv="X-UA-Compatible" content="IE=edge"><meta name="viewport" content="width=device-width, initial-scale=1.0"><title>案例_登錄</title><!-- 引入bootstrap.css --><link rel="stylesheet" href="https://cdn.jsdelivr.net/npm/bootstrap@5.2.2/dist/css/bootstrap.min.css"><!-- 公共 --><style>html,body {background-color: #EDF0F5;width: 100%;height: 100%;display: flex;justify-content: center;align-items: center;}.container {width: 520px;height: 540px;background-color: #fff;padding: 60px;box-sizing: border-box;}.container h3 {font-weight: 900;}</style><!-- 表單容器和內容 --><style>.form_wrap {color: #8B929D !important;}.form-text {color: #8B929D !important;}</style><!-- 提示框樣式 --><style>.alert {transition: .5s;opacity: 0;}.alert.show {opacity: 1;}</style>
</head><body><div class="container"><h3>歡迎-登錄</h3><!-- 登錄結果-提示框 --><div class="alert alert-success" role="alert">提示消息</div><!-- 表單 --><div class="form_wrap"><form><div class="mb-3"><label for="username" class="form-label">賬號名</label><input type="text" class="form-control username"></div><div class="mb-3"><label for="password" class="form-label">密碼</label><input type="password" class="form-control password"></div><button type="button" class="btn btn-primary btn-login"> 登 錄 </button></form></div></div><script src="https://cdn.jsdelivr.net/npm/axios/dist/axios.min.js"></script><script>// 目標1:點擊登錄時,用戶名和密碼長度判斷,并提交數據和服務器通信// 1.1 登錄-點擊事件document.querySelector('.btn-login').addEventListener('click', () => {// 1.2 獲取用戶名和密碼const username = document.querySelector('.username').valueconst password = document.querySelector('.password').value// console.log(username, password)// 1.3 判斷長度if (username.length < 8) {console.log('用戶名必須大于等于8位')return // 阻止代碼繼續執行}if (password.length < 6) {console.log('密碼必須大于等于6位')return // 阻止代碼繼續執行}// 1.4 基于axios提交用戶名和密碼// console.log('提交數據到服務器')axios({url: 'http://hmajax.itheima.net/api/login',method: 'POST',data: {username,password}}).then(result => {console.log(result)console.log(result.data.message)}).catch(error => {console.log(error)console.log(error.response.data.message)})})</script>
</body></html>
9.案例-登陸-提示信息
<!DOCTYPE html>
<html lang="en"><head><meta charset="UTF-8"><meta http-equiv="X-UA-Compatible" content="IE=edge"><meta name="viewport" content="width=device-width, initial-scale=1.0"><title>案例_登錄_提示消息</title><!-- 引入bootstrap.css --><link rel="stylesheet" href="https://cdn.jsdelivr.net/npm/bootstrap@5.2.2/dist/css/bootstrap.min.css"><!-- 公共 --><style>html,body {background-color: #EDF0F5;width: 100%;height: 100%;display: flex;justify-content: center;align-items: center;}.container {width: 520px;height: 540px;background-color: #fff;padding: 60px;box-sizing: border-box;}.container h3 {font-weight: 900;}</style><!-- 表單容器和內容 --><style>.form_wrap {color: #8B929D !important;}.form-text {color: #8B929D !important;}</style><!-- 提示框樣式 --><style>.alert {transition: .5s;opacity: 0;}.alert.show {opacity: 1;}</style>
</head><body><div class="container"><h3>歡迎-登錄</h3><!-- 登錄結果-提示框 --><div class="alert alert-success" role="alert">提示消息</div><!-- 表單 --><div class="form_wrap"><form><div class="mb-3"><label for="username" class="form-label">賬號名</label><input type="text" class="form-control username"></div><div class="mb-3"><label for="password" class="form-label">密碼</label><input type="password" class="form-control password"></div><button type="button" class="btn btn-primary btn-login"> 登 錄 </button></form></div></div><script src="https://cdn.jsdelivr.net/npm/axios/dist/axios.min.js"></script><script>// 目標1:點擊登錄時,用戶名和密碼長度判斷,并提交數據和服務器通信// 目標2:使用提示框,反饋提示消息// 2.1 獲取提示框const myAlert = document.querySelector('.alert')/*** 2.2 封裝提示框函數,重復調用,滿足提示需求* 功能:* 1. 顯示提示框* 2. 不同提示文字msg,和成功綠色失敗紅色isSuccess(true成功,false失敗)* 3. 過2秒后,讓提示框自動消失*/function alertFn(msg, isSuccess) {// 1> 顯示提示框myAlert.classList.add('show')// 2> 實現細節myAlert.innerText = msgconst bgStyle = isSuccess ? 'alert-success' : 'alert-danger'myAlert.classList.add(bgStyle)// 3> 過2秒隱藏setTimeout(() => {myAlert.classList.remove('show')// 提示:避免類名沖突,重置背景色myAlert.classList.remove(bgStyle)}, 2000)}// 1.1 登錄-點擊事件document.querySelector('.btn-login').addEventListener('click', () => {// 1.2 獲取用戶名和密碼const username = document.querySelector('.username').valueconst password = document.querySelector('.password').value// console.log(username, password)// 1.3 判斷長度if (username.length < 8) {alertFn('用戶名必須大于等于8位', false)console.log('用戶名必須大于等于8位')return // 阻止代碼繼續執行}if (password.length < 6) {alertFn('密碼必須大于等于6位', false)console.log('密碼必須大于等于6位')return // 阻止代碼繼續執行}// 1.4 基于axios提交用戶名和密碼// console.log('提交數據到服務器')axios({url: 'http://hmajax.itheima.net/api/login',method: 'POST',data: {username,password}}).then(result => {alertFn(result.data.message, true)console.log(result)console.log(result.data.message)}).catch(error => {alertFn(error.response.data.message, false)console.log(error)console.log(error.response.data.message)})})</script>
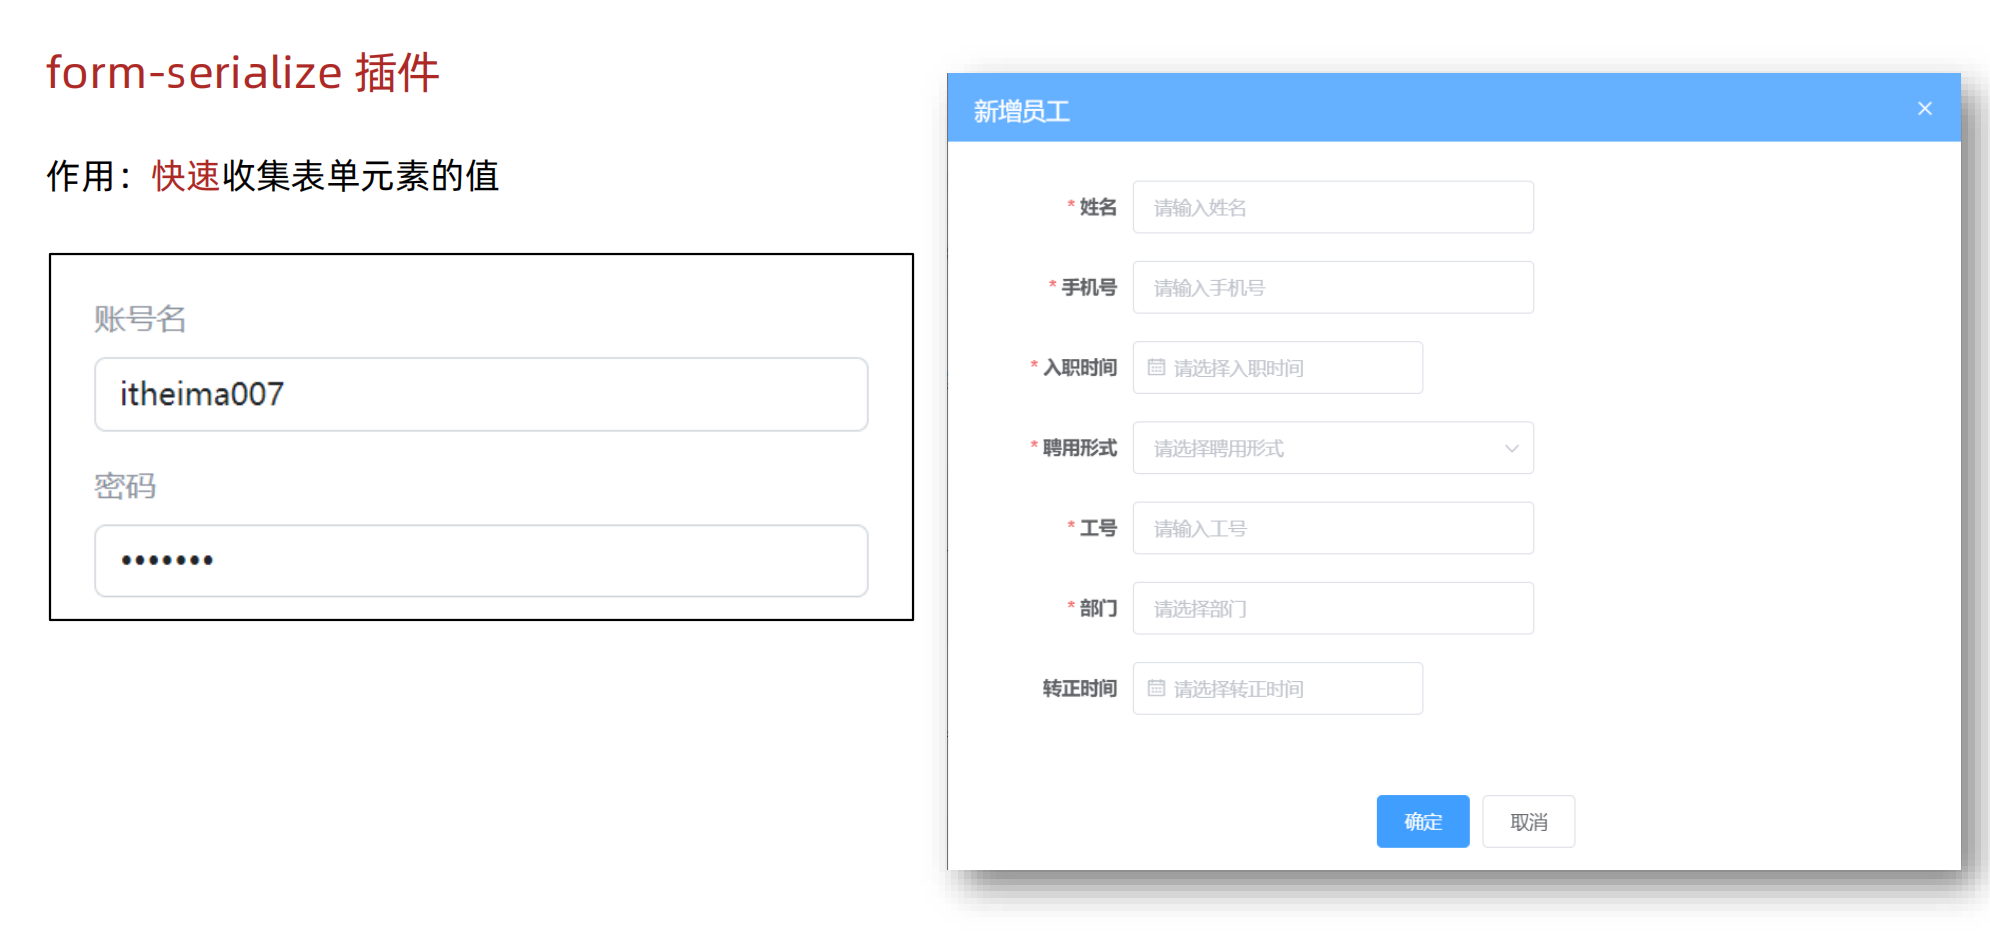
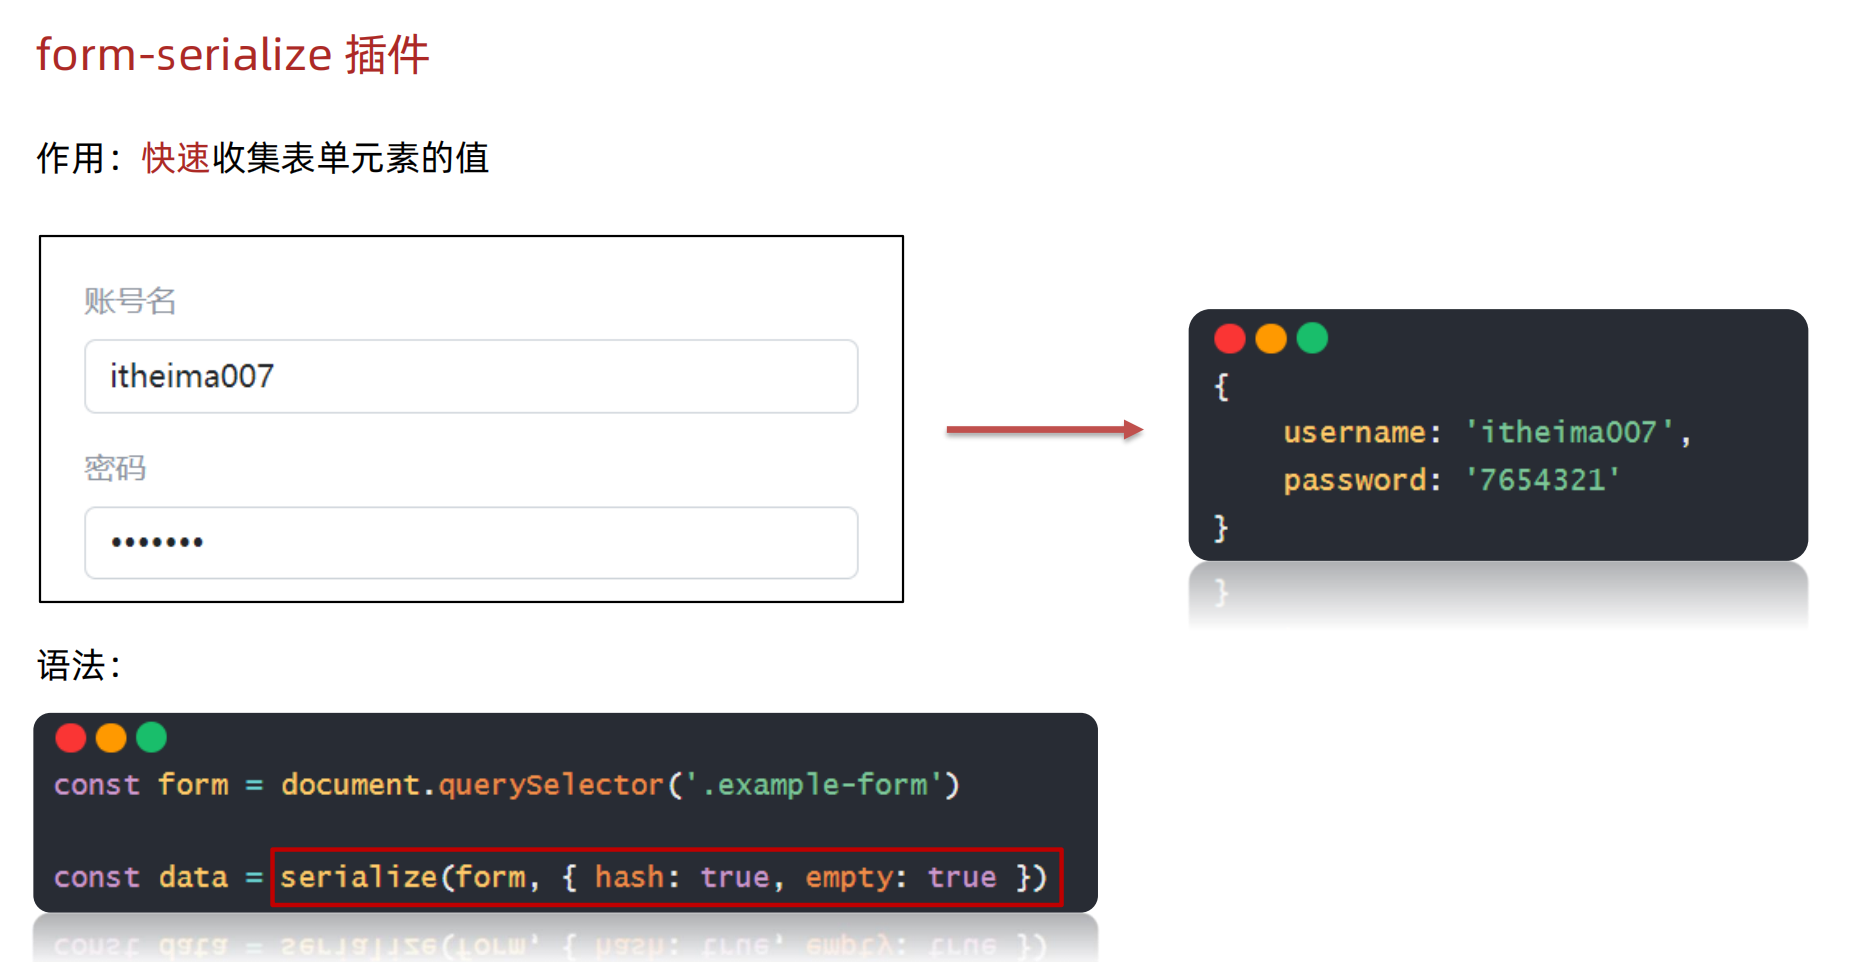
</body></html>9.form-serialize插件
<!DOCTYPE html>
<html lang="en"><head><meta charset="UTF-8"><meta http-equiv="X-UA-Compatible" content="IE=edge"><meta name="viewport" content="width=device-width, initial-scale=1.0"><title>form-serialize插件使用</title>
</head><body><form action="javascript:;" class="example-form"><input type="text" name="username"><br><input type="text" name="password"><br><input type="button" class="btn" value="提交"></form><!-- 目標:在點擊提交時,使用form-serialize插件,快速收集表單元素值1. 把插件引入到自己網頁中--><script src="./lib/form-serialize.js"></script><script>document.querySelector('.btn').addEventListener('click', () => {/*** 2. 使用serialize函數,快速收集表單元素的值* 參數1:要獲取哪個表單的數據*  表單元素設置name屬性,值會作為對象的屬性名*  建議name屬性的值,最好和接口文檔參數名一致* 參數2:配置對象*  hash 設置獲取數據結構*    - true:JS對象(推薦)一般請求體里提交給服務器*    - false: 查詢字符串*  empty 設置是否獲取空值*    - true: 獲取空值(推薦)數據結構和標簽結構一致*    - false:不獲取空值*/const form = document.querySelector('.example-form')const data = serialize(form, { hash: true, empty: true })// const data = serialize(form, { hash: false, empty: true })// const data = serialize(form, { hash: true, empty: false })console.log(data)})</script>
</body></html>
<!DOCTYPE html>
<html lang="en"><head><meta charset="UTF-8"><meta http-equiv="X-UA-Compatible" content="IE=edge"><meta name="viewport" content="width=device-width, initial-scale=1.0"><title>案例_登錄_插件使用</title><!-- 引入bootstrap.css --><link rel="stylesheet" href="https://cdn.jsdelivr.net/npm/bootstrap@5.2.2/dist/css/bootstrap.min.css"><!-- 公共 --><style>html,body {background-color: #EDF0F5;width: 100%;height: 100%;display: flex;justify-content: center;align-items: center;}.container {width: 520px;height: 540px;background-color: #fff;padding: 60px;box-sizing: border-box;}.container h3 {font-weight: 900;}</style><!-- 表單容器和內容 --><style>.form_wrap {color: #8B929D !important;}.form-text {color: #8B929D !important;}</style><!-- 提示框樣式 --><style>.alert {transition: .5s;opacity: 0;}.alert.show {opacity: 1;}</style>
</head><body><div class="container"><h3>歡迎-登錄</h3><!-- 登錄結果-提示框 --><div class="alert alert-success" role="alert">提示消息</div><!-- 表單 --><div class="form_wrap"><form class="login-form"><div class="mb-3"><label for="username" class="form-label">賬號名</label><input type="text" class="form-control username" name="username"></div><div class="mb-3"><label for="password" class="form-label">密碼</label><input type="password" class="form-control password" name="password"></div><button type="button" class="btn btn-primary btn-login"> 登 錄 </button></form></div></div><script src="https://cdn.jsdelivr.net/npm/axios/dist/axios.min.js"></script><!-- 3.1 引入插件 --><script src="./lib/form-serialize.js"></script><script>// 目標1:點擊登錄時,用戶名和密碼長度判斷,并提交數據和服務器通信// 目標2:使用提示框,反饋提示消息// 目標3:使用form-serialize插件,收集用戶名和密碼// 2.1 獲取提示框const myAlert = document.querySelector('.alert')/**2.2 封裝提示框函數,重復調用,滿足提示需求* 功能:* 1. 顯示提示框* 2. 不同提示文字msg,和成功綠色失敗紅色isSuccess(true成功,false失敗)* 3. 過2秒后,讓提示框自動消失*/function alertFn(msg, isSuccess) {// 1> 顯示提示框myAlert.classList.add('show')// 2> 實現細節myAlert.innerText = msgconst bgStyle = isSuccess ? 'alert-success' : 'alert-danger'myAlert.classList.add(bgStyle)// 3> 過2秒隱藏setTimeout(() => {myAlert.classList.remove('show')// 提示:避免類名沖突,重置背景色myAlert.classList.remove(bgStyle)}, 2000)}// 1.1 登錄-點擊事件document.querySelector('.btn-login').addEventListener('click', () => {// 3.2 使用serialize函數,收集登錄表單里用戶名和密碼const form = document.querySelector('.login-form')const data = serialize(form, { hash: true, empty: true })console.log(data)// {username: 'itheima007', password: '7654321'}const { username, password } = data// 1.2 獲取用戶名和密碼// const username = document.querySelector('.username').value// const password = document.querySelector('.password').valueconsole.log(username, password)// 1.3 判斷長度if (username.length < 8) {alertFn('用戶名必須大于等于8位', false)console.log('用戶名必須大于等于8位')return // 阻止代碼繼續執行}if (password.length < 6) {alertFn('密碼必須大于等于6位', false)console.log('密碼必須大于等于6位')return // 阻止代碼繼續執行}// 1.4 基于axios提交用戶名和密碼// console.log('提交數據到服務器')axios({url: 'http://hmajax.itheima.net/api/login',method: 'POST',data: {username,password}}).then(result => {alertFn(result.data.message, true)console.log(result)console.log(result.data.message)}).catch(error => {alertFn(error.response.data.message, false)console.log(error)console.log(error.response.data.message)})})</script>
</body></html>其實就是通過form-serialize可以直接獲得是有表單元素,而不需要一一獲取。
)


)


 和 get_the_terms() 的區別)


