一、基礎概念
????????原型模式的本質是【克隆生成對象】;
????????原型模式的定義:用原型實例指定創建對象的種類,并通過拷貝這些原型創建新的對象 。
????????原型模式的功能:?1、通過克隆來創建新的對象實例;?2、為克隆出來的新對象實例復制原型實例屬性值;
? ? ? ? 克隆:無論是自己實現克隆方法,還是采用C#提供的克隆方法,都存在一個淺度克隆和深度克隆的問題:
? ? ? ? 1、淺度克隆:只負責克隆按值傳遞的數據(比如基本數據類型、String類型);
? ? ? ??2、深度克隆:除了淺度克隆要克隆的值外,還負責克隆引用類型的數據,基本上就是被克隆實例所有的屬性數據都會被克隆出來;
| 序號 | 原型模式的優點 | 原型模式的缺點 |
| 1 | 對客戶端隱藏具體的實現類型 (即:原型模式的客戶端只知道原型接口類型,并不知道具體的實現類型,?從而減少了客戶端對具體實現類型的依賴) | 每個原型的子類都必須實現克隆操作,尤其在包含引用類型的對象時,克隆方法會比較麻煩,必須要能夠遞歸地讓所有相關對象都要正確地實現克隆 |
| 2 | 在運行時動態改變具體的實現類型 (即:原型模式可以在運行期間,由客戶來注冊符合原型接口的實現類型,也可以動態改變具體的實現類型,看起來接口沒有任何變化,但其實運行的已經是另外一個類實例了【因為克隆一個原型就類似于實例化一個類】) |
????????何時選用原型模式?
????????????????1、如果一個系統想要獨立于它想要使用的對象時【讓系統只面向接口編程,在系統需要新對象時可以通過克隆原型獲取】;
????????????????2、如果需要實例化的類是在運行時動態指定的,可通過克隆原型類得到想要的實例。
二、原型模式示例
????????業務需求:比如我們有一個訂單處理功能,需要保存訂單業務(在這個業務功能中,每當訂單的預訂數量超過1000的時候,就需要將訂單拆分為兩份訂單保存;如果拆成了兩份訂單后,數量還是超過1000,則繼續拆分,直到每份訂單的數量不超過1000);且這個訂單類型會分為兩種(一種是個人訂單;一種是公司訂單),無論何種訂單類型都需要按照業務規則處理。
?2.1、不使用模式的示例
????????既然有兩種訂單類型,且都要實現保存訂單相關業務的通用功能,那么我們可以定義一個接口來聲明這些功能行為,然后在定義具體的類分別實現即可:
1、定義訂單接口
using System;
using System.Collections.Generic;
using System.Linq;
using System.Text;
using System.Threading.Tasks;namespace PrototypePattern
{/// <summary>/// 訂單接口/// </summary>internal interface IOrder{//獲取訂單產品數量int GetOrderProductNumber();//設置訂單產品數量void SetOrderProductNumber(int productNumber);}//Interface_end
}
2、分別定義個人訂單與企業訂單類來實現接口定義的功能行為
using System;
using System.Collections.Generic;
using System.Linq;
using System.Text;
using System.Threading.Tasks;namespace PrototypePattern
{/// <summary>/// 個人訂單對象/// </summary>internal class PersonalOrder : IOrder{//消費者名稱public string? CustomerName;//產品編號public string? ProductId;//產品訂單數量private int productOrderNumber = 0;public int GetOrderProductNumber(){return productOrderNumber;}public void SetOrderProductNumber(int productNumber){//做各種邏輯校驗內容,此處省略this.productOrderNumber = productNumber;}public override string ToString(){string str=$"個人訂單的訂購人是【{CustomerName},訂購的產品是【{ProductId}】,訂購數量是【{productOrderNumber}】】";return str;}}//Class_end
}
using System;
using System.Collections.Generic;
using System.Linq;
using System.Text;
using System.Threading.Tasks;namespace PrototypePattern
{/// <summary>/// 企業訂單對象/// </summary>internal class EnterpriseOrder : IOrder{//企業名稱public string? EnterpriseName;//產品編號public string? ProductId;//產品的訂單數量private int productOrderNumber=0;public int GetOrderProductNumber(){return productOrderNumber;}public void SetOrderProductNumber(int productNumber){productOrderNumber = productNumber;}public override string ToString(){string str = $"企業訂單的訂購企業是【{EnterpriseName},訂購的產品是【{ProductId}】,訂購數量是【{productOrderNumber}】】";return str;}}//Class_end
}
3、現在的中心任務就是要實現《保存訂單》的業務方法
using System;
using System.Collections.Generic;
using System.Linq;
using System.Text;
using System.Threading.Tasks;namespace PrototypePattern
{/// <summary>/// 處理訂單的業務對象/// </summary>internal class OrderBussiness{//固定的數量private const int fixedNumber = 1000;/// <summary>/// 保存訂單/// </summary>/// <param name="order">訂單</param>public void SaveOrder(IOrder order){/*根據業務要求,當預訂產品的數量大于1000時,就需要把訂單拆分為兩份*///1、判斷訂單是否大于1000(若大于1000則拆分訂單)while (order.GetOrderProductNumber()>1000){//2.創建一份新訂單,這份訂單傳入的訂單除了數量不一樣,其他都相同IOrder newOrder = null;if (order is PersonalOrder){//創建相應的新訂單對象PersonalOrder newPO = new PersonalOrder();//將傳入訂單的數據賦值給新訂單對象PersonalOrder po = (PersonalOrder)order;newPO.CustomerName = po.CustomerName;newPO.ProductId = po.ProductId;newPO.SetOrderProductNumber(fixedNumber);//將個人訂單對象內容賦值給新訂單newOrder = newPO;}else if (order is EnterpriseOrder){ EnterpriseOrder newEO = new EnterpriseOrder();EnterpriseOrder eo = (EnterpriseOrder)order;newEO.EnterpriseName = eo.EnterpriseName;newEO.ProductId = eo.ProductId;newEO.SetOrderProductNumber(fixedNumber);newOrder=newEO;}//3、設置拆分后的訂單數量order.SetOrderProductNumber(order.GetOrderProductNumber() - fixedNumber);//4、處理業務功能Console.WriteLine($"拆分生成的訂單是【{newOrder}】");}//訂單數量不超過1000的直接執行業務處理Console.WriteLine($"拆分生成的訂單是【{order}】");}}//Class_end
}
4、編寫客戶端測試
using System.Net.Sockets;namespace PrototypePattern
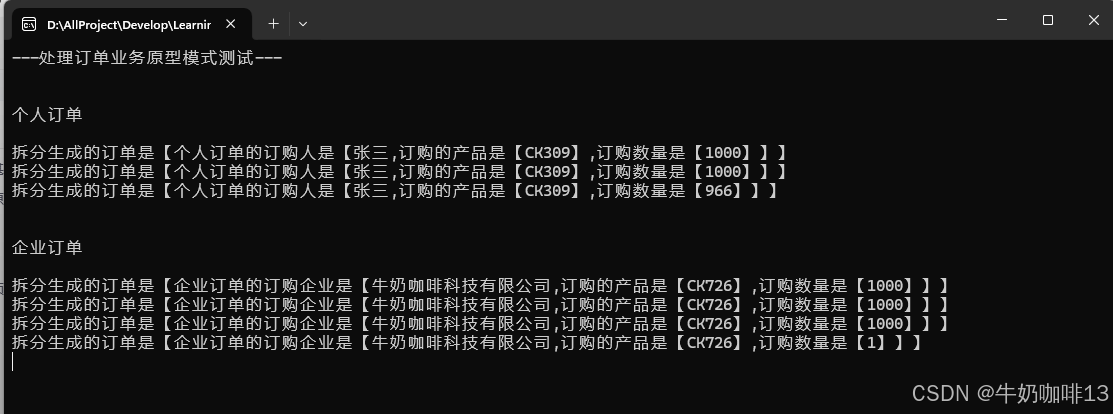
{internal class Program{static void Main(string[] args){OrderBussinessTest();Console.ReadLine();}/// <summary>/// 處理訂單的業務對象測試/// </summary>private static void OrderBussinessTest(){Console.WriteLine("---處理訂單的業務對象測試---");/*個人訂單*/Console.WriteLine("\n\n個人訂單\n");//創建訂單對象并設置內容(為了演示簡單直接new)PersonalOrder po = new PersonalOrder();po.CustomerName = "張三";po.ProductId = $"CK{new Random(Guid.NewGuid().GetHashCode()).Next(100,999)}";po.SetOrderProductNumber(2966);//獲取訂單業務對象(為了演示簡單直接new)OrderBussiness ob=new OrderBussiness();//保存訂單業務ob.SaveOrder(po);/*企業訂單*/Console.WriteLine("\n\n企業訂單\n");EnterpriseOrder eo=new EnterpriseOrder();eo.EnterpriseName = "牛奶咖啡科技有限公司";eo.ProductId= $"CK{new Random(Guid.NewGuid().GetHashCode()).Next(100, 999)}";eo.SetOrderProductNumber(3001);OrderBussiness ob2 = new OrderBussiness();ob2.SaveOrder(eo);}}//Class_end
}
5、運行結果如下:

?6、有何問題?
不使用模式的示例是實現了我們需要的保存訂單業務功能;但是存在兩個問題:
????????《1》既然我們想要通用的保存訂單業務功能,那么實現對象是不應該知道訂單的具體對象和具體實現,更不能依賴訂單的具體實現;而上面的示例很明顯的依賴了具體對象和具體實現;
????????《2》不使用模式的示例在實現業務功能的時候是很難擴展新的訂單類型(即:如果我們現在又增加了幾種訂單類型,那么還需要在保存訂單業務方法里面添新類型的處理,很繁瑣,不優雅)。
?2.2、使用原型模式的示例
????????其實上面不使用模式的示例暴露的問題總結起來就是:【我們已經有了具體的實例對象,如何能夠在不修改業務方法的情況下快速的使用更多新增的對象】而原型模式剛好就是解決這個問題的。
1、定義訂單接口規范產品功能行為
using System;
using System.Collections.Generic;
using System.Linq;
using System.Text;
using System.Threading.Tasks;namespace PrototypePattern.Prototype
{/// <summary>/// 訂單接口/// </summary>internal interface IOrder{//獲取訂單產品數量int GetOrderProductNumber();//設置訂單產品數量void SetOrderProductNumber(int productNumber);//克隆方法IOrder Clone();}//Interface_end
}
2、創建個人訂單對象與企業訂單對象繼承接口實現具體功能行為
????????注意:關于這里的克隆方法不能直接使用【return this】來寫,這是因為若這樣設置,那么每次克隆客戶端獲取的都是同一個實例,都指向同一個內存空間,此時只要修改克隆出來的實例對象就會影響到原型對象的實例,這是不可取的;【正確地做法是:直接先new一個自己的對象實例,然后再把自己實例的數據取出來賦值到新對象實例中去】如下所示:
using System;
using System.Collections.Generic;
using System.Linq;
using System.Text;
using System.Threading.Tasks;namespace PrototypePattern.Prototype
{/// <summary>/// 個人訂單對象/// </summary>internal class PersonalOrder : IOrder{//訂購人員名稱public string? CustomerName;//產品編號public string? ProductId;//訂單產品數量private int productOrderNumber=0;public IOrder Clone(){//創建一個新訂單對象,然后把該實例的數據賦值給新對象【淺度克隆】PersonalOrder po = new PersonalOrder();po.CustomerName = this.CustomerName;po.ProductId = this.ProductId;po.SetOrderProductNumber(this.productOrderNumber);return po;}public int GetOrderProductNumber(){return productOrderNumber;}public void SetOrderProductNumber(int productNumber){//做各種邏輯校驗內容,此處省略this.productOrderNumber = productNumber;}public override string ToString(){string str = $"個人訂單的訂購人是【{CustomerName},訂購的產品是【{ProductId}】,訂購數量是【{productOrderNumber}】】";return str;}}//Class_end
}
using System;
using System.Collections.Generic;
using System.Linq;
using System.Text;
using System.Threading.Tasks;namespace PrototypePattern.Prototype
{/// <summary>/// 企業訂單對象/// </summary>internal class EnterpriseOrder : IOrder{//企業名稱public string? EnterpriseName;//產品編號public string? ProductId;//產品的訂單數量private int productOrderNumber = 0;public IOrder Clone(){//創建一個新訂單對象,然后把該實例的數據賦值給新對象【淺度克隆】EnterpriseOrder eo = new EnterpriseOrder();eo.EnterpriseName = this.EnterpriseName;eo.ProductId = this.ProductId;eo.SetOrderProductNumber(this.productOrderNumber);return eo;}public int GetOrderProductNumber(){return productOrderNumber;}public void SetOrderProductNumber(int productNumber){//做各種邏輯校驗內容,此處省略this.productOrderNumber = productNumber;}public override string ToString(){string str = $"企業訂單的訂購企業是【{EnterpriseName},訂購的產品是【{ProductId}】,訂購數量是【{productOrderNumber}】】";return str;}}//Class_end
}
3、創建一個類構建通用的保存訂單業務方法且不依賴具體的實例對象、方法
using System;
using System.Collections.Generic;
using System.Linq;
using System.Text;
using System.Threading.Tasks;namespace PrototypePattern.Prototype
{/// <summary>/// 處理訂單的業務對象/// </summary>internal class OrderBussiness{private const int fixedNumber = 1000;public void SaveOrder(IOrder order){/*根據業務要求,當預訂產品的數量大于1000時,就需要把訂單拆分為兩份*///1、判斷訂單是否大于1000(若大于1000則拆分訂單)while (order.GetOrderProductNumber()>1000){//2、創建一份新的訂單,除了訂單的數量不一樣,其他內容都一致IOrder newOrder = order.Clone();//3、然后進行賦值newOrder.SetOrderProductNumber(fixedNumber);//4、創建新訂單后原訂單需要將使用的數量減去order.SetOrderProductNumber(order.GetOrderProductNumber()-fixedNumber);//5、處理業務功能Console.WriteLine($"拆分生成的訂單是【{newOrder}】");}//訂單數量不超過1000的直接執行業務處理Console.WriteLine($"拆分生成的訂單是【{order}】");}}//Class_end
}
4、客戶端測試原型模式
using System.Net.Sockets;namespace PrototypePattern
{internal class Program{static void Main(string[] args){OrderBussinessPrototypeTest();Console.ReadLine();}/// <summary>/// 處理訂單業務原型模式測試/// </summary>private static void OrderBussinessPrototypeTest(){Console.WriteLine("---處理訂單業務原型模式測試---");/*個人訂單*/Console.WriteLine("\n\n個人訂單\n");//創建訂單對象并設置內容(為了演示簡單直接new)Prototype.PersonalOrder po = new Prototype.PersonalOrder();po.CustomerName = "張三";po.ProductId = $"CK{new Random(Guid.NewGuid().GetHashCode()).Next(100, 999)}";po.SetOrderProductNumber(2966);//獲取訂單業務對象(為了演示簡單直接new)Prototype.OrderBussiness ob = new Prototype.OrderBussiness();//保存訂單業務ob.SaveOrder(po);/*企業訂單*/Console.WriteLine("\n\n企業訂單\n");Prototype.EnterpriseOrder eo = new Prototype.EnterpriseOrder();eo.EnterpriseName = "牛奶咖啡科技有限公司";eo.ProductId = $"CK{new Random(Guid.NewGuid().GetHashCode()).Next(100, 999)}";eo.SetOrderProductNumber(3001);Prototype.OrderBussiness ob2 = new Prototype.OrderBussiness();ob2.SaveOrder(eo);}}//Class_end
}
5、運行結果
?
可以看到我們使用原型模式也成功實現了業務功能,并且我們現在擴展新的訂單類型后也十分簡單,直接用新訂單類型實例調用業務方法即可,而不用對業務類方法進行任何修改。
?2.3、原型實例與克隆實例
? 2.3.1、自己手動實現克隆方法
????????原型實例與克隆出來的實例,本質上是不同的實例(克隆完成后,它們之間是沒有關聯,互不影響的,也就是說它們所指向不同的內存空間)如下所示:
using System.Net.Sockets;namespace PrototypePattern
{internal class Program{static void Main(string[] args){TestPrototypeInstaceAndCloneInstace();Console.ReadLine();}/// <summary>/// 【淺度克隆】原型實例與克隆出來的實例,本質上是不同的實例(克隆完成后,它們之間是沒有關聯,互不影響的)/// </summary>private static void TestPrototypeInstaceAndCloneInstace(){//先創建原型實例Prototype.PersonalOrder order = new Prototype.PersonalOrder();//設置原型實例的訂單數量order.SetOrderProductNumber(666);//為了演示簡單,就只輸出數量Console.WriteLine($"第一次獲取個人訂單對象實例的數量【{order.GetOrderProductNumber()}】");//通過克隆來獲取實例Prototype.PersonalOrder order2 = (Prototype.PersonalOrder)order.Clone();//修改克隆實例的數量order2.SetOrderProductNumber(33);//輸出數量Console.WriteLine($"克隆實例的數量【{order2.GetOrderProductNumber()}】");//輸出原型實例的數量Console.WriteLine($"克隆實例修改數量后原型實例的數量是【{order.GetOrderProductNumber()}】");}}//Class_end
}
運行結果如下:

? 2.3.2、C#中的克隆方法
在C#語言中已經提供了克隆方法,定義在Object類中;需要克隆功能的類,只需要繼承【System.ICloneable】接口即可;如下為演示C#克隆方法示例:
ICloneable.Clone 方法 (System) | Microsoft Learn![]() https://learn.microsoft.com/zh-cn/dotnet/api/system.icloneable.clone?view=net-7.0Object.MemberwiseClone 方法 (System) | Microsoft Learn
https://learn.microsoft.com/zh-cn/dotnet/api/system.icloneable.clone?view=net-7.0Object.MemberwiseClone 方法 (System) | Microsoft Learn![]() https://learn.microsoft.com/zh-cn/dotnet/api/system.object.memberwiseclone?view=net-9.01、創建接口
https://learn.microsoft.com/zh-cn/dotnet/api/system.object.memberwiseclone?view=net-9.01、創建接口
using System;
using System.Collections.Generic;
using System.Linq;
using System.Text;
using System.Threading.Tasks;namespace PrototypePattern.CSharpClone
{/// <summary>/// 訂單接口/// </summary>internal interface IOrder2{//獲取訂單產品數量int GetOrderProductNumber();//設置訂單產品數量void SetOrderProductNumber(int productNumber);}//Interface_end
}
?2、創建具體的個人訂單象繼承訂單接口與C#克隆接口實現功能
using System;
using System.Collections.Generic;
using System.Linq;
using System.Text;
using System.Threading.Tasks;namespace PrototypePattern.CSharpClone
{/// <summary>/// 訂單對象【繼承C#克隆接口】/// </summary>internal class PersonalOrder2 : IOrder2, ICloneable{//訂購人員名稱public string? CustomerName;//產品編號public string? ProductId;//訂單產品數量private int productOrderNumber = 0;public object Clone(){//直接調用父類的克隆方法【淺度克隆】object obj = base.MemberwiseClone();return obj;}public int GetOrderProductNumber(){return this.productOrderNumber;}public void SetOrderProductNumber(int productNumber){//做各種邏輯校驗內容,此處省略this.productOrderNumber = productNumber;}public override string ToString(){string str = $"個人訂單的訂購人是【{CustomerName},訂購的產品是【{ProductId}】,訂購數量是【{productOrderNumber}】】";return str;}}//Class_end
}
3、客戶端調用測試
using PrototypePattern.PrototypeeManager;
using System.Net.Sockets;namespace PrototypePattern
{internal class Program{static void Main(string[] args){TestPrototypeInstaceAndCloneInstace2();Console.ReadLine();}/// <summary>/// 【淺度克隆】原型實例與克隆出來的實例,本質上是不同的實例(克隆完成后,它們之間是沒有關聯,互不影響的)/// </summary>private static void TestPrototypeInstaceAndCloneInstace2(){//先創建原型實例CSharpClone.PersonalOrder2 order = new CSharpClone.PersonalOrder2();//設置原型實例的訂單數量order.SetOrderProductNumber(666);//為了演示簡單,就只輸出數量Console.WriteLine($"第一次獲取個人訂單對象實例的數量【{order.GetOrderProductNumber()}】");//通過克隆來獲取實例CSharpClone.PersonalOrder2 order2 = (CSharpClone.PersonalOrder2)order.Clone();//修改克隆實例的數量order2.SetOrderProductNumber(33);//輸出數量Console.WriteLine($"克隆實例的數量【{order2.GetOrderProductNumber()}】");//輸出原型實例的數量Console.WriteLine($"克隆實例修改數量后原型實例的數量是【{order.GetOrderProductNumber()}】");}}//Class_end
}
運行結果:

?2.4、深度克隆
?????????深度克隆:除了淺度克隆要克隆的值外,還負責克隆引用類型的數據,基本上就是被克隆實例所有的屬性數據都會被克隆出來(如果被克隆的對象里面屬性數據是引用類型,也就是屬性類型也是對象,則需要一直遞歸地克隆下去【也就是說,要想深度克隆成功,必須要整個克隆所涉及的對象都要正確實現克隆方法,如果其中的一個沒有正確實現克隆,那么就會導致克隆失敗】)。
? 2.4.1、自己實現原型的深度克隆
1、定義產品接口規范產品行為功能
using System;
using System.Collections.Generic;
using System.Linq;
using System.Text;
using System.Threading.Tasks;namespace PrototypePattern.CSharpClone
{/// <summary>/// 定義一個克隆產品自身的接口/// </summary>internal interface IProductPrototype{//克隆產品自身的方法IProductPrototype CloneProduct();}//Interface_end
}
2、定義一個產品對象,繼承產品接口并實現克隆功能
using System;
using System.Collections.Generic;
using System.Linq;
using System.Text;
using System.Threading.Tasks;namespace PrototypePattern.CSharpClone
{/// <summary>/// 產品對象/// </summary>internal class Product : IProductPrototype{//產品編號public string? ProductId;//產品名稱public string? ProductName;public IProductPrototype CloneProduct(){//創建一個新訂單,然后把本實例的數據復制過去Product product = new Product();product.ProductId = ProductId;product.ProductName = ProductName;return product;}public override string ToString(){string str = $"產品編號【{ProductId}】產品名稱【{ProductName}】";return str;}}//Class_end
}
3、訂單對象的添加產品對象屬性
using PrototypePattern.CSharpClone;
using System;
using System.Collections.Generic;
using System.Linq;
using System.Text;
using System.Threading.Tasks;namespace PrototypePattern.Prototype
{/// <summary>/// 個人訂單對象/// </summary>internal class PersonalOrder4 : IOrder{//訂購人員名稱public string? CustomerName;//產品編號public string? ProductId;//產品對象【新增的產品對象引用類型】public CSharpClone.Product? Product;//訂單產品數量private int productOrderNumber=0;public IOrder Clone(){//創建一個新訂單對象,然后把該實例的數據賦值給新對象【淺度克隆】PersonalOrder4 po = new PersonalOrder4();po.CustomerName = this.CustomerName;po.ProductId = this.ProductId;po.SetOrderProductNumber(this.productOrderNumber);/*自己實現深度克隆也不是很復雜,但是比較麻煩,如果產品類中又有屬性是引用類型,* 在產品類實現克隆方法的時候,則需要調用那個引用類型的克隆方法了。這樣一層層的調用下去,* 如果中途有任何一個對象沒有正確實現深度克隆,那將會引起錯誤*///對于對象類型的數據,深度克隆的時候需要繼續調用整個對象的克隆方法【體現深度克隆】po.Product = (CSharpClone.Product)this.Product.CloneProduct();return po;}public int GetOrderProductNumber(){return productOrderNumber;}public void SetOrderProductNumber(int productNumber){//做各種邏輯校驗內容,此處省略this.productOrderNumber = productNumber;}public override string ToString(){string str = $"個人訂單的訂購人是【{CustomerName},訂購的產品是【{ProductId}】,訂購數量是【{productOrderNumber}】】,產品對象是【{Product}】】";return str;}}//Class_end
}
4、客戶端測試
using System.Net.Sockets;namespace PrototypePattern
{internal class Program{static void Main(string[] args){OrderBussinessTestDeepClone();Console.ReadLine();}/// <summary>/// 【深度克隆】處理訂單的業務對象測試/// </summary>private static void OrderBussinessTestDeepClone(){Console.WriteLine("---處理訂單的業務對象測試【深度克隆】---");/*個人訂單*/Console.WriteLine("\n\n個人訂單\n");//創建訂單對象并設置內容(為了演示簡單直接new)Prototype.PersonalOrder4 po = new Prototype.PersonalOrder4();po.CustomerName = "張三";po.ProductId = $"CK{new Random(Guid.NewGuid().GetHashCode()).Next(100, 999)}";po.SetOrderProductNumber(2966);//實例化產品類且指定所有屬性的值CSharpClone.Product product = new CSharpClone.Product();product.ProductName = "產品1";product.ProductId = "XCKX006";//個人訂單對象的產品賦值po.Product = product;Console.WriteLine($"這是第一次獲取的個人訂單對象實例【{po}】");//通過克隆來獲取新實例Prototype.PersonalOrder4 po2 = (Prototype.PersonalOrder4)po.Clone();//修改克隆實例的值po2.CustomerName = "李四";po2.ProductId = $"2CK{new Random(Guid.NewGuid().GetHashCode()).Next(100, 999)}";po2.SetOrderProductNumber(3666);po2.Product.ProductName = "產品2";po2.Product.ProductId = "YYCKYY009";//輸出克隆實例的Console.WriteLine($"輸出克隆出來的個人訂單對象實例【{po2}】");//再次輸出原型的實例Console.WriteLine($"這是第二次獲取的個人訂單對象實例【{po}】");}}//Class_end
}
?運行結果如下:
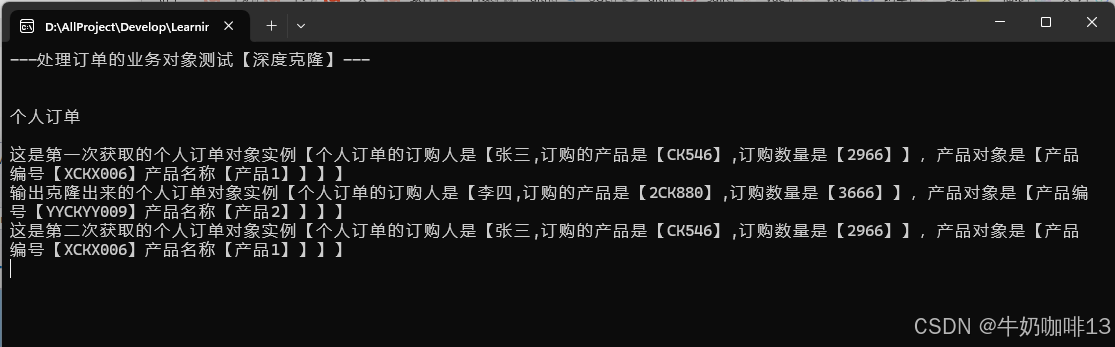
? ? ? ? 通過自己實現深度克隆可以了解其中原理;其實自己實現深度克隆也不是很復雜,只是比較麻煩。若產品類中又有屬性是引用類型,在產品實現克隆方法的時候,則需要調用那個引用類型的克隆方法;需要這樣一層層對的調用下去;但中途若有任何一個對象沒有正確實現深度克隆,就會引起錯誤 。
? 2.4.2、C#中的深度克隆
1、讓產品對象繼承C#的克隆接口【ICloneable】
using System;
using System.Collections.Generic;
using System.Linq;
using System.Text;
using System.Threading.Tasks;namespace PrototypePattern.CSharpClone
{/// <summary>/// 產品對象/// </summary>internal class Product2 : ICloneable{//產品編號public string? ProductId;//產品名稱public string? ProductName;public object Clone(){//直接使用C#的克隆方法,不用自己手動給屬性逐一賦值object obj = base.MemberwiseClone();return obj;}public override string ToString(){string str = $"產品編號【{ProductId}】產品名稱【{ProductName}】";return str;}}//Class_end
}
2、實現個人訂單對象添加產品屬性內容
using System;
using System.Collections.Generic;
using System.Linq;
using System.Text;
using System.Threading.Tasks;namespace PrototypePattern.CSharpClone
{internal class PersonalOrder5 : IOrder2, ICloneable{//訂購人員名稱public string? CustomerName;//產品編號public string? ProductId;//產品對象【新增的產品對象引用類型】public Product2? Product2;//訂單產品數量private int productOrderNumber = 0;public object Clone(){//直接調用C#的克隆方法【淺度克隆】PersonalOrder5 obj = (PersonalOrder5)base.MemberwiseClone();//必須手工針對每一個引用類型的屬性進行克隆obj.Product2 = (Product2)this.Product2.Clone();return obj;}public int GetOrderProductNumber(){return this.productOrderNumber;}public void SetOrderProductNumber(int productNumber){//做各種邏輯校驗內容,此處省略this.productOrderNumber = productNumber;}public override string ToString(){string str = $"個人訂單的訂購人是【{CustomerName},訂購的產品是【{ProductId}】,訂購數量是【{productOrderNumber}】,產品對象是【{Product2}】】";return str;}}//Class_end
}
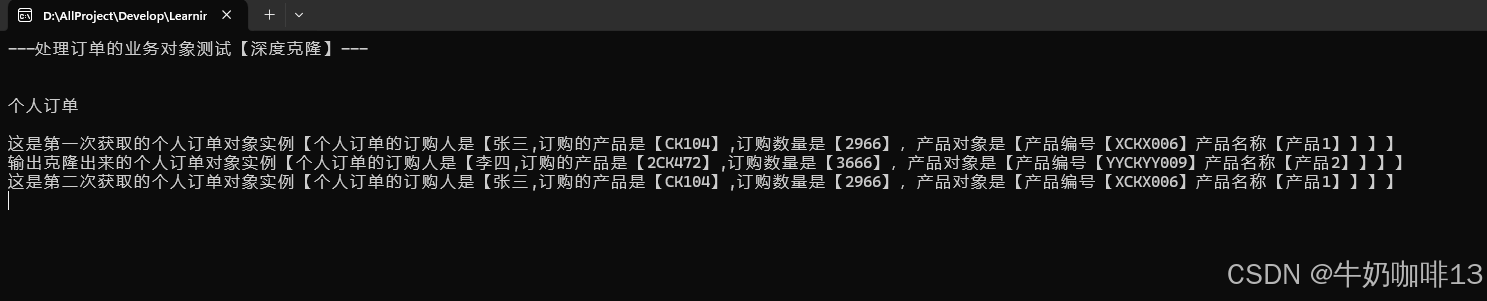
3、客戶端測試
using PrototypePattern.PrototypeeManager;
using System.Net.Sockets;namespace PrototypePattern
{internal class Program{static void Main(string[] args){OrderBussinessTestDeepClone2();Console.ReadLine();}/// <summary>/// 【深度克隆】處理訂單的業務對象測試/// </summary>private static void OrderBussinessTestDeepClone2(){Console.WriteLine("---處理訂單的業務對象測試【深度克隆】---");/*個人訂單*/Console.WriteLine("\n\n個人訂單\n");//創建訂單對象并設置內容(為了演示簡單直接new)CSharpClone.PersonalOrder5 po = new CSharpClone.PersonalOrder5();po.CustomerName = "張三";po.ProductId = $"CK{new Random(Guid.NewGuid().GetHashCode()).Next(100, 999)}";po.SetOrderProductNumber(2966);//實例化產品類且指定所有屬性的值CSharpClone.Product2 product2 = new CSharpClone.Product2();product2.ProductName = "產品1";product2.ProductId = "XCKX006";//個人訂單對象的產品賦值po.Product2 = product2;Console.WriteLine($"這是第一次獲取的個人訂單對象實例【{po}】");//通過克隆來獲取新實例CSharpClone.PersonalOrder5 po2 = (CSharpClone.PersonalOrder5)po.Clone();//修改克隆實例的值po2.CustomerName = "李四";po2.ProductId = $"2CK{new Random(Guid.NewGuid().GetHashCode()).Next(100, 999)}";po2.SetOrderProductNumber(3666);po2.Product2.ProductName = "產品2";po2.Product2.ProductId = "YYCKYY009";//輸出克隆實例的Console.WriteLine($"輸出克隆出來的個人訂單對象實例【{po2}】");//再次輸出原型的實例Console.WriteLine($"這是第二次獲取的個人訂單對象實例【{po}】");}}//Class_end
}
4、運行結果如下:
?2.5、原型管理器
????????如果一個系統中的原型數目不固定(如:原型可以被動態的創建和銷毀)那么久需要再系統中維護一個當前可用的原型注冊表(也稱為原型管理器);有了原型管理器后,除了向原型管理器里面添加原型對象的時候是通過new來創建對象的,其余時候都是通過原型管理器來請求原型實例,然后通過克隆方法來獲取新對象實例,就可以動態的管理原型了。
1、定義原型接口規范行為功能
using System;
using System.Collections.Generic;
using System.Linq;
using System.Text;
using System.Threading.Tasks;namespace PrototypePattern.PrototypeeManager
{/// <summary>/// 原型管理器接口/// </summary>internal interface IPrototypeManager{IPrototypeManager Clone();string GetName();void SetName(string name);}//Interface_end
}
2、定義類對象原型繼承接口實現具體功能
using System;
using System.Collections.Generic;
using System.Linq;
using System.Text;
using System.Threading.Tasks;namespace PrototypePattern.PrototypeeManager
{internal class ConcreatePrototype1 : IPrototypeManager{private string name;public IPrototypeManager Clone(){ConcreatePrototype1 cp=new ConcreatePrototype1();cp.SetName(name);return cp;}public string GetName(){return name;}public void SetName(string name){this.name = name;}public override string ToString(){string str = $"這是具體的原型一,名稱是【{name}】";return str;}}//Class_end
}
using System;
using System.Collections.Generic;
using System.Linq;
using System.Text;
using System.Threading.Tasks;namespace PrototypePattern.PrototypeeManager
{internal class ConcreatePrototype2 : IPrototypeManager{private string name;public IPrototypeManager Clone(){ConcreatePrototype2 cp=new ConcreatePrototype2();cp.SetName(name);return cp;}public string GetName(){return name;}public void SetName(string name){this.name = name;}public override string ToString(){string str = $"這是具體的原型二,名稱是【{name}】";return str;}}//Class_end
}
3、實現原型管理器
using System;
using System.Collections.Generic;
using System.Linq;
using System.Net.Sockets;
using System.Text;
using System.Threading.Tasks;namespace PrototypePattern.PrototypeeManager
{internal class PrototypeManager{//定義一個字典來記錄原型編號與原型實例的對應關系private static Dictionary<string,IPrototypeManager> dicPrototype=new Dictionary<string,IPrototypeManager>();//私有化構造方法,避免外部私自創建實例private PrototypeManager(){}/// <summary>/// 添加原型/// </summary>/// <param name="prototypeId">原型編號</param>/// <param name="prototype">原型實例</param>public static void AddPrototype(string prototypeId,IPrototypeManager prototype){if (string.IsNullOrEmpty(prototypeId) || prototype == null){string str = $"原型編號或者原型不能為空,請檢查后重試!";Console.WriteLine(str);return;}if (!dicPrototype.ContainsKey(prototypeId)){dicPrototype.Add(prototypeId, prototype);}else{string str = $"當前已經存在編號為【{prototypeId}】的原型【{prototype}】,不用重復添加!!!";Console.WriteLine(str);}}/// <summary>/// 刪除原型/// </summary>/// <param name="prototypeId">原型編號</param>public static void DelPrototype(string prototypeId){if (string.IsNullOrEmpty(prototypeId)){string str = $"原型編號不能為空,請檢查后重試!";Console.WriteLine(str);return;}dicPrototype.Remove(prototypeId);}/// <summary>/// 獲取原型/// </summary>/// <param name="prototypeId">原型編號</param>/// <returns></returns>public static IPrototypeManager GetPrototype(string prototypeId){IPrototypeManager prototype = null;if (string.IsNullOrEmpty(prototypeId)){string str = $"原型編號不能為空,請檢查后重試!";Console.WriteLine(str);return prototype;}if (dicPrototype.ContainsKey(prototypeId)){prototype = dicPrototype[prototypeId];return prototype;}else{Console.WriteLine($"你希望獲取的原型還沒注冊或已被銷毀!!!");return prototype;}}/// <summary>/// 修改原型/// </summary>/// <param name="prototypeId">原型編號</param>/// <param name="prototype">原型實例</param>public static void ModifyPrototype(string prototypeId, IPrototypeManager prototype){if (string.IsNullOrEmpty(prototypeId) || prototype == null){string str = $"原型編號或者原型不能為空,請檢查后重試!";Console.WriteLine(str);return;}if (dicPrototype.ContainsKey(prototypeId)){dicPrototype[prototypeId] = prototype; ;}else{string str = $"當前不存在編號為【{prototypeId}】的原型,無法修改!!!";Console.WriteLine(str);}}}//Class_end
}
4、客戶端使用原型管理器
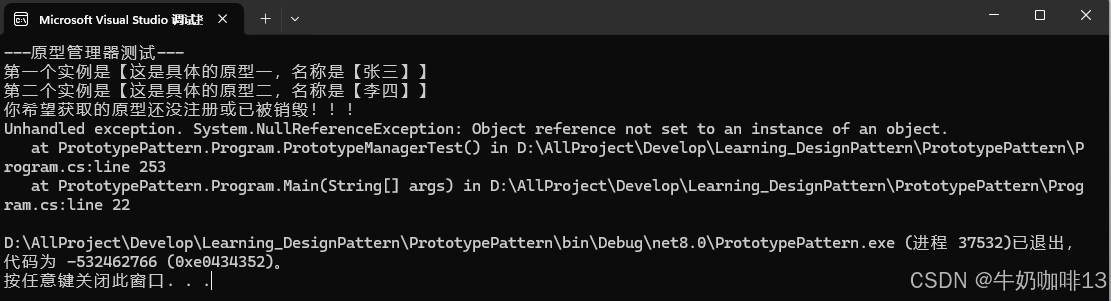
using PrototypePattern.PrototypeeManager;
using System.Net.Sockets;namespace PrototypePattern
{internal class Program{static void Main(string[] args){PrototypeManagerTest();Console.ReadLine();}/// <summary>/// 原型管理器測試/// </summary>private static void PrototypeManagerTest(){Console.WriteLine("---原型管理器測試---");//初始化原型管理器string prototypeId = "原型一";IPrototypeManager pm = new ConcreatePrototype1();PrototypeManager.AddPrototype(prototypeId,pm);//1、獲取原型來創建對象IPrototypeManager pm1 = PrototypeManager.GetPrototype(prototypeId).Clone();pm1.SetName("張三");Console.WriteLine($"第一個實例是【{pm1}】");//2、有人動態的切換string prototypeId2 = "原型二";IPrototypeManager pm2 = new ConcreatePrototype2();PrototypeManager.AddPrototype(prototypeId2,pm2);//3、重新獲取原型創建對象IPrototypeManager pm3 = PrototypeManager.GetPrototype(prototypeId2).Clone();pm3.SetName("李四");Console.WriteLine($"第二個實例是【{pm3}】");//4、有人注銷了原型PrototypeManager.DelPrototype(prototypeId);//5、再次獲取原型一來創建對象IPrototypeManager pm4 = PrototypeManager.GetPrototype(prototypeId).Clone();pm4.SetName("王五");Console.WriteLine($"第三個實例是【{pm4}】");}}//Class_end
}
5、運行結果:
三、項目源碼工程
kafeiweimei/Learning_DesignPattern: 這是一個關于C#語言編寫的基礎設計模式項目工程,方便學習理解常見的26種設計模式![]() https://github.com/kafeiweimei/Learning_DesignPattern
https://github.com/kafeiweimei/Learning_DesignPattern


)


)


)


)


