大綱
1.Nacos生產集群Web端口與數據庫配置
2.Nacos生產集群的Distro協議核心參數
3.Nacos打通CMDB實現跨機房的就近訪問
4.Nacos基于SPI動態擴展機制來獲取CMDB的數據
5.基于Nacos SPI機制開發CMDB動態擴展
6.Nacos基于CMDB來實現多機房就近訪問
7.Nacos生產集群Prometheus + Grafana監控
8.Nacos生產集群的其他一些配置參數
1.Nacos生產集群Web端口與數據庫配置
參考的系統參數文檔:
https://nacos.io/zh-cn/docs/v2/guide/admin/system-configurations.html#*************** Spring Boot Related Configurations ***************#
### Default web context path:
server.servlet.contextPath=/nacos
### Include message field
server.error.include-message=ALWAYS
### Default web server port:
server.port=8848#*************** Network Related Configurations ***************#
### If prefer hostname over ip for Nacos server addresses in cluster.conf:
### cluster.conf里是否應該填hostname
# nacos.inetutils.prefer-hostname-over-ip=false### Specify local server's IP:
### 本機IP,該參數設置后,將會使用這個IP去cluster.conf里進行匹配,請確保這個IP的值在cluster.conf里是存在的
# nacos.inetutils.ip-address=#*************** Config Module Related Configurations ***************#
### If use MySQL as datasource:
### 數據庫類型
# spring.datasource.platform=mysql### Count of DB:
### 數據庫數目
# db.num=1### Connect URL of DB:
### 第一個數據庫的URL
# db.url.0=jdbc:mysql://127.0.0.1:3306/nacos?characterEncoding=utf8&connectTimeout=1000&socketTimeout=3000&autoReconnect=true&useUnicode=true&useSSL=false&serverTimezone=UTC
## 第一個數據庫連接的用戶名
# db.user.0=nacos
### 第一個數據庫連接的密碼
# db.password.0=nacos### Connection pool configuration: hikariCP
### 數據庫連接池參數,使用的是hikari連接池,參數與hikari連接池相同,如db.pool.config.connectionTimeout或db.pool.config.maximumPoolSize
db.pool.config.connectionTimeout=30000
db.pool.config.validationTimeout=10000
db.pool.config.maximumPoolSize=20
db.pool.config.minimumIdle=22.Nacos生產集群的Distro協議核心參數
#*************** Naming Module Related Configurations ***************#
### Data dispatch task execution period in milliseconds: Will removed on v2.1.X, replace with nacos.core.protocol.distro.data.sync.delayMs
### 同步任務生成的周期,單位為毫秒
# nacos.naming.distro.taskDispatchPeriod=200### Data count of batch sync task: Will removed on v2.1.X. Deprecated
### 同步任務每批的key的數目
# nacos.naming.distro.batchSyncKeyCount=1000### Retry delay in milliseconds if sync task failed: Will removed on v2.1.X, replace with nacos.core.protocol.distro.data.sync.retryDelayMs
### 同步任務失敗的重試間隔,單位為毫秒
# nacos.naming.distro.syncRetryDelay=5000### If enable data warmup. If set to false, the server would accept request without local data preparation:
### 是否在Server啟動時進行數據預熱
# nacos.naming.data.warmup=true### If enable the instance auto expiration, kind like of health check of instance:
### 是否自動摘除臨時實例
# nacos.naming.expireInstance=true#*************** Distro Related Configurations ***************#### Distro data sync delay time, when sync task delayed, task will be merged for same data key. Default 1 second.
# nacos.core.protocol.distro.data.sync.delayMs=1000### Distro data sync timeout for one sync data, default 3 seconds.
# nacos.core.protocol.distro.data.sync.timeoutMs=3000### Distro data sync retry delay time when sync data failed or timeout, same behavior with delayMs, default 3 seconds.
# nacos.core.protocol.distro.data.sync.retryDelayMs=3000### Distro data verify interval time, verify synced data whether expired for a interval. Default 5 seconds.
# nacos.core.protocol.distro.data.verify.intervalMs=5000### Distro data verify timeout for one verify, default 3 seconds.
# nacos.core.protocol.distro.data.verify.timeoutMs=3000### Distro data load retry delay when load snapshot data failed, default 30 seconds.
# nacos.core.protocol.distro.data.load.retryDelayMs=30000
3.Nacos打通CMDB實現跨機房的就近訪問
(1)多機房部署時跨機房訪問的延遲問題
(2)Nacos的服務發現組件對接CMDB實現相同地域的就近訪問
(1)多機房部署時跨機房訪問的延遲問題
當服務進行多機房或者多地域部署時,跨地域的服務訪問往往延遲較高。一個城市內的機房間的典型網絡延遲在1ms左右,而跨城市的網絡延遲,例如廣州到北京大概為50ms。
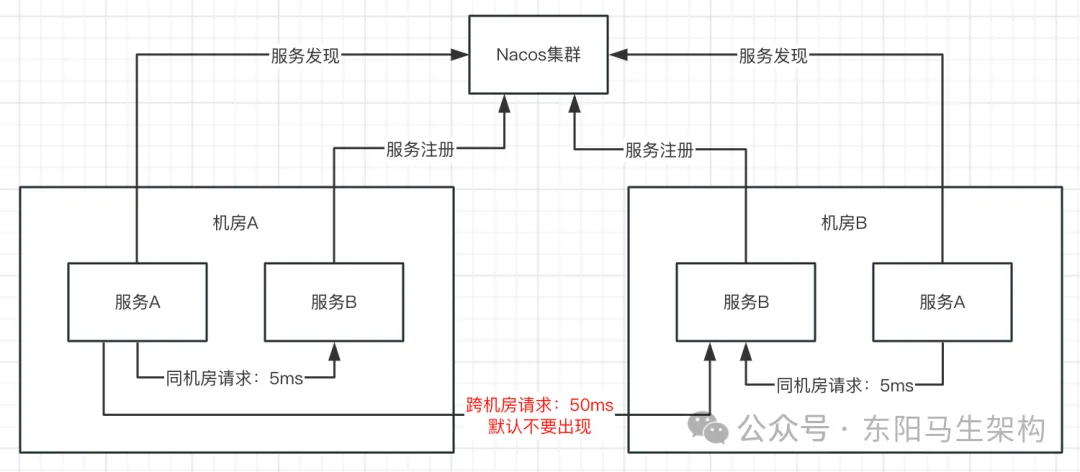
(2)Nacos的服務發現組件對接CMDB實現相同地域的就近訪問
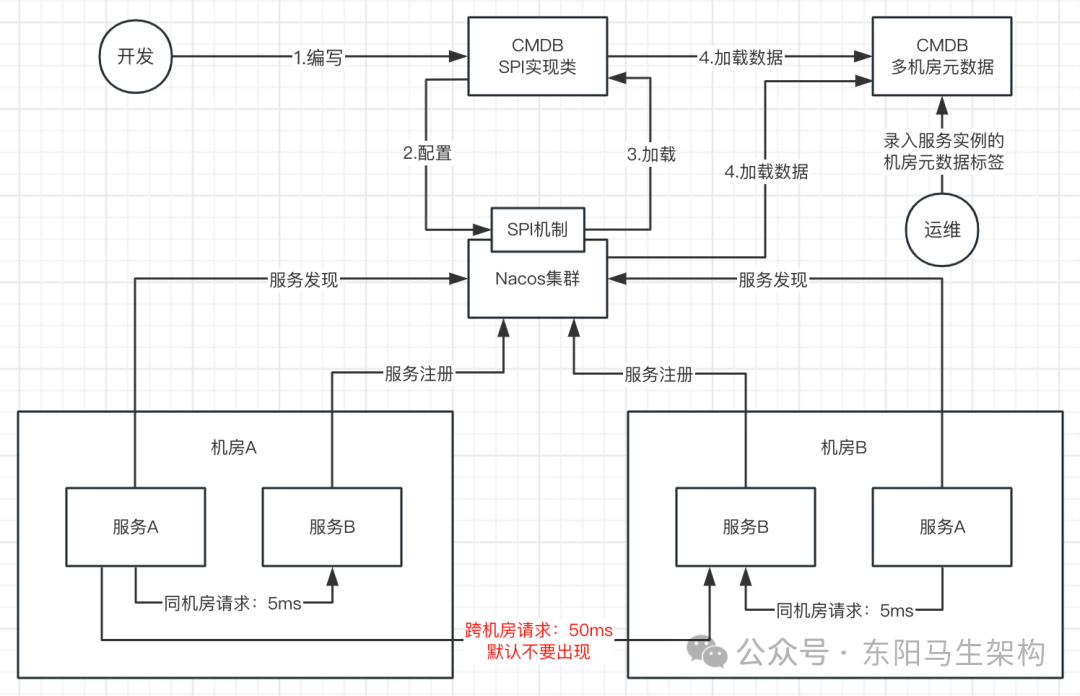
此時的希望就是能否讓服務消費者和服務提供者實現同地域就近訪問。一般在企業的生產實踐中,這樣的需求是通過打通CMDB來實現的。
CMDB一般用于存放與機器設備、應用、服務等相關的元數據,當企業的機器達到一定規模后就需要CMDB來存儲和管理它們的元數據。
有一些廣泛使用的屬性,如機器的IP、主機名、機房、應用、Region等,這些數據一般會在機器部署時錄入到CMDB,運維或者監控平臺會使用這些數據進行展示或者相關的運維操作。
通過讓Nacos的服務發現組件對接CMDB,然后配置好訪問規則,就可以實現服務消費者到服務提供者的就近訪問。
如果Nacos進行了多機房部署,由于CMDB會存儲多機房的元數據,那么就可以基于CMDB實現同機房就近訪問。
4.Nacos基于SPI動態擴展機制來獲取CMDB的數據
(1)Nacos應如何獲取CMDB里的數據
(2)Nacos對CMDB抽象的概念
(3)Nacos對CMDB約定的接口
(1)Nacos應如何獲取CMDB里的數據
基本上每個企業都會購買或自研搭建自己的CMDB。為了能夠解耦各企業的CMDB,一個比較好的策略是使用SPI機制。
Nacos約定CMDB的抽象調用接口,然后由各企業添加自己的CMDB插件,無需任何代碼上的重新構建,即可在運行狀態下對接上企業的CMDB。
Nacos定義了一個SPI接口,里面包含了與第三方CMDB約定的一些方法。依照約定實現相應的SPI接口后,將實現打成jar包放到Nacos安裝目錄,重啟Nacos即可讓Nacos與CMDB的數據打通。
所以如果希望Nacos可以獲取加載CMDB里的數據,那么就需要根據Nacos的SPI接口,編寫CMDB實現類并配置到Nacos中。
這樣Nacos啟動時就會動態掃描和加載編寫的CMDB接口實現類。通過編寫的CMDB實現類,就可以加載CMDB里的數據了。
(2)Nacos對CMDB抽象的概念
一.實體Entity
實體是CMDB里數據的承載方。在一般的CMDB中,一個實體可以指一個IP、應用或者服務。Nacos的這個實體會有很多屬性,比如IP的機房信息,服務的版本信息等。
package com.alibaba.nacos.api.cmdb.pojo;import java.util.Map;//CMDB entity.
public class Entity {private String type;private String name;private Map<String, String> labels;public String getType() { return type; }public void setType(String type) { this.type = type; }public String getName() { return name; }public void setName(String name) { this.name = name; }public Map<String, String> getLabels() { return labels; }public void setLabels(Map<String, String> labels) { this.labels = labels; }
}
二.實體類型Entity Type
Nacos并不限定實體一定是IP、應用或者服務,這取決于實際的業務場景。比如在服務發現場景,實體類型就是IP。
三.標簽Label
Label是Nacos抽象出的Entity屬性,Label定義為一個描述Entity屬性的K-V鍵值對,Label的key和value的取值范圍一般都是預先定義好的。當需要對Label進行變更,需要調用單獨的接口并觸發相應的事件。
一個常見的Label的例子是IP的機房信息。可認為機房(site)是Label的key,機房的集合(site1, site2)是Label的value。那么這個Label的定義就是:site: {site1, site2, site3}。
package com.alibaba.nacos.api.cmdb.pojo;import java.util.Set;//CMDB lable.
public class Label {private String name;private Set<String> values;private String description;public String getName() { return name; }public void setName(String name) { this.name = name; }public Set<String> getValues() { return values; }public void setValues(Set<String> values) { this.values = values; }public String getDescription() { return description; }public void setDescription(String description) { this.description = description; }
}
四.實體事件Entity Event
實體的標簽的變更事件。當CMDB的實體屬性發生變化,需要有一個事件機制來通知所有訂閱方。為了保證實體事件攜帶的變更信息是最新的,該事件只會包含變更實體的標識以及變更事件的類型,不會包含變更標簽的值。
(3)Nacos對CMDB約定的接口
第三方CMDB插件必須實現的接口:
package com.alibaba.nacos.api.cmdb.spi;import com.alibaba.nacos.api.cmdb.pojo.Entity;
import com.alibaba.nacos.api.cmdb.pojo.EntityEvent;
import com.alibaba.nacos.api.cmdb.pojo.Label;
import java.util.List;
import java.util.Map;
import java.util.Set;//Service to visit CMDB store.
public interface CmdbService {//Get all label names stored in CMDB.Set<String> getLabelNames();//Get all possible entity types in CMDB.Set<String> getEntityTypes();//Get label info.Label getLabel(String labelName);//Get label value of label name of ip.String getLabelValue(String entityName, String entityType, String labelName);//Get all label value of ip.Map<String, String> getLabelValues(String entityName, String entityType);//Dump all entities in CMDB.Map<String, Map<String, Entity>> getAllEntities();//get label change events.List<EntityEvent> getEntityEvents(long timestamp);//Get single entity.Entity getEntity(String entityName, String entityType);
}
一.獲取標簽列表的接口
SetgetLabelNames();這個方法將返回CMDB中需要被Nacos識別的標簽名集合,CMDB插件可以按需決定返回什么標簽給Nacos。
不在這個集合的標簽將會被Nacos忽略,即使該標簽出現在實體的屬性里。允許該集合會在運行時動態變化,Nacos會定時調用該接口刷新標簽集合。
二.獲取實體類型的接口
SetgetEntityTypes();獲取CMDB里實體的類型集合,不在這個集合的實體類型會被Nacos忽略。服務發現模塊目前需要的實體類型是IP。如果要通過打通CMDB數據來實現服務負載均衡,要在返回集合里包含IP。
三.獲取標簽詳情的接口
Label getLabel(String labelName);獲取標簽的詳細信息,返回的Label類包含標簽的名字和標簽值的集合。如果某個實體的這個標簽的值不在標簽值集合里,將會被視為無效。
四.查詢實體的標簽值的接口
MapgetLabelValues(String entityName,String entityType);獲取實體所有標簽的鍵值對,參數里包含實體的值和實體的類型。這個方法并不會每次在Nacos內部觸發查詢時調用,因為Nacos內部有一個CMDB數據緩存。只有當這個緩存失效或者不存在時,才會去訪問CMDB插件查詢數據。為了讓CMDB插件的實現簡單,Nacos內部實現了相應的緩存和刷新邏輯。
五.查詢實體的接口
Map<string, map> getAllEntities();
Entity getEntity(String entityName, String entityType);
查詢實體包含兩個方法:查詢所有實體的方法和查詢單個實體的方法。
查詢單個實體目前其實就是查詢這個實體的所有標簽。不過Nacos將這個方法與獲取所有標簽的方法區分開來,因為查詢單個實體方法后面可能會擴展,比查詢所有標簽獲取的信息要多。
查詢所有實體則是一次性將CMDB的所有數據拉取過來。該方法可能會比較消耗性能,無論對于Nacos還是CMDB都一樣消耗性能。Nacos調用該方法的策略是:通過可配置的定時任務來定時拉取所有數據。
在實現該CMDB插件時,也要關注CMDB服務本身性能,來采取合適策略。
六.查詢實體事件的接口
ListgetEntityEvents(long timestamp);該方法意在獲取最近一段時間內實體的變更消息,增量去拉取變更的實體。因為Nacos不會實時去訪問CMDB插件查詢實體,需要這個拉取事件的方法來獲取實體的更新。參數里的timestamp為上一次拉取事件的時間,CMDB插件可選擇使用或忽略這個參數。
5.基于Nacos SPI機制開發CMDB動態擴展
具體的參考例子是:
https://github.com/nacos-group/nacos-examplesnacos-examples里已經給出了一個示例plugin的實現,具體步驟如下:
步驟一:新建一個maven工程,引入依賴nacos-api
<dependency><groupId>com.alibaba.nacos</groupId><artifactId>nacos-api</artifactId><version>0.7.0</version>
</dependency>
步驟二:引入打包插件
<plugin><groupId>org.apache.maven.plugins</groupId><artifactId>maven-assembly-plugin</artifactId><configuration><descriptorRefs><descriptorRef>jar-with-dependencies</descriptorRef></descriptorRefs></configuration>
</plugin>
步驟三:實現com.alibaba.nacos.api.cmdb.CmdbService接口
public class ExampleCmdbServiceImpl implements CmdService {private int index = 1;...
}
步驟四:在"src/main/resource/"目錄下新建目錄"META-INF/services"
步驟五:在"src/main/resources/META-INF/services"目錄下新建文件
文件名是com.alibaba.nacos.api.cmdb.CmdbService,在文件里將第三步中創建的實現類全名寫入該文件:
com.alibaba.nacos.example.cmdb.plugin.ExampleCmdbServiceImpl步驟六:代碼自測完成后,執行如下命令進行打包:
$ mvn package assembly:single -Dmaven.test.skip=true步驟七:將target目錄下的包含依賴的jar包上傳到Nacos CMDB插件目錄
{nacos.home}/plugins/cmdb步驟八:在Nacos的application.properties里打開加載插件開關
nacos.cmdb.loadDataAtStart=true步驟九:重啟Nacos Server后便能加載到實現的Nacos-CMDB插件
從而讓Nacos獲取到CMDB里的數據。
6.Nacos基于CMDB來實現多機房就近訪問
Nacos在拿到CMDB的數據后,就可以運用CMDB數據的強大威力來實現多種靈活的負載均衡策略了。
下面舉例說明如何使用CMDB數據和Selector來實現就近訪問。假設目前Nacos已經通過CMDB拿到了一些IP的機房信息,且它們對應的標簽信息如下:
11.11.11.11site:x11
22.22.22.22site:x12
33.33.33.33site:x11
44.44.44.44site:x12
55.55.55.55site:x1311.11.11.11、22.22.22.22、33.33.33.33、44.44.44.44和55.55.55.55.55都包含了標簽site,
且它們對應的值分別為x11、x12、x11、x12、x13;
先注冊一個服務,下面掛載IP為11.11.11.11和22.22.22.22兩個服務實例。然后修改服務的"服務路由類型",并配置為基于同site優先的服務路由:
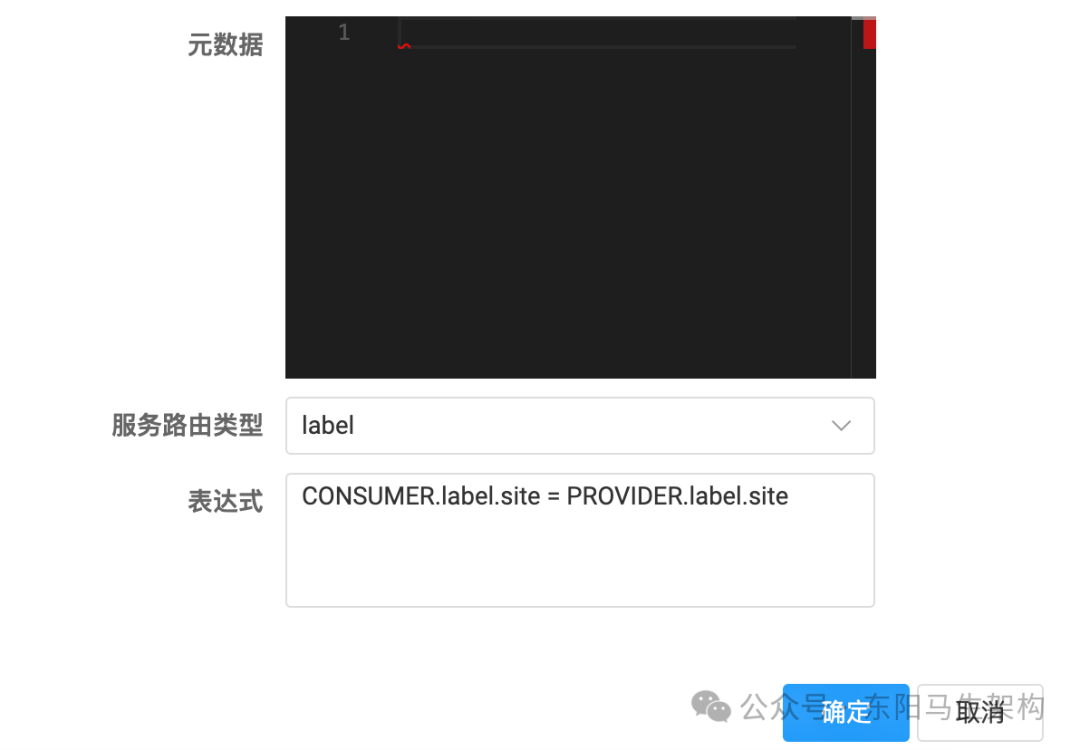
也就是將服務路由類型選擇為標簽,然后輸入如下的標簽表達式,這個表達式的格式和Nacos的Selector機制有關。
CONSUMER.label.site = PROVIDER.label.site所謂的Selector機制其實就是,任何一個如下格式的表達式,Nacos都能夠實現基于同labelName優先的負載均衡策略。
CONSUMER.label.labelName = PROVIDER.label.labelName假設服務消費者的IP分別為33.33.33.33、44.44.44.44和55.55.55.55,它們在使用如下接口查詢服務實例列表:
naming.selectInstances("nacos.test.1", true)那么不同的消費者,將獲取到不同的實例列表。33.33.33.33獲取到IP為11.11.11.11的實例,44.44.44.44獲取到IP為22.22.22.22的實例,而55.55.55.55將同時獲取到IP為11.11.11.11和22.22.22.22兩個實例。
這樣,Nacos便基于Selector機制(標簽路由),實現了就近訪問。
7.Nacos生產集群Prometheus + Grafana監控
(1)Nacos生產集群可視化配置
#*************** Metrics Related Configurations ***************#
### Metrics for prometheus
#management.endpoints.web.exposure.include=*### Metrics for elastic search
management.metrics.export.elastic.enabled=false
#management.metrics.export.elastic.host=http://localhost:9200### Metrics for influx
management.metrics.export.influx.enabled=false
#management.metrics.export.influx.db=springboot
#management.metrics.export.influx.uri=http://localhost:8086
#management.metrics.export.influx.auto-create-db=true
#management.metrics.export.influx.consistency=one
#management.metrics.export.influx.compressed=true
(2)官網介紹的結合prometheus和grafana實現監控Nacos
https://nacos.io/zh-cn/docs/v2/guide/admin/monitor-guide.html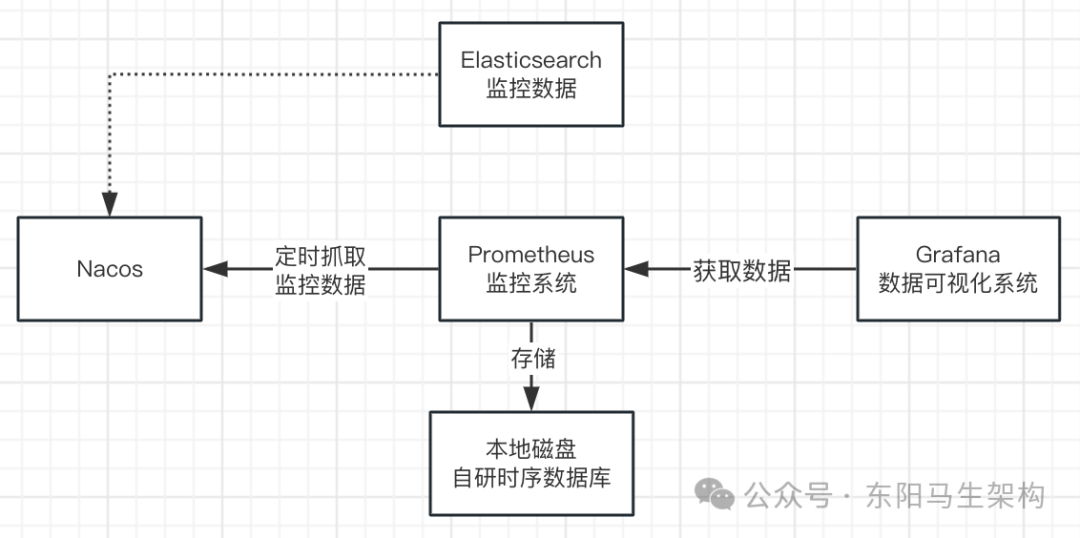
8.Nacos生產集群的其他一些配置參數
(1)Nacos生產集群安全認證核心參數
(2)Nacos生產集群服務器尋址參數
(3)Nacos生產集群Distro和Raft協議核心參數
(1)Nacos生產集群安全認證核心參數
#*************** Access Control Related Configurations ***************#
### If enable spring security, this option is deprecated in 1.2.0:
#spring.security.enabled=false### The ignore urls of auth, is deprecated in 1.2.0:
nacos.security.ignore.urls=/,/error,/**/*.css,/**/*.js,/**/*.html,/**/*.map,/**/*.svg,/**/*.png,/**/*.ico,/console-ui/public/**,/v1/auth/**,/v1/console/health/**,/actuator/**,/v1/console/server/**### The auth system to use, currently only 'nacos' and 'ldap' is supported:
nacos.core.auth.system.type=nacos### If turn on auth system:
nacos.core.auth.enabled=false### Turn on/off caching of auth information. By turning on this switch, the update of auth information would have a 15 seconds delay.
nacos.core.auth.caching.enabled=true### Since 1.4.1, Turn on/off white auth for user-agent: nacos-server, only for upgrade from old version.
nacos.core.auth.enable.userAgentAuthWhite=false### Since 1.4.1, worked when nacos.core.auth.enabled=true and nacos.core.auth.enable.userAgentAuthWhite=false.
### The two properties is the white list for auth and used by identity the request from other server.
nacos.core.auth.server.identity.key=serverIdentity
nacos.core.auth.server.identity.value=security### worked when nacos.core.auth.system.type=nacos
### The token expiration in seconds:
nacos.core.auth.plugin.nacos.token.expire.seconds=18000
### The default token:
nacos.core.auth.plugin.nacos.token.secret.key=SecretKey012345678901234567890123456789012345678901234567890123456789### worked when nacos.core.auth.system.type=ldap,{0} is Placeholder,replace login username
#nacos.core.auth.ldap.url=ldap://localhost:389
#nacos.core.auth.ldap.basedc=dc=example,dc=org
#nacos.core.auth.ldap.userDn=cn=admin,${nacos.core.auth.ldap.basedc}
#nacos.core.auth.ldap.password=admin
#nacos.core.auth.ldap.userdn=cn={0},dc=example,dc=org
#nacos.core.auth.ldap.filter.prefix=uid
(2)Nacos生產集群服務器尋址參數
### MemberLookup
### Addressing pattern category, If set, the priority is highest
# nacos.core.member.lookup.type=[file,address-server]
## Set the cluster list with a configuration file or command-line argument
# nacos.member.list=192.168.16.101:8847?raft_port=8807,192.168.16.101?raft_port=8808,192.168.16.101:8849?raft_port=8809
## for AddressServerMemberLookup
# Maximum number of retries to query the address server upon initialization
# nacos.core.address-server.retry=5
## Server domain name address of [address-server] mode
# address.server.domain=jmenv.tbsite.net
## Server port of [address-server] mode
# address.server.port=8080
## Request address of [address-server] mode
# address.server.url=/nacos/serverlist
(3)Nacos生產集群Distro和Raft協議核心參數
#*************** JRaft Related Configurations ***************#### Sets the Raft cluster election timeout, default value is 5 second
# nacos.core.protocol.raft.data.election_timeout_ms=5000
### Sets the amount of time the Raft snapshot will execute periodically, default is 30 minute
# nacos.core.protocol.raft.data.snapshot_interval_secs=30
### raft internal worker threads
# nacos.core.protocol.raft.data.core_thread_num=8
### Number of threads required for raft business request processing
# nacos.core.protocol.raft.data.cli_service_thread_num=4
### raft linear read strategy. Safe linear reads are used by default, that is, the Leader tenure is confirmed by heartbeat
# nacos.core.protocol.raft.data.read_index_type=ReadOnlySafe
### rpc request timeout, default 5 seconds
# nacos.core.protocol.raft.data.rpc_request_timeout_ms=5000#*************** Distro Related Configurations ***************#### Distro data sync delay time, when sync task delayed, task will be merged for same data key. Default 1 second.
# nacos.core.protocol.distro.data.sync.delayMs=1000### Distro data sync timeout for one sync data, default 3 seconds.
# nacos.core.protocol.distro.data.sync.timeoutMs=3000
### Distro data sync retry delay time when sync data failed or timeout, same behavior with delayMs, default 3 seconds.
# nacos.core.protocol.distro.data.sync.retryDelayMs=3000
### Distro data verify interval time, verify synced data whether expired for a interval. Default 5 seconds.
# nacos.core.protocol.distro.data.verify.intervalMs=5000
### Distro data verify timeout for one verify, default 3 seconds.
# nacos.core.protocol.distro.data.verify.timeoutMs=3000
### Distro data load retry delay when load snapshot data failed, default 30 seconds.
# nacos.core.protocol.distro.data.load.retryDelayMs=30000
![第十六屆藍橋杯大賽軟件賽省賽 C/C++ 大學B組 [京津冀]](http://pic.xiahunao.cn/第十六屆藍橋杯大賽軟件賽省賽 C/C++ 大學B組 [京津冀])


